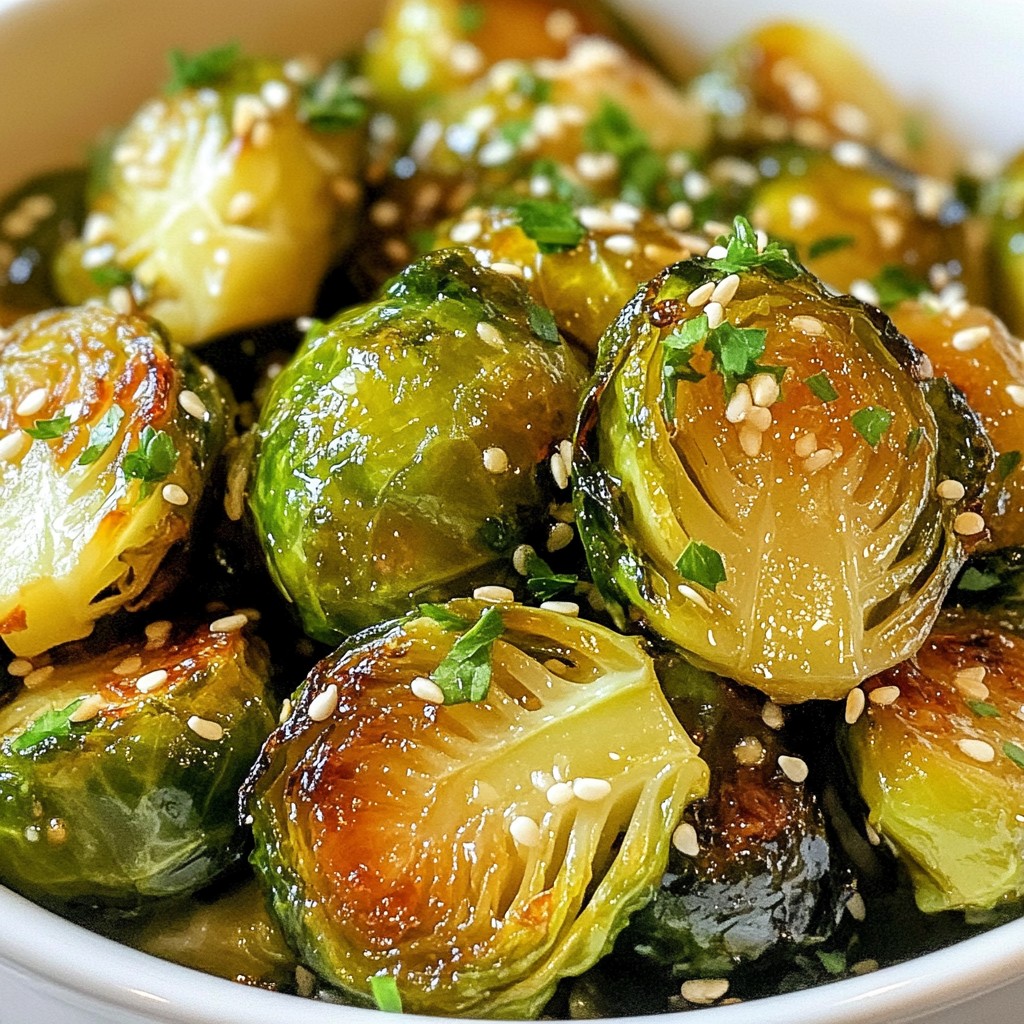
Looking for a side dish that bursts with flavor and is easy to make? Honey Garlic Brussels Sprouts will be your new go-to! With just a few simple ingredients, including Brussels sprouts, honey, and garlic, you’ll create a tasty dish that pleases everyone at the table. Follow my step-by-step guide to make these sweet and savory sprouts shine next to any meal. Let’s dive in!
Why I Love This Recipe
- Simple Preparation: With just a few ingredients and minimal prep time, this recipe makes it easy to enjoy a delicious side dish.
- Flavorful Combination: The sweet honey and savory garlic create a perfect balance that enhances the natural taste of Brussels sprouts.
- Healthy Option: Brussels sprouts are packed with nutrients, making this dish not only tasty but also a nutritious choice for any meal.
- Versatile Serving: This dish can be served warm as a side or enjoyed as a healthy snack, making it perfect for any occasion.
Ingredients
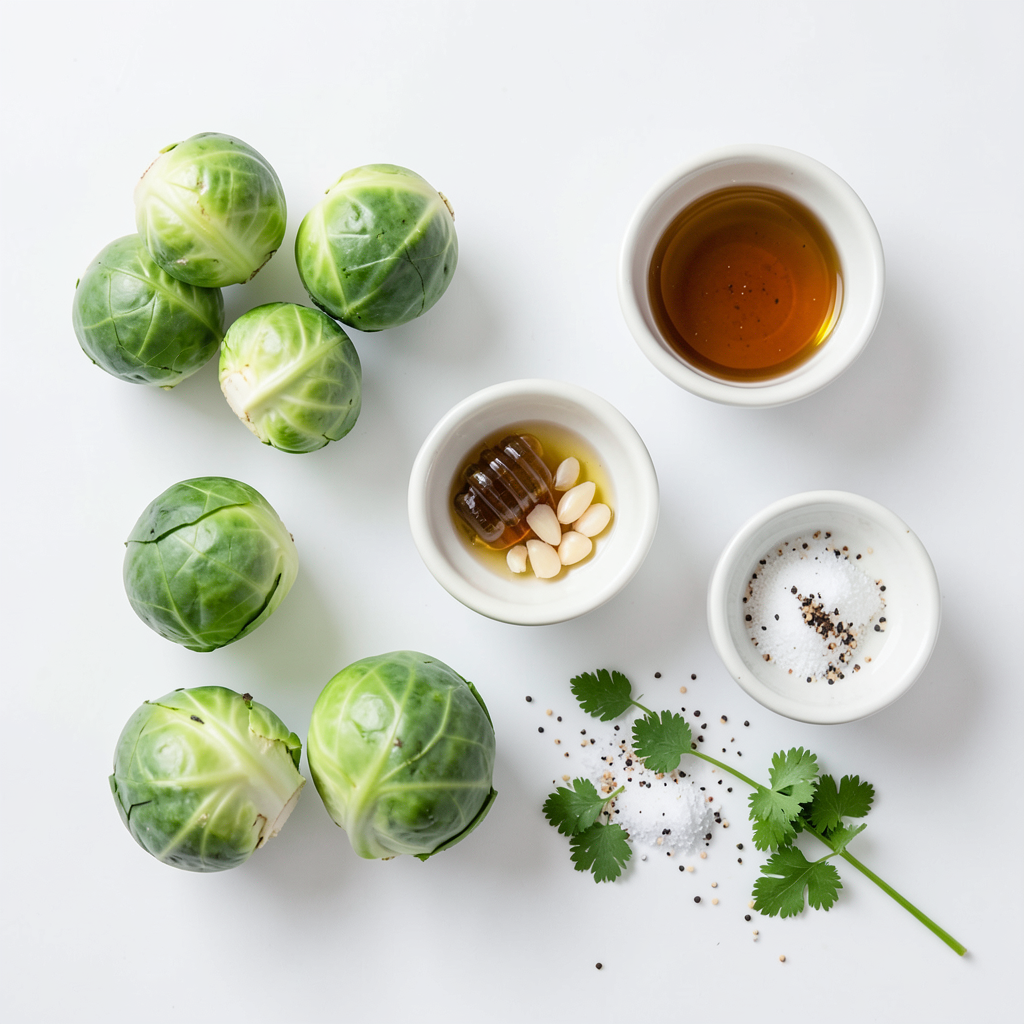
To make Honey Garlic Brussels Sprouts, you will need a few fresh items. Here’s what to gather:
- 1 lb Brussels sprouts, trimmed and halved
- 3 tablespoons honey
- 2 tablespoons low sodium soy sauce
- 3 cloves garlic, minced
- 2 tablespoons olive oil
- Salt and pepper to taste
- 1 tablespoon sesame seeds (for garnish)
- Fresh parsley, chopped (for garnish)
These ingredients create a sweet and savory dish. The Brussels sprouts become tender and caramelized, while the honey and garlic blend perfectly. Each element adds flavor and texture, making this dish special. Fresh parsley and sesame seeds not only add a pop of color but also enhance the taste. When you gather these simple ingredients, you're on your way to a delicious side dish.
Step-by-Step Instructions
Preheat the Oven
First, set your oven to 400°F (200°C). This high heat helps the Brussels sprouts caramelize.
Prepare the Sauce
In a large bowl, mix three tablespoons of honey and two tablespoons of low sodium soy sauce. Add three cloves of minced garlic and two tablespoons of olive oil. Season with salt and pepper. Whisk it all together until smooth and well mixed.
Coat the Brussels Sprouts
Add one pound of trimmed and halved Brussels sprouts to the bowl. Toss them gently until every piece gets coated in the honey garlic sauce. Make sure each sprout shines with that sweet, savory mix.
Roast the Brussels Sprouts
Spread the coated Brussels sprouts on a baking sheet lined with parchment paper. This step makes cleanup a breeze. Roast them in your preheated oven for 20-25 minutes. Halfway through, give them a gentle toss. This helps them cook evenly and get that perfect caramelized look.
Garnish and Serve
Once they are done roasting, take them out of the oven. Sprinkle one tablespoon of sesame seeds and some chopped fresh parsley on top. This adds both crunch and color. Serve them warm as a tasty side dish or a healthy snack. Enjoy every bite!
Tips & Tricks
How to Choose Fresh Brussels Sprouts
When picking Brussels sprouts, look for bright green leaves. Choose sprouts that are firm and tightly packed. Avoid any that feel soft or have yellowing leaves. Fresh Brussels sprouts smell sweet and nutty. Store them in the fridge to keep them fresh longer.
Best Ways to Roast for Maximum Flavor
Roasting Brussels sprouts at 400°F gives them a nice caramelized look. Make sure to coat them well in the honey garlic mix. Spread them out on the pan to help them roast evenly. Toss them halfway through to avoid burning. This method enhances their natural sweetness and flavor.
Cooking Time Adjustments for Different Ovens
Every oven is a bit different. For standard ovens, roast for 20 to 25 minutes. If your oven runs hot, check them at 18 minutes. A convection oven may cook faster, so start checking at 15 minutes. Keep an eye on them to ensure they don’t burn.
Making it Ahead of Time
You can prep Brussels sprouts a day ahead. Trim and halve the sprouts, then store them in the fridge. You can also mix the honey garlic sauce ahead of time. Just combine the honey, soy sauce, and garlic. When ready to cook, toss them together and roast. This makes serving easy and quick.
Pro Tips
- Choose Fresh Brussels Sprouts: Look for Brussels sprouts that are firm and bright green. Avoid any that are yellowed or wilted for the best flavor and texture.
- Adjust Sweetness: If you prefer a sweeter taste, you can increase the amount of honey. For a less sweet version, reduce the honey and add a splash of vinegar for balance.
- Even Roasting: Make sure to toss the Brussels sprouts halfway through roasting to ensure they cook evenly and achieve that perfect caramelization.
- Garnish for Flavor: Don’t skip the sesame seeds and parsley! They add not only visual appeal but also a delightful crunch and freshness to the dish.
Variations
Honey Garlic Brussels Sprouts with Bacon
For a twist, add crispy bacon. The salty, smoky flavor pairs well with the sweet sauce. Use about 4 slices of cooked bacon, chopped into small pieces. Mix the bacon in during the last 5 minutes of roasting. This addition gives each bite a satisfying crunch.
Vegan Option: Substitute Honey
If you prefer a vegan dish, swap honey for maple syrup. Maple syrup provides a similar sweetness and flavor. Use the same amount, three tablespoons. This change keeps the dish plant-based while still being delicious.
Add-Ins: Nuts or Other Vegetables
You can also get creative with add-ins! Try adding nuts like almonds or walnuts for extra crunch. Toss in these nuts during the last 10 minutes of roasting. You can also add other vegetables, like cauliflower or carrots. Just make sure they are cut evenly to cook well. This makes the dish more colorful and nutritious.
Storage Info
How to Store Leftovers
After enjoying your honey garlic Brussels sprouts, let them cool. Place them in an airtight container. They can stay fresh in the fridge for about 3 to 4 days. Be sure to seal the container tightly to keep them from drying out.
Tips for Reheating
To reheat, you can use the oven or a skillet. If you use the oven, set it to 350°F (175°C). Spread the sprouts on a baking sheet and heat for about 10-15 minutes. If you prefer a skillet, heat a little olive oil and toss them until warm. This helps keep them crisp and tasty.
Freezing Brussels Sprouts
Freezing is a great option too. First, blanch the Brussels sprouts in boiling water for 3 minutes. Then, cool them in ice water. Drain, pat dry, and place them in a freezer bag. Try to remove as much air as possible. They can last up to 3 months in the freezer. When you're ready to use them, just thaw and reheat!
FAQs
What can I serve with Honey Garlic Brussels Sprouts?
You can pair Honey Garlic Brussels Sprouts with many dishes. Try them with grilled chicken or fish for a tasty meal. They also go well with rice or quinoa. You could even serve them alongside roasted meats. These sprouts add a sweet and savory touch to any plate.
How long do Brussels sprouts last in the fridge?
Brussels sprouts can stay fresh in your fridge for about 3 to 5 days. Keep them in a plastic bag or container. Make sure they stay dry. If they look wilted or slimy, it’s best to toss them. Fresh sprouts are always tastier!
Can I make this recipe in an air fryer?
Yes, you can absolutely make Honey Garlic Brussels Sprouts in an air fryer. Preheat your air fryer to 375°F (190°C). Cook them for about 12 to 15 minutes. Shake the basket halfway to ensure even cooking. The air fryer gives them a nice crisp texture!
What are the health benefits of Brussels sprouts?
Brussels sprouts are packed with nutrients. They are high in fiber, which helps digestion. They also contain vitamins C and K, which are great for your health. Plus, they are low in calories! Eating Brussels sprouts can support your immune system and improve bone health.
You learned how to make delicious honey garlic Brussels sprouts. We covered the best ingredients, easy steps, and helpful tips. You can even try fun variations to fit your taste. Remember to store leftovers properly for later. These sprouts are tasty and healthy, making them a great side dish. Enjoy your cooking time and have fun sharing this dish with others. Let this recipe inspire you to explore even more delightful flavors in your kitchen.