Craving a delicious homemade treat that rivals your favorite bakery? In this article, I’ll show you how to make Greggs-inspired steak bakes that are savory and simple. With just a few ingredients and easy steps, you’ll whip up mouthwatering pastry filled with seasoned beef. Whether for a quick lunch or a cozy dinner, these steak bakes are sure to impress. Let’s dive into this tasty recipe!
Ingredients
Main Ingredients List
– 500g minced beef
– 1 small onion, finely chopped
– 2 cloves garlic, minced
– 1 tablespoon Worcestershire sauce
– 1 teaspoon dried thyme
– Salt and pepper to taste
– 2 tablespoons olive oil
– 1 tablespoon all-purpose flour
– 100ml beef broth
– 1 packet of puff pastry (approximately 320g)
– 1 egg, beaten (for egg wash)
Essential Kitchen Tools
– Frying pan
– Mixing spoon
– Rolling pin
– Baking tray
– Parchment paper
To make Greggs Inspired Steak Bakes, gather the ingredients above. The minced beef gives a rich flavor. Onions and garlic add depth. Worcestershire sauce brings a savory kick. Dried thyme adds an earthy note. Salt and pepper balance the taste. Olive oil helps cook the meat. Flour thickens the filling. Beef broth adds moisture. Puff pastry creates a flaky crust. The egg wash gives a golden finish.
You will need a frying pan to cook the filling. Use a mixing spoon to stir all ingredients. A rolling pin shapes the pastry. A baking tray holds the bakes while they cook. Parchment paper prevents sticking.
This simple list keeps your cooking fun and stress-free. Enjoy every bite of your delicious steak bakes!
Step-by-Step Instructions
Preheating and Preparing the Filling
– Preheat your oven to 200°C (400°F).
– Heat olive oil in a frying pan and sauté onion and garlic until softened.
– Add minced beef and cook until browned.
First, let’s get that oven warm. Preheating your oven to 200°C (400°F) is key. While the oven heats up, grab your frying pan. Heat some olive oil over medium heat. Toss in the finely chopped onion and minced garlic. Cook them until they turn soft and fragrant, which should take about three to four minutes. Next, add your minced beef to the pan. Break it apart with a wooden spoon as it cooks. You want it to brown nicely, which takes about five to seven minutes.
Making the Meat Mixture
– Stir in Worcestershire sauce, thyme, salt, and pepper.
– Add flour and gradually pour in beef broth to thicken the mixture.
– Remove from heat and let cool.
Once your beef is browned, it’s time to add some flavor. Stir in the Worcestershire sauce, dried thyme, salt, and pepper. Mix everything well to coat the meat. Now, sprinkle the all-purpose flour over the meat mixture. Gradually pour in the beef broth. Keep stirring until everything thickens nicely, which should take just a couple of minutes. After that, remove the pan from heat and let the filling cool a bit.
Assembling the Steak Bakes
– Roll out puff pastry and cut it into rectangles.
– Spoon the beef mixture onto one half of each pastry rectangle.
– Fold, seal the edges, and brush with beaten egg.
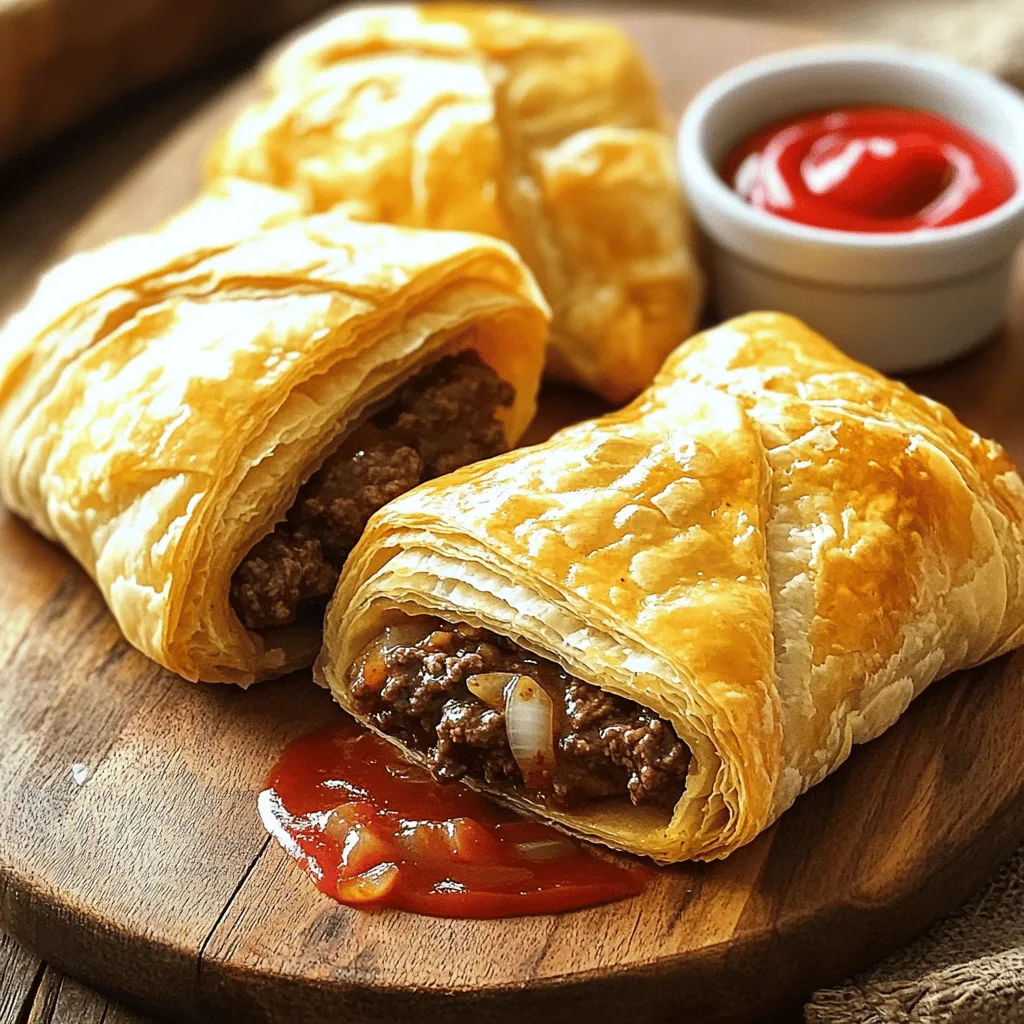
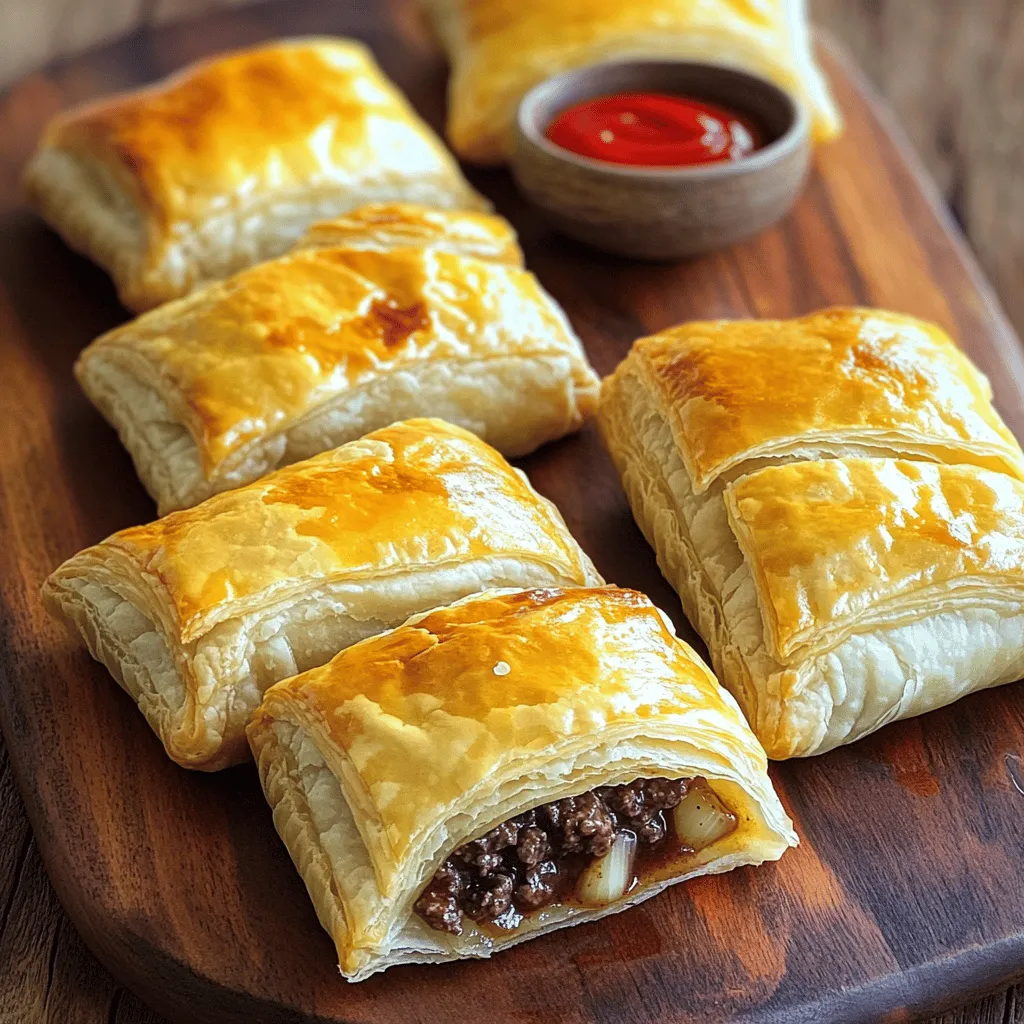
Let’s get to the fun part—assembling your steak bakes! Roll out your puff pastry on a floured surface until it’s about three millimeters thick. Cut it into rectangles, about 10 x 15 centimeters each. Take a generous spoonful of your beef mixture and place it on one half of each rectangle. Make sure to leave some space around the edges. Now, fold the other half of the pastry over the filling. Press the edges firmly with a fork to seal them. Finally, brush the tops with beaten egg for that golden finish.
Baking
– Place on a baking tray lined with parchment paper.
– Bake for 20-25 minutes until golden brown.
– Allow to cool slightly before serving.
Now, it’s time to bake! Place your assembled steak bakes on a baking tray lined with parchment paper. Slide them into your preheated oven. Bake for about 20 to 25 minutes, or until they are beautifully golden brown and puffed up. Once done, take them out and let them cool for a few minutes before serving. Enjoy your delicious Greggs inspired steak bakes!
Tips & Tricks
Perfecting the Pastry
To make your steak bakes shine, focus on the pastry.
– Ensure the pastry is rolled tightly to prevent leaks.
– Use a fork to crimp the edges for a better seal.
Flavor Enhancements
Want to customize your steak bakes? It’s easy!
– Experiment with additional spices or herbs for a unique taste.
– Consider adding cheese or mushrooms to the filling for variations.
Serving Suggestions
The right sides can make your meal even better.
– Serve with a side of dipping sauces like ketchup or gravy.
– Pair with a light salad for a complete meal.
These tips will help you create the best Greggs inspired steak bakes.Enjoy the journey of cooking!
Variations
Vegetarian Option
You can make a tasty steak bake without meat. Substitute minced beef with lentils or finely chopped mushrooms. Both options add great flavor and texture. Lentils cook quickly and soak up spices well. Mushrooms add umami and depth to your filling. Mix them with onion and garlic for a savory base. This way, you enjoy a hearty bite that fits your diet.
Spicy Version
Want to add some heat? Make a spicy version of your steak bake. Add chopped jalapeños to the meat mixture. You can also stir in a dash of hot sauce. This adds a nice kick that pairs well with the beef. Adjust the amount based on your heat preference. Just remember, a little spice goes a long way!
Different Fillings
Try different meats for a new taste. Cooked chicken or pork works great in place of beef. Shred the chicken or chop the pork finely before mixing. You can also add herbs like rosemary or oregano for extra flavor. Each meat brings its unique taste and makes the dish exciting. Experimenting with different fillings keeps your meal fresh and fun.
Storage Info
Refrigeration
Store leftover steak bakes in an airtight container for up to 3 days. This keeps them fresh and tasty. When you’re ready to eat, just reheat them.
Freezing
You can freeze the assembled, uncooked steak bakes for up to 2 months. This is great for meal prep. Just make sure to wrap them well to prevent freezer burn.
Reheating
To reheat, place the steak bakes in the oven at 180°C (350°F) until warmed through. This method keeps the pastry crispy and delicious. Enjoy them warm for the best taste!
FAQs
How long does it take to make Greggs Inspired Steak Bakes?
Prep time is about 20 minutes, and total cooking time is approximately 45 minutes.
Can I use frozen puff pastry?
Yes, frozen puff pastry works well for this recipe; just thaw before use.
What can I serve with steak bakes?
Popular pairings include dipping sauces like ketchup, gravy, or a side salad.
How do I know when the steak bakes are done?
They should be golden brown and puffed up; you can also check the internal temperature.
You now know how to make delicious steak bakes with simple ingredients. We covered the essential tools, step-by-step instructions, and helpful tips. You can also explore variations to suit your taste. Remember, these bakes store well and are great for quick meals later. Enjoy making and sharing them with friends or family. Your cooking skills can impress anyone!