Get ready to indulge in a dessert that will delight your senses—Flourless Chocolate Lava Cake! With its rich, gooey center, this treat is a chocoholic’s dream come true. In this post, I'll guide you step-by-step to create this decadent dessert. Whether you're hosting a party or treating yourself, this cake is sure to impress. Let’s dive into the world of chocolate bliss together!
Why I Love This Recipe
- Decadent Flavor: This cake boasts a rich, chocolatey taste that is simply irresistible, making it the ultimate dessert for chocolate lovers.
- Easy to Make: With just a few simple ingredients and straightforward steps, this recipe is perfect for both novice and experienced bakers.
- Impressive Presentation: When inverted, this cake reveals its molten center, creating a stunning dessert that will wow your guests.
- Gluten-Free Delight: Since it’s flourless, this cake is a fantastic option for gluten-sensitive individuals without compromising on taste.
Ingredients
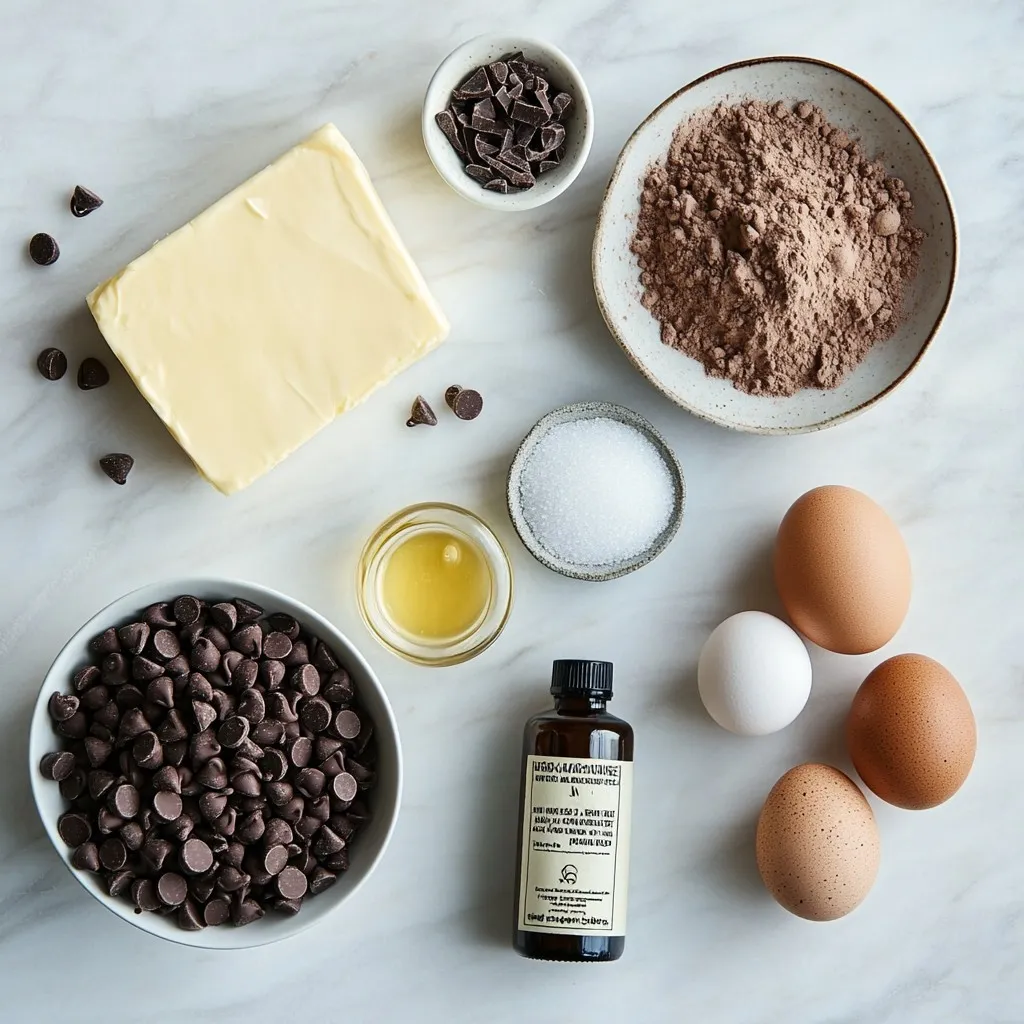
List of Ingredients
To make a flourless chocolate lava cake, you need:
- 1 cup semi-sweet chocolate chips
- 6 tablespoons unsalted butter
- 3 large eggs
- ½ cup granulated sugar
- 1 teaspoon vanilla extract
- ¼ teaspoon salt
- ¼ cup unsweetened cocoa powder
These simple ingredients create a rich and gooey dessert that everyone loves.
Optional Ingredients for Serving
You can enhance your cake with these extras:
- Powdered sugar for dusting
- Vanilla ice cream for serving
These additions make your lava cake even more delightful.
Dietary Considerations
This dessert is naturally gluten-free since it uses no flour. If you want to make it dairy-free, you can swap the butter and chocolate for dairy-free options. Always check labels to ensure they meet your needs.
Step-by-Step Instructions
Preparing the Ramekins
Start by preheating your oven to 425°F (220°C). Grease four ramekins with unsalted butter. Make sure to cover the entire inside. Then, dust each ramekin with cocoa powder. This step helps the cakes pop out easily after baking.
Melting Chocolate and Butter
In a microwave-safe bowl, mix the semi-sweet chocolate chips with the unsalted butter. Heat them in the microwave for 30 seconds. Stir the mixture well after each interval. Keep doing this until it is smooth and shiny. This blend is the heart of your lava cake.
Mixing the Batter
In another bowl, crack three large eggs. Add the granulated sugar, vanilla extract, and salt. Whisk these together until the mix is pale and frothy. Next, pour the melted chocolate mixture into this egg mix. Fold the two together gently. Be careful not to overmix; we want a rich, smooth batter.
Baking the Lava Cakes
Sift the unsweetened cocoa powder over your batter. Gently fold it in until combined. Now, divide the batter evenly among the prepared ramekins, filling each about ¾ full. Place the ramekins on a baking sheet for easy handling. Bake in your preheated oven for 12-14 minutes. The edges should be firm, but the center will still jiggle slightly.
How to Serve
After baking, let the cakes cool for 1-2 minutes. Carefully flip each ramekin onto a serving plate. The cakes should slide out easily. If you want, dust them with powdered sugar for a nice touch. Serve warm, and don't forget a scoop of vanilla ice cream for extra delight!
Tips & Tricks
Achieving the Perfect Molten Center
To get that gooey center, watch your baking time closely. Bake the cakes for 12 to 14 minutes. The edges should feel firm, but the center must jiggle. If you bake too long, the center will cook through. Use a timer to help you avoid overbaking. Every oven is different, so check a minute early. Trust me, the perfect lava cake is all about timing.
Storage Tips for Leftovers
If you have any leftover lava cakes, store them in the fridge. Place them in an airtight container to keep them fresh. They will last for about three days. When you’re ready to eat them, reheat in the microwave. Heat for about 20 seconds. This warms them without losing the gooey center. Enjoy them warm for the best taste.
Chocolate Selection Tips
The type of chocolate you use makes a big difference. I recommend semi-sweet chocolate chips for a rich flavor. Dark chocolate works too, if you want a more intense taste. Just remember, the better the chocolate, the better the cake. Look for high-quality brands with simple ingredients. Always choose chocolate you love to eat on its own.
Pro Tips
- Perfect Chocolate Melting: To avoid scorching the chocolate, melt it in short 30-second intervals, stirring in between to ensure even melting without burning.
- Check for Doneness: The ideal lava cake should have firm edges and a soft, gooey center. If unsure, do a toothpick test; it should come out with moist crumbs, not wet batter.
- Cooling Time: Allow the cakes to cool for just 1-2 minutes before inverting. This helps set the edges while keeping the center molten.
- Serving Suggestions: For an extra touch of elegance, serve with a dollop of whipped cream or a fresh raspberry alongside the vanilla ice cream.
Variations
Adding Flavors (Mint, Coffee, etc.)
You can spice up your flourless chocolate lava cake with fun flavors. Want a minty twist? Just add a few drops of mint extract to the batter. This will give it a cool and fresh taste. If you love coffee, add one tablespoon of instant coffee granules. It brings out the chocolate flavor nicely. For a fruity touch, mix in some orange zest. Each flavor adds a new layer of fun to this dessert.
Alternative Sweeteners for Healthier Options
If you want a healthier cake, switch the granulated sugar. You can use coconut sugar or maple syrup. Coconut sugar has a lower glycemic index, so it’s a bit better for your health. If you use maple syrup, reduce the amount of butter slightly. This keeps the cake moist while making it a bit lighter. These swaps keep the richness you love but make it a tad healthier.
Adapting for Different Dietary Needs
Want to make this cake gluten-free? You're already set! The recipe contains no flour. For a dairy-free option, use vegan chocolate chips and coconut oil instead of butter. The taste remains rich and delicious. If you have egg allergies, try using flax eggs. Mix one tablespoon of ground flaxseed with three tablespoons of water for each egg. Let it sit until it thickens. These swaps help you enjoy this tasty dessert no matter your dietary needs.
Storage Info
Best Practices for Refrigeration
To store leftover lava cakes, let them cool first. Place them in airtight containers. Keep them in the fridge for up to three days. If you want to enjoy them later, wait to dust with powdered sugar until you're ready to serve. This keeps them looking fresh.
Reheating Instructions
When you're ready to eat, reheat the lava cakes. Preheat your oven to 350°F (175°C). Place the cakes on a baking sheet. Heat for about 8-10 minutes. This warms them without overcooking. You can also use the microwave. Heat on low for about 20-30 seconds. Check to see if they are warm enough.
Freezing the Lava Cakes
If you want to save lava cakes for later, freezing is a great option. Wrap each cooled cake tightly in plastic wrap. Then, place them in a freezer-safe bag. They can last up to three months. When you want to eat one, take it out and thaw it in the fridge overnight. Then, reheat as needed. Enjoy that molten center again!
FAQs
Can I use different types of chocolate?
Yes, you can use dark chocolate or milk chocolate. Dark chocolate gives a rich taste. Milk chocolate offers a sweeter flavor. Just keep the same amount of chocolate chips. Adjust the sugar if you use a sweeter chocolate.
How do I know when the lava cakes are done?
Watch the edges closely while baking. They should be firm and set. The center should jiggle slightly when you shake the ramekin. If it looks too firm, it may not have a molten center.
What can I serve with flourless chocolate lava cake?
You can serve it with a scoop of vanilla ice cream. The cold ice cream pairs well with the warm cake. Fresh berries also add a nice touch. A sprinkle of powdered sugar makes it look fancy too.
Can I make the batter ahead of time?
Yes, you can make the batter ahead of time. Just cover it and keep it in the fridge. When ready to bake, pour it into the ramekins and bake as usual. It’s a great way to save time before a dinner party!
In this article, we explored making delicious chocolate lava cakes. You learned about the key ingredients and optional items to serve. I shared step-by-step instructions for perfecting your cakes, along with useful tips to achieve that molten center. We also discussed fun variations to customize your cakes and smart storage practices.
As you try this recipe, have fun experimenting! Enjoy the rich flavors and warm centers. Happy bakin