If you're craving a treat that’s both rich and crunchy, you’re in the right place! My Decadent Coconut Chocolate Truffles with Crunchy Centers are here to satisfy your sweet tooth. These little bites are easy to make and packed with flavor. Imagine soft chocolate melting in your mouth with a delightful crunch hidden inside! Stick around as I guide you through each step for a perfect truffle experience. Let’s get started!
Why I Love This Recipe
- Irresistible Flavor: The combination of rich dark chocolate and nutty coconut creates a decadent treat that’s hard to resist.
- Easy to Make: With just a few simple steps, you can whip up these truffles in no time, making them perfect for last-minute desserts.
- Customizable: You can easily swap out the nuts or add other ingredients like dried fruits to suit your taste.
- Perfect for Gifting: These truffles look beautiful and can be packaged nicely, making them an excellent homemade gift.
Ingredients
List of Ingredients
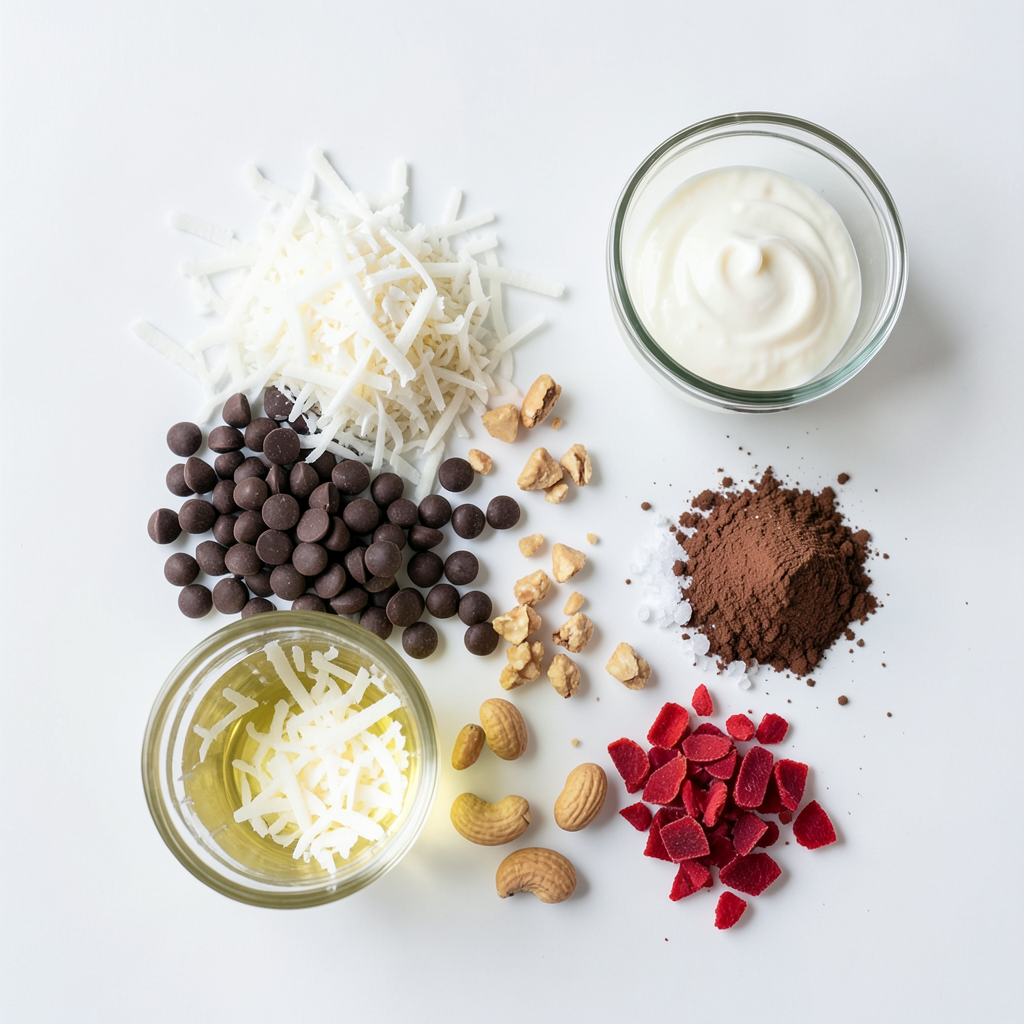
To make decadent coconut chocolate truffles with crunchy centers, you need the following:
- 1 cup shredded unsweetened coconut
- 1 cup dark chocolate chips
- 1/2 cup heavy cream
- 1/4 cup coconut oil
- 1/2 cup crushed nuts (almonds, hazelnuts, or walnuts)
- 1 tablespoon vanilla extract
- 1/4 teaspoon sea salt
- 1/2 cup cocoa powder (for rolling)
- 1/4 cup crushed freeze-dried strawberries (for garnish, optional)
Choosing the right ingredients makes a big difference. Here are a few tips:
- Coconut: Use unsweetened shredded coconut. This keeps the truffles from being too sweet.
- Chocolate: Select high-quality dark chocolate chips. Look for chocolate with at least 60% cocoa for the best flavor.
- Cream: Use heavy cream for a rich and smooth ganache. Avoid light creams; they won’t provide the same texture.
- Nuts: Choose fresh, whole nuts. They should be crunchy, not stale. You can toast them for added flavor.
- Vanilla Extract: Pure vanilla extract is best. It has a stronger flavor than imitation vanilla.
Using quality ingredients will ensure your truffles taste amazing. Enjoy the process of picking out the best!
Step-by-Step Instructions
Preparing the Crunchy Centers
To start, take 1/2 cup of crushed nuts. You can use almonds, hazelnuts, or walnuts. In a bowl, mix these nuts with 1 tablespoon of shredded coconut. This helps prevent clumping. Mix well until the nuts are coated. Set this mixture aside for later.
Making the Chocolate Ganache
Next, let's make the chocolate ganache. In a small saucepan, combine 1/2 cup of heavy cream and 1/4 cup of coconut oil. Heat this over low heat. Stir often until it melts and becomes smooth. Now, add in 1 cup of dark chocolate chips, 1 tablespoon of vanilla extract, and 1/4 teaspoon of sea salt. Keep stirring until the chocolate is fully melted and glossy.
Chilling the Mixture
Once your ganache is ready, pour it into a bowl. Cover it with plastic wrap. Refrigerate it for about 1 hour. You want the ganache to be firm enough to scoop.
Forming the Truffles
After chilling, it’s time to form the truffles. Use a small ice cream scoop or your hands to grab a heaping tablespoon of ganache. Flatten it slightly in your palm. Place about a teaspoon of the nut mixture in the center. Fold the ganache over the nuts and roll it into a ball. Repeat this until you shape all the mixture into truffles.
Coating the Truffles
Now, it's time to coat the truffles. Roll each one in 1/2 cup of cocoa powder. Make sure they are coated evenly. For a fun twist, you can sprinkle some crushed freeze-dried strawberries on top for color and extra flavor.
Final Chill
Finally, place the truffles back on a parchment-lined tray. Refrigerate them for an additional 30 minutes. This setting time is important to give the truffles a firm texture. Enjoy your decadent coconut chocolate truffles with crunchy centers!
Tips & Tricks
Achieving the Perfect Texture
To get the best texture in your truffles, think about what you like. For a smooth truffle, use less coconut and more chocolate. If you want crunch, add more crushed nuts. Mix the nuts with a bit of shredded coconut. This stops them from clumping together. The right mix gives a nice bite in every truffle.
Avoiding Common Mistakes
Many people struggle when making truffles. One common mistake is not letting the ganache chill enough. If it's too soft, shaping will be a mess. Always chill the mixture for at least an hour. Another pitfall is rolling the truffles too big. They should be bite-sized for the best experience. Keeping them small helps with even coating.
Presentation Tips
Making your truffles look great is easy. After rolling in cocoa powder, use a fork or toothpick to lift them. Place them on a nice plate. For a pop of color, sprinkle crushed freeze-dried strawberries on top. This adds charm and a hint of berry flavor. You can also use fancy paper cups for serving.
Pro Tips
- Use Quality Chocolate: The flavor of your truffles heavily depends on the quality of chocolate. Opt for high-quality dark chocolate for the best taste.
- Chill for Best Results: Ensure that the ganache is well chilled before forming the truffles. This will make it easier to handle and shape.
- Experiment with Fillings: Feel free to customize the crunchy centers by using different nuts or even adding dried fruits for an extra layer of flavor.
- Presentation Matters: For a more elegant presentation, consider rolling the truffles in a mix of cocoa powder and finely crushed freeze-dried strawberries for a pop of color.
Variations
Flavor Alternatives
You can switch up the chocolate in your truffles for fun. Try using milk chocolate for a sweeter treat. If you prefer something lighter, white chocolate works well too. Each choice adds a unique taste.
For the crunchy centers, mix up your nuts. You can use almonds, hazelnuts, or walnuts. Each nut gives a different crunch and flavor. Feel free to experiment with whatever you have on hand!
Dietary Adjustments
Want to make these truffles vegan? Use coconut cream instead of heavy cream. Replace dark chocolate chips with a vegan version. These small swaps keep your truffles tasty and plant-based.
If you need gluten-free options, you’re in luck! All the ingredients are naturally gluten-free. Just make sure to check your chocolate label. This way, everyone can enjoy these treats.
Creative Coatings
While cocoa powder is classic, you can try other coatings too. Roll your truffles in finely chopped nuts for extra crunch. You could also use shredded coconut for a tropical twist.
For something different, consider using crushed freeze-dried fruit. It adds color and a burst of flavor. Try these ideas to make your truffles even more special!
Storage Info
Best Practices for Storing Truffles
To keep your decadent coconut chocolate truffles fresh, store them in an airtight container. This helps maintain their taste and texture. Place a layer of parchment paper between the truffles to prevent them from sticking together. Keep the container in the fridge for best results. The cool temperature helps the truffles stay firm and tasty. Avoid leaving them out at room temperature for long periods, as heat can cause them to melt or lose shape.
Shelf Life
These truffles can last in the fridge for about 1 to 2 weeks. If you want to keep them longer, consider freezing them. Frozen truffles can last up to 3 months. When you're ready to enjoy them, just move them to the fridge overnight. They will soften and be ready to eat without losing flavor. Always check for any signs of spoilage before consuming.
FAQs
How long do homemade truffles last?
Homemade truffles last about one to two weeks in the refrigerator. Store them in an airtight container. This keeps them fresh and tasty. Always check for any signs of spoilage before enjoying.
Can I use other fillings for the crunchy centers?
Yes! You can try different fillings. Some great options include crushed pretzels, cookie crumbs, or even granola. Each option adds a fun crunch and unique flavor to your truffles.
How do I soften hardened truffles for serving?
If your truffles feel too hard, don’t worry! You can soften them. Simply let them sit at room temperature for about 10-15 minutes before serving. This helps them regain a creamy texture.
Is it possible to freeze truffles?
Yes, you can freeze truffles! Place them in a single layer on a tray and freeze for about an hour. Then transfer them to an airtight container. To enjoy, let them thaw in the fridge overnight before serving.
Making homemade truffles is fun and rewarding. The right ingredients, careful steps, and creative touches make all the difference. You now know how to pick fresh ingredients, prepare crunchy centers, and make smooth ganache. You’ve also learned tips to avoid common mistakes and how to store your treats.
Think about all the flavor variations you can try! With these skills, you can impress family and friends. Enjoy the process and share your tasty creations!