Craving a crunchy snack that fits your keto diet? Look no further! My Crunchy Keto Dill Pickle Cheese Crisps are the perfect guilt-free treat. With their delightful blend of sharp cheddar, Parmesan, and dill pickle relish, these cheese crisps offer flavor and crunch in every bite. In this article, I'll guide you through easy steps to make these tasty snacks, plus tips and variations to suit your taste. Let’s dive in!
Why I Love This Recipe
- Delicious Flavor Combination: The mix of sharp cheddar and Parmesan with dill pickle relish creates a unique and savory taste that is irresistible.
- Quick and Easy Preparation: With just a few simple ingredients and minimal prep time, these cheese crisps can be made in under 20 minutes.
- Keto-Friendly Snack: These cheese crisps are perfect for those following a keto diet, providing a crunchy and satisfying snack without the carbs.
- Versatile Serving Options: They can be enjoyed on their own or paired with a variety of dips, making them a great addition to any snack platter.
Ingredients
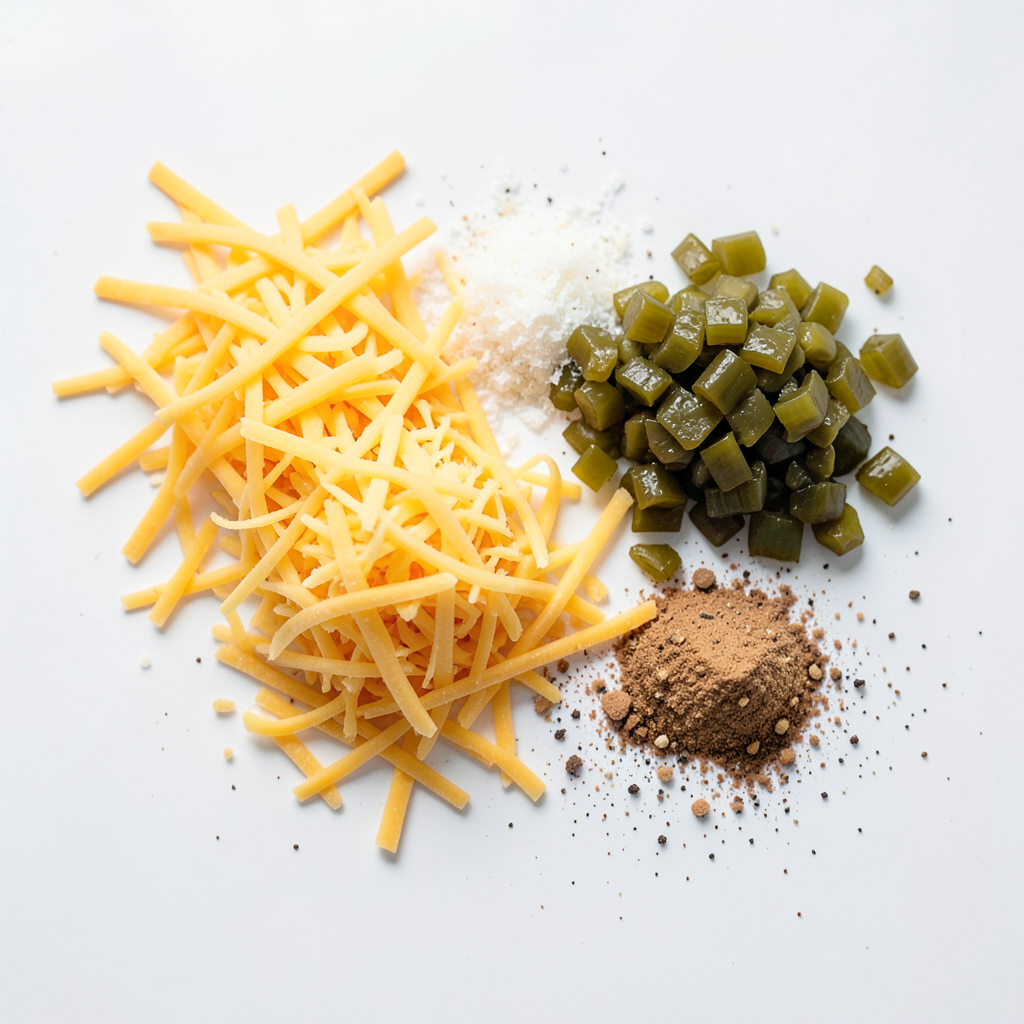
List of Ingredients
- 1 cup finely shredded sharp cheddar cheese
- 1/2 cup grated Parmesan cheese
- 1/4 cup dill pickle relish (drained)
- 1 teaspoon garlic powder
- 1 teaspoon onion powder
- 1/2 teaspoon smoked paprika
- 1/4 teaspoon black pepper
- Fresh dill for garnish (optional)
To make these crunchy keto dill pickle cheese crisps, you need a few key ingredients. First, sharp cheddar cheese gives a strong flavor. This cheese melts well and becomes crispy in the oven. Next, we add grated Parmesan cheese. It adds a nice saltiness and richness.
Dill pickle relish is the star of this snack. It brings a tangy flavor that balances the cheese. Make sure to drain it well. This prevents excess moisture in the crisps.
Next, we have the seasoning ingredients. Garlic powder and onion powder add depth and aroma. Smoked paprika gives a hint of smokiness. Finally, a bit of black pepper rounds out the flavors.
You can also add fresh dill for garnish. It enhances the dill flavor and adds a nice touch. These ingredients come together to create a tasty, crunchy snack.
Step-by-Step Instructions
Preparation Steps
1. Preheating the oven
Start by preheating your oven to 400°F (200°C). This step is key for perfect cheese crisps.
2. Mixing the cheese ingredients
In a mixing bowl, add 1 cup of finely shredded sharp cheddar cheese and 1/2 cup of grated Parmesan cheese. Stir them together until they blend well.
3. Folding in seasonings and relish
Next, fold in 1/4 cup of drained dill pickle relish, 1 teaspoon of garlic powder, 1 teaspoon of onion powder, 1/2 teaspoon of smoked paprika, and 1/4 teaspoon of black pepper. Mix until you spread the flavors evenly throughout the cheese.
Baking Procedure
1. Portioning the mixture on the baking sheet
Use a tablespoon to scoop the mixture onto a lined baking sheet. Space each scoop about 2 inches apart. Flatten each scoop slightly with the back of your spoon to form crisp shapes.
2. Baking time and temperature
Bake the cheese crisps in your preheated oven for 8-10 minutes. Watch them closely to avoid burning. You want the edges to turn golden and crispy.
3. Cooling and crisping process
After baking, take them out and let them cool on the baking sheet for a few minutes. They will crisp up as they cool down, making them even more delightful to eat.
Tips & Tricks
Achieving the Perfect Crisp
Choosing the right cheese is key. Sharp cheddar cheese gives a great flavor and crispness. I also like to use grated Parmesan cheese for a nice texture. These two types work well together.
When baking, use parchment paper. It helps the cheese crisps not stick. Bake them at 400°F (200°C) for just 8-10 minutes. Watch them closely so they don’t burn. The edges should turn golden brown. Once out of the oven, let them cool. They will harden as they sit.
Serving Suggestions
For presentation, use a rustic wooden board. This adds a nice touch. You can place the cheese crisps in a circle or a line.
Serve them with a small bowl of extra dill pickle relish. This makes for a fun and tasty dip. You can also pair them with low-carb drinks. Sparkling water or a light beer works great. Enjoy your snack time!
Pro Tips
- Use Fresh Ingredients: Freshly shredded cheese melts better and yields crispier results compared to pre-packaged shredded cheese, which often contains anti-caking agents.
- Monitor Baking Time: The baking time can vary based on your oven. Keep a close eye on the crisps after the 8-minute mark to prevent them from burning.
- Experiment with Cheese: Feel free to mix different types of cheese like gouda or mozzarella for unique flavors and textures in your cheese crisps.
- Store Properly: To maintain their crunchiness, store the cooled cheese crisps in an airtight container at room temperature, away from humidity.
Variations
Flavor Alterations
You can change the taste of your cheese crisps by using different cheeses. Try mozzarella for a milder flavor. Gouda adds a rich, smoky taste. Mixing cheeses can create a fun twist.
Seasoning is another chance to get creative. You can swap garlic powder for onion powder for a new flavor. Adding cayenne pepper gives a spicy kick. Try Italian herbs for a fresh taste.
Dietary Adjustments
If you want a dairy-free version, use nut-based cheese. The texture may differ, but the taste will still shine. Look for vegan cheese that melts well.
For nut-free options, check ingredient labels on cheese. Most cheeses are nut-free, but always confirm. You can enjoy these crisps while staying safe with your diet.
Storage Info
How to Store
To keep your crunchy keto dill pickle cheese crisps fresh, place them in an airtight container. Make sure they are completely cooled before you store them. This helps prevent moisture, which can make them soggy. You can also add a paper towel inside the container to absorb any excess moisture.
These crisps stay fresh for about 5-7 days. If you want to keep them longer, consider freezing them. Just layer them between parchment paper, then put them in a freezer-safe bag. They can last up to three months in the freezer.
Reheating Instructions
To enjoy your cheese crisps again, reheating is key. Preheat your oven to 350°F (175°C). Place the crisps on a baking sheet lined with parchment paper. Heat them for about 5 minutes. This will help restore their crunch.
Avoid using the microwave, as it can make the crisps chewy. If you want a quick option, an air fryer can work too. Just heat them for 2-3 minutes at 300°F (150°C). This will keep them crispy and tasty!
FAQs
Can I use different types of cheese?
Yes, you can use other cheeses! Try mozzarella for a milder taste. Gouda adds a nice, creamy flavor. Just make sure the cheese melts well. Mixing different cheeses can give you a unique twist on the flavor.
How do I make these cheese crisps ahead of time?
You can prep the cheese mixture in advance. Store it in the fridge for up to two days. When you're ready, scoop and bake it. This way, you enjoy fresh crisps without the wait.
Are there any low-carb alternatives to the ingredients?
You can swap the dill pickle relish for chopped dill pickles. Use cream cheese to make the crisps richer. For seasonings, try using onion powder or garlic salt. These swaps keep the recipe low-carb while still tasty.
In this post, we explored how to make delicious cheese crisps using simple ingredients like sharp cheddar and Parmesan. You learned step-by-step instructions for mixing, baking, and serving these tasty treats. I shared tips to ensure you get the perfect crisp every time. Remember, feel free to switch up flavors or adjust for dietary needs. Whether you serve them at a party or enjoy them as a snack, you'll impress everyone with your cheese crisps. Enjoy making and sharing them!