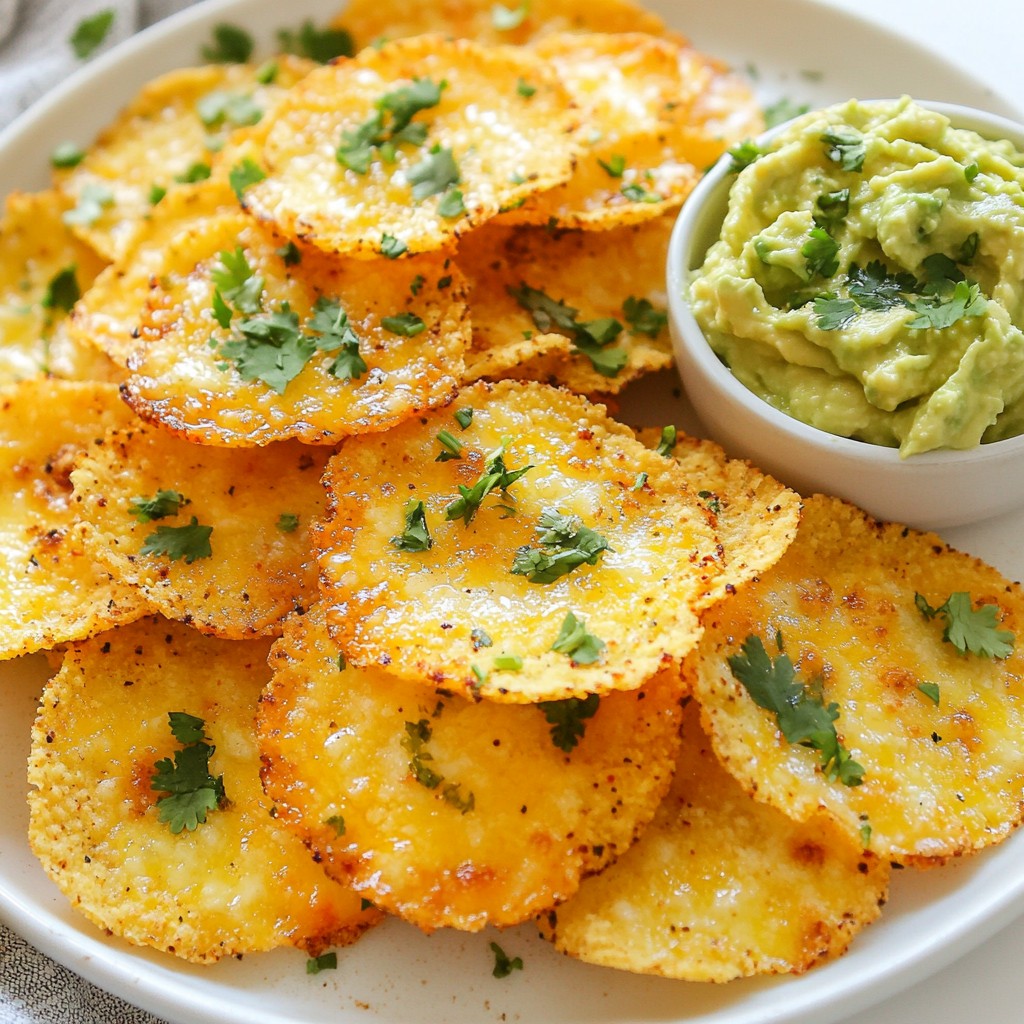
Are you ready to savor a crunchy snack that won’t ruin your diet? Let’s dive into making Crunchy Keto Chili Lime Cheese Crisps! With just a few easy ingredients, you can enjoy a zesty, cheesy treat that's low in carbs and high in flavor. I’ll take you through each step, sharing expert tips to ensure your crisps turn out perfectly every time. Stay with me to discover this fun and tasty recipe!
Why I Love This Recipe
- Crispy Texture: These cheese crisps are delightfully crunchy, making them a perfect snack or appetizer that satisfies your craving for something savory.
- Flavorful Kick: The combination of chili powder and lime zest adds a zesty twist, giving these crisps an exciting flavor profile that elevates your snacking experience.
- Easy to Make: With just a few ingredients and minimal prep time, this recipe is quick and straightforward, making it ideal for busy days or unexpected guests.
- Versatile Snack: These cheese crisps can be enjoyed on their own or paired with dips like guacamole or salsa, allowing for endless serving possibilities.
Ingredients
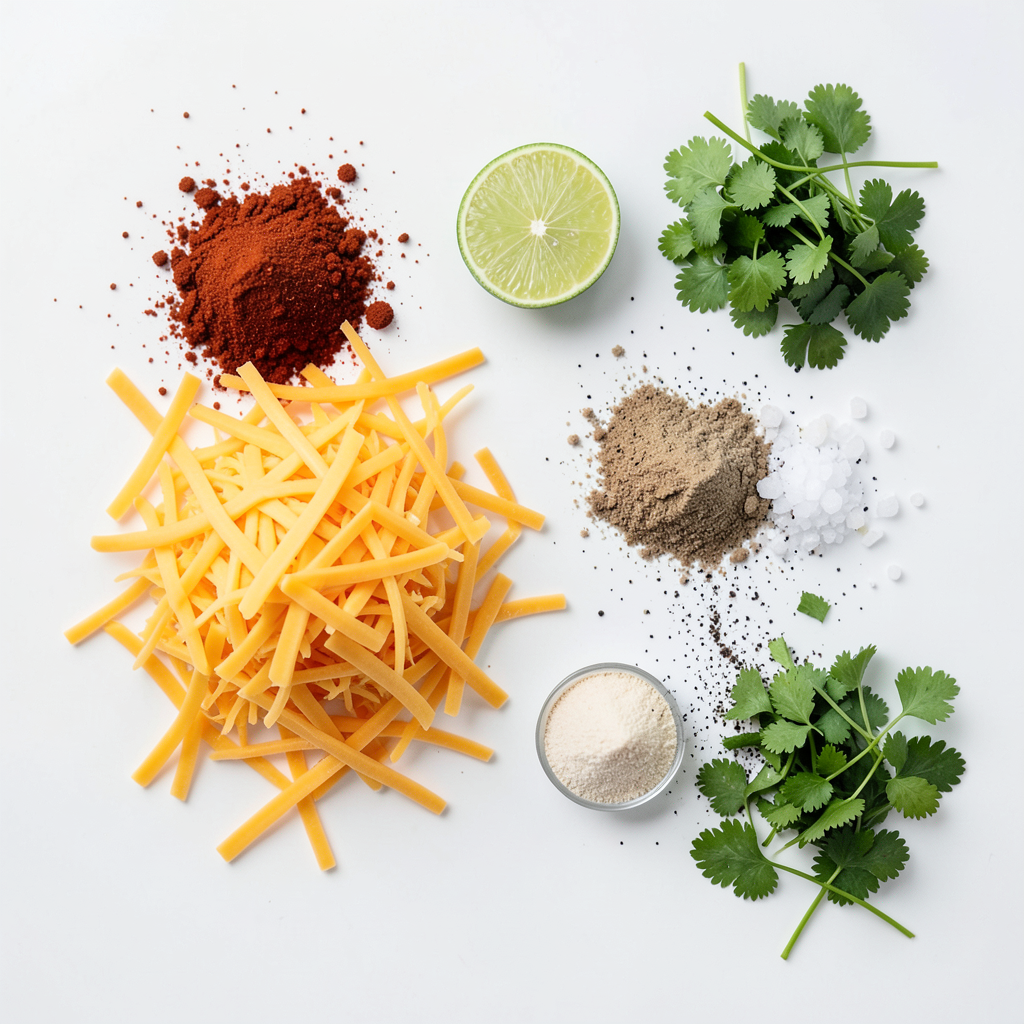
Main ingredients for Crunchy Keto Chili Lime Cheese Crisps
To make these tasty crisps, start with:
- 2 cups shredded sharp cheddar cheese
- 1 teaspoon chili powder
- 1/2 teaspoon lime zest
- 1/4 teaspoon garlic powder
- 1/4 teaspoon onion powder
- 1/4 teaspoon sea salt
- 1/4 teaspoon black pepper
These main ingredients create a bold and cheesy flavor. The sharp cheddar gives a rich taste while the spices add a kick.
Optional ingredients for enhanced flavor
You can add fresh cilantro, chopped, as a fun garnish. It adds a burst of color and freshness. You can also try adding a pinch of cayenne for heat or a squeeze of lime juice for extra zest.
Tips for selecting the best cheese
Choose a good quality sharp cheddar cheese for the best flavor. Look for cheese without fillers. Aged cheddar works well too; it has a stronger taste. Always check if it is shredded or block cheese. Shredded cheese saves prep time, but block cheese gives a fresher flavor when you shred it yourself.
Step-by-Step Instructions
Preparing the oven and baking sheet
First, set your oven to 400°F (200°C). This high heat makes the cheese melt and crisp up nicely. Next, take a baking sheet and line it with parchment paper. This helps keep the cheese from sticking. It's a simple step, but it saves you time on cleanup later.
Mixing the cheese and spices
In a mixing bowl, add 2 cups of shredded sharp cheddar cheese. This cheese gives a great flavor. Now, sprinkle in 1 teaspoon of chili powder. Add 1/2 teaspoon of lime zest for a fresh kick. Then, toss in 1/4 teaspoon each of garlic powder, onion powder, sea salt, and black pepper. Mix everything well. You want the cheese fully coated with the spices. This step is key for flavor.
Baking and cooling instructions
Using a tablespoon, scoop the cheese mixture. Place small mounds about 2 inches apart on the baking sheet. Flatten each mound slightly with the back of the spoon. Now, bake them in the oven for 5-7 minutes. Watch closely until the edges turn golden brown. When done, remove the sheet from the oven. Let the crisps cool for a few minutes on the tray. After that, transfer them to a wire rack. This helps them crisp up even more. Once cooled, enjoy right away or store in an airtight container for up to a week.
Tips & Tricks
Ensuring perfect crispiness
To get the best crunch, keep the cheese thin. Use a tablespoon to scoop small mounds. Flatten them a bit with the back of the spoon. This helps them cook evenly. Bake until the edges turn golden brown, about 5-7 minutes. Watch them closely to avoid burning.
Common mistakes to avoid
One common mistake is using too much cheese. Stick to the two cups in the recipe. Another mistake is not mixing the spices well. Make sure each piece of cheese gets coated. Lastly, don’t leave them in the oven too long. They can go from perfect to burnt quickly.
How to customize spice levels
To adjust the heat, change the chili powder amount. For milder crisps, use less. If you love spice, add more chili powder. You can also try different spices. Cumin or paprika can add unique flavors. Experiment until you find your perfect mix!
Pro Tips
- Use Fresh Ingredients: For the best flavor, opt for freshly shredded cheddar cheese rather than pre-packaged varieties, as they often contain anti-caking agents that can affect texture.
- Watch the Bake Time: Bake the cheese crisps until the edges are golden brown. If you're baking a larger batch, you may need to adjust the baking time slightly.
- Experiment with Spices: Don’t hesitate to customize the spice blend! Adding cayenne pepper for extra heat or smoked paprika for a smoky flavor can elevate your cheese crisps.
- Storage Tips: To keep the crisps crunchy, store them in an airtight container with a silica gel pack to absorb moisture. Avoid stacking them to prevent breakage.
Variations
Alternative cheese options
You can switch out the cheddar for other cheeses. Try mozzarella for a milder taste. Parmesan gives a nice salty kick. Gouda adds a rich flavor, too. Each cheese brings its own charm to the crisps.
Different flavor combinations
Feel free to mix in different spices or herbs. Add smoked paprika for a deeper taste. You can use taco seasoning for a bold twist. Fresh herbs like oregano or thyme can brighten the flavor. Experiment with your favorites to make it unique.
Making it dairy-free or vegan-friendly
To make this recipe dairy-free, use a nut-based cheese. Look for brands that melt well. You can also try nutritional yeast for a cheesy flavor. Mix in spices to enhance taste. Follow the same steps, and enjoy a crispy treat!
Storage Info
Best practices for storing cheese crisps
To keep your cheese crisps fresh, store them in an airtight container. This step helps prevent moisture from making them soggy. Use parchment paper between layers if stacking them. Keep them in a cool, dry place. Avoid direct sunlight, which can change their flavor.
How to re-crisp old cheese crisps
If your cheese crisps lose their crunch, don’t worry! Preheat your oven to 350°F (175°C). Place the cheese crisps on a baking sheet. Heat them for about 5 minutes. Watch closely to avoid burning. They will regain their crunch and taste fresh again.
Shelf life and freshness tips
Your homemade cheese crisps last about one week if stored properly. After that, they may lose their flavor and crunch. For best results, eat them within the first few days. If you notice any signs of moisture or a change in smell, it’s best to toss them. Enjoy the best flavor while they are fresh!
FAQs
What are the nutritional benefits of cheese crisps?
Cheese crisps pack a protein punch. They are low in carbs and high in fat. This makes them a great snack for keto diets. Each serving helps you feel full longer. They also provide calcium, which is good for bones. The spices add flavor without extra calories. Overall, cheese crisps support your low-carb goals while satisfying cravings.
Can I make these cheese crisps in the microwave?
Yes, you can! To make cheese crisps in the microwave, use a microwave-safe plate. Place small mounds of the cheese mixture on the plate. Leave space between each mound. Microwave on high for about 1-2 minutes. Watch closely to avoid burning. The cheese will melt and bubble. Let them cool slightly before eating. This method is quick and easy for a fast snack.
What can I serve with Crunchy Keto Chili Lime Cheese Crisps?
These cheese crisps are versatile. You can pair them with guacamole for a creamy dip. Salsa adds a fresh and zesty touch. For a spicy kick, try a hot sauce. You can also serve them with fresh cilantro for garnish. They work well on a cheese board too. Add olives or nuts for variety. Enjoy these crisps as a snack or appetizer!
You’ve learned how to make Crunchy Keto Chili Lime Cheese Crisps. We explored the main ingredients and optional flavors. You now know tips for baking and achieving perfect crispiness and how to avoid common mistakes. We also discussed variations, storage methods, and answered key questions about these snacks.
These cheese crisps are easy to make. They are delicious and versatile. Enjoy them as a snack or with your favorite dips. With these tips, your cheese crisps will always impress!