Chef Taling

  • Recipes
    • Dinner
    • Desserts
    • Appetizer
    • Drinks
  • Privacy Policy
  • Contact
  • About
menu icon
go to homepage
  • Recipes
    • Dinner
    • Desserts
    • Appetizer
    • Drinks
  • Privacy Policy
  • Contact
  • About

search icon
Homepage link
  • Recipes
    • Dinner
    • Desserts
    • Appetizer
    • Drinks
  • Privacy Policy
  • Contact
  • About

×

Crispy Garlic Parmesan Zucchini Fries Delightful Snack

Published: Aug 20, 2025 · Modified: Aug 20, 2025 by Taling · Leave a Comment

↓ Jump to Recipe

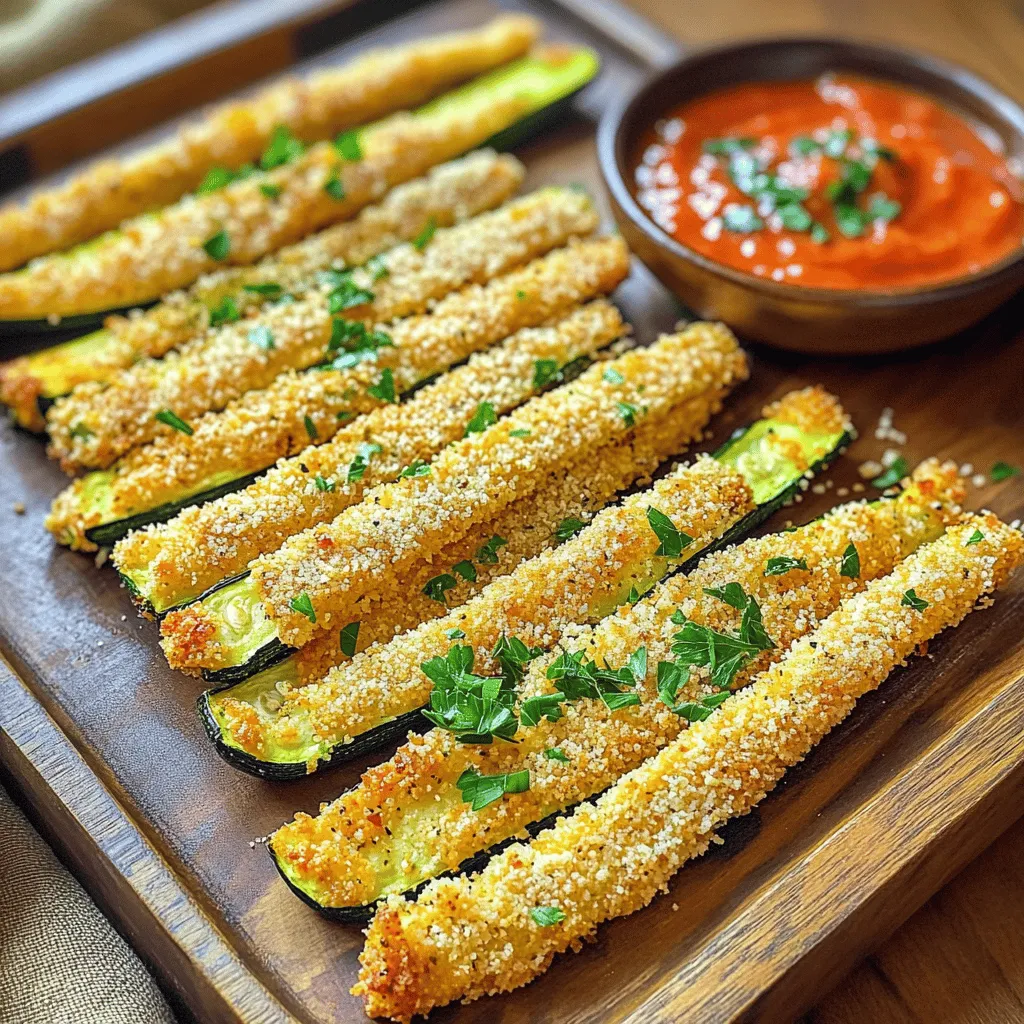
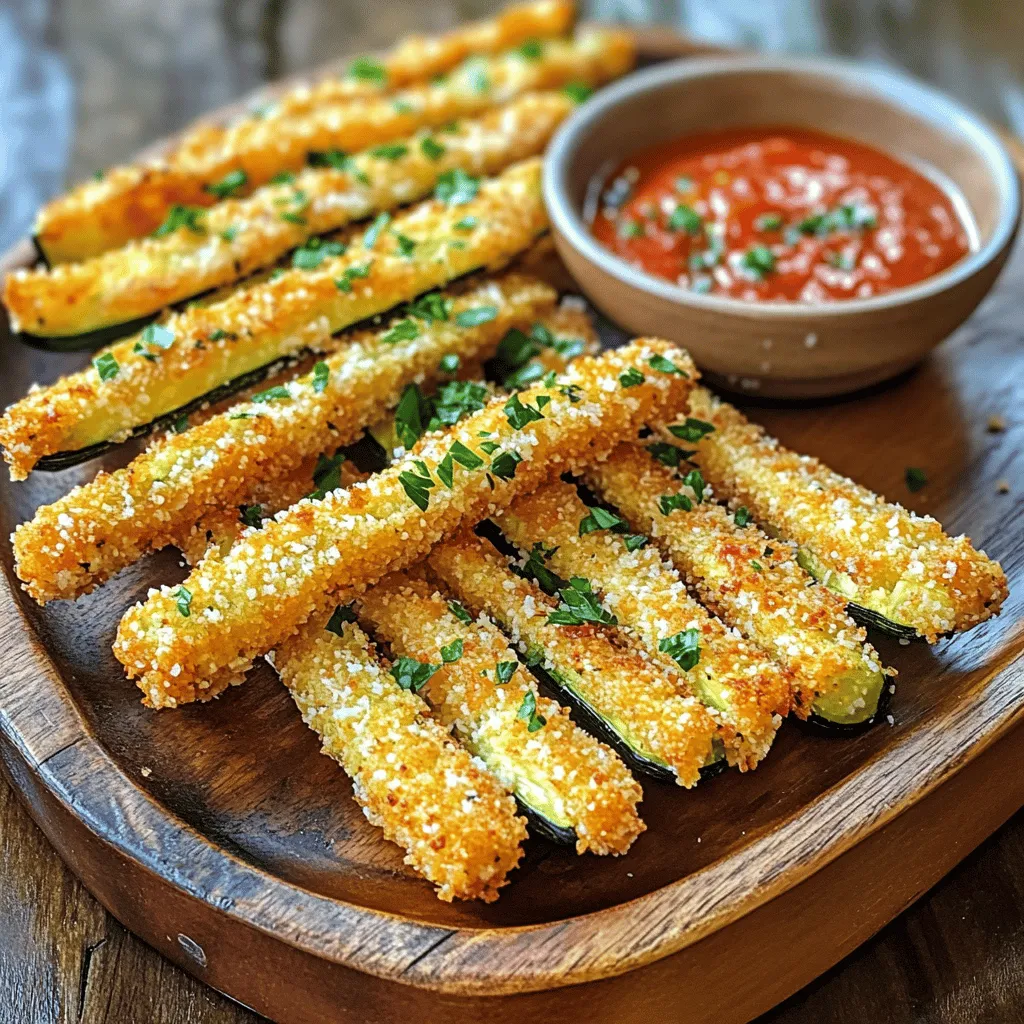
If you're looking for a fun and tasty snack, you've found it! These crispy garlic Parmesan zucchini fries will wow your taste buds. They’re easy to make, packed with flavor, and perfect for sharing—or keeping all to yourself! Follow me as I guide you through each step to create this delightful snack that’s sure to impress everyone. Let’s get cooking and crunching!

- 3 medium zucchinis, cut into fry shapes - 1 cup breadcrumbs (panko for extra crunch) - ½ cup grated Parmesan cheese - 4 cloves garlic, minced - 2 large eggs, beaten - 1 teaspoon Italian seasoning - ½ teaspoon salt - ½ teaspoon black pepper - Olive oil spray - Fresh parsley, chopped The key to great zucchini fries starts with fresh zucchinis. I like to choose medium-sized ones for the best texture. The next important part is the coating. I use panko breadcrumbs for a crunchier bite, but regular breadcrumbs work too. Grated Parmesan cheese adds a salty, cheesy flavor that makes these fries irresistible. Don’t forget the garlic! Fresh minced garlic gives a strong flavor. The beaten eggs help the coating stick to the zucchini. For seasoning, Italian seasoning brings warmth, while salt and black pepper add more flavor. If you want a lighter option, use olive oil spray. It helps the fries get crispy without too much oil. Lastly, fresh parsley is optional but gives a nice touch for presentation. - Preheat your oven to 425°F (220°C). Line a baking sheet with parchment paper. - In a shallow dish, mix together 1 cup of breadcrumbs, ½ cup of grated Parmesan cheese, 4 minced garlic cloves, 1 teaspoon of Italian seasoning, ½ teaspoon of salt, and ½ teaspoon of black pepper. Stir well to combine. - In a separate bowl, beat 2 large eggs until mixed. - Take each zucchini fry and dip it into the beaten eggs. Make sure it is well-coated. This helps the breadcrumbs stick. - After dipping, roll the zucchini fry in the breadcrumb mixture. Press lightly to ensure the crumbs stick well. - Arrange the coated zucchini fries on the prepared baking sheet in a single layer. - If you prefer, lightly drizzle the fries with olive oil or spray them with olive oil spray. - Bake in the preheated oven for 20-25 minutes. Flip the fries halfway through to ensure even crispiness. They should turn golden brown. To get the best crunch, use panko breadcrumbs. Panko gives a light and airy texture. It creates a crispier fry than regular breadcrumbs. Make sure to coat each fry completely. You want every part covered in the breadcrumb mix. This helps them crisp up nicely in the oven. You can play with flavors by adding spices. Try smoked paprika for a smoky taste, or cayenne for heat. Mixing in different cheeses can also boost flavor. Cheddar or mozzarella offers a nice twist on the classic. Each change adds a new taste to your fries. Pair your crispy fries with dips. Marinara sauce is a classic choice. Garlic aioli also adds a creamy touch. For a pretty presentation, sprinkle fresh parsley on top. This adds color and makes your dish look special. Serve them on a nice platter for friends and family to enjoy! {{image_2}} You can make these zucchini fries gluten-free! Just swap regular breadcrumbs for gluten-free breadcrumbs. This simple change keeps the crunch without the gluten. Look for brands that use rice or corn as their base. Check the label to ensure they are certified gluten-free. You can also use an air fryer to cook these fries. Set your air fryer to 400°F (200°C). Place the coated zucchini fries in a single layer in the basket. Cook them for about 10-15 minutes. Shake the basket halfway through for even cooking. The air fryer gives you a crispy texture with less oil. Want to spice things up? Try making spicy zucchini fries. Add some cayenne pepper or chili powder to the breadcrumb mix. For a fresh twist, mix in some chopped herbs like dill or basil. These small changes can turn your fries into a whole new snack experience! Store your leftover crispy garlic Parmesan zucchini fries in the fridge. First, let them cool completely. Place them in an airtight container. This keeps them fresh and prevents sogginess. Use a container that fits your fries well. Avoid stacking them too high to keep them from getting squished. To enjoy your fries again, reheat them in the oven. Preheat your oven to 400°F (200°C). Place the fries on a baking sheet. This helps them regain their crispiness. Bake for about 10-15 minutes or until warm. You can also use an air fryer for a quicker method. Set it to 350°F (175°C) and heat for 5-7 minutes. If you want to freeze the coated zucchini fries, follow these steps: First, prepare the zucchini as usual but don’t bake them. Place the coated fries in a single layer on a baking sheet. Freeze them for about 1-2 hours until firm. Once frozen, transfer them to a freezer bag or airtight container. Label with the date. They will stay good for up to three months. When ready to eat, bake straight from the freezer, adding a few extra minutes to the cooking time. No, frozen zucchini does not work well for this recipe. Frozen zucchini has a high water content. This causes the fries to become mushy when baked. Fresh zucchini keeps its shape and crunch. If you want crispy fries, always choose fresh zucchini. Zucchini fries taste best right after baking. They stay crispy for about 10 to 15 minutes. After that, they start to lose their crunch. To keep them crispy longer, serve them right away. You can also bake them just before serving for the best texture. Yes, you can prepare the zucchini fries ahead of time. Cut and coat the zucchini fries, then store them in the fridge. Keep them in an airtight container for up to a few hours. Bake them just before serving for that fresh, crispy taste. In this post, I covered the key ingredients, step-by-step instructions, and helpful tips for making delicious zucchini fries. I discussed ways to achieve maximum crispiness and shared variations to suit different tastes and dietary needs. You can easily store and reheat leftovers, too. Now, you can enjoy healthy, tasty zucchini fries that everyone will love. Have fun experimenting and making this recipe your own!

Ingredients

Main Ingredients

  1. 3 medium zucchinis, cut into fry shapes
  2. 1 cup breadcrumbs (panko for extra crunch)
  3. ½ cup grated Parmesan cheese
  4. 4 cloves garlic, minced
  5. 2 large eggs, beaten

Seasoning Components

  1. 1 teaspoon Italian seasoning
  2. ½ teaspoon salt
  3. ½ teaspoon black pepper

Optional Ingredients

  1. Olive oil spray
  2. Fresh parsley, chopped

The key to great zucchini fries starts with fresh zucchinis. I like to choose medium-sized ones for the best texture. The next important part is the coating. I use panko breadcrumbs for a crunchier bite, but regular breadcrumbs work too. Grated Parmesan cheese adds a salty, cheesy flavor that makes these fries irresistible.

Don’t forget the garlic! Fresh minced garlic gives a strong flavor. The beaten eggs help the coating stick to the zucchini. For seasoning, Italian seasoning brings warmth, while salt and black pepper add more flavor.

If you want a lighter option, use olive oil spray. It helps the fries get crispy without too much oil. Lastly, fresh parsley is optional but gives a nice touch for presentation.

Step-by-Step Instructions

Preparation Steps

  1. Preheat your oven to 425°F (220°C). Line a baking sheet with parchment paper.
  2. In a shallow dish, mix together 1 cup of breadcrumbs, ½ cup of grated Parmesan cheese, 4 minced garlic cloves, 1 teaspoon of Italian seasoning, ½ teaspoon of salt, and ½ teaspoon of black pepper. Stir well to combine.

Coating the Zucchini

  1. In a separate bowl, beat 2 large eggs until mixed.
  2. Take each zucchini fry and dip it into the beaten eggs. Make sure it is well-coated. This helps the breadcrumbs stick.
  3. After dipping, roll the zucchini fry in the breadcrumb mixture. Press lightly to ensure the crumbs stick well.

Baking Process

  1. Arrange the coated zucchini fries on the prepared baking sheet in a single layer.
  2. If you prefer, lightly drizzle the fries with olive oil or spray them with olive oil spray.
  3. Bake in the preheated oven for 20-25 minutes. Flip the fries halfway through to ensure even crispiness. They should turn golden brown.

Tips & Tricks

Achieving Maximum Crispiness

To get the best crunch, use panko breadcrumbs. Panko gives a light and airy texture. It creates a crispier fry than regular breadcrumbs. Make sure to coat each fry completely. You want every part covered in the breadcrumb mix. This helps them crisp up nicely in the oven.

Flavor Enhancements

You can play with flavors by adding spices. Try smoked paprika for a smoky taste, or cayenne for heat. Mixing in different cheeses can also boost flavor. Cheddar or mozzarella offers a nice twist on the classic. Each change adds a new taste to your fries.

Serving Suggestions

Pair your crispy fries with dips. Marinara sauce is a classic choice. Garlic aioli also adds a creamy touch. For a pretty presentation, sprinkle fresh parsley on top. This adds color and makes your dish look special. Serve them on a nice platter for friends and family to enjoy!

Variations

Gluten-Free Option

You can make these zucchini fries gluten-free! Just swap regular breadcrumbs for gluten-free breadcrumbs. This simple change keeps the crunch without the gluten. Look for brands that use rice or corn as their base. Check the label to ensure they are certified gluten-free.

Oven vs. Air Fryer

You can also use an air fryer to cook these fries. Set your air fryer to 400°F (200°C). Place the coated zucchini fries in a single layer in the basket. Cook them for about 10-15 minutes. Shake the basket halfway through for even cooking. The air fryer gives you a crispy texture with less oil.

Different Flavor Profiles

Want to spice things up? Try making spicy zucchini fries. Add some cayenne pepper or chili powder to the breadcrumb mix. For a fresh twist, mix in some chopped herbs like dill or basil. These small changes can turn your fries into a whole new snack experience!

Storage Info

Storing Leftovers

Store your leftover crispy garlic Parmesan zucchini fries in the fridge. First, let them cool completely. Place them in an airtight container. This keeps them fresh and prevents sogginess. Use a container that fits your fries well. Avoid stacking them too high to keep them from getting squished.

Reheating Tips

To enjoy your fries again, reheat them in the oven. Preheat your oven to 400°F (200°C). Place the fries on a baking sheet. This helps them regain their crispiness. Bake for about 10-15 minutes or until warm. You can also use an air fryer for a quicker method. Set it to 350°F (175°C) and heat for 5-7 minutes.

Freezing Instructions

If you want to freeze the coated zucchini fries, follow these steps: First, prepare the zucchini as usual but don’t bake them. Place the coated fries in a single layer on a baking sheet. Freeze them for about 1-2 hours until firm. Once frozen, transfer them to a freezer bag or airtight container. Label with the date. They will stay good for up to three months. When ready to eat, bake straight from the freezer, adding a few extra minutes to the cooking time.

FAQs

Can I use frozen zucchini for this recipe?

No, frozen zucchini does not work well for this recipe. Frozen zucchini has a high water content. This causes the fries to become mushy when baked. Fresh zucchini keeps its shape and crunch. If you want crispy fries, always choose fresh zucchini.

How long do the zucchini fries stay crispy?

Zucchini fries taste best right after baking. They stay crispy for about 10 to 15 minutes. After that, they start to lose their crunch. To keep them crispy longer, serve them right away. You can also bake them just before serving for the best texture.

Can I make these zucchini fries ahead of time?

Yes, you can prepare the zucchini fries ahead of time. Cut and coat the zucchini fries, then store them in the fridge. Keep them in an airtight container for up to a few hours. Bake them just before serving for that fresh, crispy taste.

In this post, I covered the key ingredients, step-by-step instructions, and helpful tips for making delicious zucchini fries. I discussed ways to achieve maximum crispiness and shared variations to suit different tastes and dietary needs. You can easily store and reheat leftovers, too. Now, you can enjoy healthy, tasty zucchini fries that everyone will love. Have fun experimenting and making this recipe your own!

- 3 medium zucchinis, cut into fry shapes - 1 cup breadcrumbs (panko for extra crunch) - ½ cup grated Parmesan cheese - 4 cloves garlic, minced - 2 large eggs, beaten - 1 teaspoon Italian seasoning - ½ teaspoon salt - ½ teaspoon black pepper - Olive oil spray - Fresh parsley, chopped The key to great zucchini fries starts with fresh zucchinis. I like to choose medium-sized ones for the best texture. The next important part is the coating. I use panko breadcrumbs for a crunchier bite, but regular breadcrumbs work too. Grated Parmesan cheese adds a salty, cheesy flavor that makes these fries irresistible. Don’t forget the garlic! Fresh minced garlic gives a strong flavor. The beaten eggs help the coating stick to the zucchini. For seasoning, Italian seasoning brings warmth, while salt and black pepper add more flavor. If you want a lighter option, use olive oil spray. It helps the fries get crispy without too much oil. Lastly, fresh parsley is optional but gives a nice touch for presentation. - Preheat your oven to 425°F (220°C). Line a baking sheet with parchment paper. - In a shallow dish, mix together 1 cup of breadcrumbs, ½ cup of grated Parmesan cheese, 4 minced garlic cloves, 1 teaspoon of Italian seasoning, ½ teaspoon of salt, and ½ teaspoon of black pepper. Stir well to combine. - In a separate bowl, beat 2 large eggs until mixed. - Take each zucchini fry and dip it into the beaten eggs. Make sure it is well-coated. This helps the breadcrumbs stick. - After dipping, roll the zucchini fry in the breadcrumb mixture. Press lightly to ensure the crumbs stick well. - Arrange the coated zucchini fries on the prepared baking sheet in a single layer. - If you prefer, lightly drizzle the fries with olive oil or spray them with olive oil spray. - Bake in the preheated oven for 20-25 minutes. Flip the fries halfway through to ensure even crispiness. They should turn golden brown. To get the best crunch, use panko breadcrumbs. Panko gives a light and airy texture. It creates a crispier fry than regular breadcrumbs. Make sure to coat each fry completely. You want every part covered in the breadcrumb mix. This helps them crisp up nicely in the oven. You can play with flavors by adding spices. Try smoked paprika for a smoky taste, or cayenne for heat. Mixing in different cheeses can also boost flavor. Cheddar or mozzarella offers a nice twist on the classic. Each change adds a new taste to your fries. Pair your crispy fries with dips. Marinara sauce is a classic choice. Garlic aioli also adds a creamy touch. For a pretty presentation, sprinkle fresh parsley on top. This adds color and makes your dish look special. Serve them on a nice platter for friends and family to enjoy! {{image_2}} You can make these zucchini fries gluten-free! Just swap regular breadcrumbs for gluten-free breadcrumbs. This simple change keeps the crunch without the gluten. Look for brands that use rice or corn as their base. Check the label to ensure they are certified gluten-free. You can also use an air fryer to cook these fries. Set your air fryer to 400°F (200°C). Place the coated zucchini fries in a single layer in the basket. Cook them for about 10-15 minutes. Shake the basket halfway through for even cooking. The air fryer gives you a crispy texture with less oil. Want to spice things up? Try making spicy zucchini fries. Add some cayenne pepper or chili powder to the breadcrumb mix. For a fresh twist, mix in some chopped herbs like dill or basil. These small changes can turn your fries into a whole new snack experience! Store your leftover crispy garlic Parmesan zucchini fries in the fridge. First, let them cool completely. Place them in an airtight container. This keeps them fresh and prevents sogginess. Use a container that fits your fries well. Avoid stacking them too high to keep them from getting squished. To enjoy your fries again, reheat them in the oven. Preheat your oven to 400°F (200°C). Place the fries on a baking sheet. This helps them regain their crispiness. Bake for about 10-15 minutes or until warm. You can also use an air fryer for a quicker method. Set it to 350°F (175°C) and heat for 5-7 minutes. If you want to freeze the coated zucchini fries, follow these steps: First, prepare the zucchini as usual but don’t bake them. Place the coated fries in a single layer on a baking sheet. Freeze them for about 1-2 hours until firm. Once frozen, transfer them to a freezer bag or airtight container. Label with the date. They will stay good for up to three months. When ready to eat, bake straight from the freezer, adding a few extra minutes to the cooking time. No, frozen zucchini does not work well for this recipe. Frozen zucchini has a high water content. This causes the fries to become mushy when baked. Fresh zucchini keeps its shape and crunch. If you want crispy fries, always choose fresh zucchini. Zucchini fries taste best right after baking. They stay crispy for about 10 to 15 minutes. After that, they start to lose their crunch. To keep them crispy longer, serve them right away. You can also bake them just before serving for the best texture. Yes, you can prepare the zucchini fries ahead of time. Cut and coat the zucchini fries, then store them in the fridge. Keep them in an airtight container for up to a few hours. Bake them just before serving for that fresh, crispy taste. In this post, I covered the key ingredients, step-by-step instructions, and helpful tips for making delicious zucchini fries. I discussed ways to achieve maximum crispiness and shared variations to suit different tastes and dietary needs. You can easily store and reheat leftovers, too. Now, you can enjoy healthy, tasty zucchini fries that everyone will love. Have fun experimenting and making this recipe your own!

Crispy Garlic Parmesan Zucchini Fries

Indulge in these crispy garlic parmesan zucchini fries that are the perfect guilt-free snack! Made with fresh zucchini, flavorful garlic, and a crunchy breadcrumb coating, these fries are baked to golden perfection. Easy to prepare and packed with deliciousness, they’re a fantastic way to enjoy veggies. Ready to take your snacking to the next level? Click through to explore this simple and tasty recipe that everyone will love!
Print Recipe Pin Recipe

Ingredients
  

3 medium zucchinis, cut into fry shapes

1 cup breadcrumbs (panko for extra crunch)

½ cup grated Parmesan cheese

4 cloves garlic, minced

2 large eggs, beaten

1 teaspoon Italian seasoning

½ teaspoon salt

½ teaspoon black pepper

Olive oil spray (or olive oil for drizzling)

Fresh parsley, chopped (for garnish)

Instructions
 

Preheat your oven to 425°F (220°C) and line a baking sheet with parchment paper.

    In a shallow dish, combine the breadcrumbs, grated Parmesan cheese, minced garlic, Italian seasoning, salt, and black pepper. Mix well.

      In a separate bowl, beat the eggs until well combined.

        Take each zucchini fry and first dip it into the beaten eggs, ensuring it is well-coated. This will help the breadcrumb mixture stick.

          Next, roll the zucchini in the breadcrumb mixture, pressing lightly to adhere the crumbs well. Place the coated fries on the prepared baking sheet in a single layer.

            If using olive oil for drizzling, lightly drizzle the fries with olive oil or spray them with olive oil spray for a lighter option.

              Bake in the preheated oven for about 20-25 minutes or until the fries are golden brown and crispy, flipping them halfway through for even cooking.

                Once done, remove from the oven and let them cool for a couple of minutes. Garnish with fresh parsley before serving.

                  Prep Time: 15 minutes | Total Time: 40 minutes | Servings: 4

                    Presentation Tips: Serve the crispy zucchini fries on a platter with a side of marinara or garlic aioli for dipping. For an extra pop of color, sprinkle additional chopped parsley on top before serving. Enjoy your delicious and healthy snack!

                      Related Recipes

                      • - 1 large bag of tortilla chips - 2 cups shredded cheese (cheddar and Monterey Jack mix) - 1 can (15 oz) black beans, rinsed and drained - 1 cup cooked chicken, shredded (or seasoned ground beef) - 1 jalapeño, sliced - 1 cup diced tomatoes - 1/2 cup sliced black olives - 1 avocado, diced - 1/4 cup sour cream - 1/4 cup fresh cilantro, chopped - 1-2 tablespoons taco seasoning - 2 tablespoons olive oil - Salt and pepper to taste These ingredients come together to create a flavor-packed snack. The tortilla chips serve as a sturdy base. The cheese melts into a gooey layer that binds everything. Black beans add a creamy texture and protein. You can choose cooked chicken or beef for extra heartiness. Fresh toppings like jalapeños and tomatoes brighten each bite. The avocado, sour cream, and cilantro add a cool finish. Taco seasoning gives a nice kick. Olive oil helps the flavors meld together. A sprinkle of salt and pepper ties it all in. Gather these ingredients, and you are ready to make your loaded sheet-pan nachos shine! 1. Preheat your oven to 400°F (200°C). This step is key for crispy nachos. 2. Grab a large baking sheet. Spread the tortilla chips evenly on it. Make sure they do not overlap too much. This helps them stay crunchy. 1. In a bowl, toss the black beans, shredded chicken, and taco seasoning together. Make sure all the beans and chicken get coated well. 2. Scatter this seasoned mixture over the tortilla chips. Distribute it evenly so every chip gets some toppings. 1. Sprinkle the mixed cheese over the chips and toppings. Cover as much area as you can for maximum cheesiness. 2. Add sliced jalapeños, diced tomatoes, and black olives on top. This adds color and flavor. 3. Drizzle with olive oil and season lightly with salt and pepper. These add richness and enhance the taste. 4. Bake in the oven for 10-12 minutes. Wait until the cheese melts and becomes bubbly. 5. Once done, remove from the oven and let cool for a bit. Top with diced avocado, sour cream, and chopped cilantro. 6. Serve right away. Guests can dig in from the sheet pan or you can serve in individual portions. How to choose the right chips Select thick tortilla chips. They need to hold up under the toppings. Look for chips that are sturdy and well-seasoned. Avoid thin chips that may break easily. A classic yellow corn chip adds great flavor. Best cheese combinations for meltiness Combine cheddar and Monterey Jack cheese for the best melt. This mix gives a rich, creamy texture. Cheddar offers sharpness, while Monterey Jack adds smoothness. For extra flavor, try adding pepper jack. It brings a kick to your nachos. Additional toppings and garnishes You can top your nachos with fresh ingredients. Diced avocado and chopped cilantro add a bright touch. A dollop of sour cream balances the heat. For a crunchy bite, add sliced jalapeños and diced tomatoes. Black olives also add a salty hint. Pairing drinks with loaded nachos Nachos pair well with cold drinks. Try a light beer or a fruity soda. For something special, a margarita is a great choice. The crisp flavors of these drinks complement the nachos perfectly. Overloading the chips Don’t load too many toppings on your chips. This can make them soggy and hard to eat. Aim for a balance of toppings to keep every chip crunchy. Spread toppings evenly to ensure every bite is tasty. Underbaking or overbaking nachos Watch the baking time closely. Underbaking leaves the cheese unmelted. Overbaking makes the chips too hard. Bake until the cheese is bubbly and slightly golden, about 10-12 minutes. Remove them promptly for the best texture. {{image_2}} If you want to change things up, consider ingredient swaps. For a vegetarian version, skip the meat. Use extra black beans or add some corn for texture. You can also use grilled mushrooms or sautéed bell peppers to give it a hearty feel. If you prefer meat, try different proteins. Ground turkey or pulled pork can add a fun twist. You can even use shrimp for a seafood-inspired nacho dish. The key is to keep it flavorful and fun. To amp up the taste, think about adding spices or sauces. A sprinkle of smoked paprika can give your nachos a nice kick. A drizzle of sriracha or chipotle sauce can also enhance the flavor. Using seasonal ingredients is another great way to change your nachos. In summer, add fresh corn or diced bell peppers. In fall, consider roasted pumpkin or sweet potato. These fresh ingredients can make your nachos pop. Many people have dietary needs, so consider gluten-free and dairy-free options. You can use corn chips for a gluten-free base. For cheese lovers, try dairy-free cheese made from nuts or soy. If you want healthier toppings, consider Greek yogurt instead of sour cream. You can also add more veggies like spinach or kale. These swaps keep your nachos tasty and nutritious without losing any fun. After your fun game night, you may have nachos left. To store them well, place them in an airtight container. Keep the nachos in the fridge for up to 3 days. Avoid leaving them out too long. Bacteria can grow if they sit at room temperature. To reheat nachos, use an oven or toaster oven. Preheat it to 350°F (175°C). Place the nachos on a baking sheet. Bake for about 5-10 minutes. This method keeps them crispy. Microwaving nachos can make them soggy. If you must, heat in short bursts of 30 seconds. Check often to avoid overcooking. You can freeze nachos, but it’s not the best idea. Freezing can change the texture. If you choose to freeze them, layer the nachos in a freezer-safe container. Use parchment paper between layers to prevent sticking. Thaw in the fridge overnight before reheating. Enjoy your nachos fresh for the best flavor and crunch! Loaded sheet-pan nachos are a fun snack made with tortilla chips and toppings. You start with a base of crispy chips. Then, you pile on cheese, beans, meat, and veggies. Common ingredients include: - Tortilla chips - Shredded cheese (cheddar and Monterey Jack mix) - Black beans - Cooked chicken or seasoned ground beef - Sliced jalapeño - Diced tomatoes - Sliced black olives - Diced avocado - Sour cream - Fresh cilantro This dish is perfect for sharing and adds excitement to game night. To add spice to your nachos, consider these tips: - Use spicy cheese, like pepper jack. - Add more sliced jalapeños or include serrano peppers. - Mix in hot sauce with your beans or meat. - Top with spicy salsa or pico de gallo. Start with small amounts of heat. You can always add more if needed! Yes, you can prep ingredients in advance! Here’s how: - Prep the toppings: Dice veggies and shred cheese a few hours before. - Store ingredients: Keep them in separate containers in the fridge. For assembly: - Layer chips and toppings: When ready to bake, spread chips on a sheet pan. - Add toppings: Quickly add your prepped ingredients and cheese. This way, you save time and still enjoy fresh nachos! We covered everything you need for loaded nachos. From key ingredients to baking steps, you now have the full picture. Remember to choose the right chips and avoid overloading them. Feel free to swap ingredients or add spices to make it your own. Also, learn how to store and reheat leftovers for later enjoyment. Nachos can be a fun and easy dish, perfect for any gathering. Get creative and enjoy your nacho-making journey!
                        Loaded Sheet-Pan Nachos for a Fun Game Night Snack
                      • - 4 cups curly kale, stems removed and chopped - 1 ripe avocado, diced - 1 cup cherry tomatoes, halved When I make this salad, I start with fresh ingredients. Curly kale is my go-to because it holds dressing well. I always remove the stems to get a softer bite. Next, I pick a ripe avocado. A good avocado adds creaminess. The last fresh item is the cherry tomatoes. They bring color and a sweet burst of flavor. - 1 tablespoon lemon juice - 1 tablespoon Dijon mustard - 1 tablespoon Worcestershire sauce For the dressing, I mix lemon juice, Dijon mustard, and Worcestershire sauce. The lemon juice gives it a zesty kick. The mustard adds depth, while the Worcestershire sauce enhances the flavor. I whisk these together for a smooth blend. - 1/2 cup croutons (store-bought or homemade) - 1/4 cup freshly grated Parmesan cheese I love adding croutons for a crunchy texture. You can use store-bought or make your own. Lastly, I sprinkle Parmesan cheese on top. It adds a salty richness to the salad. Each topping makes this dish a fresh delight. To start, take your curly kale and chop it. Remove the tough stems. Place the chopped kale in a large bowl. Add a pinch of salt to the kale. This step is key. Salting helps break down the tough leaves. Using your hands, massage the kale for about 2-3 minutes. You want it to turn dark green and feel tender. This makes the kale easier to eat and brings out its flavor. Next, grab a small bowl. In it, combine the lemon juice, Dijon mustard, Worcestershire sauce, and olive oil. Whisk these ingredients together until they are well mixed. A good whisking technique gives the dressing a creamy texture. You can use a fork or a small whisk. Make sure everything blends well for the best taste. Now, pour the dressing over the massaged kale. Toss the kale to coat it completely with the dressing. Gently fold in the diced avocado and cherry tomatoes. Be careful not to smash the avocado. Finally, add the croutons and freshly grated Parmesan cheese. Give the salad one last gentle toss. Season with salt and freshly ground black pepper to taste. Serve the salad right away for the freshest flavor. To choose a ripe avocado, look for these signs: - The skin should be dark and slightly bumpy. - Gently squeeze the avocado. It should yield to pressure but not feel mushy. - Check the stem. If it comes off easily and is green underneath, the avocado is ripe. To cut and dice an avocado, follow these steps: 1. Cut the avocado in half lengthwise. 2. Twist the two halves to separate them. 3. Remove the pit carefully using a knife or spoon. 4. Use a spoon to scoop out the flesh. 5. Slice the flesh into cubes while still in the skin. 6. Gently scoop out the cubes with a spoon. Homemade croutons are simple and add great flavor. Here’s an easy recipe: - Ingredients: - 2 cups of bread, cubed - 2 tablespoons olive oil - Salt and pepper to taste - Optional: garlic powder, herbs, or cheese 1. Preheat your oven to 375°F (190°C). 2. Toss the bread cubes with olive oil, salt, and any herbs you like. 3. Spread them on a baking sheet. 4. Bake for 10-15 minutes until golden brown. For flavor variations, try adding: - Italian herbs for a classic touch. - Paprika for a smoky vibe. - Grated cheese for extra richness. Massaging kale makes it softer and tastier. Here are the best techniques: 1. Start with clean, chopped kale in a bowl. 2. Add a pinch of salt. This helps break down the fibers. 3. Use your hands to knead and squeeze the kale for 2-3 minutes. The benefits of massaging kale include: - Making it easier to chew and digest. - Enhancing its flavor. - Changing its color to a brighter green, signaling readiness. {{image_2}} To make a vegan version of this salad, you can swap the Parmesan cheese. Use nutritional yeast instead of cheese. It adds a cheesy flavor without using dairy. For Worcestershire sauce, pick a vegan brand. This sauce often has anchovies, so check the label. Want more protein? You can add grilled chicken or tofu. Both options work well with the salad flavors. If you want other protein choices, consider chickpeas or beans. These options are healthy and tasty too. Adding seasonal vegetables makes this salad even better. Try bell peppers in summer or roasted squash in fall. You can also toss in fruits like apple slices or berries. Nuts like walnuts or almonds add crunch and flavor. Adjust according to what’s fresh and available! To keep your salad fresh, store leftovers in a sealed container. Use an airtight glass or plastic container. This helps prevent browning and keeps the flavors alive. If you can, separate the dressing from the salad. This way, the kale and other veggies stay crisp. The best temperature for storing your salad is 34°F to 40°F. This range helps maintain freshness. When stored properly, the salad lasts about 1 to 2 days. After this time, the kale may wilt, and the avocado can brown. Freezing this salad isn't recommended. The texture of the kale and avocado changes when frozen. If you must freeze, keep the components separate. Freeze the kale and avocado in one bag and the dressing in another. Before serving, let them thaw in the fridge overnight. Yes, you can prep this salad ahead of time. To keep it fresh, follow these tips: - Wash and chop kale: Store it in an airtight container. - Prepare the dressing: Mix it and keep it in a jar. - Dice avocado last: Add it right before serving to prevent browning. - Store croutons separately: This keeps them crunchy. By prepping this way, you save time and enjoy fresh flavors. If you want a different green, try these: - Spinach: It’s tender and mild. - Swiss chard: It adds a nice color and taste. - Romaine lettuce: Crisp and crunchy, great for salads. Each option brings its own flavor and texture. Yes, this salad can be gluten-free. Here’s how: - Croutons: Use gluten-free bread to make your own or buy gluten-free croutons. - Dressings: Check labels for gluten-free Worcestershire sauce. These swaps keep your salad tasty and safe for gluten-free diets. This blog post explored how to make a fresh and tasty salad. We covered the best ingredients, from curly kale and ripe avocado to a zesty dressing. You learned step-by-step how to prepare, assemble, and add crunchy toppings like croutons. We also shared tips for selecting the perfect avocado and making homemade croutons. Finally, we discussed storage tips so your salad stays fresh. With these insights, you can create your own delicious salad, tailored to your taste. Enjoy your culinary journey and make this salad your own!
                        Avocado Kale Caesar Salad Fresh and Flavorful Delight
                      • - 2 large cucumbers - 2 green onions - Cilantro (optional) - 1 teaspoon salt - 2 tablespoons soy sauce - 1 tablespoon rice vinegar - 1 tablespoon sesame oil - 1 teaspoon honey or maple syrup - 1 tablespoon Sriracha - 1 teaspoon freshly grated ginger - 1 tablespoon sesame seeds - Prep time: 10 minutes - Total time: 40 minutes - Servings: 4 The spicy sesame cucumber salad shines with its fresh and crunchy textures. You need two large cucumbers for this recipe. Slice them thinly to keep the crunch. You can use two green onions, finely chopped, for a mild onion flavor. If you like, add cilantro for a fresh touch. For the pantry ingredients, you will need one teaspoon of salt. The salt helps to draw out moisture from the cucumbers. Use two tablespoons of soy sauce for that umami depth. A tablespoon of rice vinegar adds a nice tang. Sesame oil gives a rich, nutty flavor. You can sweeten the salad with one teaspoon of honey or maple syrup. One tablespoon of Sriracha gives it a spicy kick. Adjust this to your taste. A teaspoon of freshly grated ginger adds warmth. Finally, finish with one tablespoon of sesame seeds for crunch. This salad is quick to make. It takes only 10 minutes to prep and 40 minutes total. It serves four people, making it perfect for a small gathering. Enjoy making this fresh and vibrant dish! - Thinly slice cucumbers. - Sprinkle with salt and let sit for 15-20 minutes. Start by slicing the cucumbers. Use a sharp knife for clean cuts. Thin slices help the salad soak up the dressing well. The salt draws out moisture, making your salad crisp and fresh. - Combine soy sauce, rice vinegar, and sesame oil. - Whisk in honey or maple syrup, Sriracha, and ginger. In a bowl, mix soy sauce, rice vinegar, and sesame oil. These ingredients create a savory and tangy base. Add honey or maple syrup for sweetness. Then, stir in Sriracha for heat and freshly grated ginger for zest. This dressing brings all the flavors together. - Drain excess moisture from cucumbers. - Toss cucumbers with dressing. - Add sesame seeds and green onions. After the cucumbers sit, drain any liquid. This step keeps the salad from getting soggy. Pour the dressing over the cucumbers and toss well. Finally, add sesame seeds and chopped green onions for crunch and flavor. Let the salad rest for ten minutes. This waiting time helps the flavors mix nicely. Enjoy your fresh and spicy salad! Let the salad rest before serving. This step helps the flavors mix well. After you mix in the dressing, let it sit for ten extra minutes. This time allows the cucumbers to soak up the taste. If you like spice, adjust the Sriracha to your taste. Start with one tablespoon and add more if needed. This way, you control how spicy it gets. Adding toppings can make the salad even better. Try using nuts or seeds for extra crunch. Toasted sesame seeds work great and add flavor. Chopped peanuts or almonds can also bring a nice bite. Feel free to mix and match different toppings for variety. Garnishing with cilantro adds a fresh touch. Just sprinkle some on top before serving. It not only looks good but also adds flavor. Serve the salad chilled or at room temperature. You can pair it with grilled meats or rice dishes for a full meal. {{image_2}} You can change the flavor by using different vinegars or oils. For a tangy twist, try apple cider vinegar. It adds a nice zing. You can also swap sesame oil for olive oil. This will give the salad a lighter taste. Experiment with your favorite flavors. It’s fun to discover what you like best! Want to make your salad heartier? Add protein! Tofu works great. Cut it into small cubes and toss it in. If you prefer meat, shredded chicken is a tasty choice. Both options boost the salad's protein and make it more filling. You can make your salad more colorful and crunchy with extra veggies. Bell peppers add a sweet crunch. Chop them into bite-sized pieces and mix them in. Avocados give a creamy texture. They also add healthy fats. Slice them and gently fold them into the salad for a delicious twist. To keep your spicy sesame cucumber salad fresh, store it in an airtight container. This helps keep the flavors strong and the cucumbers crunchy. Make sure to refrigerate it right after serving. If you have leftovers, place them in the fridge within two hours. The salad tastes best when eaten within a few days. The spicy sesame cucumber salad stays fresh for about 3 to 5 days in the fridge. After this time, the cucumbers can become soggy. Always check for any off smells or changes in texture before eating. If it looks or smells strange, it’s best to throw it away. I do not recommend freezing this salad. Freezing changes the texture of the cucumbers. They can become mushy once thawed. Instead, enjoy the salad fresh for the best taste and crunch. Yes, you can make this salad ahead of time. It tastes great when it sits for a while. You can prepare it up to 24 hours in advance. Just keep it in the fridge. The flavors will blend, and the salad will be extra tasty. If you don’t have Sriracha, you can use other hot sauces. Try using chili paste or a bit of cayenne pepper. Adjust the amount to your taste. If you want less heat, use a mild sauce or just skip it altogether. Yes, the Spicy Sesame Cucumber Salad is both vegan and gluten-free. It contains no animal products and uses gluten-free soy sauce. You can enjoy it without worry about dietary restrictions. To make it spicier, add more Sriracha. You can also include red pepper flakes or chopped fresh chilies. Start with a little and taste as you go. This way, you can find the perfect heat for your liking. This blog post shared a simple way to make Spicy Sesame Cucumber Salad. We covered fresh and pantry ingredients, including the best tips for taste and storage. You can customize the salad with protein or other veggies. Remember, letting the salad sit boosts flavor. With these steps, you can create a delicious dish. Enjoy making it your own!
                        Spicy Sesame Cucumber Salad Fresh and Crunchy Delight
                      • - 1 pound fresh asparagus, trimmed - 2 tablespoons olive oil - 3 cloves garlic, minced - 1/4 cup grated Parmesan cheese - 1 teaspoon lemon zest - 1/2 teaspoon salt - 1/4 teaspoon black pepper - A pinch of red pepper flakes - Additional herbs or spices The magic of Garlic Parmesan Air Fryer Asparagus starts with fresh asparagus. Make sure to choose bright green, firm stalks. Trim the ends to keep them tender. Olive oil adds rich flavor and helps crisp the asparagus in the air fryer. Use good quality oil for the best taste. Next, garlic. I love using fresh garlic in this recipe. Mince three cloves to give a great flavor punch. For seasoning, we need Parmesan cheese. Grate it yourself for the best results. Lemon zest brings a nice brightness to the dish. Use a fine grater to get just the zest, avoiding the bitter white part. Finally, we have salt and pepper. These basic seasonings enhance all the flavors. If you like some heat, add a pinch of red pepper flakes. You can also mix in other herbs to match your taste. With these simple ingredients, you can make a delightful side dish that shines at any meal. - Trimming and cleaning: Start by taking 1 pound of fresh asparagus. Hold a spear and bend it gently. It will naturally snap at the right point. Discard the tough ends. Rinse the asparagus under cold water to clean it of dirt. - Marinating the asparagus: In a large bowl, mix 2 tablespoons of olive oil, 3 cloves of minced garlic, 1 teaspoon of lemon zest, 1/2 teaspoon of salt, and 1/4 teaspoon of black pepper. Add the trimmed asparagus and toss to coat well. Let it marinate for about 5 minutes. This helps the flavors soak in. - Preheating the air fryer: Set your air fryer to 400°F (200°C) and let it preheat. This step is key for getting that perfect crisp. - Arranging asparagus in the basket: Carefully place the marinated asparagus in the air fryer basket. Arrange them in a single layer, leaving space between each spear. This way, they cook evenly and get crispy. - Adding Parmesan cheese: After 7-10 minutes of cooking, check the asparagus. They should be tender and slightly crispy. Take them out and sprinkle 1/4 cup of grated Parmesan cheese on top right away. The heat will make the cheese melt just right. - Serving suggestions: If you like a bit of heat, add a pinch of red pepper flakes. Serve the asparagus warm as a side dish or a healthy snack. It pairs well with grilled meats or a fresh salad. To avoid overcrowding the air fryer, place asparagus in a single layer. This helps them cook evenly. If you pile them up, they can become soggy instead of crispy. You can cook in batches if needed. To check for doneness, use a fork or knife. The asparagus should feel tender but not mushy. You want a slight crunch when you bite into it. For a crispier finish, cook them for a few extra minutes. For extra flavor, try adding a squeeze of fresh lemon juice. This brightens the dish and adds freshness. You can also use herbs like thyme or rosemary for a different taste. If you're out of Parmesan cheese, try using pecorino Romano. It has a nice salty flavor and melts well. Nutritional yeast is another option for a vegan twist. Pair this dish with grilled chicken or fish for a balanced meal. It also works well with rice or quinoa for a healthy side. To use leftovers, chop the asparagus and toss it into salads. You can also mix it into pasta or grain bowls for a quick meal. These ideas keep the flavors fresh and exciting. {{image_2}} You can enjoy asparagus in many ways. First, consider roasting asparagus in the oven. This method gives it a nice, rich flavor. Preheat your oven to 425°F (220°C). Toss the asparagus with olive oil, garlic, and seasoning. Spread it on a baking sheet. Roast for about 15-20 minutes, or until it is tender and slightly crispy. Another fun way is grilling asparagus. This method adds a smoky touch. Heat your grill to medium-high. Coat the asparagus with oil and seasonings. Grill for about 5-7 minutes, turning occasionally. The grill marks will add both flavor and a beautiful look. If you want a vegan twist, you can skip the cheese. Instead, use nutritional yeast for that cheesy taste. It is packed with vitamins and has a nice flavor. You can also try using cashew cheese for a creamy texture. For those on a low-carb or keto diet, keep the asparagus as your base. Use olive oil and garlic as your main flavors. You can also add bacon bits for extra flavor without adding carbs. Asparagus shines in spring, but you can use other veggies too. Try green beans or Brussels sprouts. They cook well and soak up flavors nicely. Adjust the cooking time as needed. You can also adapt the recipe for different veggies. Zucchini or bell peppers work great. Cut them into similar sizes as asparagus. Follow the same steps to cook and season them for a tasty dish. To store leftover Garlic Parmesan Air Fryer Asparagus, place it in an airtight container. Keep it in the fridge for up to 3 days. Make sure it's cool before sealing the container. If you want to freeze it, spread the cooked asparagus on a baking sheet first. Freeze it for about 1 hour, then transfer it to a freezer bag. This method helps prevent clumping. When reheating asparagus, use an air fryer or oven for the best results. Preheat your air fryer to 350°F (175°C) and heat for about 3-5 minutes. This keeps the texture crispy. You can also use a microwave, but it may make the asparagus soft. To maintain flavor, avoid reheating more than once. You can add asparagus to many dishes. Try slicing it into salads or pasta. It's great in omelets too. For meal prep, store ingredients separately. Keep the asparagus, olive oil, and spices in different containers. This way, you can easily mix and cook them when you're ready. Cooking asparagus in an air fryer takes about 7-10 minutes at 400°F. Check them halfway through to shake the basket. This helps them cook evenly. The asparagus should be tender and a bit crispy when done. You can use frozen asparagus, but fresh tastes better. If you use frozen, do not thaw them first. Just add a minute or two to the cooking time. This way, they will still get that nice texture. Garlic Parmesan Air Fryer Asparagus goes well with many dishes. Here are some ideas: - Grilled chicken or fish - Pasta with lemon or cream sauce - Quinoa or rice bowls - Steak or pork chops - A fresh salad with lemon vinaigrette This asparagus dish is a great side for both light and hearty meals. Enjoy it with your favorite proteins for a tasty dinner. In this blog post, we covered how to make Garlic Parmesan Air Fryer Asparagus. You learned about the main ingredients, cooking steps, and tips for great flavor. I shared optional variations and storage tips to help you enjoy this dish longer. Remember, experiment with different methods and seasonings to suit your taste. Incorporating asparagus into your meals can boost health and flavor. With these steps and ideas, you can create a delicious dish every time. Enjoy your cooking adventure!
                        Garlic Parmesan Air Fryer Asparagus Simple Delight

                      Leave a Reply Cancel reply

                      Your email address will not be published. Required fields are marked *

                      Recipe Rating


                      Hi I’m Taling

                      I love sharing perfected dishes from my kitchen. I’m sure they’ll earn a spot in your heart. Let’s savor this journey together!.

                      More about me

                      Recent Desserts

                      • - 1 ½ cups all-purpose flour - 1 tablespoon cocoa powder - ½ teaspoon baking powder - ½ teaspoon baking soda - ¼ teaspoon salt - ½ cup unsalted butter, softened - 1 cup granulated sugar - 1 large egg - 1 teaspoon vanilla extract - 1 tablespoon red food coloring - ½ cup powdered sugar (for dusting) For all-purpose flour, you can use cake flour for a softer cookie. If you want a gluten-free option, try almond flour or a gluten-free blend. Instead of unsalted butter, you can use margarine. Just keep in mind that it may change the taste slightly. You might replace granulated sugar with coconut sugar for a different sweetness. Make sure to adjust amounts based on what you like. You can add white chocolate chips or chopped nuts for extra texture. Crushed peppermint candies are great for a holiday twist. If you love cream cheese, consider making a cream cheese frosting drizzle. Just mix cream cheese, butter, and powdered sugar until smooth, then drizzle it over the cookies. To start, preheat your oven to 350°F (175°C). Line two baking sheets with parchment paper. This helps cookies bake evenly. In a medium bowl, sift together the flour, cocoa powder, baking powder, baking soda, and salt. This mix is key for texture. Set this bowl aside. In a large bowl, cream the softened butter and granulated sugar. Use an electric mixer for 2-3 minutes. You want it light and fluffy. Next, beat in one large egg, one teaspoon of vanilla extract, and one tablespoon of red food coloring. Mix until everything is smooth and the color is bright. Gradually add your dry ingredients to the wet mix. Stir until just combined. Be careful not to overmix. Chill the dough in the refrigerator for at least 30 minutes. This makes it easier to handle when forming cookies. After chilling, take the dough out. Use a cookie scoop or tablespoon to scoop out the dough. Form each scoop into a ball. Then, roll each ball in powdered sugar. Make sure they are fully coated. This will create that crinkle look when baked. Place the cookie dough balls on the prepared baking sheets. Leave enough space between each ball for spreading. Now it’s time to bake! Put the baking sheets in the oven. Bake for 10-12 minutes. The edges should be set, but the centers will look slightly underbaked. This gives the cookies a soft texture. Once done, take them out and let the cookies cool on the sheets for 5 minutes. After that, transfer them to a wire rack to cool completely. Enjoy your beautiful, tasty Red Velvet Crinkle Cookies! To get the best texture for your red velvet crinkle cookies, follow these steps: - Use softened butter, not melted. Softened butter helps create a light and fluffy mix. - Chill your dough for at least 30 minutes. Cold dough makes it easier to shape. - Don’t overmix the dough. Mix until just combined for soft, tender cookies. Here are some common mistakes to avoid when baking: - Forgetting to preheat your oven can lead to uneven baking. Always preheat first. - Not measuring flour correctly can make cookies dry. Use a spoon to scoop, then level. - Baking cookies too long makes them hard. Watch the edges; they should be set, but centers can look soft. Having the right tools makes baking fun and easy: - Use a good electric mixer for creaming butter and sugar. - A cookie scoop helps shape uniform cookie balls. - Parchment paper prevents sticking and makes cleanup easy. - A wire rack cools cookies evenly, keeping them soft. {{image_2}} You can easily change the flavor of your Red Velvet Crinkle Cookies. Want a hint of chocolate? Add more cocoa powder. Craving something fruity? Toss in some dried cherries or raspberries. You can also add a teaspoon of almond extract for a nutty twist. These small changes make a big impact on taste. Red velvet is classic, but you can switch up the color for fun. Use blue or green food coloring for a unique look. This works well for themed parties or holidays. For Halloween, try orange or purple! These colors can match your event and make the cookies even more special. If you need a gluten-free option, swap the all-purpose flour with a gluten-free blend. Make sure the blend has xanthan gum for the best texture. For a vegan version, replace the butter with coconut oil and the egg with a flax egg (1 tablespoon of ground flaxseed mixed with 2.5 tablespoons of water). These adjustments keep the cookies tasty while fitting your dietary needs. To keep your Red Velvet Crinkle Cookies fresh, store them in an airtight container. Line the container with parchment paper. This helps to absorb moisture. Place a layer of cookies, then add more parchment paper between layers. This keeps them from sticking together. You can also use a zip-top bag if you don’t have a container. Just remove as much air as possible before sealing. Freezing your cookies is a great way to save them for later. First, let the cookies cool completely. Then, place them in a single layer on a baking sheet. Freeze for about an hour. Once frozen, transfer them to an airtight container or a zip-top bag. This helps to keep the cookies from getting freezer burn. They can last in the freezer for up to three months. When ready to eat, let them thaw at room temperature. Red Velvet Crinkle Cookies stay fresh for about five days at room temperature. If stored correctly in an airtight container, they can last even longer. You can also refrigerate them to extend their shelf life. In the fridge, they can stay good for about a week. Always check for any signs of spoilage before eating. Enjoy these tasty treats while they are fresh! You can use beet juice for a natural option. It gives a nice red hue. Pomegranate juice works too but may change the cookie's taste. If you want, you can skip the coloring. The cookies will still taste great! Look for edges that are set. The centers should look a bit soft. A slight shine means they are ready. They will firm up as they cool. Trust your eyes, but a timer helps too! Yes, you can! Chill the dough and store it in the fridge. It lasts for up to three days. You can also freeze it for up to three months. Just thaw before baking for best results. These cookies pair nicely with milk or coffee. Try them with vanilla ice cream for a treat! You can also serve them at parties with other sweets. They add a fun splash of color to any dessert table. To sum up, we explored the essential ingredients, detailed steps, and handy tips for perfect Red Velvet Crinkle Cookies. Remember to measure your ingredients carefully and consider great mix-ins. Avoid common mistakes for the best texture. You can also try fun variations or make them gluten-free. Store your cookies properly to enjoy longer. These easy steps will help you bake delicious cookies every time. Now, it's time to make your baking dreams a reality!
                        Red Velvet Crinkle Cookies Irresistible and Tasty Treat
                      • - 3 ripe bananas, mashed - ⅓ cup melted butter - ½ cup granulated sugar - 1 large egg, beaten - 1 teaspoon vanilla extract - 1 teaspoon baking soda - A pinch of salt - 1 cup all-purpose flour - ½ cup Nutella (or chocolate hazelnut spread) - ½ cup chopped walnuts (optional) - Alternatives for bananas: You can use unsweetened applesauce. This adds moisture and sweetness. - Gluten-free options for flour: Try using almond flour or a gluten-free blend. Both work well. - Nutella substitutes: Use any chocolate hazelnut spread or even peanut butter for a twist. - Ripe bananas for sweetness: The riper the bananas, the sweeter the bread. Look for brown spots. - Choosing the right chocolate spread: A high-quality chocolate spread adds rich flavor. It makes your bread extra special. First, set your oven to 350°F (175°C). This helps the bread bake evenly. While the oven heats up, grab a 9x5 inch loaf pan. Grease it well with butter or baking spray. This prevents the bread from sticking and makes for easy removal later. In a big bowl, take your three ripe bananas and mash them. You want them smooth and creamy. Next, pour in ⅓ cup of melted butter. Mix them together until combined. Now, add ½ cup of granulated sugar, one beaten egg, and 1 teaspoon of vanilla extract. Stir this mixture well. You want all the ingredients to blend nicely. Now, sprinkle 1 teaspoon of baking soda and a pinch of salt over the wet mix. Stir just until combined. Do not overmix! Next, gently fold in 1 cup of all-purpose flour. Keep folding until you see no dry flour. If you like nuts, mix in ½ cup of chopped walnuts at this point. Pour half of the banana batter into your greased loaf pan. Next, take ½ cup of Nutella and spoon dollops over the batter. Use a knife or skewer to swirl the Nutella gently into the batter. Be careful not to mix it too much! Pour the rest of the banana batter on top. Again, add dollops of Nutella and swirl gently. This creates that beautiful marbled look. Now, it's time to bake! Place the loaf pan in the preheated oven. Bake for about 50-60 minutes. To check if it’s done, insert a toothpick into the center. If it comes out clean, your bread is ready. Let it cool in the pan for 10 minutes before moving it to a wire rack to cool completely. Enjoy your delicious creation! To get the best texture, mash your bananas well. They should be smooth, with no lumps. The right consistency helps the bread rise nicely. When mixing the batter, stop as soon as you no longer see dry flour. Overmixing can make the bread tough. One big mistake is using unripe bananas. Ripe bananas are sweeter and add moisture. They should have brown spots for the best flavor. Also, pay close attention to baking time. Overbaking dries out the bread, while underbaking leaves it gooey. Always check with a toothpick. This bread is delicious plain, but you can make it even better. Serve it warm with a pat of butter. For a treat, add a scoop of ice cream on top. Pair it with coffee or a glass of milk for a perfect snack. Enjoy it at breakfast or as a dessert! {{image_2}} You can enhance your Banana Nutella Swirl Bread with spices. Adding cinnamon or nutmeg gives a warm touch. These spices blend well with the banana and chocolate flavors. You can start with a half teaspoon of each. This small change can make a big difference. You can also experiment with different nuts. While walnuts are classic, try pecans or hazelnuts. Each nut adds a unique taste and texture to the bread. Toasting the nuts first can boost their flavor. Just remember to chop them coarsely for great bites. If you're looking for vegan options, I have some ideas. Swap the egg for a flaxseed or chia seed mixture. Combine one tablespoon of seeds with three tablespoons of water and let it sit for five minutes. Use this as a perfect egg substitute. For a low-sugar version, try using mashed dates or applesauce. These natural sweeteners work well in banana bread. You can also reduce the granulated sugar by half. This way, you keep the bread sweet but healthier. Many cultures have their own takes on banana bread. For instance, in Brazil, they often add coconut flakes. This gives a tropical twist that pairs well with chocolate. You can also try adding spices from your region. Incorporating local ingredients can make your bread unique. If you have access to local nuts or fruits, use them. This not only supports local farmers but adds personal flair to your baking. Each bite can tell a story of where you're from. To keep your Banana Nutella Swirl Bread fresh, store it at room temperature. Use a sealed container or a plastic bag. This helps to keep the bread soft. Avoid direct sunlight and heat sources. For best results, wrap the bread in plastic wrap before placing it in the container. This extra layer keeps moisture in. If you want to freeze your bread, slice it first. Place each slice in a freezer bag, removing as much air as possible. This prevents freezer burn and keeps the bread tasty. You can freeze the slices for up to three months. When you're ready to eat, thaw the slices at room temperature or warm them in the toaster. This method revives the flavor and texture. At room temperature, the bread lasts about three days. After that, it may start to dry out. Look for a few signs that the bread has gone bad. If you see mold or notice an off smell, it’s best to toss it. Freshness is key to enjoying this treat. Yes, you can use frozen bananas! Just thaw them first. Frozen bananas work great in baking. They become mushy, which helps mix easily. You can mash them right after thawing. This adds natural sweetness to your bread. Remember to drain any excess liquid before mixing. To check if the bread is done, use a toothpick. Insert it into the center of the bread. If it comes out clean, the bread is ready. Look for a golden-brown color on top. The edges may pull away from the pan slightly. This means your bread is baked perfectly! There are many fun ways to use leftover Nutella! You can spread it on toast or pancakes. Add it to smoothies for a chocolaty twist. Use it as a dip for fruits like strawberries or apples. You can also swirl it into yogurt or oatmeal for extra flavor. You now have a complete guide to making Banana Nutella Swirl Bread. We covered key ingredients, simple instructions, and tips to avoid mistakes. You learned about ingredient substitutions and the importance of quality. Plus, we discussed variations to make this recipe your own. Remember, the best results come from ripe bananas and careful baking. Enjoy every slice, and feel free to experiment with flavors! Happy baking!
                        Delicious Banana Nutella Swirl Bread Easy Recipe
                      • - 2 cups old-fashioned rolled oats - 1 cup sliced almonds - ½ cup honey or maple syrup - ¼ cup coconut oil, melted - 1 teaspoon pure vanilla extract - ½ teaspoon cinnamon - ¼ teaspoon sea salt The main ingredients create a great base for your granola clusters. Old-fashioned rolled oats give you texture and fiber. Sliced almonds add crunch and protein. Honey or maple syrup provides natural sweetness. Coconut oil helps bind the granola and gives it a nice flavor. Vanilla extract adds a warm aroma. Cinnamon and sea salt enhance the taste, making it irresistible. - ½ cup dried fruit (e.g., cranberries or cherries) Adding dried fruit is optional but can enhance your granola. Dried cranberries or cherries bring a chewy texture. They also add a burst of flavor that contrasts nicely with the crunchy clusters. Feel free to mix in your favorite dried fruit to make it your own! - Benefits of oats and almonds - Natural sweeteners vs. processed sugars Oats are a fantastic source of fiber. They help keep you full and support heart health. Almonds provide healthy fats and protein. They are great for your skin and heart. Using honey or maple syrup makes the granola healthier than using processed sugars. Natural sweeteners offer flavor without the crash. This granola is a smart choice for breakfast or snacks! First, preheat your oven to 325°F (165°C). This helps your granola cook evenly. Next, line your baking sheet with parchment paper. This will make cleanup easy and prevent sticking. In a large mixing bowl, combine the rolled oats, sliced almonds, cinnamon, and sea salt. I like to stir these ingredients well to mix the flavors. This step is key for a tasty granola. In a separate bowl, whisk together the melted coconut oil, honey or maple syrup, and vanilla extract. This mixture brings sweetness and flavor. Make sure it is fully combined to coat the oats well. Now, pour the wet mixture over the dry ingredients. Stir gently but thoroughly to ensure even coating. Every oat should feel the love of the sweet mixture! Transfer the mixture to your prepared baking sheet. Press it down firmly with a spatula. This step is crucial for making clusters. Bake in the preheated oven for 20-25 minutes. Stir halfway through to ensure even baking. Look for a golden brown color. Once baked, allow the granola to cool completely on the baking sheet. This cooling time helps the granola harden and form clusters. After it cools, break the granola into clusters. If you like, mix in any dried fruit at this stage for extra flavor. Enjoy your crunchy and delicious snack! To get those perfect granola clusters, you must press the mixture down firmly. This step helps the granola stick together as it bakes. Use a spatula to compact the mix into an even layer on the baking sheet. This creates a solid base for your clusters. Also, bake at the right temperature, which is 325°F (165°C). This temperature ensures that the granola cooks evenly and gets that lovely golden color. You can easily change the flavor of your granola. Try adding spices like nutmeg or cardamom for a warm touch. You can also use different nuts or seeds. Swap sliced almonds for walnuts or pecans. This switch adds a unique crunch and flavor. You could even add seeds like pumpkin or sunflower for more texture. Presentation can make your granola even more appealing. Serve the clusters in mason jars or cute bowls. This adds a fun touch to your breakfast or snack. Drizzle with honey or almond butter for extra sweetness. A sprinkle of sliced almonds on top makes it look even better. Enjoy your beautiful and tasty creation! {{image_2}} If you need a nut-free option, try using seeds. Sunflower seeds or pumpkin seeds work great. They keep the crunch and add good flavor. Use them in the same amount as the sliced almonds. This way, you still get tasty granola clusters without nuts. You can mix things up! For a sweet twist, add chocolate chips to your granola. Chocolate chip vanilla almond granola clusters taste amazing. You can also try a maple pecan version. Just swap the almonds for pecans and add a splash of maple syrup. Both variations are sure to please. Get creative with seasonal flavors! In the fall, add dried cranberries or a sprinkle of pumpkin spice. This gives a warm, cozy taste. For summer, toss in some tropical fruits like dried mango or pineapple. It adds a fun, fruity vibe. Enjoy these variations to keep your granola exciting! Store your Vanilla Almond Granola Clusters in airtight containers. This keeps them fresh. Place the containers in a cool, dry spot. Avoid warm places to prevent moisture. When stored at room temperature, your granola lasts about two weeks. For longer storage, consider freezing it. Granola freezes well, and you can keep it for up to three months. Check the texture and smell of your granola. If it feels soft or chewy, it may be stale. A lack of aroma also means it’s time to toss it. Fresh granola should smell sweet and nutty. Homemade Vanilla Almond Granola Clusters last about two weeks when stored properly. Use an airtight container to keep them fresh. After two weeks, the granola may still be safe to eat but could lose its crunch. Yes, you can! Use certified gluten-free oats to make this recipe gluten-free. Many brands offer gluten-free oats, which are safe for those with gluten sensitivities. Granola clusters are great with yogurt or smoothie bowls. You can also sprinkle them on oatmeal or mix them into your favorite cereal. They add a nice crunch and flavor. To lower sugar, use less honey or maple syrup. You can also try unsweetened applesauce or mashed bananas. These options keep the flavor and texture while cutting back on sugar. Making Vanilla Almond Granola Clusters is easy and fun. You learned the main ingredients needed, like oats and almonds, and how to combine them. I shared tips for perfect clusters and fun variations to try. Storage methods keep your granola fresh longer. Homemade granola is tasty and healthier than store-bought. It’s a great snack or breakfast option. Enjoy making this recipe and customizing it to your taste!
                        Vanilla Almond Granola Clusters Crunchy and Delicious
                      • - 3 ripe peaches, peeled and pitted - 1 cup fresh raspberries Fresh fruits are the stars of this sorbet. Ripe peaches give it a sweet, juicy base. They should feel soft when you gently press them. Fresh raspberries add a tangy burst of flavor. Their bright color makes the sorbet look beautiful. - ½ cup granulated sugar - 1 cup water - 2 tablespoons lemon juice We use granulated sugar to sweeten the sorbet. It mixes well with the fruit and makes a simple syrup. Water helps the sugar dissolve easily. Lemon juice adds a bit of zing. It balances the sweetness and brings out the fruit's natural flavors. - A pinch of salt Salt is a secret ingredient here. It enhances the flavors and makes the sorbet taste better. Just a small pinch will do. It helps all the sweet and tart notes shine through. First, we make a simple syrup. In a medium saucepan, combine 1 cup of water with ½ cup of granulated sugar. Heat this over medium heat. Stir until the sugar dissolves completely. This usually takes just a few minutes. Once the sugar dissolves, remove the saucepan from the heat. Let the syrup cool to room temperature. This syrup will add sweetness to our sorbet. Now, we will prepare the fruit. Take 3 ripe peaches, peel them, and remove the pits. Then, rinse 1 cup of fresh raspberries. Place the peaches and raspberries in a blender or food processor. Blend them until the mixture is smooth. You want a creamy texture without any chunks. This will create the rich base for our sorbet. Next, we combine everything. Pour the cooled simple syrup into the blender with the fruit. Add 2 tablespoons of lemon juice and a pinch of salt. Blend again until all the ingredients mix well. Taste the mixture. If it needs more sweetness, add a little sugar or extra raspberries and blend again. Now, transfer this mixture into a shallow container. Place it in the freezer. Every 30 minutes, stir the mixture to break up any ice crystals. This will take about 4 hours. When it is fully frozen and smooth, it’s ready to serve. Use a scoop to dish it up into bowls. Enjoy your peach raspberry sorbet! To make your sorbet shine, you can adjust the sweetness. Taste the mix before freezing. If it's not sweet enough, add a bit more sugar. You can also use extra raspberries for a bolder flavor. Try mixing in other fruits for fun. You can use strawberries, blackberries, or even mango. Each fruit brings its own taste to the sorbet. This way, you can create many yummy flavors! To avoid ice crystals, stir the sorbet every 30 minutes while it freezes. This helps keep it smooth and creamy. If you skip this step, the sorbet may turn icy. Use a shallow container for freezing. A wider surface area helps the sorbet freeze faster and stay smooth. Glass or metal containers work best. They help cool the mixture evenly. For a lovely presentation, serve the sorbet in chilled bowls. This keeps it cold for longer. You might want to garnish it with fresh raspberries or mint leaves. This adds color and extra flavor to your dish. Another idea is to create a layered dessert. You can serve sorbet with yogurt or fresh fruit. This not only makes it pretty but also adds more taste and texture to enjoy! {{image_2}} You can switch out fruits for fun flavors. Try using seasonal fruits like strawberries or mangoes. They add a new twist to your sorbet. You can mix peaches with blackberries, too. Each fruit brings its own sweetness and taste. Adding herbs or spices can also change the flavor. A little mint can make your sorbet refreshing. You might like a hint of ginger for a spicy kick. Experimenting with different combinations keeps things exciting. If you want to cut down on sugar, try sugar substitutes. Agave syrup or honey can work well in this recipe. Just remember to adjust the amount since they are sweeter. This way, you can enjoy a tasty treat without all the sugar. For a dairy-free option, you can leave out any cream. This sorbet is already dairy-free, making it perfect for those with allergies. You can enjoy this cool treat without any worries. To keep your peach raspberry sorbet fresh, choose the right container. I recommend using a shallow, airtight container. This helps the sorbet freeze evenly. You can also use a glass or plastic container with a tight lid. Avoid metal containers, as they can cause freezer burns. When storing your sorbet, freeze it quickly. After you finish freezing it, press a piece of plastic wrap directly onto the surface. This helps keep out air and moisture. Always ensure the lid is on tight before placing it back in the freezer. Your peach raspberry sorbet can last up to two weeks in the freezer. After that, it may lose its flavor and texture. To enjoy it at its best, try to eat it within this time frame. Watch for signs of spoilage. If you see ice crystals forming on the surface, that means it is starting to lose quality. If the sorbet has an off smell or odd color, it's best to toss it. Always trust your senses when enjoying this tasty treat! You can make sorbet by freezing the mixture manually. First, blend your fruits, sugar, and water. Once mixed, pour it into a shallow dish. Place it in the freezer. Every 30 minutes, stir it with a fork. This breaks up ice and keeps it smooth. Repeat until it’s fully frozen, usually about 4 hours. Yes, you can use frozen fruit. Just make sure to thaw it a bit before blending. This helps with blending. You might need less sugar since frozen fruit can be sweeter. Taste the mixture and adjust as needed. To soften sorbet, take it out of the freezer a few minutes before serving. Let it sit at room temperature for 5 to 10 minutes. You can also scoop it and place it in the fridge for a short time. This helps it reach the right texture. Sorbet is often seen as a healthier option than ice cream. It usually has less fat since it doesn’t contain cream. Sorbet is made mainly from fruit and sugar. However, it can still have a lot of sugar. Always check labels if you buy it. Fresh fruit sorbet is a great way to enjoy sweet flavors with fewer calories. In summary, we covered how to make delightful sorbet using fresh fruits like peaches and raspberries. You learned about necessary ingredients like sugar and lemon juice, and how to blend them into a smooth mix. We also explored tips for enhancing flavor and achieving the perfect texture. Don’t forget to try different fruits or adjustments for your diet. With proper storage, your sorbet will last. Enjoy refreshing treats with this simple method! Create your unique flavors and share them with others.
                        Peach Raspberry Sorbet Refreshing Summer Treat

                      Recent Drinks

                      • To make a delicious Turmeric Golden Milk Latte, gather these simple ingredients: - 2 cups almond milk (or your preferred milk) - 1 teaspoon ground turmeric - ½ teaspoon ground ginger - ¼ teaspoon cinnamon - 1 tablespoon honey or maple syrup (adjust to taste) - Pinch of black pepper - ½ teaspoon vanilla extract - Optional: a sprinkle of nutmeg for garnish - Almond Milk: This milk is low in calories and rich in vitamins. It helps with heart health. - Turmeric: This spice has curcumin, known for its anti-inflammatory properties. It may help improve brain function. - Ginger: Ginger can help with digestion and nausea. It adds a nice warmth to the drink. - Cinnamon: This spice is rich in antioxidants. It may help lower blood sugar and improve heart health. - Honey or Maple Syrup: Both sweeteners can boost energy. They also provide antioxidants. - Black Pepper: This spice enhances turmeric absorption. It makes the drink more effective. - Vanilla Extract: It adds flavor and can help reduce stress. - Nutmeg: This spice is optional, but it adds warmth and a nice aroma. - Milk Options: You can use oat milk, soy milk, or coconut milk for different flavors. - Sweeteners: If you prefer, try agave syrup or stevia as sugar-free options. - Spices: Experiment with cardamom or cloves for added flavor. - Nutmeg: You can skip it if you don't like nutmeg, or use a touch of cocoa powder instead. 1. Start by taking a small saucepan. 2. Add 2 cups of almond milk to the pan. 3. Measure and add 1 teaspoon of ground turmeric. 4. Next, add ½ teaspoon of ground ginger. 5. Sprinkle in ¼ teaspoon of cinnamon. 6. Sweeten your drink with 1 tablespoon of honey or maple syrup. 7. Don't forget a pinch of black pepper for better absorption of turmeric. 8. Lastly, add ½ teaspoon of vanilla extract. 9. Whisk all the ingredients well in the pan. 10. Place the saucepan on medium heat. 11. Gently warm the mixture while stirring often. 12. Keep an eye on it; do not let it boil. 13. After about 5-7 minutes, it should be hot enough. 14. Remove the pan from heat and let it cool slightly. 15. If you want a frothy drink, use a milk frother or whisk it quickly. 16. Pour the golden milk into your favorite mugs. 17. Optionally, sprinkle a bit of nutmeg on top for a nice touch. 18. Serve warm and enjoy this comforting drink! - Always use a whisk to blend the spices into the milk. - Whisking helps mix the turmeric and other spices evenly. - When heating, keep the heat low to avoid scalding the milk. - Stir often to prevent sticking at the bottom of the pan. - If you see steam but no bubbles, you are at the right temperature. - A milk frother works wonders for a smooth, frothy finish. - If you don’t have a frother, whisk vigorously by hand. - Frothing adds air, giving the latte a creamy feel. - The more you froth, the lighter and fluffier your drink will become. - For an extra touch, froth some almond milk separately and top your latte with it. You can mix spices to make your turmeric latte tastier. Try adding a pinch of nutmeg or a dash of cardamom. These spices add warmth to the drink. You can also use fresh ginger instead of ground ginger. This will give your latte a bright, zesty kick. Just remember, fresh ginger may need more time to steep. Many people rush the heating process. Always warm your milk slowly over medium heat. If you boil it, the spices can lose flavor. Another mistake is not blending the spices well. Make sure to whisk the mixture thoroughly. This helps avoid clumps of turmeric or ginger. Lastly, avoid skipping the black pepper. It helps your body absorb turmeric better. Sweetness is personal. Start with one tablespoon of honey or maple syrup. Taste your latte and add more if you like it sweeter. For creaminess, use full-fat coconut milk for a richer feel. Almond milk is lighter but still delicious. You can also mix almond and coconut milk for the best of both worlds. {{image_2}} You can easily make this latte vegan. Just use almond milk, coconut milk, or oat milk. These milks work great in this recipe. They keep the drink creamy and delicious. If you want a nut-free option, oat milk is the best choice. It blends well with turmeric and spices. To make an iced version, start with brewed turmeric milk. Follow the same steps but let it cool. Pour over ice instead of serving warm. This drink is refreshing on hot days. You can also add some ice cream for a treat! You can mix and match flavors for fun. Try adding matcha for a green twist. This adds a fresh taste and boosts energy. You can also use cocoa for a chocolatey version. The cocoa pairs well with turmeric and spices. For a special touch, add a dash of vanilla extract. This enhances the overall flavor and aroma. To store leftover turmeric golden milk, let it cool first. Then, pour it into an airtight container. Keep it in the fridge for up to three days. This way, you can enjoy the drink again without losing its flavor. When reheating your golden milk, do it gently. Pour it into a small saucepan. Heat it over low to medium heat. Stir it often to avoid burning. Never let it boil, as this can change the taste and texture. You can also use a microwave. Heat in short bursts, stirring in between. Turmeric golden milk lasts about three days in the fridge. Check for signs of spoilage. If it smells sour or has any mold, discard it. Always trust your senses. If it looks or smells off, it’s best to throw it away. Turmeric has many health benefits. It is known for its bright yellow color and active compound called curcumin. Curcumin may help reduce inflammation. It can also support joint health. Some studies suggest it may boost your mood. Turmeric might even help with digestion. Drinking turmeric may also support your immune system. Yes, you can use any milk you like. Almond milk is great, but coconut milk adds creaminess. Oat milk is a good choice for a thicker texture. If you prefer dairy, whole or skim milk works too. Just remember, different types of milk will change the flavor a bit. To make this recipe sugar-free, skip the honey or maple syrup. You can use a sugar substitute like stevia or monk fruit instead. These options will give you sweetness without the calories. Just adjust the amount to your taste. Yes, it is safe for most people to have turmeric daily. Using it in cooking or drinks is a great way to enjoy its benefits. However, if you have health issues or take certain medications, check with a doctor first. Moderation is key, as with any food. In this blog post, we explored the ingredients and health benefits of Turmeric Golden Milk. I shared step-by-step instructions for making it frothy and delicious. We also discovered tips, tricks, and variations to enhance your drink. Proper storage and reheating advice can help you enjoy leftovers. Remember, turmeric offers many health benefits, so enjoy this drink often. Use alternative ingredients if you prefer. With these ideas, you can create the perfect golden milk to suit your taste and health needs. Enjoy your journey to wellness!
                        Turmeric Golden Milk Latte Simple and Creamy Recipe
                      • - 1 ripe mango, peeled and diced - 1 cup fresh pineapple chunks - 1 banana, sliced - 1 cup coconut water (or regular water) - ½ cup plain Greek yogurt (or dairy-free alternative) - 1 tablespoon honey or agave syrup (optional) - A handful of fresh mint leaves (for garnish) - Ice cubes (optional) The key to a delicious mango pineapple smoothie lies in its fresh ingredients. You want ripe fruits for the best flavor. The mango should feel soft when you squeeze it gently. Pineapples should smell sweet and fruity. This smoothie combines sweet mango, tangy pineapple, and creamy banana. Coconut water adds hydration, while Greek yogurt gives it a nice creaminess. You can add honey for extra sweetness if you like. Mint leaves add a refreshing touch when you serve it. Each ingredient plays a role in making this smoothie flavorful and refreshing. Trust me, using fresh ingredients will make a big difference in taste! To make this smoothie, start by gathering your main ingredients. You need a ripe mango, fresh pineapple, and a banana. 1. In a blender, combine the diced mango, pineapple chunks, and banana slices. This mix brings a burst of tropical flavor. 2. Next, add one cup of coconut water to the blender. This not only hydrates but also adds a refreshing twist. 3. For creaminess, pour in half a cup of plain Greek yogurt. If you want it sweeter, drizzle in one tablespoon of honey or agave syrup. 4. Blend on high until the mixture is smooth and creamy. If you like your smoothie chilled, toss in a few ice cubes and blend again until they are fully mixed in. 5. After blending, taste your smoothie. If it needs to be sweeter or thicker, add more honey or coconut water as needed. Once your smoothie is ready, it’s time to serve it. I recommend using tall glasses to show off the vibrant color. For a fun touch, garnish each glass with a few fresh mint leaves on top. This not only looks nice but also adds a fresh aroma. Enjoy your delicious Mango Pineapple Smoothie! For the Full Recipe, please refer back to the ingredient list and instructions. To get your smoothie just right, focus on creaminess. Use ripe fruits like mango and banana. The Greek yogurt adds a nice, smooth texture. If you want a richer taste, try full-fat yogurt. For a lighter feel, use low-fat or dairy-free yogurt. Adjust the thickness by adding more liquid. Coconut water is great for this. If your smoothie is too thick, just pour in a bit more. Blend again until it’s just how you like it. If you want a thicker smoothie, add more banana or ice cubes. Boosting flavor can take your smoothie to the next level. Try adding spices like cinnamon or ginger. These spices not only add warmth but also great health benefits. A dash of cinnamon can make the smoothie taste cozy. A pinch of ginger gives it a nice kick. You can also use flavored yogurts for extra taste. Vanilla or coconut yogurt work well. If you want sweetness, think about honey or agave syrup. These can make your smoothie more enjoyable. For a fun twist, try adding a splash of vanilla extract. It will add a lovely aroma to your drink. For a full taste experience, explore the [Full Recipe]. {{image_2}} You can change the fruit in your smoothie to keep it fresh. Adding strawberries or blueberries gives a sweet twist. These berries add a nice color and taste. You can also try using other tropical fruits like papaya or kiwi. These fruits bring new flavors and nutrients to your drink. Each fruit will change the smoothie’s taste and make it unique. If you want a dairy-free smoothie, swap the Greek yogurt for a plant-based option. Almond, coconut, or soy yogurt works well. These alternatives keep your smoothie creamy without dairy. For sweeteners, you can use maple syrup or agave syrup for a vegan choice. These options add sweetness while keeping your drink plant-based. Enjoy the fruity goodness in many ways! Don't forget to check the Full Recipe for more ideas. You may have some smoothie left after making your Mango Pineapple Smoothie. To keep it fresh, use a glass jar or a BPA-free plastic container. Seal it tightly to prevent air from spoiling the flavor. Store it in the fridge for up to 24 hours. After that, it may lose some taste and texture. If you want to enjoy the smoothie later, freezing is a great option. Pour the smoothie into ice cube trays or freezer-safe bags. Leave some space in the bags for expansion. You can freeze it for up to three months. When you’re ready to drink it, take out what you need. Thaw it in the fridge overnight or blend it straight from the freezer for a slushy treat. Enjoy your refreshing Mango Pineapple Smoothie anytime! Yes, you can make this smoothie ahead of time. If you want to save it, store it in an airtight container. Keep it in the fridge for up to one day. The smoothie may separate, so stir it well before you drink it. If you don’t have coconut water, use regular water or fruit juice instead. Fruit juice can add a nice flavor. You can also try almond milk for a creamier touch. Just remember, the taste will change a bit based on what you use. To make the smoothie thicker, add more Greek yogurt or a banana. You can also use frozen fruit instead of fresh. Frozen fruit gives you a nice, thick texture. Just blend it well, and you’ll get a creamy drink. Yes, this smoothie is great for kids! It is packed with fruits and tastes sweet. You can adjust the sweetness by adding less honey. The bright colors and fresh flavors will appeal to children, making it a fun treat. You can find the Full Recipe for the Tropical Bliss Mango Pineapple Smoothie above in this article. This will guide you through every step to create your own refreshing drink. This blog post covers a simple and tasty smoothie recipe. You learned about the key ingredients and their nutritional benefits. I provided steps to prepare and serve the smoothie perfectly. Tips for texture and flavor help you make it your own. You can explore variations to suit your tastes or dietary needs. Don’t forget storage tips to keep leftovers fresh. Enjoy your smoothie making journey. It’s all about trying new things and having fun!
                        Mango Pineapple Smoothie Refreshing and Flavorful Blend
                      • - 2 packets of frozen açaí puree - 1 ripe banana - 1 cup of fresh pineapple chunks - 1 cup of coconut milk (or any non-dairy milk) - 1 tablespoon of honey or agave syrup (optional) For a vibrant tropical taste, the main ingredients are key. Açaí puree brings rich color and flavor. It is full of antioxidants. Bananas add creaminess and natural sweetness. Fresh pineapple gives a bright, juicy touch. Coconut milk offers a smooth base. You can use any non-dairy milk you prefer. Honey or agave syrup adds sweetness if needed. - Sliced kiwi - Coconut flakes - Granola - Chia seeds - Fresh berries (e.g., strawberries, blueberries) Toppings make your smoothie bowl pop! Sliced kiwi adds a zesty kick. Coconut flakes give it a tropical crunch. Granola provides texture and flavor. Chia seeds offer extra nutrients. Fresh berries, like strawberries and blueberries, add color and taste. You can mix and match these toppings for a fun look. For the full recipe, please refer to the section above. 1. Blend the ingredients Start by adding the frozen açaí puree, ripe banana, fresh pineapple chunks, and coconut milk into a blender. If you want it sweeter, you can add honey or agave syrup. Blend this mixture on high speed until it becomes creamy and smooth. 2. Adjust consistency with coconut milk If your smoothie is too thick, just add a bit more coconut milk. Blend again until you reach the texture you want. This step is key to making your smoothie bowl enjoyable. 3. Pour into a bowl Once blended, carefully pour the smoothie mixture into a bowl. Make sure to use a large enough bowl to hold all the goodness. 4. Add toppings creatively Now comes the fun part! Arrange your toppings, such as sliced kiwi, coconut flakes, granola, chia seeds, and fresh berries, over the smoothie. Try to create a colorful pattern. I love making a circular design to highlight all the vibrant colors. - Tips for presentation Use a shallow bowl to show off your beautiful toppings. You can also sprinkle some extra coconut flakes around the edge for a nice touch. A colorful presentation makes your smoothie bowl more fun to eat. - Recommended serving utensils Serve your smoothie bowl with a regular spoon. If you want to make it more special, use a wooden spoon or a cute, colorful one. Enjoy your tropical treat right away to keep it fresh and tasty. For the full recipe, refer to the earlier sections. To make a great smoothie bowl, start with ripe fruits. Ripe fruits taste better and add natural sweetness. Look for bananas that are yellow with some brown spots. When it comes to pineapples, choose ones that smell sweet. It ensures they are juicy and fresh. Blending is key to your smoothie bowl. You want a smooth and creamy texture. If your mix is too thick, add more coconut milk. Blend again until you reach the right consistency. A good blend makes your bowl enjoyable and easy to eat. A colorful topping arrangement makes your smoothie bowl pop. Use fresh berries, sliced kiwi, and coconut flakes. Lay them out in a pattern. A circular design looks appealing and fun. To elevate your smoothie bowl's look, use bowls with interesting shapes. Tall bowls or wide, shallow ones can change the game. Garnish with a sprinkle of chia seeds for a fancy touch. This not only looks great but adds a bit of crunch too. {{image_2}} You can change the non-dairy milk for this smoothie. Almond, soy, or oat milk work well. Each milk adds a different taste. Try using seasonal fruits too. Mango, papaya, or berries add a fresh twist. You can mix and match to find your favorite blend. Want more nutrients? Add spinach or kale to your smoothie. They blend well and boost health. You won’t even taste them! For extra energy, stir in nut butter or protein powder. Both will make your smoothie more filling. They add great flavor too! You can also experiment with different combinations to find the best taste for you. To store leftovers, place your smoothie bowl in the fridge. Use a tight container to keep it fresh. Glass or BPA-free plastic works well for storage. I prefer glass because it keeps flavors better. You can freeze smoothie bowls for later. Just pour the mixture into an airtight container. Leave some space at the top, as it will expand when frozen. To defrost, place it in the fridge overnight. If you’re in a rush, you can use the microwave. Just heat it in short bursts to avoid cooking. Enjoy your tropical treat later with ease! For the recipe, check out the Full Recipe. What is açaí and what are its benefits? Açaí is a small, dark purple berry from Brazil. It is full of antioxidants, which help fight free radicals in the body. Açaí is also rich in fiber, promoting good digestion. Plus, it has healthy fats that support heart health. You can enjoy its fruity taste in many dishes. Can I make this smoothie bowl ahead of time? Yes! You can prepare the smoothie mix and store it in the fridge for up to 24 hours. Just remember to keep the toppings separate. This way, your bowl stays fresh and tasty. How can I make this recipe vegan or gluten-free? To make it vegan, use agave syrup instead of honey. For gluten-free, ensure your granola and any other toppings are gluten-free. Most fruits and coconut milk are naturally gluten-free, so you’re all set! Can I substitute açaí with other fruits? Yes, you can! If you can’t find açaí, try using frozen berries like blueberries or strawberries. These fruits will add sweetness and a burst of color to your bowl. What to do if the smoothie is too thick? If your smoothie is too thick, just add a little more coconut milk. Blend again until you reach your desired creaminess. This will make it easier to pour and enjoy. How to fix a smoothie bowl that tastes too bland? If your smoothie bowl lacks flavor, try adding a splash of vanilla extract or a pinch of salt. You can also mix in a bit of honey or agave syrup for sweetness. Adjust the toppings to add more taste and texture. This article covers how to make a delicious açaí smoothie bowl. You learned about the key ingredients, easy steps for preparation, and creative topping ideas. I shared tips to improve taste and presentation, plus fun variations to try. Don’t forget storage techniques to keep your bowl fresh. With all this information, you can enjoy a tasty and nutritious treat anytime. Get creative with your favorites and make this recipe truly yours. Enjoy every bite!
                        Tropical Acai Smoothie Bowl Energizing Healthy Treat
                      • - 1 cup plain yogurt - ½ cup coconut milk - 1 cup fresh blueberries (plus extra for garnish) - 2 tablespoons honey or agave syrup (adjust to taste) - ½ teaspoon vanilla extract - A pinch of cardamom powder - Ice cubes (optional) Using fresh ingredients makes a big difference in taste. Fresh blueberries burst with flavor and nutrients. They give the lassi a bright color and a sweet taste. If you can’t find fresh blueberries, frozen ones work too. They are picked at their peak and frozen quickly. This helps keep their taste and nutrients. However, fresh blueberries always add a better texture. Each ingredient in this lassi has great health benefits. - Plain yogurt: Full of protein and good for your gut health. - Coconut milk: Contains healthy fats that can boost energy. - Blueberries: Packed with antioxidants, they help fight disease. - Honey or agave syrup: Adds sweetness and has some vitamins. - Vanilla extract: Adds flavor and may reduce stress. - Cardamom powder: Can aid digestion and add a warm spice note. This Blueberry Coconut Lassi is not just tasty; it’s also good for you! Start by gathering all your ingredients. This makes the process easier and faster. You will need: - 1 cup plain yogurt - ½ cup coconut milk - 1 cup fresh blueberries (plus extra for garnish) - 2 tablespoons honey or agave syrup (adjust to taste) - ½ teaspoon vanilla extract - A pinch of cardamom powder - Ice cubes (optional) Make sure your blueberries are fresh and ripe. They add great flavor and color. If you want a sweeter lassi, adjust the honey or agave syrup to your taste. Now it’s time to blend! In a blender, combine the yogurt, coconut milk, blueberries, honey, vanilla extract, and cardamom powder. Blend on high speed until the mix is smooth and creamy. If you like a thinner drink, add more coconut milk. After blending, taste the lassi. You can add more honey if you want it sweeter. For a chilled treat, add ice cubes and blend again until frothy. Pour your lassi into tall, clear glasses. This shows off the pretty purple color. For a special touch, garnish with a few whole blueberries on top. You can also sprinkle a little cardamom powder for added flair. If you want to impress, add a slice of lime on the glass rim. This not only looks good but adds a nice contrast to the drink. Enjoy your refreshing Blueberry Coconut Lassi! For the full recipe, check the earlier section. For a thick and creamy lassi, use full-fat yogurt. This gives your drink a rich texture. If you want it thinner, add a bit more coconut milk. Blend it well until it's smooth. You can also try adding ice cubes. This makes it frothy and cold. Both honey and agave syrup are great for sweetness. Honey gives a floral taste, while agave is mild. Start with two tablespoons and taste it. If you want it sweeter, add more. Remember, you can always add more, but you can't take it out! You can make your lassi even better! Try adding a pinch of cinnamon or nutmeg for warmth. Fresh mint leaves can add a nice touch too. You might even add a splash of lime juice for a zesty kick. All these extras can make your blueberry coconut lassi unique and delicious. For the full recipe, check out the complete instructions. {{image_2}} You can easily make a vegan version of blueberry coconut lassi. Just swap the yogurt with a plant-based option. Use coconut yogurt or almond yogurt for a creamy base. These alternatives keep that rich flavor. They also add a nice texture. You still get the fresh taste from blueberries and coconut milk. This change makes the drink creamy without any dairy. Spices can enhance the flavor of your lassi. Cardamom adds a warm note. You can also try cinnamon for a sweet twist. If you want more fruit, think about adding bananas or mangoes. These fruits blend well with blueberries. They also boost the health benefits. Each adds its own flavor and richness to the drink. If you prefer different dairy options, there are many choices. Greek yogurt gives a thicker texture. It also adds a tangy taste. You can use regular yogurt instead of plain yogurt. It is a great way to change the flavor. Try using buttermilk for a unique twist. Each choice will change the texture and taste of your lassi. Each option keeps the drink creamy and delicious. For the full recipe, check out the link above. To keep your blueberry coconut lassi fresh, store it in a clean glass jar. Make sure the jar is airtight. This helps keep out air and bacteria. If you have leftovers, don’t let them sit out for long. Refrigerate the lassi within two hours of making it. Always use a spoon to scoop the lassi. Avoid using your fingers, as this can introduce germs. When stored properly, blueberry coconut lassi lasts about 2 to 3 days in the fridge. After that, the taste and texture may change. You will notice it may separate a bit. If this happens, just give it a good shake or blend it again. Always check for any off smells or changes in color before consuming. You can freeze blueberry coconut lassi for later enjoyment. Pour the lassi into ice cube trays or freezer-safe containers. Leave some space at the top, as liquids expand when frozen. To use, thaw the lassi in the fridge overnight or blend the frozen cubes into smoothies. This method keeps the flavor and nutrients intact. For the best taste, use frozen lassi within three months. For the full recipe, check out the earlier section! Yes, you can use Greek yogurt. It makes the lassi thicker and creamier. If you prefer a lighter drink, stick with plain yogurt. Greek yogurt has more protein, which is great for keeping you full. Just remember to adjust the coconut milk to balance the thickness. Absolutely! Blueberry Coconut Lassi is a fun and tasty drink for kids. It has natural sweetness from honey and blueberries. The yogurt provides healthy probiotics, good for digestion. Kids love the vibrant color and fruity flavor. You can make it as sweet as they like! You can find Blueberry Coconut Lassi at many health food stores or cafes. Some grocery stores may also carry it in the yogurt section. If you want a fresh one, try making it at home. You can easily whip up this drink with the Full Recipe I provided. Blueberry coconut lassi is a nutritious and tasty drink. You learned about key ingredients, like fresh blueberries and coconut. The blending process ensures a smooth drink. Adjust sweetness with honey or agave for your taste. You can try different fruits and spices to mix it up. Storing tips help you keep leftovers fresh. Remember, lassi is fun to make and enjoy. Experiment with variations to find your favorite way to drink it. Enjoy your delicious and healthy blueberry coconut lassi!
                        Blueberry Coconut Lassi Creamy and Refreshing Drink

                      Footer

                      ↑ back to top

                      More information

                      • Home
                      • Drinks
                      • Appetizer
                      • Dinner
                      • Desserts
                      • About
                      • Contact
                      • Privacy Policy

                      Our Policies

                      • Privacy Policy
                      • GDPR Policy
                      • Terms Of Use
                      • Copyright Policy
                      • Cookie Policy
                      • Disclaimer

                      Copyright © 2025 cheftaling