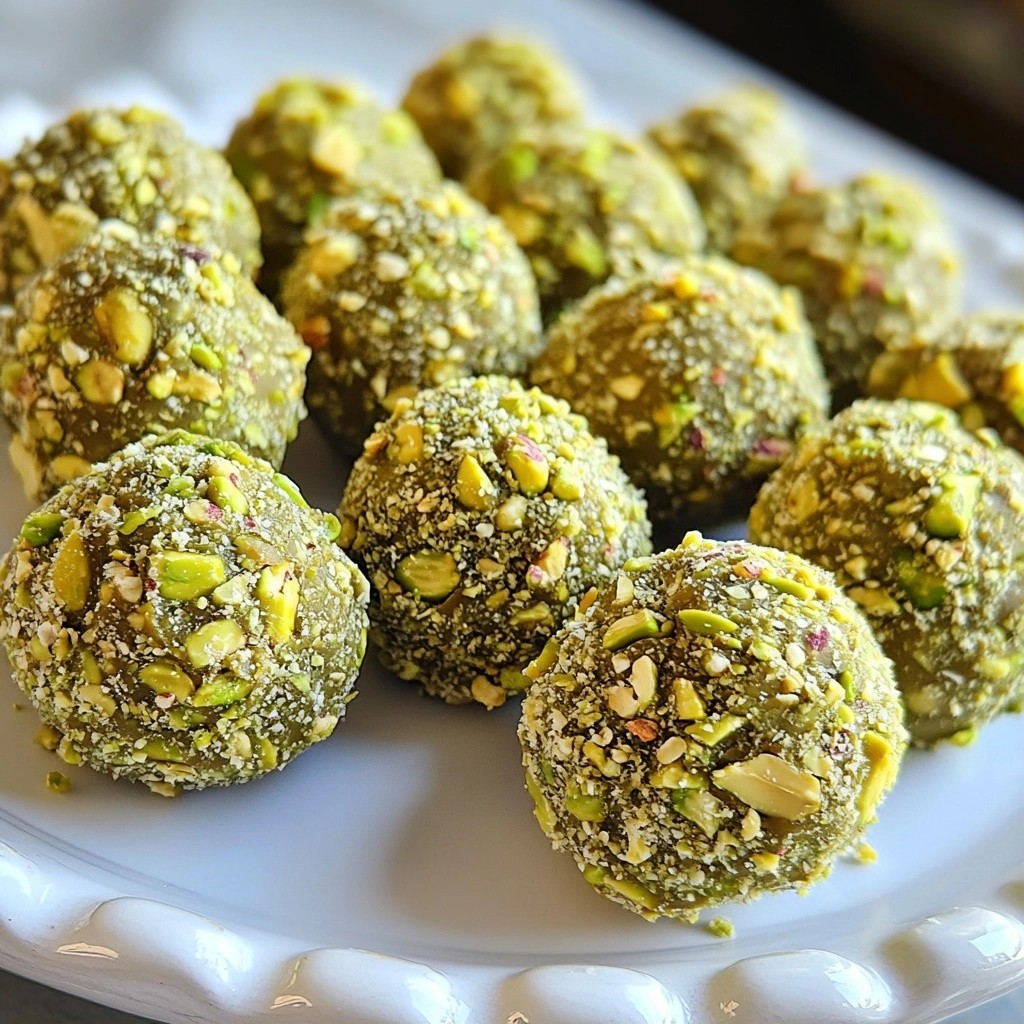
Indulge in the rich flavors of Creamy Pistachio Chocolate Truffles with Smooth Centers. These delightful treats blend crunchy pistachios with silky chocolate, creating a bite-sized dessert that’s sure to impress. Whether you're a novice or a skilled baker, my step-by-step guide will help you make these truffles effortlessly. Get ready to treat yourself and your loved ones with a sweet delight that’s perfect for any occasion!
Why I Love This Recipe
- Unique Flavor Combination: These truffles combine the rich creaminess of chocolate with the nutty crunch of pistachios, creating a delightful and unexpected flavor profile.
- Simple Ingredients: With just a handful of ingredients, these truffles are easy to make without any complicated techniques or equipment.
- Perfect for Gifting: These elegant truffles make a wonderful homemade gift for friends and family, beautifully packaged in a decorative box.
- Customizable Coating: You can experiment with different coatings like coconut flakes or crushed nuts, making each batch unique and personal.
Ingredients
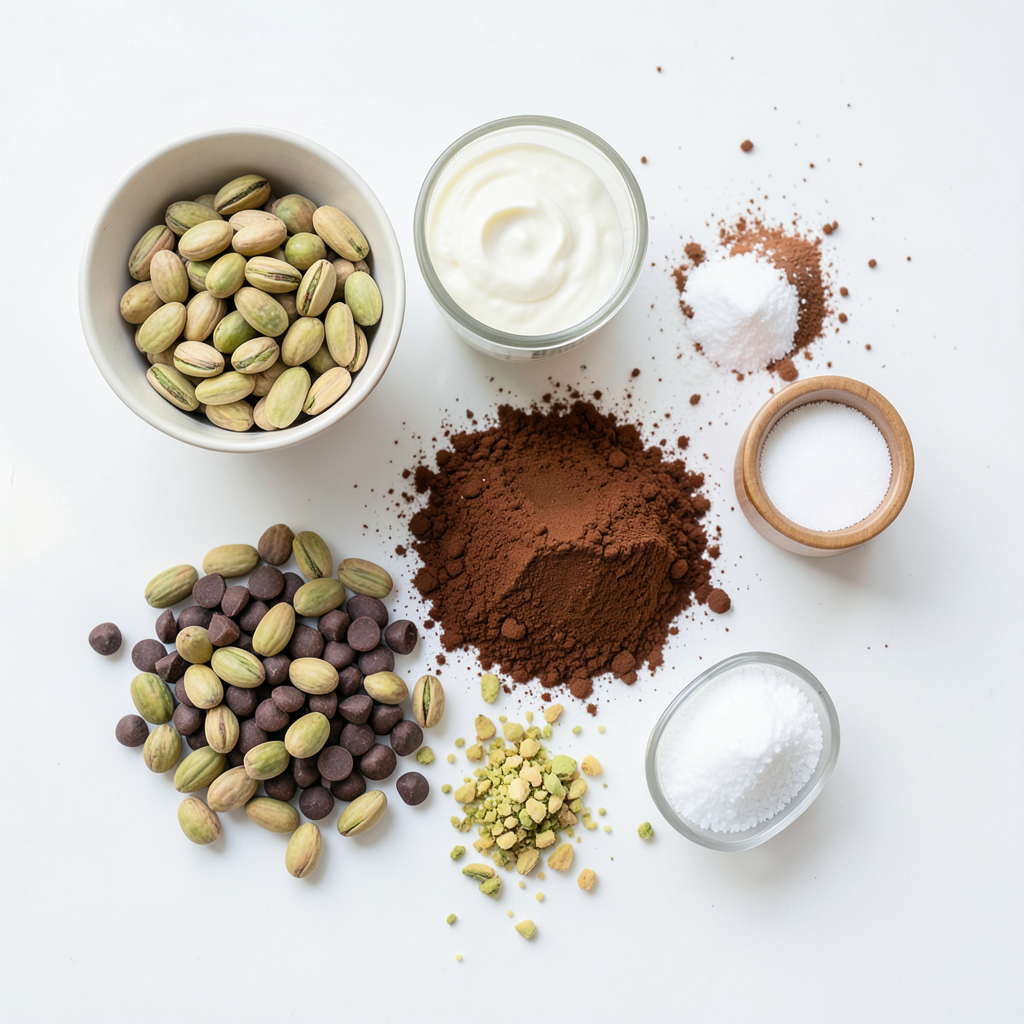
List of Ingredients
- 1 cup raw pistachios, shelled
- 1 cup semi-sweet chocolate chips
- 1/2 cup heavy cream
- 1 tablespoon unsweetened cocoa powder
- 2 tablespoons powdered sugar
- 1 teaspoon vanilla extract
- Pinch of sea salt
- 1/2 cup crushed pistachios (for coating)
Ingredient Descriptions
- Raw pistachios: These nuts give a rich flavor and creamy texture. They are the star of the truffles.
- Semi-sweet chocolate chips: This chocolate melts well, adding sweetness without being too sweet.
- Heavy cream: This is key for a smooth truffle center. It adds richness and creaminess.
- Unsweetened cocoa powder: This adds a deep chocolate flavor without extra sugar.
- Powdered sugar: This fine sugar helps sweeten the truffle mixture. It blends smoothly.
- Vanilla extract: This gives a warm, sweet note that enhances the chocolate flavor.
- Sea salt: A pinch of salt balances the sweetness and brings out flavors.
- Crushed pistachios: These are used to coat the truffles, adding texture and flavor.
Possible Substitutes
- Raw pistachios: You can use roasted pistachios for a deeper flavor, but avoid salted ones.
- Semi-sweet chocolate chips: Dark chocolate chips can be a great alternative for a bolder taste.
- Heavy cream: You can replace it with coconut cream for a dairy-free option.
- Powdered sugar: Granulated sugar can work, but it may not blend as smoothly.
- Vanilla extract: Almond extract can add a fun twist if you want something different.
- Sea salt: Table salt can be used, but use it sparingly to avoid over-salting.
- Crushed pistachios: Chopped almonds or walnuts can substitute, but they will change the flavor.
Step-by-Step Instructions
Preparation of the Pistachio Base
To start, you need to make the pistachio base. Take 1 cup of raw pistachios, and place them in a food processor. Blend them until they look like fine crumbs. Be careful not to blend too long; otherwise, they'll turn into nut butter. This step gives your truffles a rich nutty flavor and a creamy texture.
Melting the Chocolate
Next, it’s time to melt the chocolate. In a small saucepan, combine 1 cup of semi-sweet chocolate chips and 1/2 cup of heavy cream. Heat it over low heat. Stir the mixture continuously until the chocolate is smooth and melted. This process creates a silky chocolate base that pairs perfectly with the pistachios.
Combining All Ingredients and Chilling
Now, remove the melted chocolate from heat. Add the pistachio meal you made earlier, along with 1 teaspoon of vanilla extract, 2 tablespoons of powdered sugar, and a pinch of sea salt. Stir everything together until it is fully mixed. Once combined, let the mixture cool to room temperature. After that, cover it with plastic wrap and refrigerate for 30 to 45 minutes. This step helps firm up the mixture, making it easier to shape into truffles.
Tips & Tricks
Achieving a Creamy Texture
To get a creamy texture, start with fresh pistachios. They should be raw and shelled for the best taste. Blend them until they are fine but not butter. This keeps the texture light. When melting chocolate, use low heat and stir constantly. Mixing in heavy cream helps make it smooth and rich. The right balance of chocolate and cream is key to a creamy finish.
Ensuring Smooth Centers
After mixing the ingredients, let the mixture cool. It should be at room temperature before you chill it. This step helps ensure smooth centers. Refrigerate the mixture for about 30-45 minutes. Check it often. You want it firm but not too hard. When forming the truffles, use a small scoop for even sizes. This helps each truffle have a smooth, creamy center.
Best Practices for Rolling Truffles
When rolling the truffles, keep your hands slightly damp. This prevents the mixture from sticking too much. Use a light touch to form the balls. Don’t press too hard; you want them to stay airy. After rolling, coat each truffle in crushed pistachios. Make sure each one is covered well. This adds a nice crunch and a burst of flavor. Finally, chill them again to set before serving.
Pro Tips
- Use Fresh Pistachios: Ensure your pistachios are fresh for optimal flavor. Old nuts can lose their taste and make the truffles less enjoyable.
- Chill for Best Texture: Allow the truffle mixture to chill thoroughly before shaping to achieve a firmer texture that’s easier to handle.
- Experiment with Coatings: Try rolling the truffles in different coatings like shredded coconut, crushed cookies, or even a drizzle of white chocolate for variety.
- Store Properly: Keep the truffles in an airtight container in the fridge to maintain their creamy texture and flavor for up to a week.
Variations
Alternative Coatings for Truffles
You can coat your truffles in many ways. Instead of crushed pistachios, try using:
- Chopped almonds
- Toasted coconut flakes
- Unsweetened cocoa powder
- Colorful sprinkles
Each option adds a fun twist and makes your truffles pop. Experiment with what you like best.
Flavor Enhancements (e.g., spices or extracts)
To make these truffles even more exciting, add flavors. Here are some ideas:
- A pinch of cinnamon for warmth
- A drop of almond extract for a nutty taste
- A dash of sea salt to enhance sweetness
These small changes can create a flavor burst in each bite. Play around and find your perfect mix!
Using Dark Chocolate vs. Semi-Sweet
You can swap semi-sweet chocolate for dark chocolate. Dark chocolate gives a richer taste. It will also make your truffles less sweet.
Here’s how to choose:
- Semi-Sweet: Perfect for a balanced sweetness.
- Dark Chocolate: Great if you love deep, bold flavors.
Whichever chocolate you pick, your truffles will still be creamy and delicious.
Storage Info
How to Store Truffles
Store your truffles in an airtight container. This keeps them fresh and tasty. Line the container with parchment paper. Place a layer of truffles, then add another layer of paper before stacking more truffles. This helps avoid sticking.
Shelf Life and Best Practices
These creamy pistachio chocolate truffles can last up to two weeks in the fridge. Keep them cool to maintain their creamy texture. If you notice any change in smell or texture, it’s best to throw them out. Always check before eating.
Freezing Truffles for Later Use
You can freeze truffles for longer storage. First, place them in a single layer on a baking sheet. Freeze them for about an hour. Once set, transfer them to a freezer-safe bag. They can last up to three months in the freezer. When ready to enjoy, thaw them in the fridge overnight. This way, they stay smooth and delicious!
FAQs
What can I use instead of heavy cream?
You can replace heavy cream with coconut cream. It gives a rich taste. If you want a lighter option, use half-and-half. Almond milk can also work, but the texture may change. For a nut-free choice, try oat milk. Each option offers a different flavor. Keep that in mind when choosing.
How do I know when the truffle mixture is chilled enough?
The truffle mixture should feel firm to the touch. It should not stick to your fingers. If it feels too soft, chill it for a bit longer. A good time frame is 30 to 45 minutes in the fridge. You can also check by scooping some out. It should hold its shape well when rolled.
Can I make truffles in advance?
Yes, you can make truffles ahead of time. They store well in the fridge for up to a week. You can also freeze them for longer storage. Just place them in an airtight container. When ready to eat, let them thaw in the fridge. This way, you can enjoy them fresh and tasty.
This blog post covers everything you need for making delicious truffles. We discussed the key ingredients, tips for the best texture, and variations to try. Storing your truffles properly helps them last longer. With simple steps, you can create tasty treats at home. I encourage you to experiment and find your favorite combinations. Enjoy making truffles and sharing them with friends and family. You’ll impress everyone with your skills and creativity!