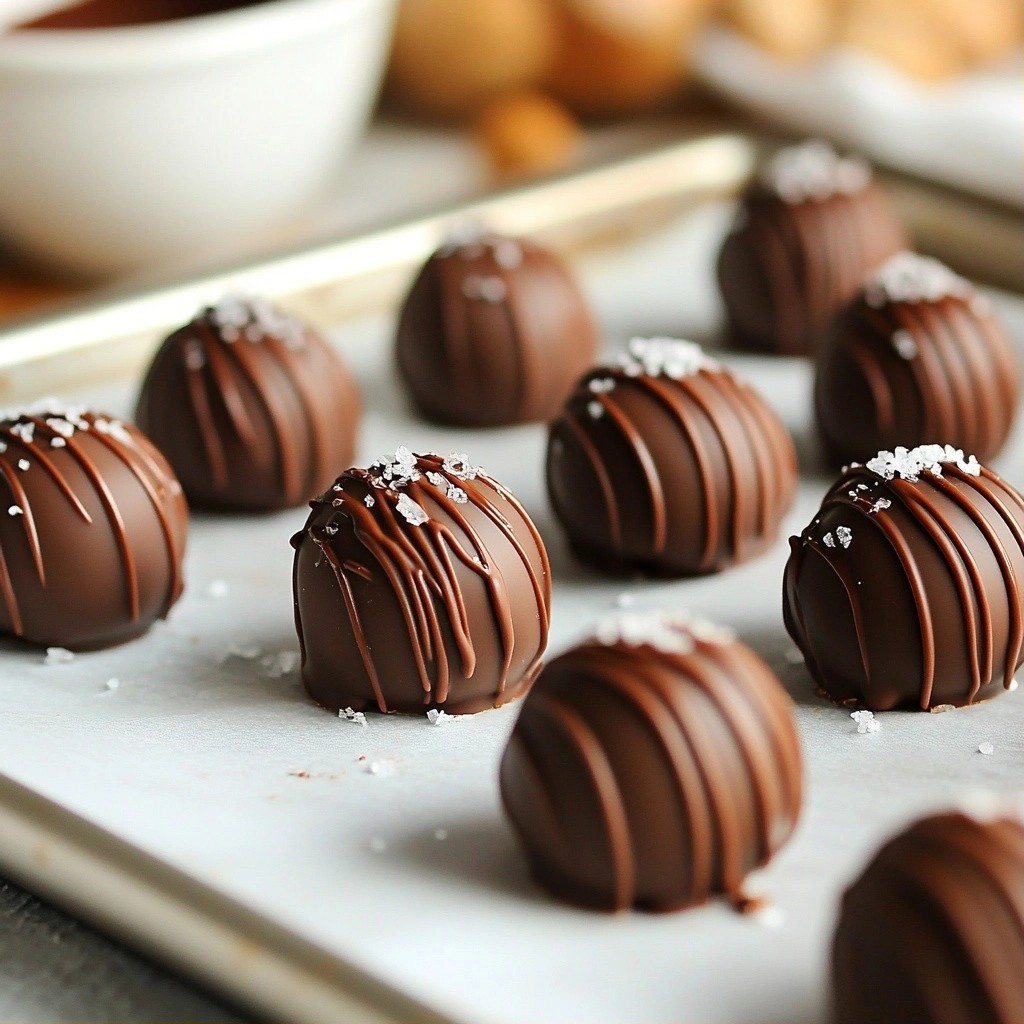
Indulging in creamy peanut butter chocolate truffles with rich centers is pure bliss. Imagine biting into a soft, chocolate-covered treat that oozes with peanut flavor. Today, I’ll guide you through a simple recipe that makes these delightful truffles a reality. Whether you’re a beginner or a seasoned pro, you’ll learn how to blend flavors and achieve that perfect texture. Let’s dive in and create a sweet masterpiece!
Why I Love This Recipe
- Decadent Flavor: The combination of creamy peanut butter and rich chocolate creates a heavenly treat that's hard to resist.
- Simple Preparation: With minimal ingredients and straightforward steps, these truffles can be whipped up in no time.
- Customizable: You can easily adjust the sweetness or try different toppings to suit your taste preferences.
- Perfect for Sharing: These truffles make an excellent gift or party treat, delighting everyone with their indulgent taste.
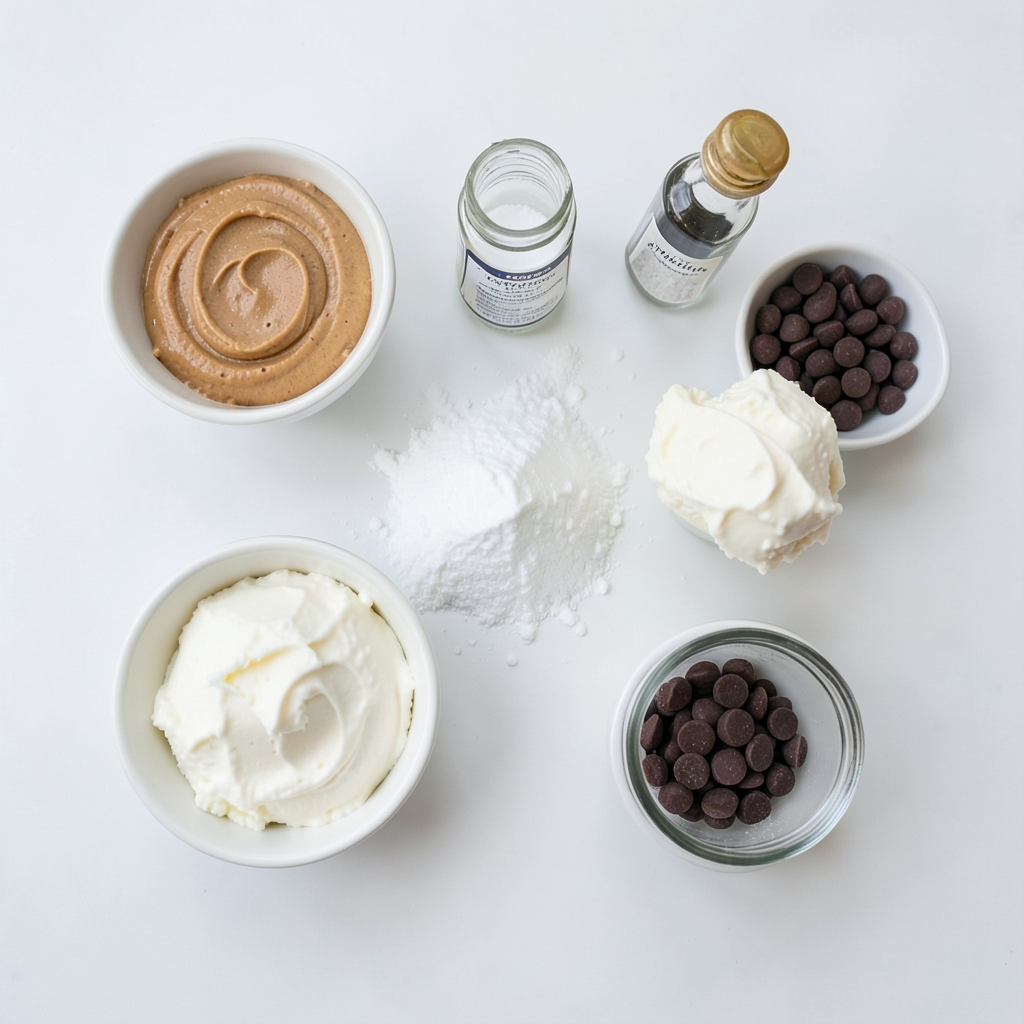
Ingredients
Main Ingredients List
- 1 cup creamy peanut butter
- 1 cup powdered sugar
- 1 teaspoon vanilla extract
- 1/4 cup cream cheese, softened
- 1 1/2 cups semi-sweet chocolate chips
- 1 tablespoon coconut oil
- Sea salt for garnish
When making creamy peanut butter chocolate truffles, you need a few key ingredients. The creamy peanut butter gives these truffles their rich flavor. The powdered sugar adds sweetness and helps with texture. Vanilla extract enhances the taste, while softened cream cheese adds that smooth, rich center.
You will also need semi-sweet chocolate chips for the coating. They provide a nice contrast to the sweet peanut butter center. The coconut oil helps the chocolate melt smoothly and coat the truffles evenly. Finally, a sprinkle of sea salt on top boosts flavor and adds a fun touch.
Suggested Brands and Alternatives
- Recommended peanut butter brands
- Chocolate chip options
- Substitutes for cream cheese
For peanut butter, I like brands like Jif or Skippy. They are creamy and spread well. If you prefer natural options, look for brands with just peanuts and salt. For chocolate chips, Ghirardelli or Nestlé are both great choices. They melt nicely and taste fantastic.
If you want to skip cream cheese, you can use Greek yogurt. It still gives a creamy texture but is a bit tangy. Another option is to use mascarpone cheese, which is rich and smooth.
Step-by-Step Instructions
Preparation of Peanut Butter Mixture
Start by mixing the creamy peanut butter, powdered sugar, vanilla extract, and cream cheese in a large bowl. I use a spatula to blend everything until it’s smooth. This step is key. You want a nice, creamy texture. Once mixed, cover the bowl with plastic wrap. Chill it in the fridge for about 30 to 45 minutes. This makes the mixture easier to handle when you form the truffles.
Forming the Truffles
After chilling, scoop out small portions of the mixture. A teaspoon or a cookie scoop works well. Roll each portion into a ball about one inch in diameter. This keeps the truffles uniform in size. Place the rolled balls on a parchment-lined baking sheet. Make sure they have space between them. This helps when you coat them later.
Melting and Coating
Next, you need to melt the chocolate. Use semi-sweet chocolate chips and add some coconut oil in a microwave-safe bowl. Microwave the mixture in 30-second intervals. Stir it between each interval until it’s fully melted and smooth. This method avoids burnt chocolate. Dip each peanut butter ball into the melted chocolate using a fork. Let the excess chocolate drip off. Place them back on the baking sheet. For a touch of flavor, sprinkle a tiny pinch of sea salt on top of each truffle right away. After coating, return the baking sheet to the fridge for about 15 to 20 minutes. This helps the chocolate harden completely.
Tips & Tricks
Achieving Smooth Centers
To get the best texture in your truffles, mix the peanut butter, sugar, and cream cheese well. Use a sturdy spatula or a mixer to blend everything until it is smooth. Chilling the mixture in the fridge for 30-45 minutes makes it easier to scoop and roll into perfect balls. This step is key! If you skip it, the mixture can be too soft and hard to handle.
Perfect Chocolate Coating
When melting chocolate, do it slowly. Use short bursts in the microwave, stirring between each session. This helps avoid lumps. If the chocolate is too thick, add a little coconut oil to make it smoother. This will help the chocolate coat your truffles evenly. Dip each ball gently, letting the extra chocolate drip off before placing them back on the baking sheet.
Flavor Enhancement
For extra flavor, think about adding a dash of cinnamon or a splash of coffee to the peanut butter mix. You can also try using almond extract instead of vanilla for a twist. When garnishing, sea salt is great, but you can also sprinkle crushed nuts or cocoa powder on top. These add texture and make your truffles look fancy!
Pro Tips
- Chill for Better Handling: Ensure that the peanut butter mixture is properly chilled before rolling into balls. This will make the process much smoother and easier.
- Quality Chocolate Matters: Use high-quality semi-sweet chocolate chips for melting. This will enhance the flavor and texture of your truffles significantly.
- Experiment with Toppings: Besides sea salt, try adding crushed nuts, sprinkles, or even a drizzle of white chocolate on top for a creative twist.
- Storage Tips: Store your truffles in an airtight container in the refrigerator. They can last up to two weeks, making them perfect for make-ahead treats.
Variations
Flavor Variations
You can switch up the flavor of your truffles with ease. First, try using different nut butters. Almond butter or cashew butter adds a twist. Each nut butter gives a unique taste. Next, consider adding spices or extracts. A dash of cinnamon or a splash of almond extract can surprise your taste buds. These small changes can make your truffles feel new and exciting.
Coating Alternatives
The coating is where you can get really creative. Instead of semi-sweet chocolate, try using white chocolate or dark chocolate. Each type of chocolate gives a different taste and look. You can also roll your truffles in crushed nuts or colorful sprinkles. This step adds texture and fun. It makes the truffles not just tasty, but pretty too!
Dietary Adjustments
If you have dietary needs, you can still enjoy these truffles. For a gluten-free option, check the labels on your ingredients. Most peanut butters and chocolates are gluten-free. If you want a vegan version, replace the cream cheese with a vegan cream cheese. You can also use dairy-free chocolate chips. These adjustments keep the truffles delicious while fitting your needs.
Storage Info
Storing Your Truffles
To keep your truffles fresh, use an airtight container. A glass jar or a plastic container works well. You can also line the container with parchment paper to avoid sticking. Store the truffles in the fridge. The cool temperature helps them stay firm and tasty.
Freezing Instructions
If you want to save some truffles for later, freezing is a great option. Place the truffles in a single layer on a baking sheet. Freeze them for about an hour until firm. Then, transfer them to a freezer-safe container or bag. Be sure to label the bag with the date. When you want to eat them, take out the desired amount and let them thaw in the fridge overnight.
Shelf Life
In the fridge, your truffles will last about one week. If you freeze them, they can last for up to three months. Always check for signs of spoilage. If the truffles smell off or have a strange texture, it's best to throw them out.
FAQs
How Do You Make Peanut Butter Truffles Without Cream Cheese?
You can skip cream cheese. Use more peanut butter instead. This will keep truffles creamy. Mix one cup of peanut butter with powdered sugar and vanilla. The truffles will still taste great.
Can You Use Crunchy Peanut Butter for These Truffles?
Yes, you can use crunchy peanut butter. It adds texture and a nutty taste. Just replace creamy peanut butter with crunchy. The truffles will have a fun crunch.
What’s the Best Way to Melt Chocolate for Dipping?
The best way to melt chocolate is in a microwave. Use a microwave-safe bowl. Heat chocolate chips in 30-second bursts. Stir after each interval until smooth. You can add coconut oil to make it shiny.
How Long Do These Truffles Take to Set?
These truffles take about 15-20 minutes to set. Place them in the fridge after coating. This helps the chocolate harden quickly. You can also let them sit at room temperature.
Can I Use Other Types of Chocolate?
Yes, you can use other types of chocolate. Dark chocolate or milk chocolate works well. Just remember to adjust the sweetness. Each type will give a different taste to your truffles.
Making peanut butter truffles is simple and fun. We discussed the key ingredients, like creamy peanut butter and chocolate chips. You learned step-by-step instructions for mixing, rolling, and coating. I shared tips for smooth centers and coating tricks to avoid lumps.
Remember, you can customize these truffles with different flavors and coatings. Store them right to keep them fresh. With these easy methods, you can enjoy tasty treats anytime. Try making them and impress your friends and family with your skills!