
Cranberry Orange Scones are the perfect breakfast treat! With a bright burst of orange and tart cranberries, they bring joy to your morning routine. Imagine biting into a warm, fluffy scone paired with your favorite drink. In this article, I’ll guide you through simple steps to create these delicious delights. Get ready to impress your taste buds and start your day right. Let’s dive into the world of Cranberry Orange Scones!
Why I Love This Recipe
- Fresh Flavor Burst: The combination of orange zest and cranberries creates a bright, refreshing taste that's perfect for any occasion.
- Easy to Make: With simple ingredients and straightforward steps, these scones are a breeze to whip up, even for novice bakers.
- Perfect for Any Time: These scones make a delightful breakfast, a pleasant afternoon snack, or a lovely addition to a brunch spread.
- Customizable Treat: You can easily tweak the recipe by adding nuts or different dried fruits to suit your taste preferences.
Ingredients
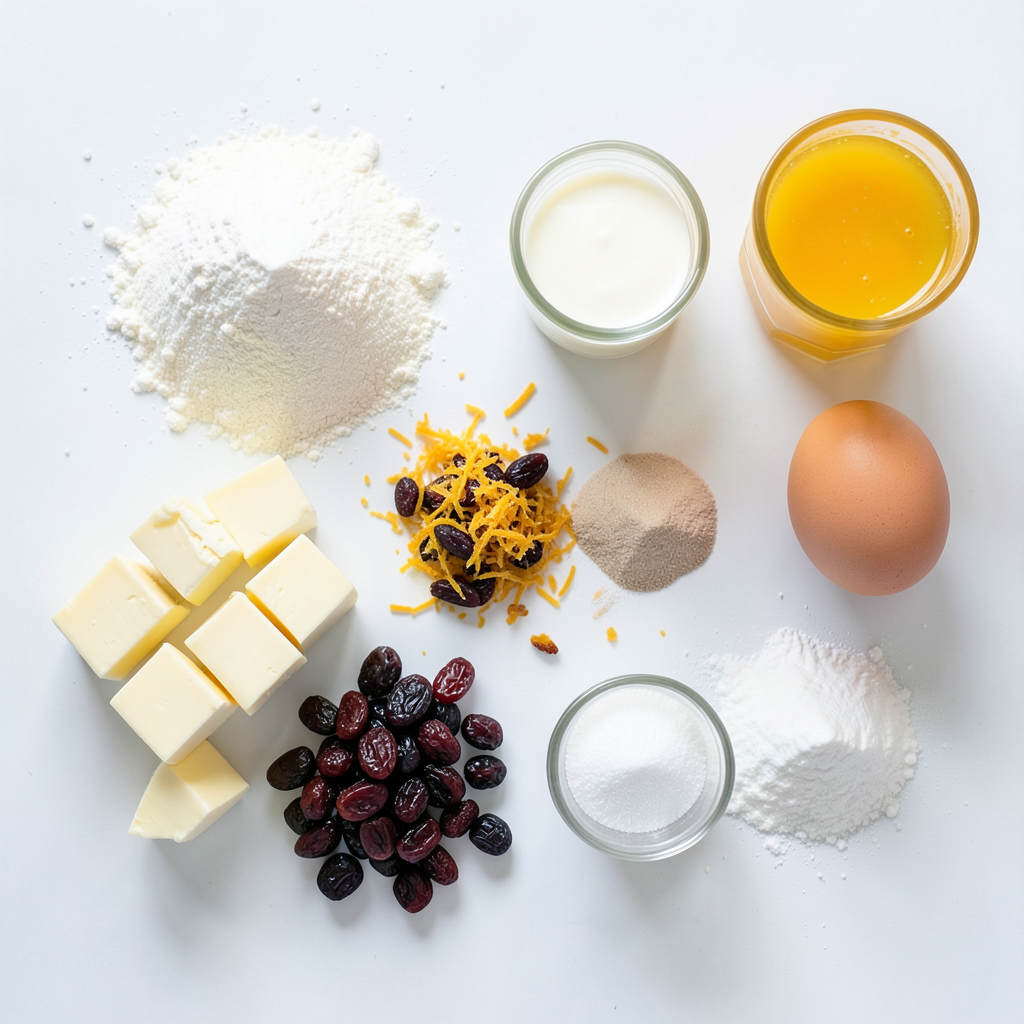
List of Ingredients
- 2 cups all-purpose flour
- 1/3 cup granulated sugar
- 1 tablespoon baking powder
- 1/2 teaspoon salt
- 1/2 cup unsalted butter, cold and cubed
- 3/4 cup dried cranberries
- Zest of 1 orange
- 1/2 cup heavy cream
- 1 large egg
- 1 teaspoon vanilla extract
- 1/4 cup orange juice
- Optional: 1/2 cup powdered sugar for glaze
Measurements and Substitutions
You can adjust some ingredients for your needs. Here are some options:
- Alternative flour options: You can use whole wheat flour or gluten-free flour for a different taste and texture.
- Sugar substitutes: Try honey or maple syrup instead of sugar. Just reduce the liquid in the recipe.
- Options for dairy-free versions: Use coconut cream or almond milk instead of heavy cream. Replace butter with a plant-based option.
These ingredient choices help you make the scones fit your taste or dietary needs. Enjoy experimenting with flavors!
Step-by-Step Instructions
Prepping the Oven and Baking Sheet
First, preheat your oven to 400°F (200°C). This step is key for even baking. While the oven heats, line a baking sheet with parchment paper. Lining the sheet prevents sticking and makes cleanup easy.
Mixing Dry Ingredients
In a large bowl, combine the flour, sugar, baking powder, and salt. Use a whisk to mix these ingredients well. This mix forms the base of your scones. Ensure there are no lumps for a smooth texture.
Incorporating Wet Ingredients
In another bowl, whisk together the heavy cream, egg, vanilla, and orange juice. Mix until smooth. This blend adds moisture and flavor. It will combine with your dry ingredients to create the dough.
Shaping and Baking the Scones
Turn the dough onto a floured surface. Knead it gently a few times. You want to bring it together without overworking it. Shape the dough into a circle that is about 1 inch thick. Cut it into triangles or wedges.
Place the scones on your lined baking sheet, leaving space between them. Bake for 15 to 18 minutes. Look for a light golden top as a sign of doneness. Enjoy the delicious aroma while they bake!
Tips & Tricks
Achieving the Best Scone Texture
To get the best scone texture, use cold butter. Cold butter helps create a flaky scone. It keeps the fat solid, which makes the scones rise well in the oven.
Do not overmix the dough. When you mix the wet and dry ingredients, stir gently. Overmixing can make your scones tough. You want a soft dough with some lumps.
Glazing Techniques
Making a simple glaze is easy. Just mix powdered sugar with a splash of orange juice. Aim for a smooth, pourable consistency. This will add a sweet and tangy touch to your scones.
For an even glaze application, use a spoon or small whisk. Drizzle it over the warm scones. This way, the glaze will spread out nicely.
Serving Suggestions
Serve your scones warm for the best taste. You can also slice them in half and add butter or jam. They go great with clotted cream, too.
When it comes to drinks, pair these scones with tea or coffee. A nice cup of orange tea complements the flavors well. You can also try a glass of fresh orange juice for a refreshing touch.
Pro Tips
- Use Cold Butter: Ensure your butter is very cold for flakier scones. You can even freeze it for a few minutes before cutting it into the flour mixture.
- Don't Overmix: When combining wet and dry ingredients, mix just until incorporated. Overmixing can lead to tough scones.
- Experiment with Add-ins: Feel free to add other mix-ins like chocolate chips or nuts for additional flavor and texture.
- Check for Doneness: Scones are best when lightly golden on top; if unsure, insert a toothpick in the center—if it comes out clean, they’re done!
Variations
Flavor Variations
You can change the taste of your cranberry orange scones by adding nuts or seeds. Chopped walnuts or pecans give a nice crunch. For a nut-free option, try sunflower seeds or pumpkin seeds. They add flavor and texture, making each bite exciting.
You can also use different dried fruits. Instead of cranberries, try raisins, apricots, or cherries. Each fruit brings a unique taste. Mixing fruits can create a fun flavor combo too. Remember to adjust the sweetness if you use sweeter fruits.
Dietary Adaptations
If you need a gluten-free option, you can replace the all-purpose flour with a gluten-free blend. Look for a mix that contains xanthan gum for best results. This swap keeps your scones light and fluffy.
For vegan substitutes, use plant-based butter instead of regular butter. Almond milk or oat milk works well in place of heavy cream. Replace the egg with a flaxseed meal mixture. Combine one tablespoon of flaxseed with three tablespoons of water. Let it sit for a few minutes to thicken. These changes keep the scones tasty and accessible for everyone.
Seasonal Variations
You can change your scone recipe for different seasons or holidays. In winter, add warm spices like cinnamon or nutmeg. These spices add cozy flavors that fit holiday vibes. For spring, consider using fresh herbs like rosemary or thyme. They give a fresh twist to the classic recipe.
For summer, try adding lemon zest along with the orange zest. This bright flavor works well with fresh berries. In fall, you might want to add pumpkin puree for a seasonal touch. Adapting your scones keeps them fun and tasty all year round.
Storage Info
Storing Leftover Scones
To store leftover scones, first, let them cool completely. Place them in an airtight container. If you want to keep them fresh longer, you can refrigerate them. Wrap each scone in plastic wrap for added protection. If you plan to store them for a while, freezing is a great option. Place the wrapped scones in a freezer-safe bag. They will stay fresh for up to three months in the freezer.
Reheating Instructions
When you are ready to enjoy your scones again, reheating is simple. Preheat your oven to 350°F (175°C). Place the scones on a baking sheet. Heat them for about 10-15 minutes. This helps maintain their soft texture. You can also use a microwave. Heat each scone for 15-20 seconds. However, the oven gives a better crispiness.
Shelf Life
Cranberry orange scones last for about two days at room temperature. If you store them in the fridge, they can last up to a week. Make sure to keep them in an airtight container to prevent drying out. If you freeze them, remember to label the bag with the date. This way, you can enjoy your scones later without worry.
FAQs
How do you make scones fluffier?
To make scones fluffier, use cold butter. Cut it into small cubes, then mix it into the dry ingredients. This helps create air pockets. Also, avoid overmixing the dough. Mix just until everything is combined. Lastly, make sure your baking powder is fresh. Old baking powder can lead to flat scones.
Can I use fresh cranberries instead of dried?
You can use fresh cranberries, but they change the texture. Fresh cranberries are more tart, which will affect the taste. To balance this, you may need to add extra sugar. Also, fresh berries contain more moisture. Reduce the liquid in your dough a bit to keep it from getting too wet.
What can I do if my dough is too sticky?
If your dough is too sticky, add a bit more flour. Sprinkle it gradually while mixing. Knead the dough gently on a floured surface. This helps to incorporate the flour without overworking the dough. If it’s still sticky, chill the dough for 10-15 minutes. This will make it easier to handle.
You’ve learned how to make delicious scones with simple steps. We covered the ingredients, mixing, baking, and storing. I shared tips for perfect texture and glaze. Whether you prefer gluten-free or vegan options, there’s a scone for everyone. Keep these tips in mind for the best results. Enjoy your fresh scones plain or with your favorite drink. Now, you can impress friends and family with your baking skills!