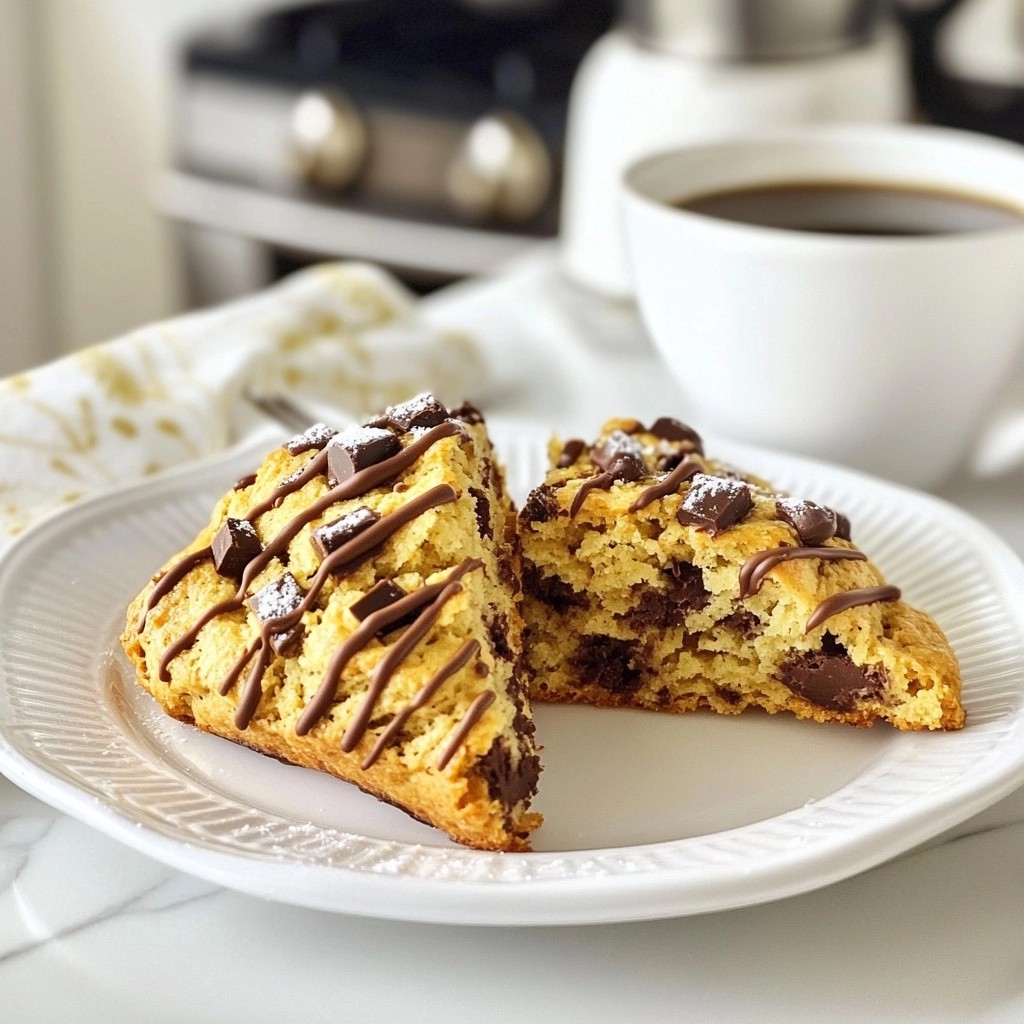
Are you ready to indulge in a sweet treat that will awaken your senses? Chunky Dark Chocolate Chip Mocha Scones blend rich coffee, creamy chocolate, and a tender crumb. These scones are perfect for breakfast or an afternoon snack. Join me as I guide you through each step of this mouthwatering recipe, sure to impress your taste buds and anyone you share them with!
Why I Love This Recipe
- Decadent Flavor: These scones are a rich combination of dark chocolate and coffee that creates a delightful mocha experience in every bite.
- Easy to Make: The straightforward instructions make these scones accessible for bakers of all skill levels, requiring just 35 minutes from start to finish.
- Perfect for Any Occasion: Whether it’s breakfast, brunch, or an afternoon treat, these scones are versatile and sure to impress your guests.
- Customizable: You can easily adjust the types of chocolate or add nuts and spices to suit your personal taste preferences.
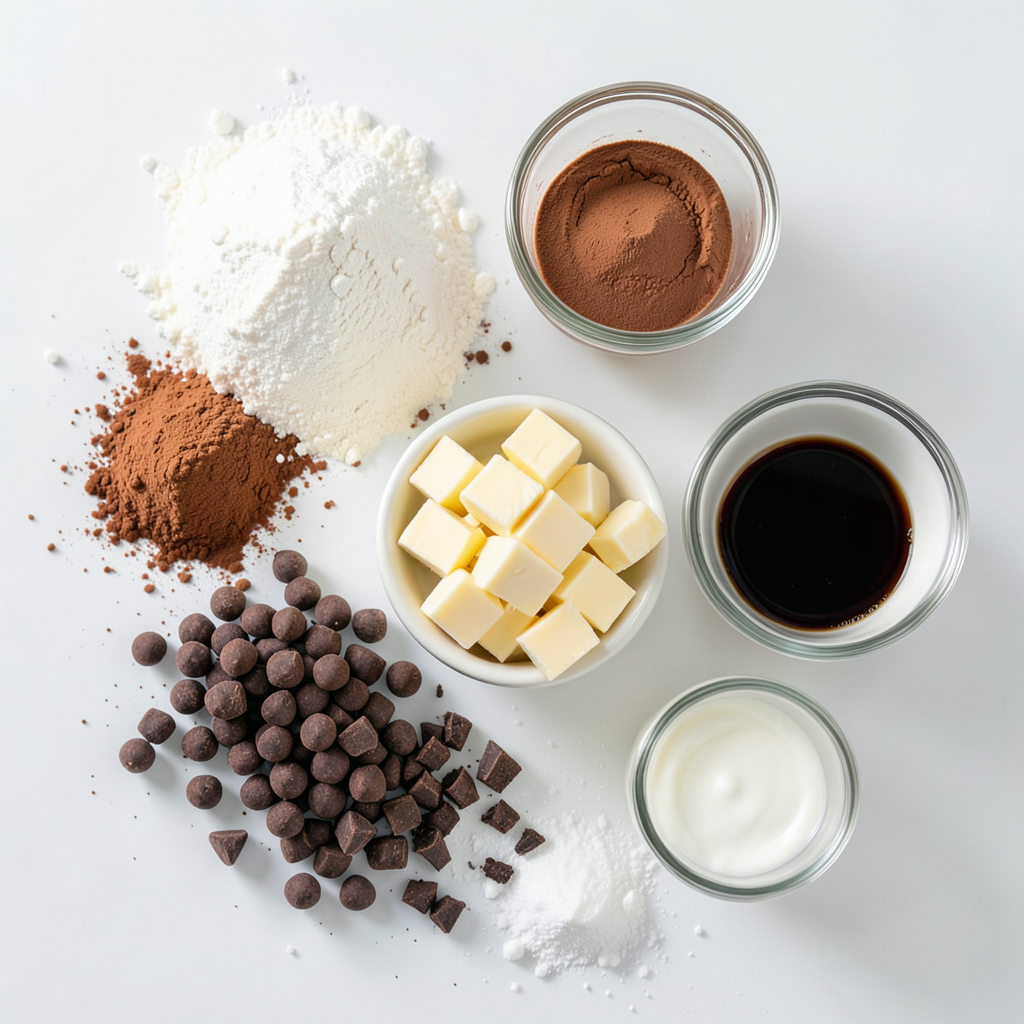
Ingredients
Dry Ingredients
- 2 cups all-purpose flour
- 1/4 cup unsweetened cocoa powder
- 1/3 cup granulated sugar
- 1 tablespoon baking powder
- 1/2 teaspoon baking soda
- 1/4 teaspoon salt
Wet Ingredients
- 1/2 cup cold unsalted butter, cubed
- 1/2 cup brewed coffee, cooled
- 1 large egg
- 1 teaspoon vanilla extract
- 1/4 cup heavy cream (for brushing)
Chocolate Components
- 1/2 cup semi-sweet chocolate chips
- 1/2 cup dark chocolate chips, coarsely chopped
- Coarse sugar (for sprinkling)
Gathering the right ingredients is key to making these scones, and every item plays a vital role. The dry ingredients form the base, giving our scones structure. All-purpose flour gives a light texture. Cocoa powder adds rich chocolate flavor. The sugar sweetens the dough and helps with browning.
Baking powder and baking soda help the scones rise. Salt enhances the flavors, making each bite better.
For the wet ingredients, cold butter adds flakiness. When you mix it into the dry blend, it creates a crumbly texture. Brewed coffee gives a mocha kick. The egg adds moisture and binds everything. Vanilla extract brings warmth and depth. Finally, the heavy cream brushed on top creates a golden, shiny finish.
The chocolate components are what make these scones special. Semi-sweet chocolate chips provide sweetness. Dark chocolate chips add depth and a touch of bitterness, balancing the sweetness. Coarse sugar on top creates a sweet crunch that you will love.
With these ingredients, you can create a delightful, rich treat. Each bite is a little piece of heaven. Now, let’s dive into the fun part—baking!
Step-by-Step Instructions
Preparing the Oven and Baking Sheet
- Preheat the oven to 400°F (200°C).
- Line a baking sheet with parchment paper.
Mixing the Dry Ingredients
- Whisk together the flour, cocoa powder, granulated sugar, baking powder, baking soda, and salt.
Incorporating the Butter
- Blend in the cubed cold butter until it resembles coarse crumbs.
Adding the Chocolate
- Stir in semi-sweet and dark chocolate chips.
Combining Wet Ingredients
- Whisk together the brewed coffee, egg, and vanilla extract until smooth.
Forming the Dough
- Gently mix the wet ingredients into the dry mixture.
- Shape the dough on a floured surface and cut into desired shapes.
Baking the Scones
- Brush the tops with heavy cream and sprinkle with coarse sugar.
- Bake for 15-20 minutes. Cool on a wire rack before serving.
Tips & Tricks
Achieving the Perfect Texture
To get the right texture, use cold butter. This keeps the scones light and fluffy. When mixing, do not overmix the dough. Mix just until it comes together. The dough should feel a bit sticky and shaggy. These tips help create a tender scone that melts in your mouth.
Enhancing Flavor
To boost flavor, think about adding spices. A dash of cinnamon or nutmeg can change everything. These spices pair well with chocolate and coffee. You can also try adding a bit of orange zest for a bright twist. Each spice brings its own special taste to the scone.
Baking Tips
Knowing when your scones are done is key. Look for a light golden color on top. You can also test with a toothpick. If it comes out clean, the scones are ready. Proper rising is also important. Make sure to space them out on the baking sheet. This allows hot air to circulate, giving you a nice rise.
Pro Tips
- Use Cold Ingredients: Make sure your butter and other dairy ingredients are cold to create flaky layers in the scones.
- Don’t Overmix: Gently bring the dough together to avoid tough scones. A shaggy texture is perfect!
- Experiment with Coffee: For a stronger flavor, use espresso or a dark roast coffee in your mixture.
- Serve Fresh: Enjoy the scones warm out of the oven for the best texture and flavor experience.
Variations
Flavor Combinations
You can make these scones even better by adding nuts or dried fruits. Chopped walnuts or pecans add crunch. Dried cherries or cranberries bring a sweet and tangy taste. Both options will enhance the texture and flavor of your scones. Just mix them into the dough along with the chocolate chips. This will create a delightful bite every time.
Gluten-Free Option
If you need a gluten-free scone, you can swap the all-purpose flour. Use a 1:1 gluten-free flour blend instead. Look for one that contains xanthan gum for better structure. This helps your scones rise and keeps them soft. You might want to add a bit more liquid to the mix, as gluten-free flour can absorb more moisture.
Different Chocolate Choices
While dark chocolate chips are fantastic, you can switch them out. Try using milk chocolate or even white chocolate chips. Milk chocolate offers a sweeter taste, while white chocolate adds creaminess. Each option changes the flavor profile, making your scones unique. You can mix different types of chocolate for a fun twist!
Storage Info
Short-term Storage
To keep your scones fresh at room temperature, place them in an airtight container. Make sure to let them cool completely before storing. This helps prevent moisture buildup. They stay good for about two days. If they begin to feel dry, consider warming them up.
Long-term Storage
For long-term storage, freezing is your best option. First, let the scones cool down. Then, wrap each scone in plastic wrap. Place the wrapped scones in a freezer-safe bag or container. They can last up to three months in the freezer. When you want to enjoy one, simply take it out and let it thaw.
Reheating Instructions
To reheat leftover scones, preheat your oven to 350°F (175°C). Place the scones on a baking sheet. Heat them for about 5-10 minutes. This method keeps them soft and brings back their fresh-baked taste. You can also use a microwave for quick reheating, but the oven will give you a better texture.
FAQs
What makes these scones chunky?
The scones get their chunky texture from the chocolate chips. I use both semi-sweet and dark chocolate chips. The larger pieces create bursts of chocolate in every bite. When you mix them in, don't break them too much. Keep them chunky for the best texture.
Can I make these scones without coffee?
Yes, you can. If you want to skip the coffee, use milk instead. You can also use water or a nut milk like almond or oat milk. The scones will still taste great without the coffee flavor.
How can I adjust the sweetness of these scones?
To make these scones less sweet, just reduce the sugar. You can cut the granulated sugar by a third. If you want them sweeter, add a little more sugar. Taste is key, so adjust it to your liking.
What toppings work well with mocha scones?
You can top these scones with a drizzle of melted chocolate. A sprinkle of cocoa powder adds a nice touch. For a creamy contrast, serve with whipped cream. Fresh fruit like berries also pairs well. Enjoy experimenting with different toppings!
In this article, we shared a simple recipe for mocha scones. You learned about key ingredients, both dry and wet, along with essential chocolate components. I provided clear steps for mixing and baking, plus tips for the perfect texture and flavor. Remember, you can easily customize these scones to suit your taste.
Try different flavors or store them for later. Enjoy your baking adventure with these delicious scones!