Craving a deliciously sweet treat that’s fun to make? Get ready to whip up some Chocolate Hazelnut Crepes! This easy recipe combines rich cocoa and creamy hazelnut spread for a mouthwatering combination. Perfect for breakfast or dessert, these crepes are soft, fluffy, and totally customizable. Let’s dive into the simple ingredients and steps that will make you a crepe pro in no time!
Why I Love This Recipe
- Decadent Flavor: The rich combination of chocolate and hazelnut creates an indulgent treat that satisfies any sweet tooth.
- Easy to Make: With simple ingredients and straightforward instructions, these crepes are perfect for both novice and experienced cooks.
- Versatile Toppings: The option to customize with whipped cream and fresh fruits allows for endless variations to suit your taste.
- Perfect for Any Occasion: Whether it's breakfast, dessert, or a special brunch, these crepes are sure to impress your guests.
Ingredients
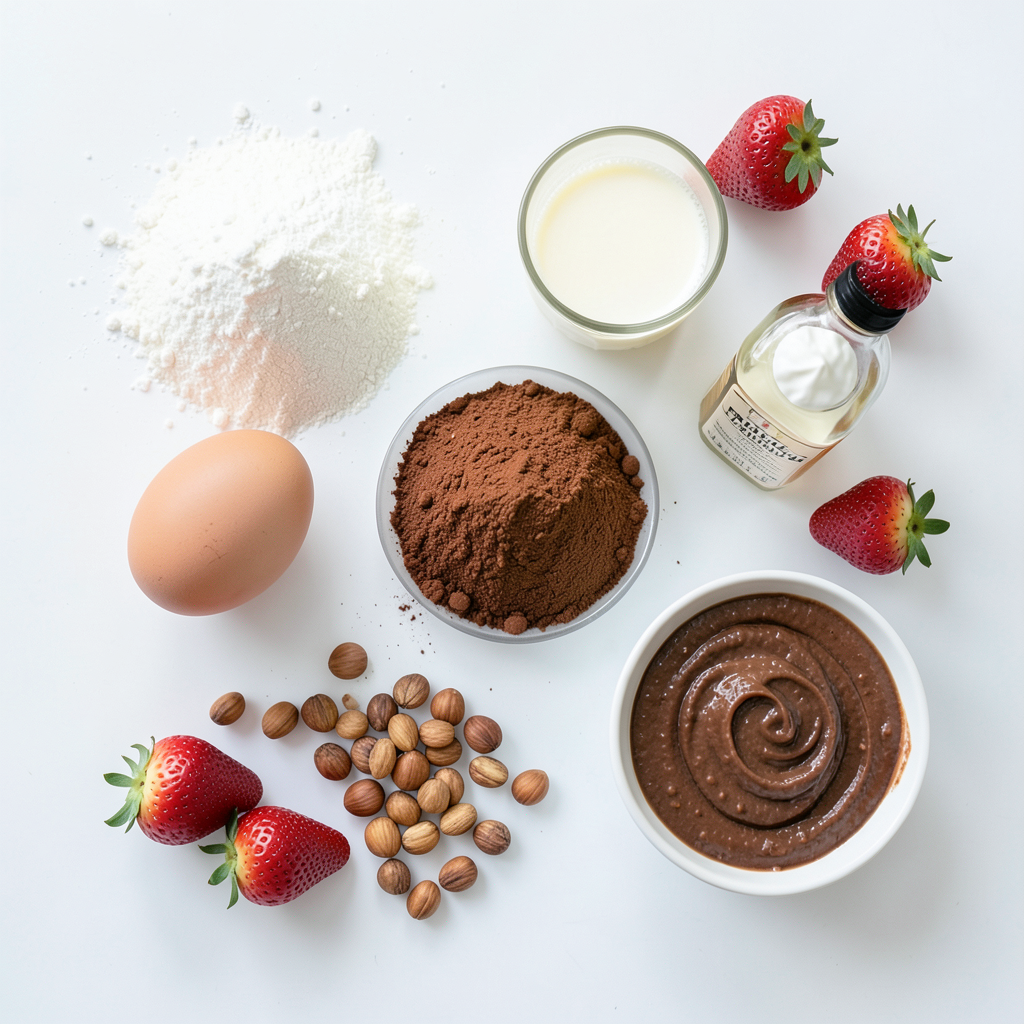
To make these tasty Chocolate Hazelnut Crepes, you need a few simple items. Gather the following ingredients:
- 1 cup all-purpose flour
- 2 tablespoons cocoa powder
- 2 tablespoons sugar
- 2 large eggs
- 1 ½ cups milk
- 1 teaspoon vanilla extract
- 1 tablespoon melted butter, plus more for cooking
- 1 cup chocolate hazelnut spread
- ½ cup chopped hazelnuts (toasted)
- Whipped cream (for serving)
- Fresh strawberries or bananas (for garnish, optional)
Each ingredient plays a key role in creating the perfect crepe. The flour gives structure. Cocoa powder adds rich chocolate flavor. Sugar sweetens the mix. Eggs bind everything together, while milk keeps it smooth. The vanilla and melted butter enhance the taste.
Chocolate hazelnut spread provides a delicious filling. Chopped hazelnuts add crunch and texture. Whipped cream and fresh fruit are great toppings. Feel free to get creative with the garnishes. Enjoy making these delightful crepes!
Step-by-Step Instructions
Mixing the Batter
1. First, grab a mixing bowl. In it, whisk together the all-purpose flour, cocoa powder, and sugar. This mix should be smooth and free from lumps.
2. Next, make a well in the center. Add the eggs and melted butter into that well.
3. Gradually add the milk and vanilla extract. Keep whisking until the batter is completely smooth.
4. Let the batter rest for about 20 minutes at room temperature. This step helps the crepes become soft and tender.
Cooking the Crepes
1. Heat a non-stick skillet over medium heat. Add a small amount of butter to coat the pan.
2. Pour about ¼ cup of batter into the skillet. Quickly swirl the pan to coat the bottom evenly.
3. Cook the crepe for 1-2 minutes. The edges will lift when it is ready.
4. Carefully flip the crepe using a spatula. Cook for another minute before removing it from the skillet.
5. Keep the crepes warm while you repeat this process with the rest of the batter, adding butter as needed.
Assembling the Crepes
1. Take a warm crepe and spread a generous tablespoon of chocolate hazelnut spread over one half.
2. Sprinkle chopped hazelnuts on top of the spread.
3. Fold the crepe in half, then fold it in half again to make a triangle.
4. Serve the crepes warm. Top them with whipped cream and fresh strawberries or bananas if you like.
Tips & Tricks
Achieving the Perfect Crepe Texture
To make great crepes, the batter needs to rest. This gives flour time to absorb liquid. A smooth texture comes from this step. Let it rest for at least 20 minutes.
Skillet temperature is key too. A medium heat works best. If the skillet is too hot, the crepes burn. If it’s too cool, they won’t cook properly. You want a nice golden color.
How to Store and Reheat Crepes
You can make crepes in advance. Stack them between sheets of wax paper. This keeps them from sticking. Store them in the fridge for up to 3 days.
To reheat, you can use a skillet. Heat it on low and warm each side for about 30 seconds. You can also use a microwave. Just cover them to keep moisture in. Heat for 10-15 seconds.
Useful Cooking Tools
A good non-stick skillet is a must. It helps the crepes slide out easily. Look for one that is at least 10 inches wide.
You’ll also need a whisk for mixing. A large mixing bowl is great for combining ingredients. These tools make the process smooth and fun!
Pro Tips
- Rest the Batter: Allowing the batter to rest for at least 20 minutes helps to relax the gluten, resulting in tender and delicate crepes.
- Control the Heat: Ensure your skillet is at the right temperature; too hot and the crepes will burn, too cool and they will stick. Medium heat is ideal.
- Use a Non-Stick Skillet: A good non-stick skillet is essential for easy flipping. If you don't have one, make sure to use enough butter to prevent sticking.
- Experiment with Fillings: While chocolate hazelnut spread is delicious, feel free to get creative with fillings like fruit preserves, whipped cream, or even savory options!
Variations
Alternative Fillings
You can try many different fillings for your crepes. Here are some ideas:
- Nut spreads: Use almond or peanut butter for a twist.
- Fruit-based fillings: Spread fresh fruit, like sliced bananas or strawberries. You can also use fruit preserves or jams.
Flavor Enhancements
Adding extra flavors can boost your crepes. Here are some tips:
- Spices: Sprinkle in some cinnamon for warmth. A dash of nutmeg can add depth, too.
- Flavored extracts: Swap vanilla for almond or hazelnut extract for more flavor.
Dietary Modifications
You can make your crepes fit different diets:
- Gluten-free options: Use a gluten-free flour blend. This keeps the crepes light and tasty.
- Dairy-free alternatives: Swap milk for almond or coconut milk. Use dairy-free butter, too.
Feel free to mix and match these ideas. Your crepes can be as unique as you!
Storage Info
Storing Leftover Crepes
To keep your leftover crepes fresh, store them in the fridge. Place them in an airtight container. If you stack them, separate each crepe with parchment paper. This prevents sticking. They will stay good for about 2 to 3 days.
If you want to store crepes longer, freezing is best. First, let them cool completely. Then, stack them with parchment paper in between. Wrap the stack tightly in plastic wrap, then place it in a freezer bag. These can last up to 2 months in the freezer.
Shelf Life
You can store homemade crepes for 2 to 3 days in the fridge. In the freezer, they last for up to 2 months. When checking for spoilage, look for signs like a sour smell or a change in color. If you see any mold, toss them. Always remember to trust your senses. If something seems off, it’s better not to eat it.
FAQs
Can I make the batter in advance?
Yes, you can make the batter ahead of time. To do this, mix your dry ingredients first. Then, add the eggs and melted butter. After that, whisk in the milk and vanilla. Cover the bowl with plastic wrap and place it in the fridge. The batter will stay fresh for up to two days. Just remember to whisk it again before using. This saves time when you want to cook.
What can I use instead of hazelnuts?
If you cannot use hazelnuts, there are many options. You can use almonds, walnuts, or pecans instead. If allergies are a concern, try sunflower seed butter or pumpkin seed butter. These spreads work well and have a similar creamy texture. You can still enjoy the rich taste of the crepes without hazelnuts.
How do I know when the crepes are done?
Look for a few signs to know your crepes are ready. The edges will lift up slightly, and the bottom will look set. You should see a light golden color on the bottom. If the top looks dry, it’s time to flip. Cook the other side for about one minute. This ensures you have tender and delicious crepes every time.
You now have all the tools to make perfect crepes at home. We covered the key ingredients, easy steps to mix and cook, and tips for the best texture. You learned how to store them, how to modify recipes, and even tricks for different dietary needs. Remember, practice makes perfect. Don't hesitate to experiment with flavors and fillings. Crepes are versatile, delicious, and fun to make. Enjoy your cooking journey and share your tasty creations with others!