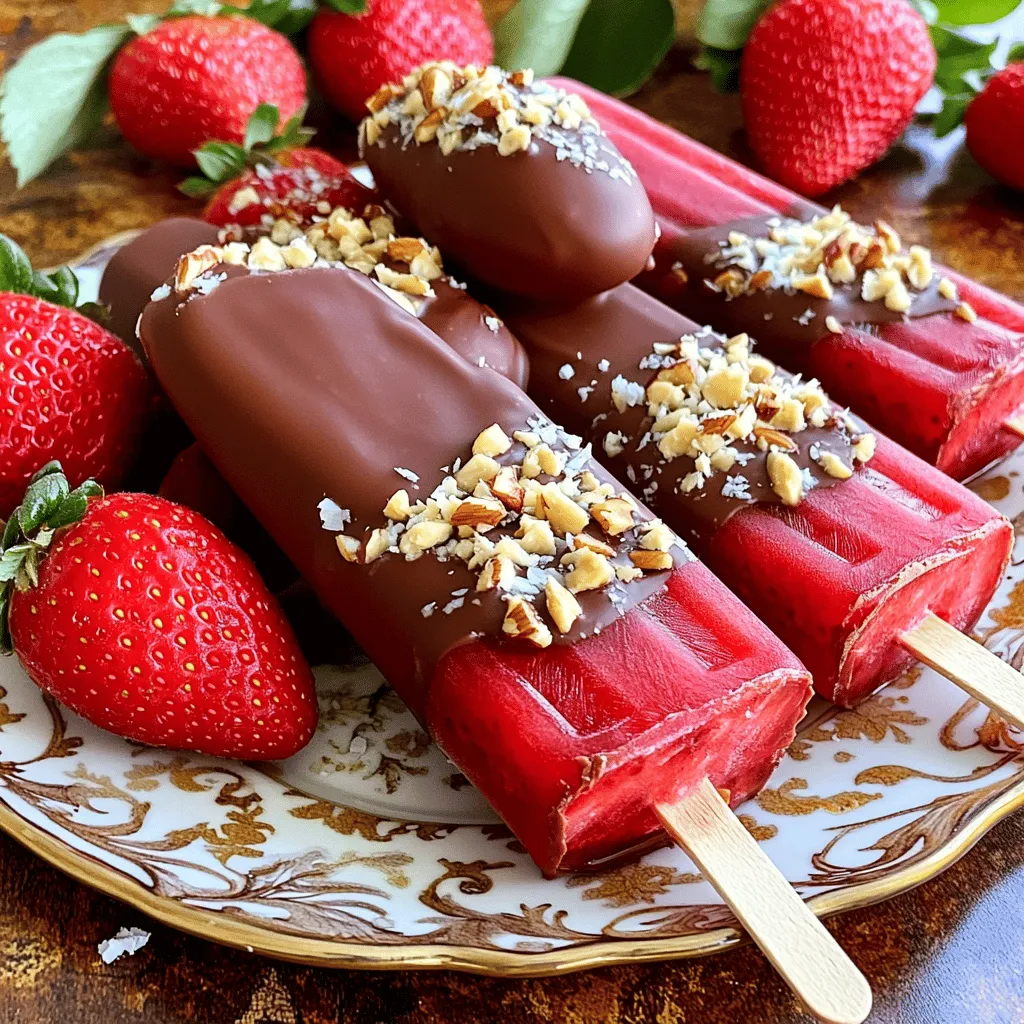
Are you ready to enjoy a sweet treat that’s both fun and easy to make? Chocolate Dipped Strawberry Popsicles are the perfect summer delight! With just a few simple ingredients, you can create a refreshing snack that pleases kids and adults alike. I’ll share my step-by-step guide, tips, and fun variations, ensuring you master this delicious recipe. Let’s dive into the world of homemade popsicles, where every bite is a burst of joy!
Ingredients
List of Ingredients
– 2 cups fresh strawberries, hulled and halved
– 1 cup coconut milk (or any milk of your choice)
– 2 tablespoons honey or maple syrup (adjust to taste)
– 1 teaspoon vanilla extract
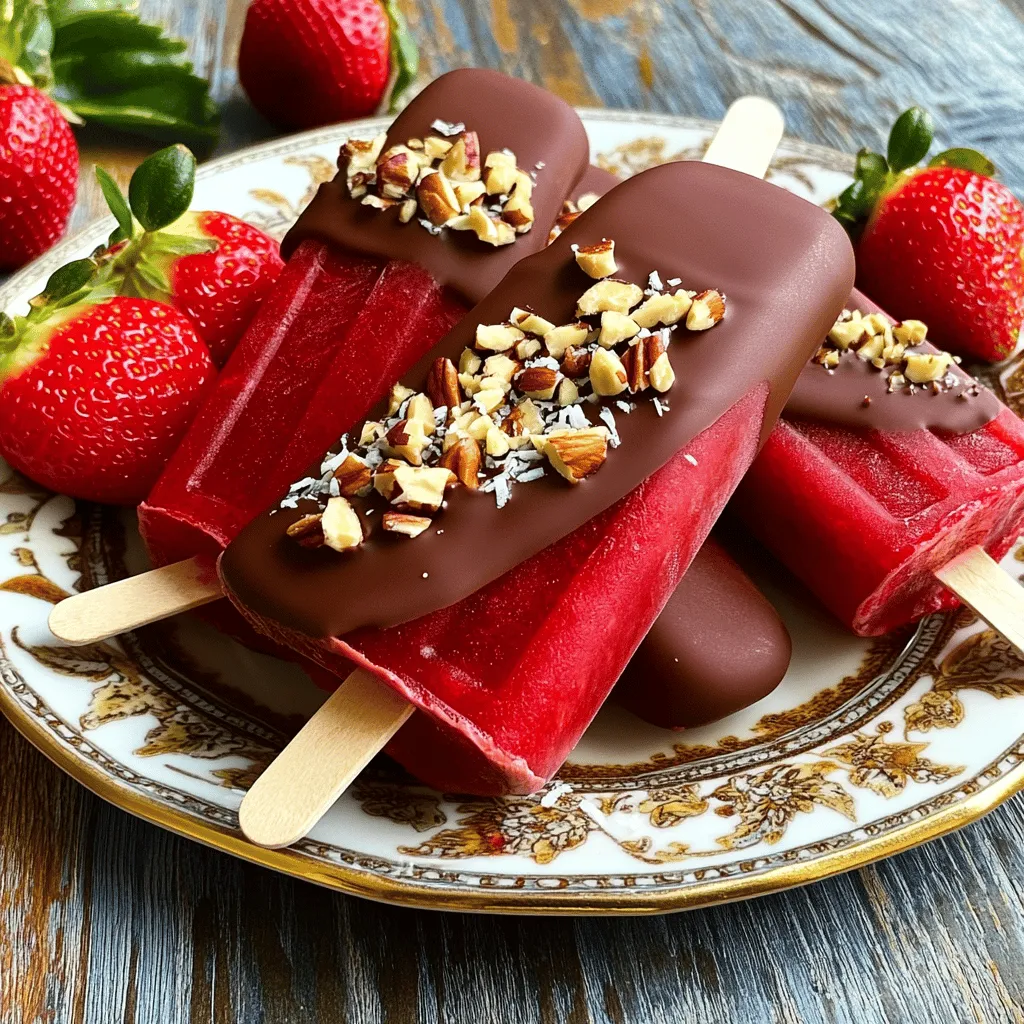
– 100g dark chocolate, chopped
– 1 tablespoon coconut oil
– ¼ cup crushed nuts (almonds, pistachios, or hazelnuts for topping, optional)
Fresh strawberries make the base for these popsicles. You want ripe, sweet berries. They should shine and smell sweet. Coconut milk adds creaminess and pairs well with strawberries. If you prefer, use almond or oat milk instead.
For sweetness, I like honey or maple syrup. You can adjust the amount based on your taste. The vanilla extract brings warmth and depth.
Next, we have dark chocolate. Choose one that you love. It coats the popsicles and gives a nice contrast to the fruit. The coconut oil helps the chocolate melt smoothly.
Lastly, the crushed nuts are optional but add great crunch and flavor. Almonds, pistachios, or hazelnuts work well. You can skip them if you want a simpler treat.
Now that you have your ingredients, you’re ready to create a delicious dessert!
Step-by-Step Instructions
Blending the Base Mixture
Start with fresh strawberries. Remove the green tops and cut them in half. This makes them easier to blend. Place the hulled strawberries in a blender. Add one cup of coconut milk, two tablespoons of honey or maple syrup, and one teaspoon of vanilla extract. Blend these ingredients until smooth. You want a nice, creamy mixture.
Filling the Popsicle Molds
Next, grab your popsicle molds. Pour the strawberry mixture into the molds. Fill each one about three-quarters full. This space helps the popsicles expand as they freeze. Be careful not to overfill them, or it will be messy.
Freezing Process
Now, insert the popsicle sticks into each mold. Make sure they stand straight. Place the molds in the freezer. Let them freeze for about four to six hours. They need to be solid to remove them easily. To release them, run warm water over the outside of the molds. This trick helps loosen the popsicles.
Melting the Chocolate Coating
For the chocolate coating, gather 100 grams of chopped dark chocolate and one tablespoon of coconut oil. Place these in a heatproof bowl. Melt the mixture in the microwave. Do this in 20-second intervals. Stir after each interval until smooth. You want it fully melted and ready to dip.
Dipping and Setting
Now comes the fun part—dipping! Take each popsicle and dip it halfway into the melted chocolate. Let any excess chocolate drip off. If you like, roll the dipped part in crushed nuts for extra crunch. Then, lay the popsicles on a baking sheet lined with parchment paper. Return them to the freezer for about 10 to 15 minutes. This sets the chocolate nicely.
Tips & Tricks
Choosing the Right Strawberries
Fresh strawberries are key for these popsicles. Look for berries that are bright red, firm, and free from blemishes. The best strawberries taste sweet and juicy. Ripe strawberries have more flavor, making your popsicles better. Choose organic strawberries if you can, as they often have a richer taste.
Customizing Sweetness
Adjust the sweetness to fit your taste. Use honey or maple syrup to sweeten your popsicles. Start with the 2 tablespoons suggested in the recipe. If you prefer a sweeter treat, add more. Just mix well and taste. Remember, the sweetness can change the final flavor.
Perfecting the Chocolate Dip
To get a smooth, even coat of chocolate, melt dark chocolate with coconut oil. This mix helps the chocolate flow better. Heat it in short bursts in the microwave. Stir often to avoid burning. When dipping your popsicles, let the excess chocolate drip off. This keeps your popsicles neat and tasty.
Variations
Alternative Coatings
You can switch up the chocolate for your popsicles. Instead of dark chocolate, try milk chocolate for a sweeter taste. White chocolate adds a creamy flavor, while ruby chocolate brings a unique berry-like taste. Each type can change how your popsicles taste. Experiment with them to find your favorite.
Flavor Combinations
Mixing fruits can make your popsicles even more fun. Try adding bananas or mango to the strawberry mix. You can also add a few drops of flavor extracts, like almond or coconut. These small changes create new tastes. Each combination can surprise your taste buds.
Healthier Options
If you’re looking for healthier popsicles, there are easy swaps. Use a low-sugar sweetener like stevia instead of honey or maple syrup. For a dairy-free option, stick with coconut milk or almond milk. You can even add Greek yogurt for creaminess without much sugar. These options keep your popsicles tasty while making them better for you.
Storage Info
Proper Storage Techniques
To keep your chocolate dipped strawberry popsicles fresh, store them in an airtight container. This helps prevent freezer burn. If you do not have one, wrap each popsicle in plastic wrap. This adds an extra layer of protection. Make sure to label the container with the date to track freshness.
Shelf Life
You can store these popsicles in the freezer for up to two months. After that, they may lose taste and texture. To enjoy them at their best, try to eat them within this time frame.
Thawing Tips
When you are ready to enjoy your popsicles, remove them from the freezer. Let them sit for about 5 minutes to soften slightly. This makes them easier to bite into. If you want them cold and firm, enjoy them right away!
FAQs
Can I use frozen strawberries instead of fresh?
Yes, you can use frozen strawberries! Just remember to thaw them first. This helps in blending. Frozen strawberries may make your popsicles a bit softer. But they still taste great.
How can I make these popsicles vegan?
You can easily make these popsicles vegan. Just swap honey for maple syrup. Use coconut milk or any plant-based milk. This keeps the popsicles creamy and delicious.
What is the best way to remove popsicles from molds?
To remove popsicles, run warm water over the outside of the molds. This warms the sides and helps loosen the popsicles. They should slide out easily after a few seconds.
How do I prevent the chocolate from cracking after setting?
To prevent cracking, add coconut oil to the chocolate. This keeps it smooth and flexible. Make sure the popsicles are cold when you dip them in chocolate. This helps the chocolate set nicely without cracking.
You now have a simple guide to make tasty strawberry popsicles. Using fresh strawberries and creamy coconut milk, you can create a fun treat. Remember to customize the sweetness and experiment with toppings like nuts. Storing them right will keep them fresh, and you can enjoy different variations too. With these steps, you’ll impress family and friends with your skills. Get ready to enjoy your homemade popsicles!