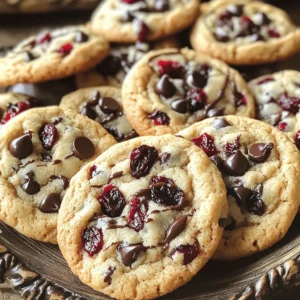
- Cherry Chocolate Chewy Cookies Irresistible Delight
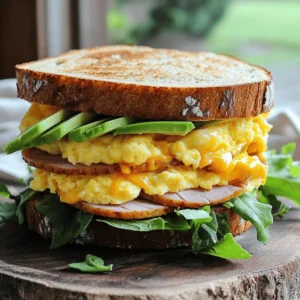
- Egg & Ham Breakfast Sandwich with Melty Cheddar Delight
- Unicorn Rainbow Snack Mix Fun and Colorful Treat
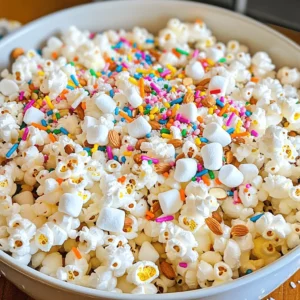
- Birthday Cake Popcorn Snack Mix Fun and Tasty Treat
- Peanut Butter Chocolate Snack Mix Crunchy and Fun
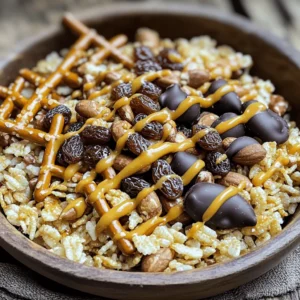
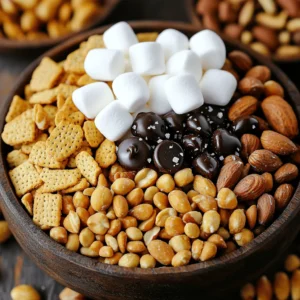
- S'mores Trail Mix Tasty Snack for Any Occasion
- Chocolate Dipped Pumpkin Biscotti Irresistible Treat
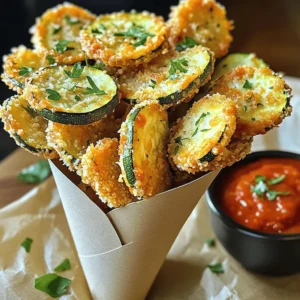
- Parmesan Zucchini Fries Crunchy and Flavorful Snack
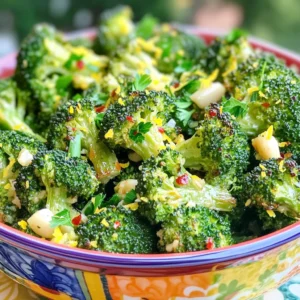
- Lemon Garlic Roasted Broccoli Tasty and Healthy Side
- Oreo Pumpkin Cheesecake Irresistible Fall Treat
- Jalapeño Popper Pinwheels Flavorful and Easy Recipe
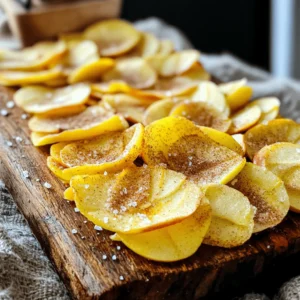
- Cinnamon Apple Chips Simple and Tasty Snack Recipe
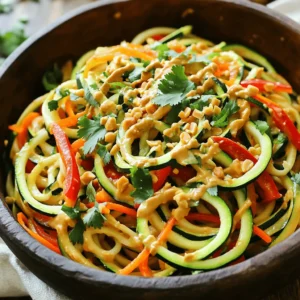
- Thai Peanut Zucchini Noodles Flavorful and Fresh Meal
- Baked Feta Pasta Simple and Flavorful Recipe
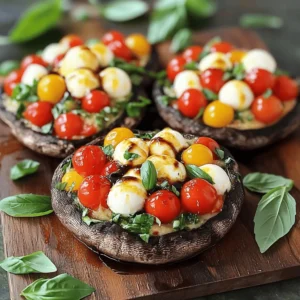
- Caprese Stuffed Portobellos Savory and Simple Delight
- Rainbow Veggie Pinwheels Fresh and Colorful Delight
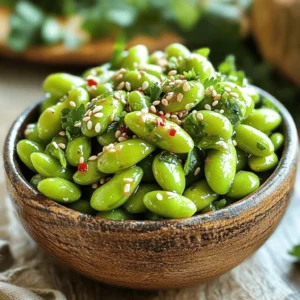
- Spicy Garlic Edamame Flavorful and Easy Snack Recipe
- Chocolate Dipped Pretzel Rods Delightful Snack Treat
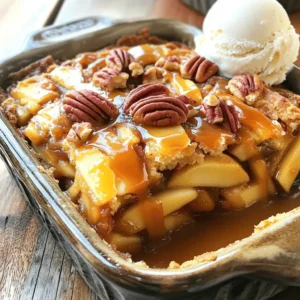
- Caramel Apple Dump Cake Easy and Delicious Dessert
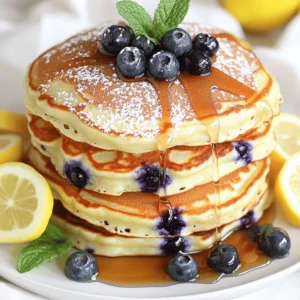
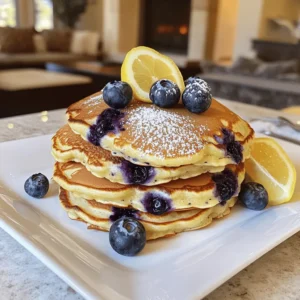
- Lemon Blueberry Ricotta Pancakes Tasty Breakfast Treat
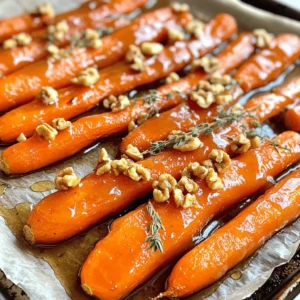
- Maple Glazed Roasted Carrots Flavorful Side Dish
- Cheesy Broccoli Cheddar Potato Skins Flavorful Treat
- No Bake Monster Cookie Energy Bites Easy Recipe
- Savory Sweet Potato and Black Bean Enchiladas Recipe
- Easy Spicy Tuna Sushi Bowls Tasty and Quick Recipe
- Cheesy Garlic Protein Pizza Quick and Flavorful Meal
- Copycat Chicken Salad Chick Classic Recipe Unleashed
- Cheesy Broccoli Cheddar Potato Skins Delightful Recipe
- Sweet Potato and Black Bean Enchiladas Delicious Dish
- Lemon Blueberry Ricotta Pancakes Delightful Breakfast Dish
- Maple Glazed Roasted Carrots Tasty and Simple Dish
- Cheesy Broccoli Cheddar Potato Skins Delightful Recipe
- No Bake Monster Cookie Energy Bites Easy Recipe
- Sweet Potato and Black Bean Enchiladas Delicious Dish
- Easy Spicy Tuna Sushi Bowls Flavorful Weeknight Meal
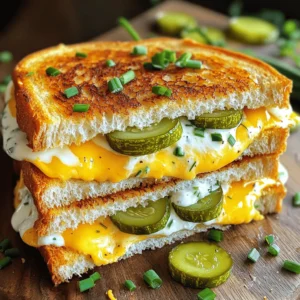
- Pickle Ranch Grilled Cheese Irresistible Flavor Boost
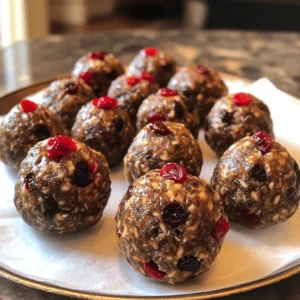
- Cherry Almond Butter Bites Tasty and Nutritious Treat
- Pickle Brined Turkey Burgers Juicy and Flavorful Meal
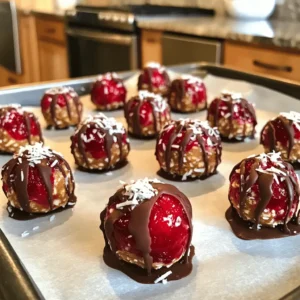
- Cherry Chocolate Protein Balls Healthy Snack Delight
- Pickle Ranch Chicken Casserole Easy and Tasty Dish
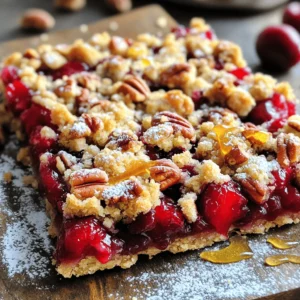
- Cherry Pecan Crumble Bars Tasty and Simple Treat
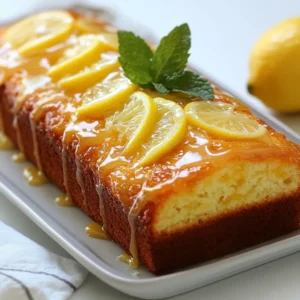
- Glazed Lemon Loaf Simple and Moist Recipe Guide


![The right ingredients make all the difference in creating tasty Chocolate Dipped Pumpkin Biscotti. Here’s what you need to gather for this scrumptious treat: - 1 cup canned pumpkin puree - 3/4 cup sugar - 1/2 cup vegetable oil - 2 large eggs - 2 teaspoons vanilla extract - 2 1/2 cups all-purpose flour - 1 teaspoon baking powder - 1/2 teaspoon baking soda - 1 teaspoon ground cinnamon - 1/2 teaspoon ground nutmeg - 1/4 teaspoon ground ginger - 1/2 teaspoon salt - 1 cup semi-sweet chocolate chips - Optional: Chopped nuts or pumpkin seeds for topping Canned pumpkin puree gives the biscotti a rich flavor and moisture. Sugar adds sweetness and helps create a nice crust. The vegetable oil keeps the biscotti tender. Eggs bind everything together and add structure. Vanilla extract brings warmth and depth. All-purpose flour provides the base, while baking powder and baking soda help the dough rise. Ground cinnamon, nutmeg, and ginger create that cozy fall flavor. Salt balances the sweetness. Semi-sweet chocolate chips provide the perfect chocolatey finish. You can add chopped nuts or pumpkin seeds for extra crunch if you like. Each ingredient plays a key role in making these biscotti a delightful treat. For the full recipe, check the details available. Start by preheating your oven to 350°F (175°C). This step is key to ensure even baking. Line a baking sheet with parchment paper. This helps prevent sticking and makes cleanup easy. In a large bowl, combine 1 cup of canned pumpkin puree, 3/4 cup of sugar, 1/2 cup of vegetable oil, 2 large eggs, and 2 teaspoons of vanilla extract. Whisk these ingredients together until smooth. This mixture will bring moisture and flavor to your biscotti. In another bowl, mix 2 1/2 cups of all-purpose flour, 1 teaspoon of baking powder, 1/2 teaspoon of baking soda, 1 teaspoon of ground cinnamon, 1/2 teaspoon of ground nutmeg, 1/4 teaspoon of ground ginger, and 1/2 teaspoon of salt. Whisk these dry ingredients together. This blend gives the biscotti structure and spice. Gradually add the dry ingredients to the wet mixture. Stir gently until you see no dry flour. Do not overmix! Divide the dough into two equal parts. Shape each half into a log about 12 inches long and 3 inches wide. Place these logs on your prepared baking sheet with space in between. Bake the logs in your preheated oven for 25-30 minutes. They should look golden and firm when done. After baking, let them cool for about 15 minutes. This cooling time makes slicing easier. Once cooled, take a serrated knife and slice each log diagonally into 1-inch thick slices. Arrange the slices cut-side down on the baking sheet. Return them to the oven for another 15-20 minutes. This second bake makes them crisp and delightful. While the biscotti cool, melt 1 cup of semi-sweet chocolate chips. Use a microwave-safe bowl and heat in 30-second bursts, stirring in between. Once smooth, dip one end of each biscotti into the melted chocolate. Let the excess drip off. If you like, sprinkle chopped nuts or pumpkin seeds on top while the chocolate is still wet. Finally, place the dipped biscotti on parchment paper to let the chocolate set. For the full recipe details, check out the [Full Recipe]. To get the right texture, use fresh canned pumpkin puree. This makes your biscotti moist and flavorful. Mix the wet and dry ingredients until just combined. Overmixing can lead to tough biscotti. To achieve crispiness, slice the logs thinly. A serrated knife works best for clean cuts. Bake the sliced biscotti twice for that satisfying crunch. Store your biscotti in an airtight container. This keeps them fresh and tasty. They last up to two weeks at room temperature. You can also freeze them for longer storage. Just place them in a freezer bag, and they will be good for three months. When ready, thaw them at room temperature. Pair these biscotti with coffee or tea. They make a lovely treat for afternoon breaks. You can also gift them to friends. Put them in a pretty box, and they will love the thought. For extra flair, add a ribbon to the box. Enjoy sharing your delicious creation with others! {{image_2}} You can make these biscotti gluten-free! Just swap the all-purpose flour with a gluten-free blend. Look for one that works well in baking. You can use 2 ½ cups of this blend. Make sure it has xanthan gum in it, as it helps with texture. This swap keeps the taste and crunch you love. Want to spice things up? You can add more flavor! Try one teaspoon of pumpkin spice for a warm touch. You might also like to add a splash of almond extract or maple extract for a twist. As for the chocolate, you can use white chocolate or dark chocolate instead of semi-sweet. Each choice gives a new taste to your biscotti. If you need a nut-free version, that's easy! Just skip any nuts or seeds you might want to add on top. You can also use sunflower seeds or pumpkin seeds if you want a crunch without nuts. Look for chocolate that is nut-free, too. Enjoy the same great biscotti without worry! You can get a handy printable recipe card for chocolate dipped pumpkin biscotti. This card helps you keep all your ingredients and steps in one place. You can print it out or save it on your phone. This makes cooking easy and fun! Using the recipe card is simple. First, gather all your ingredients. The card lists everything you need. Next, follow the steps on the card. It gives you clear instructions, so you won’t miss any steps. You can check off each step as you go. This keeps you on track and makes cooking less stressful. Having a printable version offers many benefits. It allows you to save time while cooking. You won’t need to search your phone or computer for the recipe. Plus, you can jot down notes or changes for next time. If you like to cook with friends, a printed card helps everyone see the steps together. It's a fun way to share the joy of cooking! Store your biscotti in an airtight container. This keeps them fresh and crisp. You can also use wax paper between layers to avoid sticking. Biscotti can stay fresh for up to two weeks on the counter. Yes, you can make them ahead of time. Biscotti actually taste better after a day or two. Just store them as mentioned above. This makes them perfect for events or gifts. To make it dairy-free, simply swap the semi-sweet chocolate chips for dairy-free chocolate. You can also use plant-based oil instead of vegetable oil if needed. This keeps the flavor while fitting your diet. You can try white chocolate or even dark chocolate for a twist. Chopped nuts or pumpkin seeds add extra crunch. You could also sprinkle cinnamon sugar on top before baking for added flavor. The first bake takes about 25-30 minutes. After slicing, you will bake them again for 15-20 minutes. This two-step baking makes them crunchy and perfect for dipping. Yes, you can use homemade pumpkin puree or different brands. Just make sure it is pure pumpkin and not a pie filling. The flavor will be just as good, and it gives you options! This guide shares how to make tasty chocolate-dipped pumpkin biscotti. You learned about the key ingredients, step-by-step instructions, and helpful tips for perfect results. I covered variations for gluten-free, nut-free, and different flavors. Use the printable recipe card for easy access. Biscotti are great for sharing or a cozy treat with your favorite drink. Enjoy making this fun recipe and impress your friends with your baking skills!](https://cheftaling.com/wp-content/uploads/2025/07/4aa23013-4775-44d2-b7fd-66bc8f743f85-300x300.webp)
![To make the Oreo pumpkin cheesecake, you need these simple ingredients: - 1 ½ cups Oreo cookie crumbs - 4 tablespoons unsalted butter, melted - 16 oz cream cheese, softened - 1 cup canned pumpkin puree - 1 cup sugar - 1 teaspoon vanilla extract - 2 large eggs - 1 teaspoon ground cinnamon - ½ teaspoon ground nutmeg - ¼ teaspoon ground ginger - ½ cup sour cream - Extra Oreo cookies for garnish (optional) These ingredients work together to create a creamy and flavorful cheesecake. The Oreo cookie crumbs give the crust a delicious, rich taste. Using cream cheese and pumpkin puree makes it smooth and light. The spices like cinnamon, nutmeg, and ginger add warmth, perfect for fall. I love how easy this recipe is. You can find all these ingredients at your local grocery store. Just remember to pick up some extra Oreos if you want to garnish your cheesecake. Trust me, it’s worth it! For the full recipe, check the link provided. Set your oven temperature to 325°F (163°C). This step is key for even baking. In a medium bowl, mix 1 ½ cups of Oreo cookie crumbs with 4 tablespoons of melted butter. Stir until the crumbs soak up the butter. Press this mixture into the bottom of a 9-inch springform pan. Make it firm and even. Bake the crust for 10 minutes, then let it cool. In a large bowl, beat 16 oz of softened cream cheese until it is smooth. This process makes the filling creamy. Then, mix in 1 cup of canned pumpkin puree and 1 cup of sugar until everything is well combined. Add 2 large eggs one at a time, mixing well after each. Next, include 1 teaspoon of ground cinnamon, ½ teaspoon of ground nutmeg, and ¼ teaspoon of ground ginger. Mix on low speed until just combined. Pour the pumpkin cheesecake filling over the cooled Oreo crust. Smooth the top with a spatula. Place it in the oven and bake for 50-60 minutes. Keep an eye on it; the center should still jiggle slightly when done. After baking, turn off the oven and leave the cheesecake inside for an hour. This gradual cooling helps prevent cracks. Once it cools down, refrigerate the cheesecake for at least 4 hours. For best results, chill it overnight. For the complete recipe, check out the Full Recipe section. - Monitor cake for slight jiggle: This helps ensure your cheesecake is creamy. When it has a slight jiggle in the center, it means it's still set properly. Don't overbake; a slight jiggle means it will firm up as it cools. - Use a water bath for more even cooking: This method helps the cheesecake cook gently. Fill a large pan with water and place it in the oven while baking. The steam keeps your cheesecake moist and prevents cracks. - Serve with caramel sauce: A drizzle of caramel adds sweetness and a beautiful look. Pour some on each plate before placing the cheesecake slice on top. - Sprinkle additional crushed Oreos: This adds texture and a fun look. Just crush some extra Oreos and sprinkle them on top for an appealing finish. - Perfect for holidays: This cheesecake shines at Thanksgiving or Halloween gatherings. Its flavors and look make it a crowd favorite. - Pair with coffee or chai: The rich flavors match well with warm drinks. Serve with a cup of coffee or chai for a delightful treat. For the full recipe, check out the detailed instructions to create this delicious dessert! {{image_2}} You can make your Oreo pumpkin cheesecake even better with a few add-ins. - Chocolate chips: Try adding chocolate chips to the filling for an extra layer of flavor. They melt and make each slice richer and more decadent. - Swirl in caramel or chocolate sauce: Drizzle some caramel or chocolate sauce into the cheesecake before baking. Use a knife to swirl it in, creating a beautiful pattern. This adds a sweet surprise in every bite. If you need a gluten-free version, it's easy to adapt. Simply substitute regular Oreo cookies with gluten-free Oreo cookies. The taste stays delicious, and everyone can enjoy this treat without worry. Want to switch things up? Here are some fun flavor ideas: - Add white chocolate: Mixing in white chocolate chips gives a rich and creamy taste. It pairs nicely with the pumpkin flavor. - Experiment with different spices: You can try other spices like allspice or cloves. Just a pinch can change the whole flavor profile. Get creative and find your favorite combo! For the full recipe, check out the [Full Recipe]. After baking your Oreo pumpkin cheesecake, let it cool completely. Then, store it in an airtight container. This way, it stays fresh for up to 5 days. Keeping it sealed helps prevent any odors from other foods in the fridge from affecting its taste. If you want to keep your cheesecake longer, freezing is a great option. First, slice the cheesecake into pieces. Wrap each slice tightly in plastic wrap. Place the wrapped slices in a freezer-safe bag or container. This method helps keep the cheesecake fresh for up to 3 months. When you are ready to enjoy, just take out a slice! To thaw your frozen cheesecake, take it out of the freezer and unwrap it. Place the slice in the fridge for several hours or overnight. This slow thawing process keeps the texture smooth and creamy. Avoid thawing at room temperature, as this can make the cheesecake soggy. Enjoy your delicious treat anytime! For the full recipe, check out the main article. Yes, you can use fresh pumpkin. Fresh pumpkin has a different taste and texture. To use it, roast the pumpkin until soft, then puree it. Make sure to drain excess water. This process takes more time than using canned pumpkin, but the flavor is often richer and fresher. Check the cheesecake by gently shaking the pan. The center should jiggle slightly, but the edges should be set. You can also insert a knife in the center. If it comes out mostly clean, it’s done. Remember, the cheesecake will firm up as it cools. If your cheesecake cracks, don’t worry! This can happen to anyone. To prevent cracks, avoid overbaking and let the cheesecake cool slowly in the oven. If cracks do occur, cover them with whipped cream or more crushed Oreos. It will still taste great! To achieve an extra creamy cheesecake, use softened cream cheese. Beat it well to remove lumps. Adding sour cream helps too, as it adds moisture. Also, avoid overmixing after adding eggs, as this can make the texture less smooth. This blog post covers everything you need to know about making a pumpkin cheesecake with an Oreo crust. You learned the key ingredients, step-by-step instructions, and useful tips for success. I hope you feel ready to try this recipe. Experiment with flavors and enjoy your own tasty twist. With care and patience, a delicious dessert awaits you!](https://cheftaling.com/wp-content/uploads/2025/07/fca7cf4f-ca66-4e80-b5bd-d11f1905d500-300x300.webp)

![When making Baked Feta Pasta, you need some simple ingredients that pack a punch. Here’s what you’ll need: - 8 ounces of pasta (penne or rigatoni) - 1 block (8 ounces) of feta cheese - 1 pint of cherry tomatoes, halved - 1/4 cup of olive oil - 4 cloves of garlic, minced - 1 teaspoon of dried oregano - 1/2 teaspoon of red pepper flakes (adjust to taste) - Salt and pepper to taste - 1/4 cup of fresh basil, chopped (for garnish) - Zest of 1 lemon (for a fresh twist) Gather these ingredients before you start. They are easy to find at your local market. Fresh ingredients make the dish taste better. You can choose any shape of pasta you like, but I prefer penne or rigatoni for this recipe. The feta cheese adds a creamy texture when baked, while the tomatoes burst with flavor. The garlic and herbs give it that extra kick. Don't forget the lemon zest; it brightens the whole dish! For a full experience, you can check the Full Recipe. - Preheat your oven to 400°F (200°C). - Take an 8-ounce block of feta cheese and place it in the center of a baking dish. - Surround the cheese with 1 pint of halved cherry tomatoes. - Add 4 minced garlic cloves on top of the cheese and tomatoes. - Drizzle 1/4 cup of olive oil over the feta and tomatoes. - Sprinkle 1 teaspoon of dried oregano, 1/2 teaspoon of red pepper flakes, salt, and pepper to taste on top. - Bake the dish for 25-30 minutes. The cheese should be soft and the tomatoes bursting. - While the feta and tomatoes bake, cook 8 ounces of pasta according to the package instructions. Drain it when done. - After baking, take the dish out of the oven. Use a fork to mash the feta and tomatoes together. - Mix in the cooked pasta, ensuring it combines well with the creamy mixture. - Stir in the zest of 1 lemon and 1/4 cup of chopped fresh basil. - Taste and adjust the seasoning if needed. Serve warm for a delightful meal. For the full recipe, be sure to check the details above! Choosing the right pasta shape Pasta shape matters for this dish. I like penne or rigatoni. Their curves hold sauce well. You can use any pasta you enjoy, but these shapes work best. How to achieve the perfect feta consistency Bake the feta until soft but not runny. You want it creamy, not liquid. When you mix it with tomatoes, it should blend smoothly. Adding more spices or herbs Feel free to add your favorite spices. Try thyme, rosemary, or crushed red pepper. They can boost the taste. Fresh herbs like parsley or dill also add great flavor. Incorporating vegetables for variety You can add more veggies to the mix. Spinach, bell peppers, or zucchini work well. Toss them in with the tomatoes. They will cook down and add color and nutrients. Serving suggestions for visual appeal Serve the dish in a large bowl. This makes it look inviting. Add a sprinkle of cheese on top for flair. A drizzle of olive oil can also enhance the look. Garnishing with fresh herbs Finish with fresh herbs like basil or parsley. They add color and freshness. A little lemon zest on top also brightens the dish. It looks great and tastes even better. For a complete guide to making this delicious dish, check out the Full Recipe. {{image_2}} If you need gluten-free options, use gluten-free pasta. Many brands make great choices, like brown rice pasta or quinoa pasta. These can give you the same tasty dish without gluten. For a vegan twist, swap the feta cheese for a plant-based cheese. Look for brands that melt well. You can also use tofu for a protein boost. Just marinate it in lemon juice and herbs for extra flavor. Want to add protein? Chicken and shrimp work well in this dish. Cook them separately and toss them in with the pasta. This adds a hearty touch. You can also try different cheeses. Goat cheese adds a tangy flavor, while mozzarella gives a creamy texture. Experiment and find your favorite cheese that fits your taste. Seasonal vegetables can make this dish even better. In summer, add zucchini or bell peppers. In fall, use roasted butternut squash or Brussels sprouts. Fresh veggies add color and nutrition. Herbs can change the flavor too. Try fresh thyme or parsley for a new twist. You can also use a mix of herbs, depending on what you have. These small changes can make your baked feta pasta special. For the full recipe, check out [Full Recipe]. To keep your Baked Feta Pasta fresh, start by refrigerating leftovers. Place the pasta in an airtight container. Make sure to cool it to room temperature before sealing. This helps prevent moisture buildup. You can also freeze portions for meal prep. Use freezer-safe bags or containers. Divide the pasta into serving sizes. Just remember to label them with the date. When you’re ready to enjoy leftovers, it's best to reheat gently. Use the stove or the microwave. If using a microwave, cover the dish to keep moisture in. Stir the pasta halfway through to heat evenly. Avoid cooking too long, as it can turn the pasta mushy. A splash of water or olive oil can help revive the dish. Baked Feta Pasta can last in the fridge for about 3 to 5 days. Always check for signs of spoilage. Look for any off smells, changes in color, or mold. If you notice any of these, it’s best to discard the dish. Keeping track of how long it’s been stored helps ensure you enjoy it at its best. What can I substitute for feta cheese? You can use goat cheese or ricotta for a similar taste. Cream cheese also works well. Each option gives a nice twist to your dish. Can I use frozen vegetables in this dish? Yes, frozen vegetables are great! Just add them in with the tomatoes. They will cook well in the oven. Remember to adjust cooking time if needed. How do I make Baked Feta Pasta in a one-pot? To make it in one pot, cook the pasta in a large pot with water. Add the feta, tomatoes, and spices directly into the pot. Stir everything together while it cooks. This saves time and cleanup! Could I use roasted garlic instead of fresh? Absolutely! Roasted garlic adds a sweet, deep flavor. Just use about half the amount since it’s stronger. Mix it in with the feta and tomatoes. What are the calorie counts per serving? Each serving has around 400 calories. This can vary based on the pasta and oil you use. Adjust your ingredients to fit your diet. Is this recipe suitable for a low-carb diet? This recipe is not low-carb due to the pasta. For a low-carb option, use zucchini noodles or spaghetti squash instead. They are healthy and delicious alternatives. This Baked Feta Pasta combines fresh ingredients for a flavorful meal. You need simple steps, from baking the feta and tomatoes to mixing in cooked pasta. With tips for storage and variations, you can easily adapt this dish. I hope you feel inspired to try different flavors. Meal prep or inviting friends over can be fun with it. Enjoy your cooking, and remember to add your own twist!](https://cheftaling.com/wp-content/uploads/2025/07/1438cfca-4f41-4544-a71b-27e4d7a143f1-300x300.webp)

![- 1 cup pretzel rods - 1 cup dark chocolate chips - 1 teaspoon coconut oil (for smoothness) - 1/2 cup chopped nuts (almonds, peanuts, or hazelnuts) - 1/2 cup colorful sprinkles - Sea salt for garnish To make chocolate dipped pretzel rods, you need just a few simple ingredients. First, grab some pretzel rods. They add a great crunch. Next, gather dark chocolate chips. They bring rich flavor and sweetness. You will also need coconut oil. This keeps the chocolate smooth and easy to dip. Chopped nuts can add a nice crunch and flavor. Almonds, peanuts, or hazelnuts work well. Colorful sprinkles make your treats look fun and festive. Last, sea salt adds a touch of balance. It enhances the sweet taste of the chocolate. This list gives you all you need for a tasty snack. Follow the [Full Recipe] for detailed steps to create your delicious treat! Melting the chocolate and coconut oil Start by gathering your dark chocolate chips and coconut oil. Place them in a microwave-safe bowl. Heat them in the microwave in 30-second bursts. Stir often until the mix is smooth and melted. This step is key for a nice coating. Dipping the pretzel rods Next, grab your pretzel rods. Dip each rod into the melted chocolate. Make sure the rod is covered well. Lift it out and let the extra chocolate drip off. This helps avoid a soggy snack. Decorating with toppings While the chocolate is still wet, add your toppings. Use chopped nuts, colorful sprinkles, or both. Press them gently to make sure they stick. This adds fun texture and makes the pretzel rods pop visually. Adding sea salt Once all the pretzel rods are coated and decorated, sprinkle a little sea salt on top. This will help balance the sweet chocolate. Just a pinch makes a big difference! Chilling the pretzel rods Now, place the decorated pretzel rods on a baking sheet lined with parchment paper. Pop them in the fridge for about 30 minutes. This helps the chocolate harden and makes the snacks ready to eat. Serving suggestions After chilling, take the pretzel rods out. Carefully remove them from the parchment paper. You can arrange them on a nice platter. They also make great gifts when packaged nicely. Enjoy your tasty treats! For the full recipe, check out the details provided earlier. To get the best chocolate-dipped pretzel rods, start with even coating. Dip your pretzel rod in the melted chocolate. Move it around gently to cover all sides. Let any extra chocolate drip off. This step helps keep the pretzel from being too messy. To handle excess chocolate, hold the pretzel rod above the bowl for a few seconds. Tap it lightly against the bowl's edge. This way, you remove any extra chocolate without losing the sheen. Using coconut oil is key for smooth chocolate. It helps the chocolate stay silky and easy to dip. Just mix one teaspoon with your dark chocolate chips while melting. This simple addition makes a big difference. Watch for chocolate seize. If you get water in your chocolate, it will clump. To avoid this, use dry utensils and bowls. Keep everything clean and dry for best results. Choosing the right toppings can make your pretzel rods pop. You can use chopped nuts, colorful sprinkles, or even crushed candies. Mix and match for fun textures and flavors. For presentation, arrange the dipped pretzel rods on a nice platter. You can even wrap them in clear bags with a ribbon for gifts. This makes your treat look extra special! For the full recipe, check out the details above. {{image_2}} You can choose from many types of chocolate for your pretzel rods. Milk chocolate is sweet and creamy. It makes the pretzels taste rich and indulgent. White chocolate, on the other hand, is sweet but has a different taste. It offers a nice contrast to the salty pretzels. You can also use flavored chocolates, like mint or raspberry. These can add a fun twist to your snack. Just melt them the same way as dark chocolate. This lets you create unique flavors that surprise your guests. While nuts and sprinkles are classic choices, think outside the box. Try crushed cookies, like Oreos, for a different texture. You can also use coconut flakes for a tropical vibe. Dried fruit, like cranberries or cherries, adds a sweet and chewy touch. For special occasions, use seasonal decorations. Around Halloween, use orange and black sprinkles. For Christmas, add red and green ones. This will make your pretzel rods festive and fun. You can easily scale this recipe up or down. If you want more rods, just double the ingredients. If you need fewer, cut the amounts in half. This lets you make just the right amount for any gathering. For parties, serve them on a platter with colorful paper. You could also package them as gifts in clear bags tied with ribbons. This makes them great for sharing or giving away. To keep your chocolate dipped pretzel rods fresh, use an airtight container. A glass jar or a plastic container works best. Line the bottom with wax paper to prevent sticking. Store them in a cool, dry place away from sunlight. This helps maintain their crunch and yummy flavor. Avoid placing them in the fridge unless it is very warm outside. Chilling can cause the chocolate to sweat and lose its shine. If you do refrigerate them, let them sit at room temperature before serving. This restores their texture. If you want to keep your pretzel rods longer, freezing is a great option. Place them in a single layer on a baking sheet. Flash freeze them for about an hour. This keeps them from sticking together. After they freeze, transfer the pretzel rods to a freezer-safe bag. Make sure to squeeze out all the air before sealing. They can last up to three months in the freezer. When you're ready to enjoy them, take them out and let them thaw at room temperature. This brings back their delicious crunch and taste. For the best quality, do not refreeze them after thawing. For the full recipe of chocolate dipped pretzel rods, refer to the recipe section above. Chocolate dipped pretzel rods last about a week at room temperature. Keep them in an airtight container to avoid moisture. If you refrigerate them, they can last up to two weeks. The cold helps the chocolate stay firm and fresh. Yes, you can use different pretzels. Stick pretzels work best, but you can use mini pretzels or pretzel twists too. Each type gives a unique taste and texture. Mini pretzels are great for bite-sized snacks, while twists add fun shapes. Absolutely! You can skip the nuts to make it nut-free. Instead of nuts, try using seeds like sunflower or pumpkin seeds. They add crunch without the nut risk. Use allergen-friendly sprinkles to keep it safe for everyone. You can find pre-made chocolate dipped pretzel rods in many places. Look for brands like Pretzel Crisps or gourmet shops. Online, check Amazon or specialty food stores. Local grocery stores may also stock them in the snack aisle. In this post, we explored how to create delicious chocolate-dipped pretzel rods. We covered the ingredients needed, like pretzel rods and chocolate chips. I shared easy steps for preparing and decorating them. You learned tips for perfecting your technique and making tasty variations. I also discussed storage tips to keep them fresh. Remember, these treats are fun to customize for any occasion. Enjoy making your own version, and impress your friends and family with these sweet snacks!](https://cheftaling.com/wp-content/uploads/2025/07/8442fd37-9d8c-40bc-bbbf-b3358f432144-300x300.webp)


![To make savory sweet potato and black bean enchiladas, gather these simple ingredients: - 2 medium sweet potatoes, peeled and diced - 1 can (15 oz) black beans, rinsed and drained - 1 cup corn kernels (fresh or frozen) - 1 teaspoon ground cumin - 1 teaspoon chili powder - 1/2 teaspoon smoked paprika - Salt and pepper to taste - 8-10 corn tortillas - 2 cups enchilada sauce (store-bought or homemade) - 1 cup shredded cheese (cheddar, Monterey Jack, or vegan cheese) - Fresh cilantro, chopped (for garnish) - Lime wedges (for serving) These ingredients bring together great flavors and textures. Sweet potatoes add creaminess, while black beans provide protein. Corn gives a nice crunch, and spices bring warmth. You can find many options for enchilada sauce. I often make my own, but store-bought works well too. Feel free to customize the cheese based on your taste. If you want to keep it plant-based, use vegan cheese. Fresh cilantro and lime wedges make the dish pop. They add freshness and brightness to each bite. Check out the Full Recipe for detailed steps on how to put these ingredients together into a delicious meal! - Preheat the oven to 375°F (190°C). - In a medium pot, boil water. Add the diced sweet potatoes. Cook for about 10-15 minutes until they are soft. Drain and mash them slightly. - In a large bowl, mix the mashed sweet potatoes with black beans, corn, cumin, chili powder, smoked paprika, salt, and pepper. Combine well. - Take a corn tortilla. Add about 2-3 tablespoons of the sweet potato mixture in the middle. Roll it tightly. Place the rolled tortilla seam-side down in a baking dish. Repeat with the rest of the tortillas and filling. - Spread a thin layer of enchilada sauce (about 1/2 cup) on the bottom of a 9x13 inch baking dish. This keeps the tortillas from sticking. - Once all the enchiladas are in the dish, pour the rest of the enchilada sauce on top. Make sure to cover all the tortillas. Sprinkle shredded cheese on top. - Cover the dish with foil to stop the cheese from burning. Bake for 20 minutes. Remove the foil and bake for another 10-15 minutes until the cheese is melted and bubbly. - Take it out of the oven. Let it cool for a few minutes before serving. For the full recipe, check out the details above. Enjoy your tasty enchiladas! - How to perfectly mash sweet potatoes Start with peeled and diced sweet potatoes. Boil them in water for 10 to 15 minutes. Check for fork-tenderness. Drain and mash until smooth. A potato masher works great for this task. For extra flavor, mix in a pinch of salt. - Ensuring tortillas don't tear during assembly Warm your corn tortillas before using them. Heat them in a dry pan for about 30 seconds on each side. This softens them and makes them easier to roll without breaking. If you have a microwave, wrap them in a damp paper towel and heat for about 20 seconds. - Ideal garnishes for enchiladas Fresh cilantro adds a bright flavor. Squeeze lime juice over the top for zest. You can also use diced avocado for creaminess. A dollop of sour cream or yogurt adds richness too. - Pairings such as salads or sides A simple green salad goes well with enchiladas. You can use mixed greens, cherry tomatoes, and a light dressing. Roasted veggies or a side of Mexican rice also make tasty companions. - Recommendations for the best enchilada sauce Look for enchilada sauce with natural ingredients. A good sauce should have a rich flavor. If you want to try making your own, blend tomatoes, chili powder, and garlic for a fresh taste. - Choosing fresh versus frozen corn Fresh corn is sweet and crunchy. If it's not in season, frozen corn is a great option. It’s picked at peak freshness and retains flavor. Just be sure to thaw and drain it before adding to the dish. {{image_2}} If you want gluten-free options, use corn tortillas. They taste great and hold up well. For those who need a dairy-free choice, vegan cheese works well. Brands like Daiya or Follow Your Heart melt nicely and add flavor. Want more spice? Add jalapeños to the filling. They give a nice kick. You can also swap out black beans for other beans like pinto or kidney. Each type brings its own taste and texture, so feel free to experiment. You can mix in other veggies for extra nutrition. Spinach or bell peppers add color and flavor. Think about what is in season for the best taste. Using seasonal veggies makes your dish fresh and vibrant. Try this with your sweet potato and black bean enchiladas for a fun twist. For the full recipe, check out the [Full Recipe]. To keep your enchiladas fresh, store leftovers in an airtight container. This helps prevent drying out. Use a glass or plastic container with a tight lid. Make sure to let the enchiladas cool before sealing. They can last up to three days in the fridge. If you want to save some for later, freezing works well. Here’s how: 1. Allow the enchiladas to cool completely. 2. Wrap each enchilada tightly in plastic wrap. 3. Place them in a freezer-safe bag or container. 4. Label the bag with the date. You can freeze them for up to three months. When you are ready to eat, thaw them in the fridge overnight before reheating. To reheat without losing texture, use the oven. Preheat it to 350°F (175°C). Place the enchiladas in a baking dish. Cover them with foil to keep them moist. Heat for about 20 minutes. For a quick option, you can microwave them. Place a damp paper towel over the enchiladas. Heat for 1-2 minutes, checking often. To keep your enchiladas fresh, avoid reheating multiple times. This can make them dry. Enjoy your delicious Sweet Potato and Black Bean Enchiladas from the Full Recipe! How long do Sweet Potato and Black Bean Enchiladas last in the fridge? These enchiladas last about 3 to 5 days in the fridge. Make sure to store them in an airtight container. This keeps them fresh and tasty. Can I make enchiladas ahead of time? Yes, you can prepare them a day before. Just assemble the enchiladas and cover them with sauce. Store them in the fridge overnight. When ready, bake them as directed. What can I substitute for cheese? You can use vegan cheese or nutritional yeast. Both add a nice flavor. You could also skip cheese entirely if you prefer a lighter dish. Are Sweet Potato and Black Bean Enchiladas gluten-free? Yes, if you use gluten-free corn tortillas, these enchiladas are gluten-free. Always check the package to ensure the tortillas meet gluten-free standards. For a complete cooking guide, check out the Full Recipe. In this blog post, we explored how to make delicious Sweet Potato and Black Bean Enchiladas. You learned about the key ingredients, from sweet potatoes to cheese, and went through easy steps to prepare, fill, and bake your enchiladas. We shared useful tips for serving and storing. These enchiladas offer great taste and flexibility. You can customize them to fit your diet or preferences. Enjoy making and sharing this dish with friends and family!](https://cheftaling.com/wp-content/uploads/2025/07/6e7c5afb-1fdb-4216-9bad-fd45bff2b478-300x300.webp)
![- 1 cup sushi rice - 1 ¼ cup water - 1 tablespoon rice vinegar - 1 tablespoon sugar - ½ teaspoon salt - 8 ounces sushi-grade tuna, diced - 2 tablespoons mayonnaise (preferably Kewpie) - 1 tablespoon Sriracha (or to taste) - 1 avocado, sliced - 1 carrot, julienned - ½ cucumber, thinly sliced - 2 green onions, sliced - Sesame seeds for garnish - Seaweed sheets, cut into strips (for serving) - Soy sauce (for drizzling) Gather these ingredients before you start. The sushi rice gives a nice base. The spicy tuna adds flavor. The toppings bring freshness and crunch. Each part plays an important role. You can mix and match some toppings if you like. Maybe add radish or pickled ginger for a twist. Always choose high-quality ingredients for the best taste. If you want the full recipe, check the [Full Recipe]. - Rinse the rice until water runs clear. - Combine rice and water, bring to a boil, then simmer. First, rinsing the rice is important. It removes excess starch and helps the rice cook evenly. Use cold water and rinse it until the water is clear. Then, add the rinsed rice to a medium pot with water. Bring it to a boil over high heat. Once boiling, lower the heat to low and cover the pot. Let it simmer for about 15 to 20 minutes. The rice will absorb all the water and become tender. - Prepare vinegar mixture and fold into cooked rice. - Allow rice to cool. While the rice cooks, prepare a vinegar mixture. In a small bowl, mix rice vinegar, sugar, and salt. Stir until the sugar and salt dissolve. Once the rice is cooked, transfer it to a large bowl. Gently fold the vinegar mixture into the rice. This adds flavor and makes the rice sticky. Let it cool while you prepare the spicy tuna. - Combine diced tuna, mayonnaise, and Sriracha in a bowl. - Adjust spice level to preference. In a separate bowl, combine diced sushi-grade tuna, mayonnaise, and Sriracha. Mix well until the tuna is fully coated. If you like it spicier, add more Sriracha. Taste it and adjust based on your spice preference. This mix is what makes the dish pop with flavor. - Scoop sushi rice into serving bowls. - Layer with spicy tuna and fresh toppings. Now, it’s time to build your sushi bowls. Scoop a generous portion of sushi rice into each serving bowl. Then, top it with the spicy tuna mixture. Add fresh toppings like sliced avocado, julienned carrot, and cucumber slices. This gives a nice crunch and freshness to the dish. - Garnish with sesame seeds and green onions. - Drizzle with soy sauce and serve with seaweed strips. Finish your bowls with a sprinkle of sesame seeds and sliced green onions. These add flavor and a nice look. Drizzle with soy sauce for extra taste. Serve with strips of seaweed on the side for that perfect sushi experience. If you want the full recipe, be sure to check out the full recipe section! To make great sushi rice, start by rinsing the rice. Rinsing removes excess starch. This helps the rice stay fluffy and not too sticky. Use a proper water-to-rice ratio. For one cup of sushi rice, use 1 ¼ cups of water. This balance ensures the rice cooks well and absorbs the water perfectly. You can adjust the spice level of your dish with Sriracha. Add more if you like it hot. If you prefer a milder taste, use less. I recommend Kewpie mayonnaise for its rich flavor. You can also use regular mayo, but Kewpie adds a nice twist. Mixing these ingredients well creates a creamy, spicy blend. How you arrange your toppings makes a big difference. Start with a base of sushi rice in the bowl. Then, layer the spicy tuna, avocado, carrot, and cucumber. This adds color and texture. For garnish, sprinkle sesame seeds on top. You can also add sliced green onions for extra freshness. Serve with seaweed strips on the side for a nice crunch. {{image_2}} You can change up the protein in your spicy tuna sushi bowls. Salmon is a great choice if you want a rich flavor. It pairs well with the spicy sauce. If you prefer a plant-based option, try tofu. Firm tofu can soak up flavors well. This way, non-seafood lovers can still enjoy a tasty bowl. Adding more veggies can make your bowl even better. You can use bell peppers for crunch or radishes for a spicy kick. Seasonal produce is always a good idea. In the summer, fresh corn or zucchini can bring sweetness. This way, you get a unique taste every time you make it. Don't be afraid to play with flavors. You can try different sauces or marinades. Miso adds a savory depth, while wasabi gives a good kick. A drizzle of sesame oil can also enhance the taste. Experimenting helps you find what you love best. For more ideas, check the Full Recipe for inspiration! To keep your sushi rice and tuna fresh, use airtight containers. This prevents air from getting in and keeps flavors strong. Store sushi rice in one container and the spicy tuna mix in another. Always refrigerate them right away. If you leave them out too long, they can spoil quickly. Reheating sushi rice can be tricky. To keep its texture, sprinkle some water on the rice. Use a microwave-safe bowl, cover it with a damp paper towel, and heat for about 30 seconds. Stir and check if it needs more time. For tuna, it’s best to enjoy it cold, so try not to reheat it. You can freeze sushi rice, but it may change texture. To freeze, pack it tightly into a container and remove as much air as possible. For the spicy tuna, I don’t recommend freezing because it can lose its taste. If you freeze any parts, thaw them slowly in the fridge overnight before using. Always check for freshness before you eat. To pick sushi-grade tuna, look for bright color and a fresh smell. The fish should feel firm and moist. You can ask your fishmonger about its source and handling. Always choose tuna from a trusted seller. This ensures quality and safety for your bowl. You can use regular rice, but sushi rice is best. Sushi rice is sticky and has a unique taste. If using regular rice, opt for short-grain varieties. This will help mimic the texture of sushi rice. Remember, the flavor and texture will change. If you lack Sriracha, try other hot sauces or chili paste. You can also mix mayonnaise with red pepper flakes. Another option is to use gochujang for a different kick. Adjust the amount based on your spice level. To make it gluten-free, swap soy sauce with tamari or coconut aminos. For mayonnaise, use a gluten-free brand. Many options are available at grocery stores today. Always check labels to ensure they are certified gluten-free. Yes, you can prep the ingredients in advance. Store the rice, tuna mix, and veggies separately. This keeps everything fresh and tasty. Assemble the bowls just before serving for the best flavor. It’s a great way to save time on busy days. You now have everything you need to make tasty spicy tuna sushi bowls. We covered the main ingredients, from sushi rice to fresh toppings. You learned step-by-step how to cook, mix, and assemble your bowls. Remember to experiment with flavors and make it your own. Whether you're a sushi lover or just starting out, this recipe is simple and fun. Enjoy your homemade sushi bowls with your favorite ingredients!](https://cheftaling.com/wp-content/uploads/2025/07/1136b387-2bb4-459d-b17d-441029855bb9-300x300.webp)


![To make these tasty bites, gather these simple ingredients: - 1 cup rolled oats - 1/2 cup creamy peanut butter - 1/3 cup honey or maple syrup - 1/2 cup mini chocolate chips - 1/4 cup M&M's or dairy-free chocolate candies - 1/4 cup ground flaxseed - 1 teaspoon vanilla extract - A pinch of salt These ingredients create a fun mix of flavors and textures. Rolled oats give a hearty base. Creamy peanut butter adds richness. Honey or maple syrup provides sweetness. Mini chocolate chips and M&M's bring joy and color. Ground flaxseed gives a boost of nutrition. Vanilla extract enhances the flavor, while a pinch of salt balances sweetness. - Calories per serving: About 150 - Protein, carbs, and fat content: Each bite has around 4 grams of protein, 15 grams of carbs, and 8 grams of fat. - Health benefits of main ingredients: - Rolled oats supply fiber, which helps digestion. - Peanut butter offers healthy fats and protein. - Honey or maple syrup gives energy from natural sugars. - Flaxseed is rich in omega-3 fatty acids, great for heart health. These bites make a great snack for kids and adults. You can feel good about enjoying them. Check the [Full Recipe] for step-by-step instructions. 1. Mix dry ingredients: In a large bowl, add the rolled oats, ground flaxseed, and a pinch of salt. Stir well to combine. 2. Combine wet ingredients: In another bowl, mix the creamy peanut butter, honey (or maple syrup), and vanilla extract. Make sure it’s smooth and creamy. 3. Combine wet and dry ingredients: Pour the wet mixture into the dry mix. Stir until everything is blended well. 1. Rolling the mixture into bites: Take a small amount of the mixture and roll it into a ball about 1 inch wide. If it sticks to your hands, wet them slightly. 2. Chill time duration and method: Place the energy bites on a parchment-lined sheet. Chill them in the fridge for at least 30 minutes to firm up. 3. Tips for handling the mix: If it feels too sticky, you can add a bit more oats or ground flaxseed. This helps with rolling. You want them to hold together well! For the full recipe, check out the detailed instructions provided earlier. Enjoy making these fun and tasty energy bites! To make your No Bake Monster Cookie Energy Bites sweeter, you can add more honey or maple syrup. Taste the mix before rolling to find the right balance. If you want a nut-free option, you can use sun butter or soy nut butter instead of peanut butter. These alternatives give a similar taste and texture without nuts. If your mixture feels too sticky, wet your hands with a little water. This will help you roll the bites without a mess. These energy bites pair great with fresh fruits like apples or bananas. You can also blend them into smoothies for a tasty twist. They are perfect for snacks at parties, school lunches, or after workouts. For a fun presentation, place the bites on a colorful plate. Sprinkling some extra mini chocolate chips and M&M's around them makes it look festive. If you want to impress your guests, use cupcake liners to serve them. This adds a nice touch that your friends will love. For the full recipe, check out the [Full Recipe]. {{image_2}} You can easily change the flavor of your No Bake Monster Cookie Energy Bites. Here are a few fun ideas: - Add-ins like coconut flakes: Mixing in unsweetened coconut can add a nice chew and sweetness. - Alternative mix-ins for customization: Try adding dried fruit like raisins or cranberries for a fruity twist. You can also swap in your favorite nuts or seeds. - Adjusting texture with seeds or nuts: Sunflower seeds or almond slices can add crunch and extra nutrition. These small changes can make a big difference. Experiment with different flavors to find your favorite combination! If you have dietary needs, you can still enjoy these energy bites with some simple swaps: - Vegan and gluten-free options: Use maple syrup instead of honey. Look for gluten-free oats to keep it safe for gluten-free diets. - Nut-free substitutions: Replace peanut butter with sunflower seed butter for a nut-free option. It still tastes great! - Low-sugar adaptations: Cut back on the chocolate chips or use dark chocolate for less sugar. You can also use a sugar substitute to lower the sweetness. These options allow everyone to enjoy No Bake Monster Cookie Energy Bites, no matter their diet! For the full recipe, check out the details above. To keep your No Bake Monster Cookie Energy Bites fresh, store them in an airtight container. This helps keep moisture out and flavor in. You can refrigerate them for up to a week. If you want to keep them longer, freezing is a great option. They can last up to three months in the freezer. Just wrap them tightly in plastic before placing them in a freezer-safe bag. For best results, label your container with the date. When you're ready to enjoy your energy bites after chilling, you can eat them straight from the fridge. They taste great cold! If they are too firm, let them sit at room temperature for a few minutes. This softens them slightly. You can also pair them with fresh fruit or yogurt for a fun snack. If you froze them, simply take them out and let them thaw in the fridge overnight before serving. Enjoy! Can I use old-fashioned oats instead of rolled oats? Yes, you can use old-fashioned oats. They will work well in this recipe. The texture may differ slightly, but they will still taste great. How long do these energy bites last in the fridge? These energy bites last about a week in the fridge. Store them in an airtight container to keep them fresh. Can I use a different nut butter than peanut butter? Absolutely! You can use almond butter, sunflower seed butter, or any nut butter you like. Just make sure it’s creamy for the best results. Are these energy bites suitable for kids? Yes, they are perfect for kids! These bites are fun, tasty, and packed with energy. They make a great snack for school or playtime. Can I make these ahead of time? Yes, you can make these energy bites ahead of time. Just store them in the fridge for easy snacking later. What to do if the mixture is too dry? If your mixture is too dry, add a little more honey or nut butter. This will help bind the ingredients better. Can you freeze the energy bites? Yes, you can freeze these energy bites! They freeze well and can last for about three months. Just thaw them in the fridge before eating. How to prevent sticking while rolling? To prevent sticking, wet your hands slightly before rolling the bites. This will help keep the mixture from sticking to your fingers. Are these energy bites healthy? Yes, these energy bites are healthy. They contain oats, nut butter, and flaxseed, which are full of nutrients. What’s the protein content per bite? Each energy bite has about 3 grams of protein. This is great for a quick energy boost! How can I increase the fiber content? To boost fiber, add more ground flaxseed or some chia seeds. Both are high in fiber and will enhance the texture. You can find the full recipe above and enjoy these easy-to-make bites! These No Bake Monster Cookie Energy Bites are easy to make and fun to eat. You learned about the tasty ingredients, the health benefits, and how to prepare them step by step. The tips for variations and storage show you how to customize and keep these bites fresh. Try these energy bites for a quick snack or party treat. Enjoy them anytime for a boost of energy!](https://cheftaling.com/wp-content/uploads/2025/07/a5fcc1c3-5e39-44d9-b643-797fa02891d3-300x300.webp)