• Home
  • Recipe Index
    • Desserts
    • Dinner
    • Appetizer
    • Drinks
  • About
  • Contact
  • Privacy Policy
menu icon
go to homepage
  • Home
  • Recipe Index
    • Desserts
    • Dinner
    • Appetizer
    • Drinks
  • About
  • Contact
  • Privacy Policy

search icon
Homepage link
  • Home
  • Recipe Index
    • Desserts
    • Dinner
    • Appetizer
    • Drinks
  • About
  • Contact
  • Privacy Policy

×
Taling

Taling

Chef Taling is the creator and culinary voice behind Taling’s Recipes, an online hub where she turns her lifelong love of food into step-by-step dishes home cooks can trust.

Her journey began in her grandmother’s kitchen, soaking up the aromas of spices and the joy of shared meals an experience that sparked a passion for exploring global flavors and recreating them for friends, family, and now a worldwide audience.

  • - 1 block (14 oz) firm tofu, drained and pressed - ¼ cup low-sodium soy sauce - 2 tablespoons honey or maple syrup - 2 tablespoons rice vinegar - 2 tablespoons sesame oil These ingredients form the heart of your dish. The firm tofu gives the meal its base and protein. Low-sodium soy sauce offers a rich umami flavor without too much salt. Honey or maple syrup adds sweetness, while rice vinegar adds a touch of tang. Lastly, sesame oil provides a nutty aroma that ties everything together. - 2 cups broccoli florets - 1 red bell pepper, sliced - 1 carrot, thinly sliced - 1 cup snap peas The veggies bring color and crunch. Broccoli florets add a hearty bite. Red bell pepper contributes sweetness and vibrancy. Carrots add a nice crunch, while snap peas bring a fresh snap. Together, these vegetables create a colorful spread that looks as good as it tastes. - 2 tablespoons sesame seeds (for garnish) - 2 green onions, chopped (for garnish) These garnishes are not just for looks; they add flavor and texture. Sesame seeds add a delightful crunch. Green onions bring a fresh, mild onion flavor. Using these garnishes makes your dish pop and look gourmet. You can enjoy your teriyaki tofu and veggies with or without them, but they elevate the meal. First, preheat your oven to 400°F (200°C). This helps cook everything evenly. Next, line a large sheet pan with parchment paper. This makes clean-up easy. Now, it’s time to cut the tofu. Drain and press the block of firm tofu to remove excess water. Then, cut it into bite-sized cubes. Place the tofu cubes in a medium bowl. While you're at it, prepare the vegetables. Slice the red bell pepper and thinly slice the carrot. Cut the broccoli into florets. Finally, gather the snap peas. You want a colorful mix for a vibrant dish! In a small bowl, mix the teriyaki sauce ingredients. Combine the low-sodium soy sauce, honey or maple syrup, rice vinegar, sesame oil, grated ginger, and minced garlic. Whisk until well combined. Pour half of this sauce over the tofu cubes. Let them marinate for about 15 minutes. This allows the tofu to soak up the flavors. Remember, reserve the other half of the sauce for later! Once the tofu has marinated, it’s time to arrange everything on the sheet pan. First, place the prepared vegetables on one side of the pan. Then, add the marinated tofu on the other side. Drizzle the reserved teriyaki sauce over both the tofu and veggies. Make sure everything is evenly coated. This ensures every bite is packed with flavor! Now, it’s time to bake! Place the sheet pan in the preheated oven. Bake for 25-30 minutes. This allows the tofu to turn golden and crispy. Don’t forget to stir everything halfway through. This step helps the tofu and veggies cook evenly. After baking, you’ll have a delicious meal ready to enjoy! How to get crispy tofu To get crispy tofu, start by pressing it well. Remove as much water as you can. Cut the tofu into bite-sized cubes. Marinate it in the teriyaki sauce for about 15 minutes. This step helps the tofu absorb flavor. When you bake it, use a hot oven. A temperature of 400°F (200°C) works best. Bake it until golden brown, which usually takes 25 to 30 minutes. Don't forget to stir halfway through to ensure even cooking. Best practices for tender vegetables For tender veggies, cut them into uniform sizes. This ensures they cook evenly. Broccoli, bell peppers, carrots, and snap peas are great choices. Place the veggies on one side of the pan. Drizzle them with some teriyaki sauce before baking. This adds flavor while keeping them crisp yet tender. Ideas for rice or grain pairings Serve your teriyaki tofu and veggies over rice or quinoa. Both options soak up the sauce nicely. Brown rice or jasmine rice adds a nutty flavor. Quinoa offers a protein boost and a slightly chewy texture. If you prefer, try cauliflower rice for a low-carb option. Ways to enhance flavor with extra toppings Boost flavor with toppings like sesame seeds and chopped green onions. These add crunch and freshness. You can also sprinkle some crushed red pepper for a kick. If you like nuts, try adding chopped peanuts or cashews for added texture. Recommended pans and utensils A large sheet pan is essential for this recipe. Use parchment paper for easy clean-up. A sharp knife will help with cutting veggies and tofu. A medium bowl is perfect for marinating the tofu. Kitchen gadgets for ease of preparation Consider using a tofu press to remove water easily. A whisk will help mix the sauce well. If you have a spatula, it helps with stirring the tofu and veggies on the pan. These tools will make your cooking process smooth and fun! {{image_2}} You can easily change the veggies in this recipe. Some great choices include: - Cauliflower florets - Zucchini slices - Bell peppers of different colors - Asparagus spears - Mushrooms These swaps keep the dish fresh and exciting. You can also try different sauces. If you want a kick, use sriracha instead of honey. For a sweeter taste, try agave syrup. If you need a gluten-free option, use tamari instead of soy sauce. Tamari has a similar taste and works well. You can also skip the honey and use maple syrup for a vegan dish. This keeps the meal plant-based and tasty. For larger groups, simply double or triple the ingredients. Use multiple sheet pans if needed. This recipe is great for meal prep too. You can store leftovers in containers and enjoy them later. Just reheat in the oven or microwave for a quick meal. To keep your leftovers fresh, use airtight containers. Glass or BPA-free plastic containers work best. Store your teriyaki tofu and veggies in the fridge for up to three days. This keeps the flavors intact and the tofu nice. Reheat your leftovers in the oven or on the stovetop. The oven helps maintain the tofu's crispiness. Preheat the oven to 350°F (175°C) and bake for about 10-15 minutes. On the stovetop, warm it gently in a pan over medium heat. Add a splash of water or sauce to keep it moist. Serve over rice or quinoa for a quick meal. You can freeze the dish for longer storage. Make sure to let it cool first. Place it in a freezer-safe container or bag. It can stay frozen for up to three months. When you’re ready to eat, thaw it in the fridge overnight. Reheat it in the oven or stovetop as mentioned before. This will help maintain the best quality and texture. If you want to skip tofu, try tempeh or chickpeas. Tempeh has a nutty taste. It also holds flavor well. Chickpeas add protein and a creamy texture. You can use seitan for a chewy bite. Each option makes your meal tasty. This dish takes about 45 minutes total. You spend 15 minutes prepping. This includes cutting tofu and veggies. Cooking takes around 25 to 30 minutes in the oven. This time gives you a warm, tasty meal. Yes, feel free to spice it up! Add red pepper flakes for heat. You can mix in five-spice powder for depth. Garlic powder or onion powder also works well. Experiment with flavors to find your favorite mix. Absolutely! This dish is great for meal prep. You can make it ahead and store it. Use airtight containers to keep it fresh. Reheat portions easily for quick lunches or dinners. This makes your week simpler. This blog post shows you how to make a tasty teriyaki tofu dish. We discussed essential ingredients, including firm tofu and vibrant vegetables. I outlined clear steps, from prepping ingredients to baking everything just right. You learned tips for a crispy texture and serving suggestions. Experiment with substitutions and make this meal your own. Storing leftovers is easy, and reheating keeps it delicious. Dive in and enjoy your healthy creation!
    Sheet Pan Teriyaki Tofu & Veggies Flavorful Delight
  • To make Air Fryer Garlic Herb Potato Wedges, you need simple ingredients. Here’s what you’ll need: - 4 medium-sized russet potatoes, washed and cut into wedges - 3 tablespoons olive oil - 4 cloves garlic, minced - 1 teaspoon dried oregano - 1 teaspoon dried rosemary - 1 teaspoon paprika - Salt and pepper to taste - Fresh parsley, chopped (for garnish) These ingredients are easy to find. The russet potatoes give a great texture. The garlic and herbs add fantastic flavor. Olive oil helps achieve that crispy finish. Make sure to wash the potatoes well. Clean potatoes help the skin get nice and crispy. Cut them into wedges, making them even in size. This step ensures they cook at the same rate. The garlic will infuse the wedges with a rich taste. Oregano and rosemary add a nice herbal note. Paprika brings a warm, slightly sweet flavor. Adjust salt and pepper based on your taste. Chop fresh parsley to sprinkle on top after cooking. This adds a pop of color and freshness. With these ingredients, you’re set to create a crispy delight! Set your air fryer to 400°F (200°C) and preheat it for about 5 minutes. Preheating is key. It helps the potato wedges cook evenly and get that perfect crisp. If you skip this step, the wedges may turn out soggy instead of crunchy. First, wash your russet potatoes well. This removes any dirt. Next, cut them into wedges. Aim for wedges that are not too thick. This helps them cook faster and more evenly. In a large bowl, combine the potato wedges with olive oil, minced garlic, oregano, rosemary, paprika, salt, and pepper. Toss everything well. Each wedge should be coated in flavor. This step adds the delicious garlic herb taste. Arrange the seasoned potato wedges in a single layer in the air fryer basket. Avoid overcrowding them. This allows hot air to circulate and crisp each wedge. Cook them for 15-20 minutes. About halfway through, shake the basket gently. This helps them brown evenly. Check for doneness by looking for a golden brown color. They should be crispy on the outside. If they need more time, add a few extra minutes. Once cooked, remove the wedges and garnish with fresh parsley for a vibrant touch. To make your potato wedges crispy, thickness matters. Aim for wedges that are about 1 inch thick. This size strikes a balance between soft inside and crunchy outside. If they are too thick, they may not cook evenly. Thinner wedges can burn easily. Shaking the basket is key. Halfway through cooking, give the basket a good shake. This helps the wedges cook evenly. It also promotes better airflow around each piece. Don't skip this step if you want crispiness. To boost flavor, consider extra spices. Try adding chili powder for heat or cumin for earthiness. You can also mix in some onion powder for added depth. These spices can give your wedges a unique twist. Using fresh herbs can elevate the taste. Fresh parsley adds brightness. It also looks nice as a garnish. Dried herbs work well too, but fresh offers a stronger flavor. If using dried, remember to use less since they are more potent. {{image_2}} You can make these potato wedges spicy. Just add chili powder or cayenne pepper. Start with 1 teaspoon for a mild kick. If you love heat, feel free to add more. Mix it well with the other spices. This small change makes a big flavor boost. Your friends will love the spicy twist! Cheese adds a rich taste to your wedges. Use grated cheese like Parmesan or cheddar. Add about half a cup when mixing the potatoes. The cheese melts and makes the wedges creamy. It also gives a nice golden color. This option is perfect for cheese lovers! You don’t have to stick with russet potatoes. Sweet potatoes work great for a different flavor. They add a bit of sweetness and color. Yukon golds are another tasty choice. They are creamy and hold flavors well. Just adjust the cooking time if needed, as different potatoes may cook differently. To keep your leftover potato wedges fresh, store them in an airtight container. Let the wedges cool down completely before placing them in the container. You can keep them in the fridge for up to three days. If you want to keep them longer, consider freezing. Just make sure to wrap them tightly in plastic wrap and then place them in a freezer bag. They can last up to three months in the freezer. For the best taste and texture, I recommend reheating your potato wedges in the air fryer. Preheat the air fryer to 350°F (175°C). Place the wedges in the basket in a single layer. Heat them for about 5-8 minutes, shaking the basket halfway through. This method helps restore their crispiness. If you prefer the oven, preheat it to 400°F (200°C). Spread the wedges on a baking sheet and warm them for about 10-15 minutes. Keep an eye on them to prevent burning. Yes, you can use many other seasonings. Some popular choices are: - Italian seasoning for a herby twist. - Cajun spice for a bold kick. - Chili powder for heat. - Lemon zest for a citrusy flavor. Feel free to mix things up! The key is to balance flavors. Experimenting can lead to new favorites. The cooking time depends on how thick you cut the wedges. For regular-sized wedges, aim for 15-20 minutes at 400°F (200°C). - Thin wedges may cook faster, around 12-15 minutes. - Thicker wedges might take 20-25 minutes. Always check for doneness. The wedges should be golden brown and crispy. Air frying is a healthier option compared to deep frying. Here are some benefits: - Less oil means fewer calories and fat. - Air frying keeps more nutrients in the potatoes. - The method can lead to less acrylamide, a harmful chemical formed in frying. Enjoy your crispy wedges guilt-free! You learned how to make crispy air fryer potato wedges using simple ingredients. Preheating the air fryer and preparing your potatoes is key. Remember to coat them well and check for doneness as they cook. Try variations like spicy garlic or cheese wedges to add fun flavors. Store leftovers properly, and reheating in the air fryer keeps them crisp. With these tips, you can enjoy tasty potato wedges that are both healthy and delicious. Enjoy your cooking journey!
    Air Fryer Garlic Herb Potato Wedges Crispy Delight
  • - 500g chicken breast, sliced into thin strips - 2 tablespoons gochujang (Korean red chili paste) - 1 cup jasmine rice, rinsed - 1 tablespoon soy sauce - 1 tablespoon sesame oil - 2 cloves garlic, minced - 1 inch ginger, grated - 1 tablespoon honey - Salt and pepper to taste - 1 cup broccoli florets - 1 carrot, julienned - 2 green onions, chopped - Sesame seeds for garnish The chicken breast gives this dish a lean and tasty protein. Gochujang adds spice and depth. Jasmine rice serves as a soft base for all the flavors. The soy sauce and sesame oil bring in salty and nutty notes. Garlic and ginger add a burst of freshness. Broccoli adds crunch, while carrots bring color. Green onions and sesame seeds finish the dish with flair. Each ingredient builds the whole meal, making it simple yet full of flavor. In a large bowl, combine the sliced chicken, gochujang, soy sauce, sesame oil, minced garlic, grated ginger, honey, salt, and pepper. Mix everything well. The chicken needs to soak in these flavors. For the best taste, let it marinate for at least 30 minutes. If you have time, marinating overnight gives a stronger flavor. To cook jasmine rice, start by rinsing it under cold water. This helps remove excess starch. In a saucepan, combine the rinsed rice and water. Bring it to a boil. Once boiling, reduce the heat to low, cover the pot, and let it simmer for 15-20 minutes. When the rice is done, fluff it with a fork. This keeps the grains separate and perfect. While the rice cooks, prepare your vegetables. Steam the broccoli florets until they turn tender. This usually takes about 5-7 minutes. You want them to stay bright green. For the carrot, julienne it into thin strips. This adds great color and texture to your bowls. Heat a large skillet over medium heat. Once hot, add the marinated chicken strips to the skillet. Cook for about 5-7 minutes. Stir frequently to ensure even cooking and to avoid burning. The chicken should be fully cooked and slightly caramelized. This adds more flavor. To create your rice bowls, start with a base of jasmine rice in each serving bowl. Next, add the cooked gochujang chicken on top. Layer the steamed broccoli and julienned carrots for a colorful presentation. Make sure to spread the ingredients evenly for the best look. Lastly, finish with a sprinkle of chopped green onions and sesame seeds. These add a nice crunch and extra flavor. Serve your bowls hot. Each bite will be a delightful mix of spicy, sweet, and savory tastes. Enjoy your meal! To make your chicken burst with flavor, marinate it well. Mix the chicken with gochujang, soy sauce, sesame oil, garlic, ginger, honey, salt, and pepper. Let it sit for at least 30 minutes. For deeper taste, marinate it overnight. When cooking, keep an eye on the heat. Use medium heat to cook the chicken. This helps it stay juicy. Stir often to prevent burning. Cook until it's caramelized and no longer pink. For fluffy jasmine rice, rinse it first. Rinsing removes excess starch, which can make the rice sticky. Use a 1:2 ratio of rice to water. Bring it to a boil, then lower the heat. Cover and let it simmer for 15-20 minutes. Fluff with a fork to keep it light. If you want variety, try brown rice or sushi rice. Just adjust the water and cooking times. Brown rice takes longer to cook but has a nice nutty flavor. To keep your veggies bright, steam them quickly. Broccoli should be tender but still green. This takes about 5-7 minutes. You can also try other veggies like bell peppers or snap peas. For a twist, swap out the carrots for zucchini or radishes. This adds color and crunch. Feel free to mix it up based on what you have on hand! {{image_2}} You can switch the chicken for beef, tofu, or seafood. Each option brings a unique flavor. If you choose beef, use thin strips and cook them for 4-6 minutes. For tofu, press it first to remove water, then cut it into cubes and sauté for about 8-10 minutes. If seafood is your choice, shrimp or fish cooks quickly. Just 3-5 minutes should suffice for shrimp, while fish needs about 4-6 minutes, depending on thickness. For a vegan dish, replace chicken with tofu or tempeh. Use a vegan gochujang. To make it gluten-free, switch soy sauce for tamari. You can reduce sodium by using low-sodium soy sauce or omitting it completely. Adding more ginger and garlic can help boost flavor without salt. Feel free to add more spices or sauces. A splash of rice vinegar can brighten the dish. You can also try sesame seeds, chili flakes, or even a drizzle of sriracha for extra heat. If you like it spicy, increase the gochujang. For milder flavor, add a touch of honey or sugar to balance the heat. After cooking, let your Gochujang chicken cool down for about 30 minutes. This step helps keep it from getting soggy. Store the chicken and rice in airtight containers. Glass or plastic containers work well. Keep your steamed veggies separate to maintain their crunch. To reheat, the stovetop method is best. Heat a pan over medium heat. Add a splash of water or broth to keep things moist. Stir in the chicken and rice until warm. If you use a microwave, cover the bowl with a damp paper towel. This keeps the dish from drying out. Heat it in short bursts, stirring in between. You can freeze the cooked chicken and rice. Place them in freezer-safe containers. Use them within three months for the best taste. When you’re ready, thaw them overnight in the fridge. Reheat as mentioned above for a quick meal. Enjoy your tasty Gochujang chicken even on busy days! Gochujang has a rich taste. It is spicy, sweet, and a bit savory. This paste comes from fermented chili peppers, which gives it depth. The heat level varies, but it adds a warm kick to dishes. You can use it in marinades or sauces for extra flavor. You can marinate chicken for at least 30 minutes. For the best flavor, I recommend marinating overnight. This allows the chicken to absorb all the tasty spices. If you're short on time, even a quick soak works. Just make sure not to skip this step! If you don’t have jasmine rice, you can use basmati rice or short-grain rice. Basmati has a nutty flavor, while short-grain rice is stickier. Keep in mind that cooking times may vary. Always follow the package instructions for the best results. Yes, you can prepare this recipe ahead of time! Marinate the chicken the night before for more flavor. You can also cook the rice and veggies in advance. Just store them in the fridge. When you're ready to eat, reheat everything and enjoy! Gochujang is not always gluten-free. Some brands use wheat in their recipes. Always check the label to be sure. If you need a gluten-free option, look for brands that specifically state they are gluten-free. This way, you can enjoy the flavors without worry! This blog post detailed how to make a tasty Korean-inspired chicken bowl. We covered main ingredients like chicken breast, gochujang, and jasmine rice. You learned how to marinate the chicken, cook fluffy rice, and prepare fresh veggies. Remember, you can customize this meal to your taste. Swap proteins, adjust spices, or try different veggies. With these tips, each bowl can be a new delight. Enjoy creating your own delicious version!
    Gochujang Chicken Rice Bowls Flavorful and Simple Meal
  • To make Chocolate Mocha Overnight Oats, you need the following ingredients: - 1 cup rolled oats - 2 cups almond milk (or any milk of choice) - 2 tablespoons cocoa powder - 1 tablespoon instant coffee granules - 2 tablespoons maple syrup (or honey) - 1/2 teaspoon vanilla extract - A pinch of salt - 1/4 cup Greek yogurt (optional for creaminess) - 2 tablespoons chocolate chips (optional for topping) - Sliced banana or berries for topping These ingredients come together to create a rich, chocolatey breakfast. The oats soak up the almond milk and cocoa, making each bite creamy and satisfying. Using almond milk keeps it light, while maple syrup adds natural sweetness. The instant coffee gives it a nice mocha flavor. If you want extra creaminess, add Greek yogurt. Don’t forget the toppings! Sliced bananas or fresh berries add color and taste. You can even sprinkle some chocolate chips on top for a sweet finish. This mix of ingredients makes the perfect breakfast for any day. Enjoy the ease and deliciousness of Chocolate Mocha Overnight Oats! - In a large bowl, combine: - 1 cup rolled oats - 2 cups almond milk (or any milk of choice) - 2 tablespoons cocoa powder - 1 tablespoon instant coffee granules - 2 tablespoons maple syrup (or honey) - 1/2 teaspoon vanilla extract - A pinch of salt - If you want creaminess, mix in 1/4 cup Greek yogurt. This makes your oats extra smooth. - Now, divide the mixture into two jars. - Seal the jars tightly to lock in flavor. - Place them in the refrigerator. Let them chill overnight or for at least 4-6 hours. - When it’s time to eat, stir the oats well. - If they look too thick, add a splash of milk. - Top with chocolate chips, banana slices, or berries. This adds fun flavors and textures. To get the right thickness, adjust the milk amount. Start with two cups of almond milk. If your oats seem too thick, add a splash of milk. This will help create a creamy texture. Always stir your oats before serving. This mixes the flavors well and ensures every bite is tasty. You can experiment with different types of milk. Oat milk is a great choice for creaminess. Coconut milk adds a tropical twist. For extra flavor, use flavored Greek yogurt. This adds a delicious taste and makes your oats even creamier. Make a big batch of oats for quick breakfasts all week. Divide the mixture into jars. This makes it easy to grab one in the morning. Store the jars in the fridge for a fresh start to your day. {{image_2}} You can change up the flavors easily. - Add nut butter for creaminess and taste. - Try different toppings like nuts or seeds for crunch. Want a lower-calorie option? - Substitute maple syrup with a sugar-free sweetener. - Use dairy-free yogurt for a vegan choice. Make your oats special with seasonal flavors. - Add pumpkin spice in fall or peppermint extract in winter. - For freshness, include fruits like apples in fall or strawberries in summer. Store your overnight oats in the refrigerator. This keeps them fresh and tasty. Use airtight containers to stop any spoilage from happening. Your chocolate mocha overnight oats can last up to 5 days in the fridge. They are best eaten fresh but can stay good this long. Do not freeze them, as the texture will change when thawed. You can enjoy your oats cold right from the fridge. If you prefer them warm, heat in the microwave for a quick breakfast. Stir them well and add a splash of milk if they seem too thick when reheating. Yes, if you prefer a non-caffeinated version, simply omit the coffee. The oats will still taste great with chocolate and other flavors. You can add more cocoa powder or a dash of vanilla to keep it yummy. For best results, soak the oats overnight or for at least 4-6 hours. This helps the oats absorb the milk and flavors. If you rush it, the oats might be too chewy. Letting them soak overnight gives you the best texture. Absolutely! Use plant-based yogurt and a suitable sweetener to keep it vegan-friendly. Almond milk is great, but you can also try oat or coconut milk. This way, everyone can enjoy this tasty breakfast delight! You learned how to make easy overnight oats packed with flavor and nutrition. This recipe uses simple ingredients like oats, cocoa powder, and your choice of milk. I shared tips for personalizing flavors and storage. Remember, meal prep helps you save time during busy mornings. With endless variations, you can enjoy this healthy dish all week long. Now, get started on your tasty and nutritious breakfast!
    Chocolate Mocha Overnight Oats Easy Breakfast Delight
  • - 4 salmon fillets (about 6 ounces each) - 1 pound fresh green beans, trimmed - 1 lemon, zested and juiced - 3 tablespoons fresh dill, chopped - 2 tablespoons olive oil For this dish, the salmon is the star. Each fillet provides rich, flaky goodness. Pair it with fresh green beans for a crunchy texture. The lemon adds a bright zing, while the dill gives it a fresh herb flavor. Olive oil helps bind everything together and gives a nice sheen. - 3 cloves garlic, minced - Salt and pepper to taste - 1 teaspoon paprika - Lemon wedges for serving Garlic brings a savory punch to this dish. Salt and pepper are essential to enhance all the flavors. Paprika adds a gentle warmth, making the meal more inviting. Finally, lemon wedges are perfect for serving. A squeeze of fresh lemon right before eating can brighten the plate. These ingredients combine to make a simple yet delightful meal. You’ll enjoy how they work together to create a balanced flavor profile. 1. Preheat your oven to 400°F (200°C). This heat helps cook the salmon and beans perfectly. 2. Line a large baking sheet with parchment paper. This makes cleanup quick and easy. 3. In a small bowl, whisk together the lemon juice, lemon zest, chopped dill, olive oil, minced garlic, paprika, salt, and pepper. This mixture will add great flavor. 1. Place the salmon fillets on one side of the baking sheet. Make sure they have space between them for even cooking. 2. Brush half of the lemon dill mixture over the salmon fillets. This adds moisture and taste. 3. On the other side of the baking sheet, spread the trimmed green beans in a single layer. 4. Drizzle the remaining lemon dill mixture over the green beans. Toss them to coat evenly. This step enhances their flavor. 1. Roast in the preheated oven for 15-20 minutes. The salmon should flake easily with a fork when it is done. 2. The green beans should be tender but still crisp. This gives them a nice texture. 3. Keep an eye on the dish while it cooks. You want both the salmon and beans to reach the right doneness. 4. Once done, remove the sheet pan from the oven. Let it cool slightly before serving. To cook salmon and green beans evenly, place them on the same sheet pan. Salmon cooks fast, while beans need a bit longer. Try to spread the beans out in a single layer. This helps them roast well without steaming. If your beans are small, check them after 10 minutes. You might need to adjust the cooking time based on your oven. Some ovens run hot or cool. Always keep an eye on both ingredients. For a vibrant display, serve the salmon and beans on a large platter. Drizzle any leftover pan juices over the dish. This adds flavor and a nice shine. Garnish with extra dill and lemon wedges. The bright colors will make the dish pop. You can also use a sprinkle of paprika for extra flair. This simple touch can make your meal look gourmet. {{image_2}} You can switch out the salmon for other fish. Try using cod, trout, or tilapia. These fish work well with the lemon and dill flavor too. If you want to go meatless, try tofu. Just make sure to press it first to remove extra water. For greens, green beans are tasty, but you can use asparagus or broccoli. Snap peas also add a nice crunch. You can even mix different veggies together for more flavor. Just cut them to similar sizes for even cooking. You can spice things up by adding a pinch of red pepper flakes. This will give your dish a little kick! If you want different herbs, try parsley or thyme. Both add fresh flavors that work well with salmon. For the lemon dill mixture, consider adding a splash of honey or mustard. This gives a sweet and tangy twist. You can also use lime juice instead of lemon for a different zest. Feel free to get creative and find what you like best! To keep your leftover salmon and beans fresh, let them cool first. Place them in airtight containers. This step prevents moisture loss and keeps flavors intact. Store the containers in the fridge. Your dish can last up to three days this way. If you want to store it longer, consider freezing. Just remember, freezing may change the texture. For the best results, reheat your salmon and beans in the oven. Set it to 350°F (175°C). Place the dish in a baking pan, cover it with foil, and heat for about 10-15 minutes. This method helps maintain the texture of the fish and keeps the beans crisp. You can also use the microwave, but be cautious. Heat it in short intervals to avoid drying out the salmon. Always check the temperature to ensure it's warm throughout. How long does it take to cook the salmon? It takes about 15 to 20 minutes to cook salmon. The salmon is done when it flakes easily with a fork. I find that checking at 15 minutes is best to avoid overcooking. Can I use frozen salmon instead? Yes, you can use frozen salmon. Just remember to thaw it first. Thawing allows the salmon to cook evenly. Frozen salmon may need a few extra minutes in the oven. What other vegetables work well on a sheet pan? You can use many vegetables on a sheet pan. Asparagus, bell peppers, or zucchini are great choices. Make sure to cut them into similar sizes for even cooking. What to serve with lemon dill salmon & beans? This dish pairs well with rice or quinoa. You can also serve it with a fresh salad. A light, tangy dressing complements the flavors nicely. Can this dish be made ahead of time? Yes, you can prep this dish ahead of time. Marinate the salmon and beans in the fridge for a few hours. This saves time and boosts the flavor when you’re ready to cook. This blog post covered a simple lemon dill salmon dish. You learned about key ingredients like salmon, green beans, and fresh herbs. I shared easy steps for cooking and tips to enhance your meal's look and taste. Remember, you can swap ingredients or add spices for variety. Proper storage and reheating tips keep leftovers fresh. Enjoy cooking and impressing others with your new skills! This dish is tasty and adjustable, making it a great choice for meal planning.
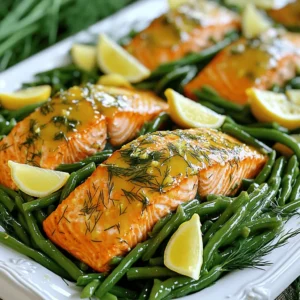
    Sheet-Pan Lemon Dill Salmon & Beans Simple Dish
  • To make this tasty dish, gather these main ingredients: - 4 boneless, skinless chicken thighs - 1 cup long-grain rice - 2 cups chicken broth - 1/4 cup honey - 1/4 cup Dijon mustard - 2 tablespoons olive oil - 1 teaspoon garlic powder - 1 teaspoon onion powder - 1 teaspoon dried thyme - Salt and pepper to taste - 1 cup frozen peas These items create a balanced meal with protein and carbs. The spices in this recipe add layers of flavor. You will need: - 1 teaspoon garlic powder - 1 teaspoon onion powder - 1 teaspoon dried thyme - Salt and pepper to taste These spices enhance the chicken and rice, making them more tasty. Garnishes can make your dish look great. Consider these: - Fresh parsley, chopped Sprinkling parsley on top gives your dish a fresh look and extra flavor. First, gather your chicken and marinade ingredients. You need four boneless, skinless chicken thighs. In a small bowl, mix 1/4 cup honey, 1/4 cup Dijon mustard, 2 tablespoons olive oil, 1 teaspoon garlic powder, 1 teaspoon onion powder, and 1 teaspoon dried thyme. Add salt and pepper to taste. Whisk until smooth. Place the chicken thighs in a large bowl. Pour half of the marinade over them. Toss well to coat. Let it sit while you heat the skillet. Heat 2 tablespoons of olive oil in a large oven-safe skillet over medium-high heat. Once hot, add the marinated chicken thighs. Sear each side for about 3 to 4 minutes. Look for a nice golden brown color. The chicken will not be cooked through yet. This step adds flavor and texture. Once seared, remove the chicken and set it aside. In the same skillet, add 1 cup of long-grain rice. Stir it around to soak up the chicken juices. Cook for 1 to 2 minutes. This step gives the rice a rich flavor. Pour in 2 cups of chicken broth and stir. Nestle the seared chicken thighs back into the skillet on top of the rice. Make sure everything is evenly spread out. Cover the skillet with a lid or foil. Place it in the preheated oven at 375°F (190°C). Bake for 25 to 30 minutes. Check that the rice is tender and the chicken is cooked through. After baking, take the skillet out of the oven. Stir in 1 cup of frozen peas. Cover again and let it sit for 5 minutes. This allows the peas to heat through. Finally, fluff the rice with a fork. Drizzle the remaining honey mustard sauce over everything and sprinkle with chopped parsley before serving. To get a nice sear on chicken, heat your skillet first. Use medium-high heat and add a little olive oil. Place the chicken in the skillet without crowding it. Sear each side for about 3-4 minutes until golden brown. This step seals in the juices. Make sure not to move the chicken too much while it cooks. Let it form a crust before flipping. For fluffy rice, rinse it under cold water before cooking. This removes excess starch and prevents clumping. When adding the rice to the skillet, stir it well to coat in chicken juices. Use the right amount of chicken broth, which helps the rice absorb flavor. Cover the skillet tightly while baking. This keeps steam in and helps the rice cook evenly. Serving straight from the skillet adds a rustic touch. Fluff the rice with a fork before serving to separate the grains. Drizzle the extra honey mustard sauce over the chicken and rice for added flavor. A sprinkle of fresh parsley gives a pop of color. For a special touch, serve with a side of crusty bread. {{image_2}} You can switch the chicken for other meats. Try boneless turkey thighs for a leaner option. Pork chops also work well and add a different flavor. For a plant-based choice, use firm tofu or tempeh. Just ensure they soak in the honey mustard marinade before cooking. Rice is great, but you can try other grains. Quinoa adds a nutty taste and cooks quickly. Barley is hearty and gives a chewy texture. Couscous cooks fast and absorbs flavors well. Each grain brings its own unique taste to the dish. Boost nutrition by adding veggies to the mix. Carrots give a sweet crunch when diced small. Bell peppers add color and sweetness. Spinach wilts nicely and packs nutrients. Just toss them in with the rice for extra flavor and health benefits. To store your One-Pan Honey Mustard Chicken & Rice, let it cool first. Then, transfer it to an airtight container. This keeps the dish fresh and tasty. Make sure to store it in the fridge. It will stay good for up to 3 days. If you want to keep it longer, consider freezing. When you’re ready to eat leftovers, reheat them in the oven or on the stove. For the oven, preheat to 350°F (175°C). Place the chicken and rice in a baking dish. Cover it with foil to keep moisture in. Heat for about 20 minutes. On the stove, use medium heat. Add a splash of broth or water to avoid drying it out. Stir occasionally until hot. To freeze this dish, let it cool completely. Then, portion it into freezer-safe bags or containers. Remove as much air as possible before sealing. Label them with the date. You can freeze it for up to 3 months. When ready to eat, thaw it overnight in the fridge. Then, reheat as mentioned above. Enjoy your delicious meal anytime! Yes, you can use bone-in chicken thighs. They add flavor and moisture. Just increase the cooking time. Bone-in thighs may need about 10 more minutes in the oven. Check the internal temperature with a meat thermometer. It should reach 165°F (74°C) to be safe to eat. You can use yellow mustard if you want a milder taste. Honey mustard is also a great choice. If you want zest, try spicy brown mustard. Each will change the flavor a bit. Adjust the honey in the recipe if your substitute is sweeter. Yes, you can use gluten-free rice. Look for brands labeled as gluten-free. Quinoa or cauliflower rice are also good swaps. They keep the meal healthy and tasty. Ensure the broth you use is gluten-free too. Check the chicken's internal temperature with a meat thermometer. It should read 165°F (74°C). You can also cut into the thickest part. The meat should be white, not pink. Juices should run clear. These tips will help you serve safe and delicious chicken. You learned how to make one-pan honey mustard chicken and rice. We covered key ingredients, cooking steps, and tips for success. Remember, perfect searing and fluffy rice make all the difference. You can also switch proteins or add veggies to fit your taste. Store leftovers properly to enjoy later or freeze for convenience. With your new skills, impressing family and friends is easy. You now have a delicious recipe that ticks all the boxes for flavor and fun. Enjoy your cooking adventure!
    One-Pan Honey Mustard Chicken & Rice Tasty Delight
  • - 1 ripe banana - 2 tablespoons natural peanut butter - 1 cup unsweetened almond milk (or any milk of choice) - 1 scoop vanilla protein powder (plant-based or whey) - 1 tablespoon chia seeds - 1 teaspoon honey (optional for sweetness) - A pinch of cinnamon - Ice cubes (optional, for a thicker texture) Gather these simple items before you start. A ripe banana gives natural sweetness and creaminess. Use two tablespoons of natural peanut butter for a rich flavor. Almond milk is my go-to, but any milk you love works great. The protein powder adds a boost of nutrition. Choose vanilla to match the banana. Chia seeds are tiny but mighty. They add fiber and help keep you full. If you like it sweeter, add honey, but it’s not a must. A pinch of cinnamon brings warmth and depth to this drink. For a thicker texture, toss in some ice cubes. This smoothie is flexible, so feel free to mix and match based on your taste. Now, let's blend it all together! 1. Start by peeling the ripe banana. Break it into small chunks. 2. In a blender, combine the banana chunks, natural peanut butter, almond milk, protein powder, chia seeds, and a pinch of cinnamon. 3. If you like a colder and thicker smoothie, add some ice cubes. 1. Blend all the ingredients on high speed. Keep blending until you have a smooth and creamy mix. 2. Stop the blender and taste your smoothie. If you want it sweeter, add honey. Blend again for a few seconds to mix. 1. Pour the smoothie into a tall glass. Enjoy it right away for the best taste and creaminess. 2. For a fun twist, you can top it with extra chia seeds or banana slices. This makes it look pretty too! To get the perfect texture, use a ripe banana. A ripe banana makes the smoothie creamy. Add ice cubes if you want it thicker. If you prefer a smoother drink, blend longer. Scrape the sides of the blender to mix all the ingredients well. This ensures a silky-smooth result. If your smoothie tastes too bland, add honey or more banana. Start with a teaspoon of honey. Blend and taste again. You can always add more honey if needed. This way, you control the sweetness to match your taste. Remember, ripe bananas also add natural sweetness. Use a high-speed blender for the best results. A strong blender breaks down the ingredients quickly. If you have a less powerful blender, blend in stages. Start with the liquids first, then add the solids. This helps everything mix better. Make sure your blender is clean for the best flavor. {{image_2}} You can switch the peanut butter for other nut butters. Almond butter offers a nutty taste. Cashew butter is creamy and sweet. Sunflower seed butter is a great choice for allergies. Each nut butter brings its own flavor and health benefits. Experiment to find your favorite. You can add many fruits to the smoothie. Frozen berries add sweetness and color. Spinach or kale boosts nutrition without changing the taste. Try mango for a tropical twist. Each fruit adds vitamins and makes the smoothie fun. Mix and match to discover new flavors. Choosing the right protein powder is key. Plant-based powders are great for vegan diets. Whey protein is popular for muscle recovery. Look for flavors that match your taste, like chocolate or vanilla. The right powder can enhance the smoothie’s flavor and nutrition. Test different types to see what you prefer. Store any leftover smoothie in an airtight container. You want to keep it fresh. Place it in the fridge right after making it. It will stay good for about one day. When you are ready to drink it again, shake or stir well. This helps mix any settled ingredients. You can freeze your smoothie for later. Pour it into ice cube trays or freezer-safe bags. This way, you can grab a portion whenever you want. To use, thaw the smoothie overnight in the fridge. You can also blend it again for a fresh taste. In the fridge, your smoothie lasts about 24 hours. In the freezer, it can last up to three months. Just remember, the sooner you drink it, the better the taste and texture will be! Yes, this smoothie is gluten-free. All the ingredients listed are naturally free from gluten. The peanut butter, banana, almond milk, protein powder, chia seeds, and honey do not contain gluten. Always check labels if you use store-bought items to confirm they are gluten-free. Absolutely! To make this smoothie vegan, simply use plant-based protein powder. Ensure your peanut butter is also free from animal products. Replace honey with maple syrup or agave nectar for sweetness. All other ingredients are already vegan-friendly. This smoothie offers many health benefits. It provides protein from the peanut butter and protein powder, which helps build muscle. Bananas add potassium, good for heart health. Chia seeds are packed with fiber, aiding digestion. Almond milk is low in calories and rich in vitamins. Yes, you can use various milk types. Cow’s milk will add creaminess and protein. Soy milk is a great option for extra protein. Coconut milk gives a tropical flavor. Each milk option changes the taste and texture slightly, so choose what you enjoy best. This smoothie recipe combines simple ingredients for great taste and nutrition. You learned step-by-step how to prepare it and tips for perfect texture. Variations let you customize your drink to fit your taste. Remember to store leftovers properly for later enjoyment. Smoothies can be healthy and fun. Try new mixtures to find what you love best. Keep experimenting and enjoy your delicious creations!
    Peanut Butter Banana Protein Smoothie Easy Recipe
  • To make pumpkin spice cupcakes, you will need the following ingredients: - 1 ½ cups all-purpose flour - 1 cup granulated sugar - ½ cup brown sugar, packed - 1 teaspoon baking soda - ½ teaspoon baking powder - ½ teaspoon salt - 2 teaspoons pumpkin spice (or a mix of cinnamon, nutmeg, and ginger) - 1 cup pumpkin puree (canned or fresh) - ½ cup vegetable oil - 3 large eggs - 1 teaspoon vanilla extract - ½ cup chopped pecans or walnuts (optional) - Cream cheese frosting (store-bought or homemade) for topping Using these ingredients, you will create a delightful treat that captures the essence of fall. The pumpkin puree adds moisture and flavor. The mix of spices brings warmth and sweetness. You can add nuts for a crunchy texture, but it’s optional. Each ingredient plays a vital role in making these cupcakes moist and delicious. The combination of sugars helps them rise and brown beautifully. The pumpkin spice brings a cozy aroma that fills your kitchen. Keep these ingredients handy, as they are key to crafting the perfect pumpkin spice cupcakes. First, preheat your oven to 350°F (175°C). While that heats up, grab a 12-cup muffin tin. Line it with cupcake liners to make clean-up easy. In a large bowl, combine the dry ingredients. You'll need 1 ½ cups of all-purpose flour, 1 cup of granulated sugar, ½ cup of brown sugar, 1 teaspoon of baking soda, ½ teaspoon of baking powder, ½ teaspoon of salt, and 2 teaspoons of pumpkin spice. Whisk them together until they blend well. In a separate bowl, mix the wet ingredients. Use 1 cup of pumpkin puree, ½ cup of vegetable oil, 3 large eggs, and 1 teaspoon of vanilla extract. Stir until you achieve a smooth mixture. Now, it’s time to combine the two mixtures. Gradually add the wet mixture to the dry ingredients. Stir gently just until combined. Be careful not to over-mix. If you want some crunch, fold in ½ cup of chopped pecans or walnuts. Next, fill each cupcake liner about 2/3 full with the batter. Bake them in the oven for 18-20 minutes. To check for doneness, insert a toothpick into the center. If it comes out clean, your cupcakes are ready! After baking, let the cupcakes cool in the pan for 5 minutes. Then, transfer them to a wire rack to cool completely. Once cool, frost them with cream cheese frosting. You can sprinkle some pumpkin spice or add toasted pecans on top for extra flair! To check for doneness, use a toothpick. Insert it into the center of a cupcake. If it comes out clean, your cupcakes are ready. Avoid over-mixing the batter. Mix just until you see no dry flour. This keeps your cupcakes light and fluffy. For the best cream cheese frosting, beat the cream cheese until smooth. Gradually add powdered sugar for sweetness. You can add vanilla for a richer flavor. If you want a twist, try some maple syrup or a hint of cinnamon. This makes your frosting even more special. Want to boost the flavor? Add a pinch of nutmeg or cloves. You can mix in chocolate chips for a sweet surprise. If you enjoy nuts, try adding chopped pecans or walnuts right into the batter. These little changes make a big difference in taste! {{image_2}} You can easily make these cupcakes gluten-free. Just swap the all-purpose flour with a gluten-free flour blend. Look for a mix that has xanthan gum, as it helps with texture. You may need to adjust the liquid slightly. Always check the package for specific baking tips. For a dairy-free treat, replace the cream cheese frosting. Use a dairy-free cream cheese spread or a simple whipped coconut cream. This keeps the cupcakes light and fluffy while making them suitable for those with dairy allergies. Just remember to ensure all other ingredients are dairy-free. Want to mix it up? Try different toppings! Chocolate ganache adds a rich flavor, while caramel drizzle brings sweetness. You can even top with whipped cream for an airy finish. These options let you customize each cupcake and surprise your taste buds! To keep your pumpkin spice cupcakes fresh, store them at room temperature. Place them in an airtight container. This helps keep them moist and tasty. Make sure to leave space between cupcakes to avoid squishing. If you have leftover cupcakes, they will stay good for about three days on your counter. For long-term storage, freezing is a great option. First, let the cupcakes cool completely. Wrap each cupcake in plastic wrap tightly. Then, place them in a freezer bag or container. Label the bag with the date. You can freeze them for up to three months. When you're ready to enjoy, let them thaw at room temperature. If you have leftover frosting, store it in an airtight container. Keep it in the fridge for up to one week. For longer storage, you can freeze the frosting as well. Just place it in a freezer-safe container. When you want to use it, thaw it in the fridge overnight. Stir it well before frosting your cupcakes again. You can use applesauce or mashed banana as a substitute for pumpkin puree. They add moisture and sweetness. Another option is butternut squash puree. You can also try sweet potato puree, which has a similar texture. These swaps can change the flavor, but they keep your cupcakes tasty. To check if your cupcakes are done, use a toothpick. Insert it into the center of a cupcake. If it comes out clean or with a few crumbs, they are ready. You can also look for a slight spring when you press the top. The edges should be firm, and the tops should look set. Yes, you can make these cupcakes ahead of time. Bake and let them cool completely. Then, store them in an airtight container. They will stay fresh for up to three days at room temperature. For longer storage, freeze the cupcakes without frosting for up to three months. Thaw them before frosting. If you want a different frosting, consider buttercream frosting. A simple vanilla buttercream works well. You can also try whipped cream for a lighter touch. Chocolate ganache is another delicious option for a rich flavor. If you prefer dairy-free, use coconut cream whipped topping as an alternative. You learned how to make delicious pumpkin cupcakes from scratch. We covered all the steps, from gathering ingredients to baking and cooling. You can even try variations like gluten-free or dairy-free options. Remember, checking for doneness and storing your cupcakes properly keeps them fresh longer. Experiment with flavors and toppings to make your cupcakes unique. Now, you have the tools to create mouthwatering treats that friends and family will love. Enjoy baking and sharing your tasty creations!
    Pumpkin Spice Cupcakes Irresistible Fall Treat
  • - 1 lb (450g) sirloin steak, cut into bite-sized cubes - 4 tablespoons unsalted butter - 4 cloves garlic, minced - 1 teaspoon fresh rosemary, chopped (or ½ teaspoon dried) - 1 teaspoon fresh thyme leaves (or ½ teaspoon dried) - Salt and pepper to taste - 1 tablespoon olive oil - Fresh parsley, chopped, for garnish I suggest using sirloin steak for this dish. Sirloin offers great flavor and tenderness. You can also try ribeye or tenderloin if you want something richer. Both cuts will add a nice depth to your garlic butter steak bites. You can add some heat with red pepper flakes or switch up the herbs. Try adding oregano or basil for a twist. To make it fancy, serve with a sprinkle of blue cheese. Fresh herbs like chives or dill can also add freshness. Using these options will enhance the dish's flavor and presentation. Start by cutting your sirloin steak into bite-sized cubes. Make sure they are even. Next, season the cubes with salt and pepper. This helps boost their flavor. Let them rest at room temperature for about 15 minutes. This step helps make the steak tender and juicy. Grab a large cast-iron skillet or a heavy pan. Heat the olive oil over medium-high heat. You want it to shimmer but not smoke. This means it's ready for the steak. Once the oil is hot, add the steak cubes in a single layer. Don't crowd the pan! Sear for about 2 minutes without moving them. This helps form a nice crust. After 2 minutes, flip the cubes. Sear for another 2 minutes. They should be medium-rare and brown. Remove the steak bites from the skillet and set them aside. In the same skillet, lower the heat to medium. Add the unsalted butter and let it melt. Once melted, add your minced garlic, chopped rosemary, and thyme. Stir this mix for about 1 to 2 minutes. The smell will be amazing, but watch the garlic so it doesn't burn. Now, it's time to bring everything together. Return the seared steak bites to the skillet. Toss them in the garlic butter mixture. Make sure they are well coated. Cook them together for one more minute. This step lets the flavors mix beautifully. Remove the skillet from the heat. Sprinkle freshly chopped parsley over the steak bites. This adds a nice pop of color. Serve the steak bites on a platter. You can use toothpicks for easy eating. Drizzle some garlic butter sauce from the skillet on top. For a full meal, pair them with roasted veggies or a fresh salad. Enjoy! To get steak bites just right, start with good meat. I suggest using sirloin steak. Cut it into bite-sized cubes. Season those cubes with salt and pepper. Let them sit for about 15 minutes at room temperature. This helps the flavors mix and the meat become tender. When cooking, use a hot skillet. This gives a good sear. Sear each side for two minutes. Aim for a nice brown crust but keep it medium-rare. This balance keeps the meat juicy. For best results, use a cast-iron skillet or a heavy pan. These hold heat well and create a great crust. A good spatula helps you flip the steak without tearing it. Using a meat thermometer can help you check doneness. Aim for 130°F for medium-rare. While garlic and butter shine, extra herbs can boost flavor. Try adding fresh parsley or oregano. These herbs add a nice touch. You can also sprinkle in some red pepper flakes for heat. Experimenting with spices leads to more fun. Consider a splash of Worcestershire sauce or a hint of lemon juice. These add depth and freshness to the dish. {{image_2}} If you want to mix things up, try different proteins. Chicken, shrimp, or even tofu work great in this dish. Just cut them into bite-sized pieces like the steak. Adjust cooking time as needed. Chicken will take a bit longer than steak, while shrimp cooks faster. You can easily change the flavor of your steak bites. For a spicy kick, add red pepper flakes or cayenne pepper to the garlic butter. If you prefer something sweet, drizzle a bit of honey in the butter. You can also add soy sauce for a savory twist. Experiment with flavors that excite you. These steak bites suit many occasions. For parties, serve them on a platter with toothpicks. This makes them easy to grab and enjoy. For a cozy dinner, pair them with roasted vegetables or a fresh salad. You can also serve them as a main dish for a special date night. The options are endless! To store leftover garlic butter steak bites, let them cool first. Place the steak bites in an airtight container. Add any leftover garlic butter on top. Seal the container tightly. You can keep them in the fridge for up to three days. When you're ready to eat, reheat the steak bites gently. You can use a skillet over low heat. Add a splash of water or broth to keep them moist. Stir often until heated through. This helps maintain their juicy texture. Avoid using high heat as it can dry them out. If you want to freeze the steak bites, do so right after cooking. Let them cool completely. Place them in a freezer-safe bag or container. Remove as much air as possible before sealing. They can last in the freezer for up to three months. To thaw, move them to the fridge overnight before reheating. To make steak bites tender, start with good meat. Use sirloin, which is flavorful and tender. Season the cubes with salt and pepper, and let them sit at room temp for 15 minutes. This step helps the meat cook evenly. Searing in a hot skillet for a short time keeps them juicy. Overcooking makes them tough, so aim for medium-rare. Yes, you can use other cuts. Ribeye or filet mignon work well too. They have great flavor and stay tender. Just remember, lean cuts like flank steak may be chewier. Adjust cooking time based on the cut. Always check for doneness to keep them juicy. Garlic butter steak bites pair well with several sides. I love serving them with roasted vegetables or a fresh salad. You can also add mashed potatoes or rice for a heartier meal. For a fun twist, serve with toothpicks for easy snacking at parties! Garlic butter steak bites can last about 3 to 4 days in the fridge. Store them in an airtight container to keep them fresh. Reheat gently in a skillet to avoid drying them out. Enjoy them as a quick meal or snack! We covered how to make delicious garlic butter steak bites with simple steps. Remember the right ingredients, quality cuts, and cooking tips for the best taste. Enjoy your meal by exploring different flavors and side dishes. Store leftovers properly for next time. Cooking can be fun and easy, so try it out! Enjoy every bite and impress others with your skills. You can master this dish and make it your own.
    Garlic Butter Steak Bites Flavorful and Easy Recipe
  • - 8 oz rice noodles - 1 cup bell peppers, thinly sliced (mix of red and yellow) - 1 cup carrots, julienned - 1 cup snap peas, trimmed - 2 green onions, sliced - 1/2 cup roasted peanuts, chopped - 1/4 cup fresh cilantro, chopped For the Peanut Sauce: - 1/4 cup peanut butter (creamy) - 2 tablespoons soy sauce - 2 tablespoons lime juice - 1 tablespoon sesame oil - 1 tablespoon brown sugar - 1 tablespoon grated ginger - 1 garlic clove, minced - 1-2 tablespoons water (to thin out the sauce) Rice noodles are the base of this dish. They soak up the sauce well. Bell peppers bring a sweet crunch and bright color. Carrots add sweetness and a nice texture. Snap peas give a fresh taste and crispiness. Green onions add a mild onion flavor. Peanuts give a crunchy finish and nutty taste. Cilantro adds a fresh herb flavor that brightens the dish. The peanut sauce is the star. Peanut butter gives a rich, creamy base. Soy sauce adds saltiness that balances the sweetness. Lime juice brings a tangy kick. Sesame oil adds a nutty flavor. Brown sugar sweetens the sauce. Grated ginger adds warmth and spice. Garlic adds depth and richness. You can swap rice noodles with whole wheat or zucchini noodles for a twist. Use any bell pepper color you like. For carrots, try zucchini or cucumber for a different crunch. If you don’t have snap peas, use broccoli or green beans. Green onions can be replaced with chives or shallots. For the sauce, creamy peanut butter can be swapped with almond or cashew butter. Tamari works as a gluten-free soy sauce. Lime juice can be replaced with lemon juice for a different tang. If you prefer less sweetness, cut back on brown sugar. For a spicier kick, add chili paste or sriracha to the sauce. To start, bring a large pot of water to a boil. Add 8 oz of rice noodles. Cook them according to the package instructions, usually about 5-7 minutes. After cooking, drain the noodles and rinse them under cold water. This stops the cooking process and keeps the noodles firm. Set them aside until you need them. In a mixing bowl, combine the following ingredients: - 1/4 cup peanut butter (creamy) - 2 tablespoons soy sauce - 2 tablespoons lime juice - 1 tablespoon sesame oil - 1 tablespoon brown sugar - 1 tablespoon grated ginger - 1 minced garlic clove - 1-2 tablespoons water (to thin out the sauce) Whisk these together until smooth. If the sauce is too thick, add more water, one tablespoon at a time. This helps you reach your desired consistency. Heat a large skillet or wok over medium heat. Add a bit of sesame oil to the pan. Once the oil is hot, add your sliced bell peppers, julienned carrots, and trimmed snap peas. Stir-fry these veggies for about 3-4 minutes. You want them to be tender yet still crisp. This keeps the colors bright and flavors fresh. Now it’s time to combine everything. Add the cooked noodles to your skillet with the sautéed vegetables. Pour the peanut sauce over the noodles. Toss everything gently to coat the noodles and veggies evenly in the sauce. Make sure everything is heated through before moving on. For serving, use large bowls. Garnish your dish with extra chopped peanuts and fresh cilantro. You can also drizzle more lime juice on top for an added zing. This not only enhances the flavor but makes your dish look beautiful. Enjoy your Thai peanut noodles! To make the best peanut sauce, start with creamy peanut butter. Mix it with soy sauce and lime juice. This gives your sauce a nice tang. If your sauce is too thick, add water. Do this one tablespoon at a time. Keep mixing until you reach the right texture. If you want more flavor, add more ginger or garlic. Taste as you go to find the perfect balance that makes your taste buds dance. Seasonal veggies can change your dish. Use bell peppers in summer, or swap them for squash in fall. Carrots add sweetness, while snap peas bring a nice crunch. Try adding spinach or bok choy for extra greens. Be creative! Explore what’s fresh at your local market. Mixing different colors and textures makes your meal not only tasty but also fun to eat. To prevent clumping, rinse your rice noodles under cold water right after cooking. This stops the cooking process and cools them down. Stir the noodles gently while they cook. This keeps them separated. If you notice them sticking, drizzle a little sesame oil over them. This adds flavor and helps them stay loose. Perfectly cooked noodles are key to a great dish! {{image_2}} You can boost your Thai peanut noodles with protein. Chicken, tofu, or shrimp work well. - Chicken: Use cooked, shredded chicken for a hearty touch. Add it after you sauté the veggies. - Tofu: Press and cube firm tofu. Sauté until golden for a nice crunch. Mix it in with the noodles. - Shrimp: Cook shrimp in the skillet until pink. They add great flavor and protein. Adding protein makes the dish more filling and tasty. Want to turn up the heat? Here are a few easy ways. - Chili Paste: Add a spoon of chili paste to your peanut sauce. This gives a hot kick. - Sliced Jalapeños: Toss in fresh jalapeños during the veggie stage for heat. - Crushed Red Pepper: Sprinkle crushed red pepper on top before serving for extra spice. These easy changes will make your noodles spicy and exciting. If you need gluten-free options, you have choices. - Noodles: Use gluten-free rice noodles instead of regular. They taste great and are easy to find. - Sauce: Choose gluten-free soy sauce or tamari for the peanut sauce. This keeps the flavor intact. These swaps ensure everyone can enjoy your Thai peanut noodles without worry. To keep your Thai peanut noodles fresh, store them in an airtight container. Let them cool first. This helps stop steam that can make them soggy. If you want to freeze them, separate the noodles and sauce. This keeps the flavors fresh. You can keep the noodles and sauce in separate containers. It helps them last longer. When you want to eat leftovers, the best way to reheat is on the stove. Add a splash of water to the noodles. This helps them stay moist. Heat over low to medium heat, stirring often. You can also use the microwave. Just heat them in short bursts, stirring in between. This keeps the noodles from drying out. In the fridge, your Thai peanut noodles will last about 3-4 days. If you freeze them, they last about 2-3 months. When you are ready to eat, just thaw them overnight in the fridge before reheating. Always check for any odd smells or colors before eating leftovers. Yes, you can make Thai Peanut Noodles ahead of time. Cook the noodles and store them in the fridge. Keep them in an airtight container. They stay fresh for up to three days. For the sauce, mix all ingredients and store it separately. This way, you keep the sauce fresh and tasty. When ready to eat, just reheat the noodles and toss them with the sauce. It makes for a quick meal on busy nights. Thai Peanut Noodles go well with many dishes. Here are some great pairings: - Spring Rolls: Fresh and crunchy, they add a nice touch. - Thai Salad: A light salad keeps the meal balanced. - Grilled Chicken: Adds protein and flavor. - Coconut Rice: Sweet rice compliments the noodles well. - Thai Iced Tea: A refreshing drink that balances the meal. These sides enhance the meal and make it more exciting. You can easily modify this recipe. Here are some tips: - Vegan: Use maple syrup instead of brown sugar. Ensure your soy sauce is vegan. - Allergy-Sensitive: Substitute peanut butter with sun butter or tahini. This is great for nut allergies. - Low-Carb: Try zucchini noodles or shirataki noodles. They are low in carbs but still tasty. These adjustments help everyone enjoy this dish. Yes, you can use crunchy peanut butter! It will change the texture. You'll have little pieces of peanuts in the sauce. This adds extra crunch and flavor. The taste will be richer and more textured. If you like a bit of bite, go for it! Just remember to adjust the amount of water so the sauce stays smooth enough to coat the noodles. This article covered how to make delicious Thai Peanut Noodles. I discussed the key ingredients like rice noodles, fresh veggies, and peanut sauce. You learned step-by-step instructions, substitution tips, and fun variations to try. By using the right cooking methods and serving suggestions, you can create a tasty dish. Keep these tips in mind as you enjoy making your own version. Happy cooking!
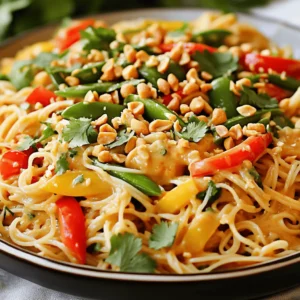
    Thai Peanut Noodles Flavorful and Simple Recipe Guide
  • - 1 lb ground beef - 2 medium sweet potatoes, diced - 1 can (15 oz) black beans, drained and rinsed - 1 can (15 oz) diced tomatoes with green chilies - 1 medium onion, chopped - 2 cloves garlic, minced - 1 green bell pepper, chopped - 1 tablespoon chili powder - 1 teaspoon cumin - ½ teaspoon smoked paprika - ½ teaspoon salt - ¼ teaspoon black pepper - 2 tablespoons olive oil This chili has a mix of hearty and sweet flavors. Ground beef gives it a rich base. Sweet potatoes add a natural sweetness that balances the dish. Black beans bring protein and texture. Diced tomatoes with green chilies add a nice kick. Onion and garlic build a savory foundation. Green bell pepper adds a fresh crunch. For spices, I use chili powder, cumin, and smoked paprika. These give depth and warmth. Salt and black pepper enhance all the flavors. Olive oil is great for sautéing the onion and garlic. When you gather these ingredients, you set the stage for a comforting meal. Each element plays a role in making this dish truly special. The colors and scents come together to excite your senses. You’ll see how easy it is to create a dish that warms both the heart and the belly. 1. Start by heating 2 tablespoons of olive oil in a large pot over medium heat. 2. Add 1 medium chopped onion and 2 minced garlic cloves to the pot. Sauté for about 2-3 minutes. You want them soft and fragrant. 3. Next, add in 1 pound of ground beef. Break it apart as it cooks. Season it with 1 tablespoon of chili powder, 1 teaspoon of cumin, ½ teaspoon of smoked paprika, ½ teaspoon of salt, and ¼ teaspoon of black pepper. Cook until the beef is browned, which takes about 5-7 minutes. 1. Now it's time to stir in the chopped green bell pepper and 2 diced sweet potatoes. Cook for another 3-4 minutes. This helps the veggies soften just a bit. 2. Pour in 1 can of diced tomatoes with green chilies and 2 cups of beef broth. Add 1 can of black beans that you've drained and rinsed. Mix everything together well. 1. Increase the heat and bring the mixture to a boil. Once it bubbles, reduce the heat to low and cover the pot. 2. Let it simmer for about 30-35 minutes. Stir occasionally so nothing sticks to the bottom. You want the sweet potatoes to be tender. 3. After it's done, taste and adjust the seasoning if needed. If you want more heat, add a pinch of cayenne or more chili powder. 4. Serve the chili hot. Top with fresh cilantro and a dollop of sour cream if you like. To make your chili taste even better, adjust the seasoning. Start with the spices in the recipe. After cooking, taste it. If it needs more flavor, add salt or more chili powder. You can also try adding a pinch of cayenne pepper if you like heat. You can add different spices, too. A bit of oregano or a dash of hot sauce can bring new life to your dish. Experiment and find what you love best. The look of your dish matters just as much as the taste. Garnish your chili with fresh cilantro for a pop of color. A swirl of sour cream adds creaminess and cools the heat. Serve your chili in rustic bowls for a cozy feel. Pair it with crusty bread or crispy tortilla chips to make a full meal. This makes it perfect for sharing. Choosing the right pot is key. A large pot or Dutch oven works best for chili. It helps the flavors blend well and allows for even cooking. While cooking, stir your chili often. This keeps it from sticking to the bottom and burning. If you notice it thickening too much, add a splash of beef broth. It will keep your chili nice and smooth. {{image_2}} If you prefer turkey or chicken, use ground turkey or chicken instead of beef. These meats are leaner and still provide great flavor. Just follow the same cooking steps for a lighter dish. Switching out vegetables is also easy. You can add corn, zucchini, or even carrots to the mix. Each choice adds its own taste and texture. Feel free to get creative with what you have on hand! For a vegetarian or vegan option, use plant-based meat instead of ground beef. This gives you the same texture while keeping it meat-free. Lentils are another great choice. They add protein and fiber to your meal. Substituting vegetable broth is key for a vegan version. It replaces the beef broth while still giving depth. This swap keeps your chili rich and hearty without any meat. To make it milder, reduce or skip the chili powder. You can also add a little sugar to balance the heat. This makes it friendly for those who prefer less spice. For chili lovers, add more heat by using cayenne pepper or extra chili powder. You can also add diced jalapeños for a fresh kick. Adjust to your liking and enjoy the bold flavors. To store your leftover beef and sweet potato chili, let it cool first. Once cooled, transfer it to a container. I recommend using airtight glass or plastic containers. These keep the chili fresh for longer. Make sure to add a lid tightly. This prevents spills and keeps odors out of your fridge. You can freeze this chili too. Use freezer-safe containers or heavy-duty freezer bags. Portion out servings for easy meals. Before sealing, remove as much air as possible. This helps prevent freezer burn. When you want to eat it, take it out and place it in the fridge overnight to thaw. For quick reheating, you can also use the microwave. In the fridge, your chili stays fresh for about 3 to 4 days. If you freeze it, it can last up to 3 months. Check for signs that it has gone bad. If you see any mold or notice a sour smell, it’s time to toss it. Always trust your senses; they are key to safe eating! You can pair this chili with many tasty sides. Here are some great options: - Crusty bread: A warm loaf is perfect for dipping. - Tortilla chips: Crunchy chips add a fun texture. - Rice: Serve over white or brown rice for a heartier meal. - Cornbread: Sweet cornbread complements the chili's flavor. - Salad: A simple green salad adds freshness. These sides balance the rich flavors of the chili and enhance your meal. Yes, you can use a slow cooker for this chili! Here’s how: 1. Brown the beef: Start by browning the ground beef in a pan. This adds flavor. 2. Prep veggies: Chop your onions, garlic, and sweet potatoes. 3. Combine ingredients: Add all ingredients to the slow cooker. This includes the beef, veggies, beans, and spices. 4. Cook on low: Let it cook for about 6-8 hours on low or 3-4 hours on high. This method makes the chili even more flavorful as it simmers slowly. This chili lasts well in the fridge. Here are some tips for storage: - Duration: It stays fresh for about 3-4 days. - Best practices: Store it in an airtight container to keep it safe. - Reheat carefully: When you reheat, warm it gently on the stove or in the microwave. Always check for any off smells or changes in color before eating leftovers. This beef and sweet potato chili combines hearty flavors and healthy ingredients. You learned about key components like ground beef, sweet potatoes, and beans. I shared step-by-step cooking instructions for a rich, savory dish. Remember the tips to enhance flavor and make dietary swaps. You can adjust the spice level for your taste. This chili is easy to store or freeze for later. Enjoy crafting this meal that warms your heart and feeds your body. Happy cooking!
    Savory Beef and Sweet Potato Chili Hearty Comfort Dish
  • - 2 cups cooked chicken, shredded - 1/2 cup buffalo sauce - 1 cup shredded cheddar cheese - 1/2 cup green onions, chopped - 1 cup coleslaw mix - 12 egg roll wrappers - Cooking spray or olive oil for misting - Blue cheese or ranch dressing for serving To make the best Buffalo Chicken Egg Rolls, focus on fresh ingredients. Start with cooked chicken. Shredded rotisserie chicken works great for this recipe. The buffalo sauce adds a spicy kick. Adjust it to suit your taste. A good cheddar cheese melts well and gives flavor. Next, chop some green onions. They add a nice crunch and freshness. The coleslaw mix adds texture and a bit of sweetness. Finally, egg roll wrappers hold everything together. They are easy to find in stores. For a crispy finish, lightly mist the egg rolls with cooking spray or olive oil. This step helps them brown nicely in the air fryer. Serve with blue cheese or ranch dressing for a creamy dip. It pairs well with the spicy flavor of the egg rolls. First, take a large mixing bowl. Add 2 cups of shredded chicken. Pour in 1/2 cup of buffalo sauce. You can adjust the sauce for spice. Next, add 1 cup of shredded cheddar cheese. Toss in 1/2 cup of chopped green onions. Finally, mix in 1 cup of coleslaw mix. Stir everything until it is well combined. This filling is the heart of your egg rolls. Now, grab an egg roll wrapper. Lay it flat on a clean surface. Position it so one corner points toward you, like a diamond. Scoop about 2 tablespoons of the filling into the center. Fold the bottom corner over the filling. Tuck it in tightly to seal. Next, fold the two side corners toward the center. Roll from the bottom to the top to close the egg roll. If needed, use a bit of water on your fingers to seal the edges. Repeat this process for all the wrappers and filling. It's time to cook! Preheat your air fryer to 375°F (190°C). While waiting, lightly spray or brush the egg rolls with cooking spray or olive oil. Place the egg rolls in the air fryer basket. Make sure not to overcrowd them. Air fry for 10-12 minutes. Turn them halfway through. They should be golden brown and crispy when done. Once cooked, let them cool slightly before serving. Enjoy them with blue cheese or ranch dressing for dipping! To get crispy edges, sealing is key. After you fill the wrapper, fold the bottom corner tightly over the filling. Then, fold the sides towards the center. Finally, roll from the bottom to the top. If needed, use a bit of water on your fingers to seal the edges well. This helps keep the filling inside while cooking. For wrapping, I recommend laying the wrapper in a diamond shape. This method makes it easier to roll and seal. Buffalo sauce can be spicy, but you can tone it down. To make milder rolls, mix the buffalo sauce with some ranch dressing. You can also use less buffalo sauce in the filling. Start with 1/4 cup and taste the mixture. This way, you keep the flavor without too much heat. You can always add more sauce later if you like it spicier. For even cooking, preheat your air fryer to 375°F (190°C). Place the egg rolls in the basket in a single layer. Avoid overcrowding the basket. This allows hot air to circulate and crisp up all sides. If you have many rolls, cook them in batches. Lightly spray or brush them with olive oil before cooking. This step adds extra crispiness and flavor. {{image_2}} You can easily switch chicken for turkey or pork. Turkey gives a lighter taste. It still holds the spicy buffalo flavor well. For pork, use shredded cooked pork. It adds a rich flavor. Just keep the buffalo sauce to balance the taste. Each option offers a fun twist. You can enjoy them in many ways. If you want a meat-free choice, try plant-based proteins. You can use shredded jackfruit or tofu. Both soak up flavor well. Add cheese alternatives for the creamy texture. Nutritional yeast gives a cheesy taste without dairy. Also, keep the coleslaw mix for crunch. This way, you get a filling veggie snack. Feel free to play with spices and sauces. Add garlic powder for a strong kick. Smoked paprika gives a nice depth to the taste. You can also experiment with different sauces. Try barbecue sauce for a sweet twist. Or add ranch seasoning for a creamy touch. Each variation makes your egg rolls unique and fun! To store your leftover buffalo chicken egg rolls, place them in an airtight container. Make sure they are completely cool before sealing. This helps keep them fresh. You can store them in the fridge for up to three days. If you want to keep them longer, consider freezing them instead. The best way to reheat your egg rolls is in the air fryer. This keeps them crispy. Preheat your air fryer to 375°F (190°C). Place the egg rolls in a single layer. Heat for about 5-7 minutes. Check them halfway to ensure even heating. They should be hot and crispy when done. If you want to freeze uncooked egg rolls, start by laying them out on a baking sheet. Make sure they are not touching. Freeze them for about an hour, or until solid. Then, place them in a freezer bag. Label the bag with the date. You can freeze them for up to three months. When ready to cook, just air fry them straight from the freezer. Yes, using store-bought rotisserie chicken saves time. It cuts your prep work in half. The chicken is already cooked and seasoned. This option makes your filling flavorful right away. Plus, it makes the dish super quick. Just shred the chicken and mix it with the other ingredients. You’ll have delicious egg rolls in no time. I love serving buffalo chicken egg rolls with a few tasty sides. Here are some great options: - Blue cheese or ranch dressing: Perfect for dipping. - Celery sticks: Adds a nice crunch and freshness. - Carrot sticks: A sweet side that pairs well. - French fries: Crispy fries go great with these rolls. - Salad: A light salad can balance the meal. These sides enhance your meal and make it feel complete. To get the crispiest egg rolls, follow these tips: - Preheat your air fryer: Heat it to 375°F (190°C) before cooking. - Spray with oil: Lightly mist the egg rolls with cooking spray or olive oil. This helps them brown nicely. - Don’t overcrowd: Place the egg rolls in a single layer. This allows hot air to circulate and crisp all sides. - Turn halfway through: Flip them at the halfway point to get even crispiness. By following these steps, your egg rolls will come out perfectly crispy every time. Enjoy! In this article, we explored making buffalo chicken egg rolls. We covered key ingredients, filling prep, and assembly steps. You learned helpful tips for perfecting your wraps, adjusting spice levels, and air fryer tricks. We also shared storage methods and answered common questions. Try these tasty rolls for a fun snack or dinner. Enjoy your cooking adventure!
    Buffalo Chicken Egg Rolls Air Fryer Crispy Delight
  • - 1 lb large shrimp, peeled and deveined - 4 cups broccoli florets - 1/4 cup unsalted butter, melted - 4 cloves garlic, minced - 1 tablespoon lemon juice - 1 teaspoon smoked paprika - 1 teaspoon onion powder - 1/2 teaspoon salt - 1/4 teaspoon black pepper - Fresh parsley, chopped (for garnish) - Lemon wedges (for serving) When I make Sheet Pan Garlic Butter Shrimp & Broccoli, I always use fresh ingredients. The shrimp must be large, peeled, and deveined for the best taste. The broccoli florets add color and crunch. The butter, melted, brings all the flavors together. The garlic is key. I use four cloves, minced finely. It adds a wonderful aroma. Lemon juice gives a nice zing and balances the richness of the butter. Smoked paprika adds warmth and depth. Onion powder, salt, and black pepper round out the flavor profile. For garnish, I love using fresh parsley. It adds a pop of color and freshness. Lemon wedges are great for serving. They brighten the dish and enhance the taste of the shrimp. With these ingredients, you can create a simple yet delicious meal. The best part? It all cooks on one pan, making cleanup easy! - Preheat oven to 400°F (200°C). - Line a sheet pan with parchment paper. Start by heating your oven. This step ensures that the shrimp and broccoli cook evenly. Lining the pan with parchment paper makes cleanup so easy later. You will love this simple trick. - Combine melted butter and seasonings. In a small bowl, mix melted butter with minced garlic, lemon juice, smoked paprika, onion powder, salt, and black pepper. Stir until smooth. This mixture brings rich flavor to your dish, balancing garlic and lemon perfectly. - Arrange broccoli and shrimp on the sheet pan. - Drizzle with garlic butter mixture and toss. Place the broccoli florets on one side of the pan. Pour half of the garlic butter sauce over them. Toss gently to coat. Next, lay the shrimp on the other side. Drizzle the remaining sauce over the shrimp and toss to coat. This step ensures every piece gets flavor. - Bake for 12-15 minutes and check for doneness. Put the sheet pan in the oven. Bake for 12 to 15 minutes. Check if the shrimp are pink and opaque. The broccoli should be tender and slightly crispy. This is a quick and easy way to make a full meal. - Garnish with parsley and serve with lemon. Once done, take the pan out of the oven. Sprinkle chopped parsley over both the shrimp and broccoli. Serve with lemon wedges on the side. The lemon adds a fresh kick that brightens the dish. Enjoy your meal! How to tell when shrimp is done Shrimp cook fast. Look for a pink hue and firm texture. When the shrimp curl into a C shape, they are ready. Avoiding overcooking Overcooked shrimp become rubbery. Keep an eye on cooking time. Aim for 12-15 minutes in the oven. Check them at the 10-minute mark to be safe. Adding spices or herbs for extra flavor Want a flavor boost? Try adding red pepper flakes for heat. Fresh herbs like basil or thyme also work well. They add freshness to the dish. Recommended side dishes Pair this dish with rice or quinoa. A light salad goes well too. These sides balance the richness of the garlic butter. Using parchment paper for easy cleanup Line your sheet pan with parchment paper. It makes cleanup a breeze. Just toss it away after cooking. Less scrubbing means more time to enjoy your meal. Dishwashing tips to save time Soak your pan while you eat. This helps loosen stuck bits. Use hot soapy water for quick cleaning. If you have a dishwasher, make sure to load it right after. {{image_2}} You can change up the veggies in this dish. Try adding bell peppers, snap peas, or carrots. They all cook nicely with the shrimp. Seasonal veggies work great too! In spring, use asparagus. In fall, toss in Brussels sprouts. Each choice brings a new taste to your meal. If you prefer, swap shrimp for chicken or tofu. Chicken thighs add a juicy bite while tofu gives a nice texture. When using chicken, cook it longer. Aim for 20-25 minutes until it's fully cooked. If using tofu, bake it for 15 minutes. Adjust the time for each protein to ensure your meal is perfect. Want a kick? Add a pinch of red pepper flakes for heat. You can also try different marinades. A honey soy sauce mix can bring a sweet touch. Or go for a spicy sriracha blend. Each twist will change the flavor and make this dish your own. To store your leftovers, let them cool first. Place the shrimp and broccoli in a shallow container. Cover the container tightly with a lid or wrap it well with plastic wrap. This keeps the dish fresh and tasty. I recommend using glass or BPA-free plastic containers. These are safe and easy to clean. If you want to freeze this dish, let it cool completely. Then, place the shrimp and broccoli in a freezer-safe container or bag. Make sure to remove as much air as possible. This helps prevent freezer burn. When you're ready to eat, thaw it overnight in the fridge. To reheat, warm it in the oven at 350°F (175°C) until hot. You can also use a microwave, but the oven keeps the shrimp from getting rubbery. In the fridge, this dish will last about three days. If you freeze it, it can stay good for up to three months. Just remember that the longer it sits, the more the texture and flavor may change. Enjoy it fresh for the best taste! Yes, you can prep this dish ahead. Chop the broccoli and keep it in the fridge. Mix the garlic butter sauce and store it in a sealed container. You can season the shrimp and store it separately. This way, you save time on busy nights. Just combine everything when you are ready to bake. Yes, this recipe is gluten-free. All the ingredients listed are safe for those with gluten sensitivity. Just ensure your butter does not contain any additives. Always check labels when buying pre-made items. This helps avoid any hidden gluten. This dish pairs well with rice or quinoa. You could also serve it with a light salad. Garlic bread is a tasty option too. For drinks, a crisp white wine or sparkling water works great. These options balance the rich flavors of the shrimp. Yes, you can use frozen shrimp. Just make sure to thaw them first. This helps them cook evenly. You can place them in cold water for about 15 minutes. After thawing, pat them dry before seasoning. This keeps the shrimp from becoming watery. This blog post laid out the simple steps to make garlic butter shrimp and broccoli. We covered key ingredients, including shrimp, broccoli, and seasonings. I shared easy instructions on cooking and tips for success. Remember, you can swap proteins or veggies based on your taste. Store leftovers correctly for best freshness. With this dish, you can enjoy a tasty meal packed with flavor. Ready to try this quick and wholesome recipe? You won't regret it!
    Sheet Pan Garlic Butter Shrimp & Broccoli Delight
  • To make this yummy coffee cake, gather these simple ingredients: - 2 cups all-purpose flour - 1 cup granulated sugar - 1/2 cup unsalted butter, softened - 1 cup milk - 2 large eggs - 2 teaspoons baking powder - 1 teaspoon vanilla extract - 1/2 teaspoon salt - 1 cup chopped walnuts - 1/2 cup maple syrup - 1 teaspoon cinnamon You can swap some ingredients if needed. Here are a few options: - Use coconut oil instead of butter for a dairy-free option. - Swap almond milk for regular milk to make it dairy-free. - Use brown sugar instead of granulated sugar for a richer flavor. - If you want a nut-free cake, leave out the walnuts entirely. Choosing the right ingredients makes a big difference. Here’s what I recommend: - Use fresh, high-quality eggs for better flavor and texture. - Choose real maple syrup, not imitation, for a true maple taste. - Opt for organic all-purpose flour for a cleaner bake. - Select fresh walnuts and chop them yourself for the best crunch. Using these quality ingredients will elevate your coffee cake and impress your guests! First, I preheat the oven to 350°F (175°C). This step is key for even baking. Next, I grease a 9x13 inch baking pan. I use butter for a nice, non-stick finish. Make sure to cover all corners well. This helps the cake come out easily after baking. In a large bowl, I cream together softened butter and granulated sugar. I mix until it looks light and fluffy. Then, I add the eggs, one at a time. Each egg needs a good mix before the next. After that, I stir in the vanilla extract for flavor. In a separate bowl, I whisk the flour, baking powder, salt, and cinnamon. Mixing these dry ingredients first helps them blend well. I then add this dry mix to my creamed mixture, alternating with the milk. I mix until just combined but avoid overmixing. Finally, I gently fold in the chopped walnuts and maple syrup. This adds a nice crunch and sweetness. Now, I pour the batter into the prepared baking pan. I smooth the top with a spatula to make it even. I place the pan in the oven and bake for 30-35 minutes. To check if it’s done, I insert a toothpick into the center. If it comes out clean, the cake is ready! After baking, I let the cake cool in the pan for about 10 minutes. Then, I carefully transfer it to a wire rack. This step helps it cool completely and avoids sogginess. For an extra treat, I sometimes drizzle maple syrup on top before serving. To get the best texture for your Maple Walnut Coffee Cake, follow these simple tips: - Use room temperature butter and eggs. This helps mix the batter smoothly. - Do not over-mix the batter. Mix until just combined to keep it fluffy. - Fold in walnuts gently. This keeps the cake light and airy. If you're new to baking, here are some helpful tips: - Preheat the oven. Always preheat your oven to ensure even baking. - Use the right pan size. A 9x13 inch pan works best for this recipe. - Test with a toothpick. Insert it into the center to check if it’s done. Serving your coffee cake is easy and fun. Here are some ideas: - Serve warm or at room temperature. This makes the flavors shine. - Pair with coffee or tea. The flavors of maple and walnuts go well with both. - Add a drizzle of maple syrup on top. This adds sweetness and looks nice. {{image_2}} You can make a gluten-free version of this cake. Use gluten-free flour instead of all-purpose flour. Look for a blend that works best for baking. Many brands offer this option. Follow the same steps in the recipe. You will get a moist and tasty cake. For a creamier twist, add a cream cheese swirl. Mix 8 ounces of softened cream cheese with 1/4 cup of sugar and 1 egg. After mixing the batter, pour half into the pan. Then, dollop the cream cheese mix on top. Use a knife to swirl it into the batter. Pour the rest of the batter over this. Bake as usual for a rich flavor. You can also make this cake nut-free. Simply leave out the walnuts. For extra texture, add 1/2 cup of oats or chocolate chips. This change still keeps the cake delicious and fun. Follow the same recipe steps for baking. Enjoy a tasty treat without the nuts. After you finish your delicious cake, let it cool. Cut the cake into slices. Place the slices in an airtight container. If you do not have one, wrap the cake in plastic wrap. This keeps it fresh for up to four days at room temperature. For best taste, keep it in a cool, dry place. To keep your cake fresh, avoid direct sunlight. Heat and humidity can dry it out. If you want to keep it longer, refrigerate it. Wrap the cake tightly in foil before putting it in the fridge. This helps it last for about a week. Remember, cold storage can change the texture, so serve it at room temperature. You can freeze Maple Walnut Coffee Cake for later! First, let the cake cool completely. Wrap individual slices in plastic wrap. Then, place them in a freezer-safe bag. Mark the date on the bag. The cake will stay fresh for up to three months. When you want a slice, remove it from the freezer. Let it thaw in the fridge overnight or at room temperature for a few hours before serving. Enjoy the taste of your cake any time! To keep your maple walnut coffee cake moist, use fresh ingredients. Use room temperature butter and eggs. Adding milk helps too. Avoid overmixing the batter, as this can dry it out. Bake just until a toothpick comes out clean. You can also store it in an airtight container. This keeps moisture in. Yes, you can! If you dislike walnuts, try pecans or almonds. Both nuts add a nice crunch. You can even skip nuts for a nut-free cake. Just keep the flavor balance in mind. Using nuts can enhance the cake's texture and taste. When stored properly, your cake can last for about 3 to 5 days. Keep it in an airtight container. If you want it to last longer, freeze it. It can stay good for about 3 months in the freezer. Just remember to thaw it before serving. Absolutely! You can prepare the batter a day in advance. Just cover it and keep it in the fridge. For baked cake, you can also make it a day ahead. Just allow it to cool before storing. This makes serving easy for special occasions or brunch. This blog post covered how to make a Maple Walnut Coffee Cake. We discussed the best ingredients, step-by-step instructions, and tips for success. You learned about fun variations and how to store leftovers properly. In the end, making this cake is rewarding and simple. Enjoy your baking journey and share your delicious results!
    Maple Walnut Coffee Cake Bakery Delightful Recipe
  • To make this rich and creamy soup, gather these simple ingredients: - 4 large leeks, white and light green parts only, cleaned and sliced - 4 medium Yukon Gold potatoes, peeled and diced - 4 cups vegetable broth - 1 cup heavy cream (or a non-dairy alternative) - 3 cloves garlic, minced - 1 tablespoon fresh thyme, chopped (or 1 teaspoon dried thyme) - 2 tablespoons olive oil - Salt and pepper to taste - Chopped chives for garnish If you can't find leeks, green onions work well. You can use russet potatoes too, but Yukon Gold adds a nice creaminess. For a dairy-free option, switch the heavy cream with coconut milk or almond milk. You can also use vegetable broth if you want a lighter flavor. Fresh herbs like parsley or dill can replace thyme for a different taste. Fresh ingredients make a big difference in flavor. Fresh leeks give a mild sweetness that dried leeks just can't match. Yukon Gold potatoes are creamy and buttery, which makes the soup rich. Fresh garlic and herbs add depth and aroma. Always choose high-quality ingredients for the best soup. It makes every bite wonderful! Start by preparing the leeks. You need four large leeks, just the white and light green parts. Clean them well and slice them thin. Heat two tablespoons of olive oil in a skillet over medium heat. Add the sliced leeks and cook for about five minutes. You want them to soften and smell good. This step adds great flavor to your soup. Next, peel and dice four medium Yukon Gold potatoes. These potatoes are creamy and work well in soup. They add body and texture. After prepping the leeks and potatoes, place them in your slow cooker. In the slow cooker, combine the sautéed leeks, diced potatoes, and three minced garlic cloves. Now, add four cups of vegetable broth. Stir everything well to mix the ingredients. Don't forget to add salt and pepper to taste. Cover the slow cooker and cook on low for six to eight hours. If you are short on time, cooking on high for four hours works too. The goal is to make sure the potatoes are tender and cooked through. After cooking, it’s time to blend the soup. You can use an immersion blender for this. Blend until the soup is smooth. If you like texture, blend only half of the soup. Once blended, stir in one cup of heavy cream or a non-dairy alternative. Let the soup heat on low for about ten minutes. Taste and adjust the seasoning if needed. It’s good to check the flavor before serving. Ladle the warm soup into bowls and garnish with chopped chives. This adds a nice color and fresh taste. Enjoy your rich and creamy potato leek soup! To make your soup taste amazing, start with fresh leeks. They bring a sweet and mild flavor. Sauté the leeks in olive oil before adding them to the slow cooker. This step adds depth. Don't skip the garlic, as it gives a nice aroma. Adding thyme boosts the earthiness. You can even try fresh herbs like rosemary for a twist. For a smooth and creamy soup, use an immersion blender. Blend until it’s silky. If you like some chunks, blend just half of the soup. You can adjust the creaminess by adding more or less heavy cream. For a dairy-free option, use coconut milk or almond milk. This keeps it rich while changing the flavor. Serve the soup hot in a bowl. Garnish each bowl with chopped chives for a pop of color. Drizzle a bit of cream on top to make it look fancy. Pair your soup with crusty bread for a complete meal. If you want a crunchy bite, add croutons for texture. Enjoy your hearty bowl of goodness! {{image_2}} You can easily make this soup vegan. Simply replace heavy cream with a non-dairy milk. Almond, coconut, or cashew milk work well. You can also use coconut cream for a richer taste. This swap will keep the soup creamy without dairy. Feel free to add more vegetables. Carrots, celery, or spinach can boost nutrition. Just chop them small and add them with the potatoes. For protein, consider adding white beans or lentils. They blend well and add heartiness to each bowl. Want to change the flavor? Try adding herbs like dill or parsley. Smoked paprika can give the soup a nice kick. For a fresh touch, squeeze in some lemon juice before serving. Each of these options brings a new taste to the classic recipe. After enjoying your soup, cool it down to room temperature. Then, transfer the soup to an airtight container. Make sure to seal it well to keep out air. Store it in the fridge for up to 5 days. This helps keep the taste fresh. If you want to save some for later, freezing is a great choice. First, let the soup cool. Then, pour it into freezer-safe containers. Leave some space at the top to allow for expansion. You can freeze it for up to 3 months. When you're ready to eat, just thaw it in the fridge overnight. To reheat, gently warm the soup on the stove. Stir it often to avoid sticking. If it seems too thick, add a splash of broth or water. You can also microwave it in short bursts. Stir in between to heat evenly. Always check the temperature before serving. Enjoy your creamy delight! To boost the flavor, you can add more herbs. Fresh herbs like parsley or dill work well. You can also add a bay leaf during cooking. A splash of lemon juice adds brightness too. For a richer taste, try using chicken broth instead of vegetable broth. Don't forget a pinch of smoked paprika for a hint of smokiness. Each of these tweaks will make your soup more exciting and delicious. Yes, you can use different potatoes. Russet potatoes are a good choice. They make the soup creamy but may break down more. Red potatoes add a nice texture but are less creamy. Sweet potatoes are great for a sweeter flavor. Just remember to adjust cooking time as needed. Each type of potato gives a unique taste and structure to your soup. Slow Cooker Potato Leek Soup will last about 3 to 5 days in the fridge. Store it in an airtight container. If you want to keep it longer, consider freezing it. When stored well, it can last up to 3 months in the freezer. Just remember to let it cool completely before freezing. Reheat on the stove or in the microwave for convenience. We explored the key ingredients for Slow Cooker Potato Leek Soup, focusing on fresh choices. We learned how to prepare and cook this dish step-by-step for great taste. Tips helped enhance flavor and texture, making it even better. Variations showed how to customize the soup to fit your diet. Lastly, storage methods ensure your leftovers stay tasty. In summary, using fresh ingredients and exploring variations can transform your cooking. Enjoy the process and share your soup with others!
    Slow Cooker Potato Leek Soup Rich and Creamy Delight
  • - 2 cups gingersnap crumbs - 1/2 cup unsalted butter, melted - 1/4 cup brown sugar - 16 oz cream cheese, softened - 1 cup pumpkin puree - 1 cup granulated sugar - 3 large eggs - 1 teaspoon vanilla extract - Spices: 1 teaspoon ground cinnamon, 1/2 teaspoon ground nutmeg, 1/2 teaspoon ground ginger - 1/4 teaspoon salt - 1 cup caramel sauce (store-bought or homemade) This recipe starts with a crunchy gingersnap crust. The crust is simple yet full of flavor. You mix gingersnap crumbs with melted butter and brown sugar. Press this mixture into the bottom of your baking dish. Next, we create a smooth and creamy cheesecake filling. Start with softened cream cheese. This step is key. If the cream cheese is cold, it will be hard to mix. Add pumpkin puree and granulated sugar to the cream cheese. This combination gives the bars their delicious pumpkin flavor. Then, mix in the eggs, one at a time. This helps to keep the filling light. After that, add vanilla extract and spices. The warm spices will fill your kitchen with a lovely aroma. Lastly, we need caramel sauce. You can use store-bought sauce for ease, or make your own if you prefer. Drizzle this over the cheesecake filling. Swirl it in with a knife for a beautiful marbled look. Each layer adds to the rich taste of these pumpkin caramel cheesecake bars. 1. Preheat your oven to 350°F (175°C). This step is crucial for a perfect crust. 2. In a medium bowl, mix 2 cups of gingersnap crumbs, 1/2 cup of melted butter, and 1/4 cup of brown sugar. Stir until the crumbs look like wet sand. 3. Press the mixture evenly into the bottom of your greased 9x13 inch baking dish. Bake for 10 minutes. Let it cool slightly. 1. In a large bowl, beat 16 ounces of softened cream cheese until smooth. This makes for a creamy texture. 2. Mix in 1 cup of pumpkin puree and 1 cup of granulated sugar. Blend well until smooth. 3. Add 3 large eggs, one at a time. Beat well after each egg. This helps to create a light filling. 4. Stir in 1 teaspoon of vanilla extract, 1 teaspoon of ground cinnamon, 1/2 teaspoon of ground nutmeg, 1/2 teaspoon of ground ginger, and 1/4 teaspoon of salt. Mix until all ingredients are combined. 1. Pour the pumpkin cheesecake filling over the cooled gingersnap crust. Spread it evenly. 2. Drizzle 1 cup of caramel sauce on top. Use a knife or skewer to swirl the caramel into the cheesecake. This creates a beautiful marbled effect. 3. Bake for 35-40 minutes. The center should be set but slightly jiggly. 4. After baking, let it cool at room temperature for about an hour. Then refrigerate for at least 4 hours, or overnight, to set completely. To get a smooth texture, always start with softened cream cheese. This helps it mix well and prevents lumps. If you forget to soften it, you can microwave it for a few seconds. Also, mix the eggs gently. Overmixing can cause cracks in your cheesecake. Add them one at a time, and just mix until blended. This keeps the bars looking nice. A pinch of salt can make a big difference. It enhances the sweetness and adds depth to the flavor. Use a high-quality caramel sauce. The better the sauce, the more delicious your bars will be. You can make homemade caramel, or choose a good store brand. Either way, quality matters. For a beautiful finish, garnish your bars with whipped cream. Crushed gingersnap cookies on top add a nice crunch. Drizzle more caramel sauce over the bars right before serving. This extra touch makes them look special and inviting. Serve them chilled on a nice platter to impress your guests. {{image_2}} You can change the crust for a new taste. - Use 2 cups of graham cracker crumbs instead of gingersnap crumbs. - For a gluten-free crust, try a nut-based crust, like almonds or pecans. You do not have to stick to pumpkin. - Swap pumpkin puree with sweet potato puree for a different flavor. - You can play with spices too. Try using allspice or cloves instead of the usual cinnamon and nutmeg. Add fun touches to your bars for extra joy. - Mix in chocolate chips or toffee bits for a sweet surprise in the filling. - Top your bars with chopped pecans or walnuts for a crunchy finish. To keep your pumpkin caramel cheesecake bars fresh, store them in an airtight container in the refrigerator. This will protect them from drying out. Always use parchment paper when baking. This makes it easy to lift and cut the bars later. If you want to save some bars for later, freeze them in individual portions. This way, you can enjoy a slice whenever you want. To serve, thaw the bars in the refrigerator. This keeps the texture just right. These tasty bars are best eaten within a week when stored in the fridge. They pair wonderfully with coffee or tea. Enjoying them as a dessert with your favorite drink makes for a delightful experience. Yes, but ensure it is cooked and well-pureed. Fresh pumpkin can bring a bright flavor. To prepare, cut the pumpkin, roast it, and blend until smooth. This method gives you a rich taste. Make sure you drain any excess moisture. It will help your cheesecake bars set better. The center should be set but still slightly jiggly. When you take them out, the edges will be firm. The middle will have a soft wobble. This indicates it still has some creaminess. Keep in mind, they will firm up as they cool. Yes, these bars can be made and refrigerated for up to 2 days in advance. This makes them great for parties or family dinners. Just cover them well with plastic wrap. This keeps them fresh and tasty. Allow them to chill for at least four hours before serving. This helps the flavors meld together beautifully. This blog post covered how to create delicious pumpkin cheesecake bars with a gingersnap crust. We explored each ingredient and step, ensuring you have the tools to succeed. Remember to soften the cream cheese and avoid overmixing the eggs to get the perfect texture. With these tips, your cheesecake can shine. Don't forget to customize your bars with different toppings or crust options. Enjoy your baking, and savor each bite!
    Pumpkin Caramel Cheesecake Bars with Gingersnap Base
  • To make Slow Cooker Butternut Squash Dal with Coconut, you will need: - 1 medium butternut squash, peeled and diced - 1 cup red lentils, rinsed - 1 onion, finely chopped - 3 cloves garlic, minced - 1 inch ginger, grated - 2 teaspoons turmeric powder - 1 teaspoon cumin seeds - 1 teaspoon coriander powder - 1 can (400ml) coconut milk - 3 cups vegetable broth - Salt, to taste - Fresh cilantro, for garnish - Lime wedges, for serving You can add a few things to boost the taste: - 1-2 green chilies for heat - A splash of lemon juice for brightness - A dash of smoked paprika for depth - Chopped spinach or kale for added greens - Cooked rice or quinoa for extra body When picking out your ingredients, keep these tips in mind: - Choose a butternut squash that feels heavy for its size. Look for a smooth skin without blemishes. - Select red lentils that are dry and free from any stones or debris. - Pick onions that are firm and have dry, papery skin. - For garlic, choose bulbs that are plump and free from sprouting. - Fresh ginger should be firm and have a smooth skin. - Check coconut milk for a creamy texture without separation. - Ensure your vegetable broth is low-sodium for better control over salt levels. These tips will help ensure your dal is as tasty as possible! Start by peeling and dicing one medium butternut squash. Cut it into small, even cubes for even cooking. Next, rinse one cup of red lentils under cold water. This helps remove any dirt and makes them cleaner. Finely chop one onion and mince three cloves of garlic. Grate a one-inch piece of fresh ginger. Each of these ingredients adds depth to the flavor of the dal. In a bowl, gather the spices: two teaspoons of turmeric powder, one teaspoon of cumin seeds, and one teaspoon of coriander powder. You can also add salt to taste. Measure out one can of coconut milk and three cups of vegetable broth. Make sure to have fresh cilantro and lime wedges ready for serving. In your slow cooker, add the diced butternut squash, rinsed red lentils, chopped onion, minced garlic, and grated ginger. Sprinkle in the turmeric powder, cumin seeds, coriander powder, and salt. Stir everything together to mix the flavors well. Now, pour in the coconut milk and vegetable broth. Make sure all the ingredients are covered with the liquid. This step is key for a creamy texture. Set your slow cooker to low and cook for six to eight hours. If you're short on time, you can cook it on high for three to four hours. The dal is ready when the lentils and squash are tender. When the cooking time is up, give the dal a good stir. This helps combine all the flavors. Taste it and adjust the seasoning if needed. You might want to add a bit more salt. To serve, ladle the dal into bowls and garnish it with fresh cilantro. For a zesty kick, offer lime wedges on the side. Squeezing lime over the dal brightens the dish. Enjoy your warm, comforting bowl of butternut squash dal! To get the best taste from your butternut squash dal, use fresh ingredients. Fresh produce boosts flavor and nutrition. Don’t skip the spices! Turmeric, cumin, and coriander add warmth and depth. Toast the cumin seeds in a dry pan first. This brings out their rich aroma. Avoid overcooking the dal. If cooked too long, the lentils will turn mushy. Keep an eye on the cooking time. Use low heat for a longer, steady cook. This helps flavors blend well. Also, don’t forget to taste as you go. Adjust salt and spices to suit your taste. This dish pairs well with rice or naan. Serve it with a squeeze of lime for brightness. Fresh cilantro adds a nice touch on top. You might like to add a side of yogurt. This can balance the spices and add creaminess. For a complete meal, serve with a salad or roasted veggies. {{image_2}} You can spice up this dish in many ways. Adding a pinch of cinnamon gives a warm hint. A little chili powder can add heat. You might try smoked paprika for a deep flavor. Cardamom also brings a nice aroma. Just start with small amounts. You can always add more later. If you don't have butternut squash, pumpkin works great too. For lentils, try yellow or green ones. If you are out of coconut milk, almond milk is a good choice. You can use vegetable broth or chicken broth if you prefer. Fresh cilantro can be swapped with parsley if needed. This recipe is already vegan and gluten-free. The ingredients like lentils and coconut milk fit both diets. If you want a richer taste, try adding a few cashews. Just blend them with some water. They add creaminess without dairy. Enjoy this dish knowing it suits many diets! After enjoying your Slow Cooker Butternut Squash Dal, let it cool. Pour the leftover dal into airtight containers. Store it in the fridge. It stays fresh for up to four days. Make sure to label your containers with the date. This helps you keep track of freshness. To reheat your dal, use a pot on the stove. Add a splash of water or broth to keep it moist. Heat it over medium heat, stirring often. You can also use the microwave. Place the dal in a microwave-safe dish. Cover it loosely and heat for two to three minutes. Stir halfway through to ensure even heating. If you want to save your dal for later, freezing is a great option. Pour the cooled dal into freezer-safe bags or containers. Remove as much air as possible to avoid freezer burn. Label the bags with the date. Your dal can last up to three months in the freezer. When you’re ready to eat, thaw it overnight in the fridge before reheating. Yes, you can use other lentils. Green or brown lentils can work well. They may take longer to cook. Red lentils break down and create a nice texture. They are perfect for dal. To spice it up, add chili powder or fresh chilies. You can also use cayenne pepper. Start with a little, then taste. Adjust to your heat preference. This will give your dal a nice kick. This dish is packed with nutrition. Butternut squash is high in vitamins A and C. Red lentils provide protein and fiber. Coconut milk adds healthy fats. Fresh cilantro offers antioxidants. Together, they create a balanced meal. In this post, we explored the key ingredients for butternut squash dal, including tips for freshness. I shared a clear process for preparation and slow cooking, along with valuable tips to boost flavor. We also discussed variations for dietary needs and how to store leftovers effectively. With these insights, you can create a tasty dish that fits your taste and lifestyle. Enjoy making butternut squash dal your way!
    Slow Cooker Butternut Squash Dal with Coconut Delight
  • - 1 lb ground chicken - 1/3 cup panko breadcrumbs - 1/4 cup green onions, finely chopped - 1/3 cup teriyaki sauce The main ingredients form the heart of this dish. Ground chicken gives a nice, tender bite. Panko breadcrumbs add crunch and help the meatballs hold their shape. Green onions add freshness and a mild onion flavor. Teriyaki sauce brings a sweet and savory taste that ties everything together. - 1 bell pepper, sliced (any color) - 1 cup broccoli florets - 1 cup carrots, thinly sliced Choosing the right veggies enhances the meal. Bell peppers add color and sweetness. Broccoli florets bring a nice crunch. Carrots provide a hint of earthiness. Together, they add nutrients and flavor that balance the meatballs. - 2 tablespoons soy sauce - 1 tablespoon sesame oil - 2 cloves garlic, minced - 1 teaspoon fresh ginger, grated - Salt and black pepper to taste Seasonings play a key role in flavor. Soy sauce adds saltiness and depth. Sesame oil gives a nutty aroma. Garlic and ginger bring warmth and zest. Salt and pepper help enhance all the flavors. These elements create a rich taste in every bite. - Preheat the oven to 400°F (200°C). - Line a sheet pan with parchment paper for easy cleanup. - In a large bowl, combine: - 1 lb ground chicken - 1/3 cup panko breadcrumbs - 1/4 cup green onions, finely chopped - 1 egg, beaten - 2 tablespoons soy sauce - 1 tablespoon sesame oil - 2 cloves garlic, minced - 1 teaspoon fresh ginger, grated - Salt and black pepper to taste Mix all ingredients until well combined. - Using your hands, form the mixture into small meatballs, about 1 inch wide. Place them on the sheet pan. - In a separate bowl, toss: - 1 bell pepper, sliced - 1 cup broccoli florets - 1 cup carrots, thinly sliced Drizzle with olive oil, salt, and pepper. Mix well. - Arrange the seasoned vegetables around the meatballs on the sheet pan. - Bake in the preheated oven for about 20 minutes. Check that the meatballs are cooked through and the veggies are tender. - Remove the pan from the oven. Drizzle 1/3 cup teriyaki sauce over the meatballs and veggies. Toss gently to coat. - Return to the oven for an additional 5 minutes. This helps caramelize the sauce slightly. - Once done, let it rest for a minute before serving. To make your meatballs tasty, mix all the ingredients well. This helps the flavors blend. You can add some crushed red pepper for heat. A splash of lime juice adds brightness. When choosing veggies, pick fresh ones. Bright colors often mean better taste. Cut them into similar sizes for even cooking. Check on them halfway through baking. If they look tender, they are done. For serving, use a large platter to show off the dish. A sprinkle of sesame seeds adds a nice crunch. Add more green onions on top for color. Serve with extra teriyaki sauce on the side for dipping. {{image_2}} If you want to mix things up, try turkey or beef meatballs. Ground turkey gives a lighter taste. Ground beef adds a richer flavor. Both options work well with the teriyaki sauce. For a vegetarian choice, use chickpea or lentil meatballs. These add protein and flavor without meat. You can use seasonal vegetables for this dish. Zucchini, snap peas, or asparagus work great. They add freshness and color. Fresh veggies often taste better, but frozen ones are quick and easy. They cook well and save time. Just be sure not to overcook them. You can make your own teriyaki sauce. Combine soy sauce, brown sugar, and garlic for a simple mix. This way, you control the taste and sweetness. If you need gluten-free options, look for tamari or coconut aminos. These sauces give a similar flavor without gluten. To keep your meatballs fresh, store them in an airtight container. You can refrigerate them right after cooling. They will last about three to four days in the fridge. The best way to reheat meatballs is in the oven. Preheat it to 350°F (175°C). Place the meatballs on a baking sheet. Heat them for about 10 to 15 minutes. This method keeps them juicy and firm. If you prefer the microwave, use medium power. Heat in short bursts of 30 seconds. Check often to avoid drying them out. To freeze leftovers, let the meatballs cool first. Arrange them in a single layer on a baking sheet. Once frozen, transfer them to a freezer bag. They can last up to three months in the freezer. When ready to use, thaw them in the fridge overnight. Reheat using the oven or microwave for best results. Yes, you can prep this dish ahead of time. Here are some meal prep suggestions: - Meatballs: Form the meatballs and store them in the fridge for up to 24 hours. - Veggies: Chop bell peppers, broccoli, and carrots a day in advance. Store them in airtight containers. - Cooking: When ready to cook, simply place everything on the pan and bake as directed. This saves time on busy days and keeps your meal fresh. To check for doneness, you can use a meat thermometer. The center of the meatball should reach 165°F (74°C). Here are some tips to ensure they are cooked: - Color: The meatballs should be golden brown outside and no longer pink inside. - Juices: When cut, the juices should run clear. - Texture: They should be firm but not dry. These methods help ensure your meatballs are safe and tasty. Yes, store-bought teriyaki sauce can work well. Here are some recommendations: - Quality: Look for sauces with natural ingredients and less sugar. - Flavor: Different brands have unique flavors, so taste a bit before using. - Homemade option: If you have the time, making your own teriyaki sauce can enhance flavor. You can combine soy sauce, honey, garlic, and ginger for a quick homemade version. You can make delicious teriyaki chicken meatballs with fresh veggies easily. We covered the main ingredients, like ground chicken and panko breadcrumbs, along with tasty vegetables and sauces. I shared a clear guide to prepare, bake, and garnish your dish. Remember, mixing well boosts flavor, and using seasonal veggies enhances freshness. Try different proteins and sauces to mix things up. You can store and reheat leftovers for later enjoyment. Now, gather your ingredients and get cooking! Enjoy your meal and the smiles it brings.
    Sheet-Pan Teriyaki Chicken Meatballs with Veggies Delight
  • - 2 lbs chicken wings - 1 tablespoon olive oil - 1 teaspoon garlic powder - 1 teaspoon onion powder - 1 teaspoon smoked paprika - 1 teaspoon salt - ½ teaspoon black pepper - ½ cup buffalo sauce - ¼ cup ranch dressing - Fresh parsley, chopped (for garnish) To make Buffalo Ranch Wings in the air fryer, you need key ingredients. First, the chicken wings. They are the star of this dish. For flavor, we add olive oil, garlic powder, onion powder, and smoked paprika. These make the wings tasty and help them crisp up. Next, we season with salt and black pepper. These two ingredients bring out the natural flavors of the chicken. For the sauce, buffalo sauce adds heat and tang. Ranch dressing gives a cool, creamy balance. Finally, fresh parsley adds color and freshness when you serve the wings. Gather these ingredients. You’ll love how they come together to create a crispy, flavorful dish! 1. Patting the chicken wings dry: Start by drying the wings with paper towels. This step is key to making them crispy. Removing excess moisture will give you that perfect crunch. 2. Seasoning the wings evenly: In a large bowl, mix 1 tablespoon of olive oil, 1 teaspoon garlic powder, 1 teaspoon onion powder, 1 teaspoon smoked paprika, 1 teaspoon salt, and ½ teaspoon black pepper. Toss the wings in this mix until they are fully coated. This will ensure each bite is packed with flavor. 1. Preheating the air fryer: Set your air fryer to 380°F (190°C) and let it heat for about 5 minutes. Preheating helps the wings cook evenly and get that crispy texture. 2. Cooking instructions and tips: Place the seasoned wings in a single layer in the air fryer basket. Avoid overcrowding, as this can lead to uneven cooking. Cook for about 25-30 minutes. Shake the basket halfway through to ensure even crispiness. You will know they are done when they turn golden brown. 1. Tossing wings in buffalo sauce: Once the wings are cooked, move them to a large bowl. Pour ½ cup of buffalo sauce over the wings. Toss well until each wing is fully coated. The buffalo sauce adds a spicy kick that pairs perfectly with the ranch. 2. Garnishing with parsley: To finish, sprinkle chopped fresh parsley on top. This not only adds color but also a fresh taste to balance the flavors. You can also serve ranch dressing on the side for dipping. To get crispy wings, start by drying them well. Use paper towels to pat them dry. Removing moisture is key for a crunchy finish. Next, cook your wings at the right temperature. Set your air fryer to 380°F (190°C). This hot air cooks the wings quickly, making them crispy. Cooking for 25-30 minutes gives you that golden brown look. Shake the basket halfway to ensure even cooking. You can boost the flavor with extra spices. Try adding cayenne for heat or smoked paprika for depth. Marinades also work wonders. For a zesty twist, let wings sit in buffalo sauce for an hour before cooking. You can even use other sauces like BBQ or teriyaki to change things up. Don’t forget to add fresh herbs for extra taste! Avoid overcrowding the air fryer. If you pack too many wings, they won’t cook evenly. Cook in smaller batches for the best results. If you want to make more, cook them in groups. Keep the first batch warm in the oven at a low heat. This way, you serve all wings hot and crispy! {{image_2}} You can change the flavor of your buffalo ranch wings easily. To add heat, try using cayenne pepper or chili powder. These spices give a nice kick. You can also mix in some hot sauce for extra fire. If you want a new sauce, consider BBQ or teriyaki. Both add a different taste and make the wings fun. You can even blend buffalo sauce with honey for a sweet twist. The options are endless! If you don’t have an air fryer, you can still enjoy these wings. Baking is a great option. Preheat your oven to 400°F (200°C). Spread the seasoned wings on a baking sheet. Bake for 40-45 minutes until crispy. Deep-frying is another method. Heat oil in a pot to 350°F (175°C). Fry the wings in small batches for about 8-10 minutes. This gives you that crunchy texture that everyone loves. Not every wing lover eats chicken. You can use drumsticks instead of wings. They cook the same way and taste great. If you want a plant-based option, try cauliflower wings. Cut cauliflower into bite-sized pieces and toss them in the same seasonings. For gluten-free wings, just make sure your sauces are gluten-free. If you want lower calories, consider using skinless chicken wings. These options still give you that tasty buffalo ranch flavor without all the extra fat. To keep your cooked wings fresh, store them in an airtight container. This helps prevent moisture loss. If you have a lot of wings, use a large container. Always let them cool down first. I like to use glass containers as they do not absorb odors. You can also wrap them tightly in plastic wrap or foil. The best way to reheat wings is in the air fryer. Set it to 350°F (175°C) and heat for about 5-8 minutes. This keeps them crispy. If you don't have an air fryer, you can use an oven. Preheat it to 350°F (175°C) and place the wings on a baking sheet. Heat for 10-15 minutes. A microwave is the least recommended option, as it can make wings soggy. To freeze wings, let them cool completely first. Place them in a freezer-safe bag or container. Make sure to remove as much air as possible. They can last up to three months in the freezer. When you’re ready to cook them, do not thaw. Preheat your air fryer to 380°F (190°C) and cook for about 30-35 minutes. Shake the basket halfway through for even cooking. Enjoy your wings any time! Cook buffalo wings in an air fryer for 25 to 30 minutes at 380°F (190°C). Shake the basket halfway through. This helps ensure even cooking and crispiness. Wings should be golden brown when done. Yes, you can make these wings ahead of time. Cook the wings fully and then let them cool. Store them in the fridge. When ready to serve, reheat in the air fryer for about 10 minutes for best results. The best buffalo sauce is one that matches your taste. I recommend a classic hot sauce with a bit of butter for richness. Brands like Frank’s RedHot or Crystal are popular choices. You can also make your own by mixing hot sauce with melted butter. Buffalo ranch wings have a mild to medium heat level. The spice comes from the buffalo sauce. If you want less heat, use less buffalo sauce or choose a milder brand. The ranch dressing helps cool down the spice, making it a great mix. Yes, you can use frozen chicken wings. Just cook them for a little longer, around 30 to 35 minutes at the same temperature. Make sure they are fully cooked and reach an internal temperature of 165°F (74°C). You can create delicious buffalo ranch wings at home with easy steps. Start with quality ingredients like chicken, seasonings, and sauces. Follow the simple preparation and cooking methods to achieve crispy, flavorful wings. Don't forget to experiment with variations and cooking techniques that suit your taste. Proper storage ensures leftovers stay fresh, and reheating tips help maintain texture. Enjoy your tasty wings with friends, and don't hesitate to try new flavors. Cooking can be fun and rewarding, so dive in and create your perfect buffalo ranch wings!
    Buffalo Ranch Wings Air Fryer Easy Crispy Recipe
  • - 2 pounds chicken wings - 1/2 cup honey - 1/4 cup BBQ sauce - 1 tablespoon olive oil - 1 teaspoon garlic powder - 1 teaspoon onion powder - 1/2 teaspoon smoked paprika - Salt and pepper to taste - Chopped green onions for garnish The secret to great Air Fryer Honey BBQ Chicken Wings starts with choosing the right ingredients. You need fresh chicken wings. Look for plump wings that have a nice sheen. Quality wings make a big difference in taste. Honey is next. The sweetness of honey balances the smoky BBQ sauce. I like to use a good brand of BBQ sauce. Pick one you love because it adds a lot of flavor. The olive oil helps the wings crisp up. Use just a little, but don't skip it. For seasoning, garlic powder and onion powder bring depth to the wings. Smoked paprika gives a nice smoky flavor. Salt and pepper round out the seasoning, so don’t forget them. Use them to taste, and remember that a little goes a long way. Finally, green onions add a pop of color and taste. They look great on top of the finished wings. You can even mix in some chopped green onions into the sauce for added flavor. With these ingredients, you're on your way to a finger-licking good dish! To start, you need to pat chicken wings dry with paper towels. This step is key. Drying helps the wings get crispy in the air fryer. If they are wet, the skin won't crisp up well. So, take your time with this step. Next, combine the sauce ingredients in a bowl. You will need honey, BBQ sauce, olive oil, garlic powder, onion powder, smoked paprika, salt, and pepper. Whisk them together until smooth. Make sure to mix well to blend all the flavors. A good whisk will make the sauce shine. Now, let’s marinate the wings. Place them in a large bowl or resealable bag. Pour half of the honey BBQ sauce over the wings. Toss to coat them evenly. For best flavor, let them marinate for at least 30 minutes. The longer they sit, the more flavor they soak up. Before cooking, preheat the air fryer. Set it to 400°F (200°C) and let it heat for about 5 minutes. Preheating helps the wings cook evenly. If you skip this step, you might end up with unevenly cooked wings. Now, it’s time to air fry. Place the marinated wings in the basket in a single layer. You may need to do this in batches. Cook them for 25-30 minutes. Flip the wings halfway through. This helps ensure even cooking and crispiness. After cooking, toss the wings in the remaining honey BBQ sauce. This adds a lot of flavor. Transfer them to a serving platter and garnish with chopped green onions. Serve hot with extra BBQ sauce on the side for dipping. Enjoy every bite of your finger-licking wings! To get crispy wings, start by drying them well with paper towels. This step helps remove moisture. Moisture can make the skin soggy. Next, coat the wings lightly with cornstarch. This adds crunch to the skin. - Technique 1: Dry the wings thoroughly. - Technique 2: Use cornstarch for extra crunch. You can change the sweetness and heat of your wings. If you like them sweeter, add more honey. For extra heat, mix in cayenne pepper or hot sauce. Try different BBQ sauces too. Each sauce brings a unique flavor. - Customize Sweetness: Add more honey for a sweeter taste. - Adjust Heat: Mix in hot sauce for a spicy kick. - BBQ Sauce Suggestions: Experiment with different brands for variety. Most air fryers can only cook a few wings at once. If you have a lot, cook them in batches. Keep the cooked wings warm in the oven. Set the oven to a low temperature, about 200°F. This way, they stay hot until you serve them. - Batch Cooking: Cook wings in small groups for best results. - Keeping Warm: Use a low oven to keep wings warm. {{image_2}} You can change up the flavor of your honey BBQ wings to suit your taste. Here are a couple of fun ideas: - Spicy honey BBQ wings: Add cayenne pepper or hot sauce to your honey BBQ sauce. This will give your wings a kick. Start with a small amount. You can always add more heat later. - Smoky chipotle BBQ wings: Mix in chipotle powder or adobo sauce. This will add a rich, smoky flavor. It’s perfect for those who love bold tastes. If you want to try different cooking methods, you have options: - Oven-baked honey BBQ wings: Preheat your oven to 425°F (220°C). Arrange wings on a baking sheet. Bake for 30-35 minutes, flipping halfway. This method gives a nice crisp as well. - Grilled honey BBQ wings: Preheat your grill to medium heat. Grill wings for about 15-20 minutes. Make sure to turn them often and baste with sauce. This will give a smoky flavor that is hard to beat. You can easily adapt this recipe to fit your diet: - Vegan options using plant-based wings: Substitute chicken wings with plant-based wings. These are widely available and can taste just as good. - Gluten-free BBQ sauce recommendations: Check labels on BBQ sauce. Many brands offer gluten-free options. You can also make your own by combining ketchup, honey, and apple cider vinegar. To keep your chicken wings fresh, use airtight containers. Glass or plastic containers work well. Let the wings cool to room temperature before sealing. Store them in the fridge for up to three days. Keep your refrigerator at or below 40°F (4°C) for the best results. When you want to enjoy your wings again, the air fryer is the best choice. Preheat it to 350°F (175°C). Place the wings in a single layer. Heat them for about 10 minutes. This helps them stay crispy. If you don’t have an air fryer, you can use an oven. Set it to 350°F (175°C) and bake for about 15 minutes. To keep them crispy, don’t cover the wings while reheating. If you have extra wings, freezing is a great option. First, let them cool completely. Place the wings in a freezer-safe bag. Remove as much air as possible before sealing. They can last up to three months in the freezer. When you're ready to eat, take them out and thaw overnight in the fridge. This keeps the wings juicy and tasty. Then, you can reheat them as mentioned above. It takes about 25 to 30 minutes to cook chicken wings in an air fryer. I recommend setting the air fryer to 400°F (200°C) for the best results. Halfway through cooking, turn the wings to ensure even browning. This method gives you crispy, golden wings that are juicy inside. Yes, you can use frozen chicken wings! However, you must adjust the cooking time. Frozen wings need about 35 to 40 minutes to cook. Start at the same temperature, but check them to ensure they are cooked through. It’s best to separate the wings as they cook for even crispness. Several sauces pair nicely with honey BBQ wings. Here are some popular choices: - Ranch dressing - Blue cheese dressing - Extra BBQ sauce - Hot sauce for a kick These dips add extra flavor and make your meal more fun. To check if chicken wings are done, use a meat thermometer. The internal temperature should reach 165°F (74°C). You can also check if the juices run clear when you cut into the wing. If you see pink, cook them a bit longer. Safety is key in cooking chicken. You now have all the steps to make tasty honey BBQ chicken wings. We covered all the key ingredients, from chicken to seasonings, plus tips for cooking them just right. Don't forget the variations, like spicy options or using plant-based wings. Proper storage and reheating methods help keep them fresh and crispy. Enjoy creating and sharing these delicious wings. They are sure to impress!
    Air Fryer Honey BBQ Chicken Wings Finger-Licking Delight
  • - 2 cups all-purpose flour - 1/2 cup unsalted butter, softened - 3/4 cup granulated sugar - 2 large eggs - 1/2 cup buttermilk - 1 large apple (preferably Granny Smith) - 1/2 cup brown sugar (packed) - 1/4 cup all-purpose flour - 1 teaspoon ground cinnamon - 1/4 cup unsalted butter (melted) - 1 teaspoon baking powder - 1/2 teaspoon baking soda - 1/2 teaspoon salt - 1 teaspoon ground cinnamon - 1/2 teaspoon ground nutmeg - 1 teaspoon vanilla extract Gather these ingredients before you start baking. The apples add a nice touch of sweetness. Granny Smith apples work great for their tartness. The streusel topping gives a crunchy finish. It’s fun to mix the flavors of cinnamon and nutmeg. All these ingredients will help you create a delicious bread everyone will love. 1. First, preheat your oven to 350°F (175°C). This step is important for even baking. 2. Grease a 9x5-inch loaf pan. I like to line it with parchment paper. This helps with easy removal later. 3. In a medium bowl, whisk together 2 cups of all-purpose flour, 1 teaspoon baking powder, 1/2 teaspoon baking soda, 1/2 teaspoon salt, 1 teaspoon ground cinnamon, and 1/2 teaspoon ground nutmeg. Set this mixture aside for later. 1. In a large bowl, cream together 1/2 cup of softened unsalted butter and 3/4 cup of granulated sugar. Use an electric mixer. Mix until the mixture is light and fluffy, which takes about 3 minutes. 2. Next, add 2 large eggs, one at a time. Mix well after each egg. Then stir in 1 teaspoon of vanilla extract. 3. Gradually add the dry ingredient mixture to the butter mixture. Alternate this with 1/2 cup of buttermilk. Start and end with the dry mix. Mix just until combined. Be careful not to overmix. 1. Gently fold in 1 large apple that has been peeled, cored, and diced. Make sure the apples are evenly spread throughout the batter. 2. In a small bowl, prepare the streusel topping. Combine 1/2 cup of packed brown sugar, 1/4 cup of all-purpose flour, 1 teaspoon of ground cinnamon, and 1/4 cup of melted unsalted butter. Mix this until it is crumbly. 3. Pour half of the batter into the prepared loaf pan. Sprinkle half of the streusel mixture over it. Then, pour the remaining batter on top and finish with the rest of the streusel. 1. Bake in the preheated oven for 55-65 minutes. Check for doneness by inserting a toothpick into the center. If it comes out clean, your bread is ready. 2. If the top of the bread browns too fast, cover it with aluminum foil for the last 15 minutes of baking. This helps prevent over-browning and keeps it moist. To get the best texture, start with room-temperature ingredients. This means letting the butter and eggs sit out for a bit. Room temperature helps them mix well, creating a fluffy batter. If your butter is too cold, it won’t blend smoothly. Avoid overmixing the batter. Mix just until the dry ingredients are combined. Overmixing can make the bread tough. It’s okay if there are a few small lumps. These won’t hurt the final product. Choose the right apples for this recipe. I recommend Granny Smith apples. They are tart and stand up well in baking. You can also try Honeycrisp for a sweeter flavor or Fuji for a juicy bite. You can add extra spices to boost the taste. Consider adding a pinch of ginger or allspice. For a twist, mix in some chopped nuts or raisins. Just remember to keep the balance of flavors. This bread pairs perfectly with coffee or tea. It also makes a great breakfast dish. Serve it warm with a bit of butter or cream cheese. For presentation, slice the bread neatly and arrange it on a platter. Dust with powdered sugar for a pretty touch. You can also serve it with a side of fresh fruit for color and freshness. {{image_2}} You can change the taste of your bread by adding nuts. Walnuts or pecans work great. They add a nice crunch and rich flavor. You can also mix in different fruits. Try berries for a tart kick or bananas for sweetness. Each option gives a new twist to the bread. If you need a gluten-free option, swap all-purpose flour for gluten-free flour. Make sure to check that your other ingredients are also gluten-free. You can also create a vegan version. Replace butter with a plant-based alternative. Use flax eggs instead of regular eggs, and choose a plant-based milk in place of buttermilk. With the changing seasons, you can add fun flavors. In fall, mix in pumpkin or cranberries for a festive touch. These ingredients bring warmth and spice. During the holidays, consider adding flavors like peppermint or ginger. They create a joyful atmosphere while you enjoy your bread. To keep your bakery-style cinnamon apple streusel bread fresh, store it at room temperature. Place it in an airtight container. This will help keep the bread moist and tasty. If you do not have a container, wrap it in plastic wrap. Avoid putting it in a place with direct sunlight, as heat can dry it out. For longer shelf life, you can refrigerate the bread. Wrap it well in plastic wrap and then in foil. This will stop it from drying out. When ready to eat, let it come to room temperature for the best taste. To freeze the bread properly, wrap it tightly in plastic wrap. Then, place it in a freezer-safe bag or container. Make sure to push out any air to prevent freezer burn. This will keep your bread fresh for up to three months. When you want to enjoy some bread, remove it from the freezer. Let it thaw in the fridge overnight for the best flavor. If you need it fast, you can thaw it at room temperature for a few hours. Just be sure to slice it before thawing for quicker results. Your cinnamon apple streusel bread stays fresh for about 3 to 5 days at room temperature. In the fridge, it can last about a week. If you freeze it, it will remain tasty for up to three months. Just remember, the sooner you eat it, the better it will taste! Can I use whole wheat flour instead of all-purpose? Yes, you can use whole wheat flour. It makes the bread denser. You may need to add a bit more liquid since whole wheat absorbs more moisture. Start with a 25% swap and see how it turns out. How can I make this recipe ahead of time? You can prep the batter and store it in the fridge for up to 24 hours. Just keep it covered. You can also make the bread and freeze it. Slice it first for easier thawing later. Can I use almond milk instead of buttermilk? Yes, you can use almond milk. To mimic buttermilk, add a teaspoon of vinegar or lemon juice to the almond milk. Let it sit for five minutes before using. This makes it taste closer to buttermilk. What is a good substitute for eggs? You can use applesauce as a substitute. Use 1/4 cup of unsweetened applesauce for each egg. This adds moisture and helps bind the bread together. Why is my bread too dense? Dense bread may happen if you overmix the batter. Mixing too much can add too much air. Ensure you mix just until combined. Also, check that your baking powder and baking soda are fresh. How can I fix a soggy center? A soggy center often means the bread is underbaked. Use a toothpick to test doneness. If it comes out wet, bake it longer. If the top is browning too fast, cover it with foil. This blog post outlines the essential ingredients and steps to make a delicious apple bread. You learned about the ingredients for the bread and the streusel topping. I shared tips for getting the best texture and flavor. You also saw ways to store the bread and answered common baking questions. Baking can be fun and rewarding. With this guide, you can bake a tasty treat that everyone will love. Enjoy the process and share your results!
    Bakery-Style Cinnamon Apple Streusel Bread Recipe
  • To make this dish, you need 1 pound of fresh asparagus. Look for bright green spears. Choose ones that are firm and not limp. Trim the tough ends before cooking. This helps the asparagus cook evenly and be tender. You will need some key items for the coating. Use 1 cup of all-purpose flour. This helps the egg stick. Next, use 2 large eggs, beaten well. They give the fries their crispiness. For the crunchy finish, use 1 cup of panko breadcrumbs. Panko adds a nice texture. Mix in ½ cup of grated Parmesan cheese for flavor. Season your asparagus to make it tasty. Add 3 cloves of minced garlic to the panko mix. This gives a strong garlic kick. Use 1 teaspoon of garlic powder and 1 teaspoon of onion powder for extra flavor. Lastly, add ½ teaspoon of salt and ¼ teaspoon of black pepper. These simple spices enhance the dish. Gather these ingredients for a snack that is both crunchy and flavorful! First, preheat your oven to 425°F (220°C). This temperature helps make the fries crispy. Line a baking sheet with parchment paper. This makes cleanup easy and prevents sticking. Now it’s time to prepare the asparagus. Take 1 pound of fresh asparagus and trim the ends. Set up three bowls. In the first bowl, add 1 cup of all-purpose flour. In the second bowl, beat 2 large eggs. In the third bowl, mix 1 cup of panko breadcrumbs, ½ cup of grated Parmesan cheese, 3 cloves of minced garlic, 1 teaspoon of garlic powder, 1 teaspoon of onion powder, ½ teaspoon of salt, and ¼ teaspoon of black pepper. Take each asparagus spear. First, dredge it in the flour. Make sure to coat it well. Shake off any extra flour. Next, dip the floured asparagus into the beaten eggs. Let any excess egg drip off. Finally, coat the asparagus with the panko mixture. Press gently to make sure it sticks. Place the coated asparagus on the baking sheet. If you have olive oil, drizzle about 2 tablespoons over the asparagus or use an olive oil spray. This helps them brown. Bake in the preheated oven for 15-20 minutes. Flip them halfway through to get even crispiness. Once they are golden brown and crispy, take them out. Let them cool for a minute, then garnish with chopped fresh parsley. Serve these fries while they are hot for the best taste. To get your asparagus fries extra crispy, follow these steps. First, make sure to use panko breadcrumbs. They provide a light and airy crunch. Second, coat each spear well in flour, eggs, and then the panko mixture. Press firmly when coating to help it stick. Lastly, use olive oil spray or drizzle olive oil lightly over the fries before baking. This helps them brown nicely. For the best results, choose thin, fresh asparagus. Thin spears cook evenly and turn crispy faster. Look for vibrant green color and firm stalks. Avoid thick asparagus, as it may not get as crispy. If you can, buy asparagus that is in season for the best flavor. If you want to mix things up, try different coatings. Instead of panko, you can use crushed cornflakes for a crunchy texture. You could also add different herbs or spices to your breadcrumb mix. Parmesan cheese is great, but you can swap it with other cheeses like cheddar or mozzarella for a unique taste. Experiment and find your favorite combination! {{image_2}} You can change the flavor by adding different cheeses. Try using cheddar or feta. These cheeses give a nice twist to your fries. If you want a stronger taste, go for blue cheese. Mixing cheeses can create a unique blend. Simply add the cheese to the panko mixture. Adjust the amount based on your taste. If you love heat, spice up your fries! Add red pepper flakes to the panko mix. This will give your asparagus a kick. You can also use spicy garlic powder. It adds flavor and warmth. Adjust the amount based on how spicy you want it. This variation is great for those who love bold flavors. Dipping sauces can take your fries to the next level. A classic option is ranch dressing. It pairs well with the garlic and cheese. Another great choice is a spicy mayo. You can mix mayonnaise with sriracha. For a fresh taste, try a lemon herb dip. Just mix yogurt with lemon juice and herbs. These sauces add fun flavors to your crispy fries. To keep your Crispy Garlic Parmesan Asparagus Fries fresh, store them in an airtight container. Make sure to let them cool completely before sealing. This helps prevent moisture build-up, which can make them soggy. You can keep the fries in the fridge for up to three days. Always label the container with the date, so you know when to use them. When you want to enjoy your leftover fries, reheating them correctly is key. Preheat your oven to 375°F (190°C). Place the asparagus fries on a baking sheet. Bake for about 10 minutes, or until they regain their crispiness. Avoid using the microwave, as it can make them soft and chewy. For a quick fix, you can also use an air fryer for about 5 minutes. If you have extra fries, freezing them is a great option. First, bake the fries as per the recipe but take them out a minute or two early. Let them cool, then arrange them in a single layer on a baking sheet. Freeze until solid, then transfer them to a freezer-safe bag. They can last up to three months. When you're ready to eat, bake them from frozen at 425°F (220°C) for about 15-20 minutes. Yes, you can use frozen asparagus. However, fresh asparagus gives the best flavor and texture. Frozen asparagus may have more moisture. This can lead to less crispiness. If using frozen, thaw and pat dry before coating. This step helps improve the final crunch. These fries pair well with many dishes. Try serving them with a creamy dip. Ranch or garlic aioli works great. You can also serve them with grilled chicken or fish. They add a fun twist to any meal. Enjoy them as a side or a snack. To make this recipe gluten-free, swap the all-purpose flour. Use a gluten-free flour blend instead. Check the breadcrumbs too. Look for gluten-free panko or make your own. Just crush gluten-free bread into small pieces. This keeps the dish tasty and friendly for everyone. This blog post covered all you need for making delicious crispy asparagus fries. We explored key ingredients like fresh asparagus and spices. The step-by-step guide made the process easy to follow. I shared tips on getting maximum crispiness and creative variations to try. Remember, with proper storage and reheating, you can enjoy your fries later. Whether you’re a novice or an expert, these fries will make a great snack or side dish. Enjoy experimenting and have fun in the kitchen!
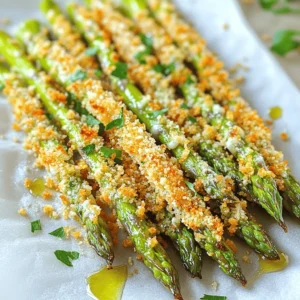
    Crispy Garlic Parmesan Asparagus Fries Flavorful Snack
  • - 2 cups graham cracker crumbs - 1 cup unsweetened shredded coconut - 1/2 cup walnuts, chopped - 1 cup dried cranberries - 8 ounces white chocolate, chopped - 1/2 cup sweetened condensed milk - 1 teaspoon vanilla extract - Pinch of salt To make No-Bake White Chocolate Cranberry Bars, you need just a few simple ingredients. The graham cracker crumbs form the base, giving the bars a nice crunch. Shredded coconut adds a tropical flavor. Chopped walnuts bring in a nutty taste and extra texture. Dried cranberries provide sweetness and a pop of color. Next, we melt white chocolate, which binds all the ingredients together. Sweetened condensed milk adds creaminess and sweetness. A dash of vanilla extract enhances the flavor. A pinch of salt balances the sweetness, making each bite even better. - You can add a pinch of cinnamon for warmth. - Try using almonds instead of walnuts for a different taste. - Swap dried cranberries for raisins or cherries for variety. - Add a scoop of protein powder for a nutrition boost. These optional ingredients let you customize the bars. You can make them your own with just a few simple swaps. 1. Mixing dry ingredients Start by taking a large mixing bowl. Add 2 cups of graham cracker crumbs, 1 cup of shredded coconut, 1/2 cup of chopped walnuts, and 1 cup of dried cranberries. Mix these dry ingredients well. Ensure they blend evenly for great flavor. 2. Melting the white chocolate Grab a microwave-safe bowl. Place 8 ounces of chopped white chocolate in it. Melt the chocolate in the microwave. Do this in 20-second bursts. Stir after each round until it is smooth. This makes it easy to mix later. 3. Combining ingredients Once melted, add 1/2 cup of sweetened condensed milk, 1 teaspoon of vanilla extract, and a pinch of salt to the chocolate. Stir until fully combined. Then, pour this chocolate mixture into your large bowl with dry ingredients. Gently stir until everything is coated in chocolate. 1. Preparing the pan Line an 8x8-inch baking pan with parchment paper. Leave some overhang on the sides. This makes it easy to lift the bars out later. 2. Transferring the mixture Scoop the mixture into the prepared pan. Use a spatula or your hands to press it down firm. Make sure it creates an even layer. This helps the bars hold their shape. 3. Refrigeration process Place the pan in the fridge. Let it chill for at least 2 hours. This step is important for the bars to set properly. 1. How to cut the bars neatly Once set, remove the bars by lifting the parchment paper. Place them on a cutting board. Use a sharp knife to cut them into neat squares. This helps with serving and looks nice. 2. Serving suggestions Serve the bars plain or with a drizzle of white chocolate on top. They are perfect for parties or as a sweet snack. Enjoy the tasty mix of flavors in every bite! - Melting white chocolate: Break the chocolate into small pieces. Use a microwave-safe bowl. Heat in 20-second bursts. Stir after each burst. Stop when it’s mostly melted. Stir until smooth. This method helps avoid burning the chocolate. - Preventing sticking: Line your pan with parchment paper. Leave some paper hanging over the edges. This makes it easier to lift the bars out. Press the mixture down firmly in the pan. This helps the bars hold their shape. - Mixing ingredients: Don’t rush the mixing. Combine dry ingredients thoroughly before adding wet ones. This ensures even flavor and texture. Stir gently when adding the melted chocolate. You want to coat everything without breaking the mix. - Refrigeration tips: Chill the bars for at least 2 hours. This helps them set well. Avoid opening the fridge often. Each time you open it, the temperature changes, which can lead to a less firm bar. - Suggested flavor add-ins: Try adding a bit of orange zest for a citrus twist. You can also mix in some almond extract for a nutty flavor. Both options give your bars a fun touch. - Ways to customize texture: Want crunch? Add more walnuts or some crispy rice cereal. For chewiness, include more dried cranberries. You can also swap in different nuts or seeds for a unique bite. {{image_2}} You can easily change the nuts and seeds in the recipe. Instead of walnuts, try pecans or almonds. They add a nice crunch and flavor. If you want a nut-free version, use pumpkin seeds or sunflower seeds. Both options work well and keep the bars tasty. You can also swap dried fruits. If you want a twist, use chopped dates or apricots. These fruits add their own sweetness and chewiness. You can mix and match to find your favorite combo. For a different taste, consider making white chocolate raspberry bars. Add fresh or frozen raspberries to the mix. The tartness of the berries pairs perfectly with sweet white chocolate. You can even swirl in some raspberry puree for a lovely look. If you need a nut-free version, skip the nuts altogether. You can use more coconut or add rolled oats. This change keeps the texture nice and chewy without nuts. Serving these bars can be fun and creative. You can cut them into different shapes, like hearts or stars, for a special occasion. Drizzle some melted chocolate on top for a fancy touch. For gifts, wrap them in clear cellophane and tie with a ribbon. This makes them look great and keeps them fresh. You can even add a tag with the recipe for a nice personal touch. To keep your leftover bars fresh, store them in the fridge. Wrap them tightly in plastic wrap or foil. You can also place them in an airtight container. This way, they stay moist and tasty. For best results, use a glass or plastic container with a lid. Avoid metal containers as they can alter the taste. These bars last about one week in the fridge. Check for any changes in color or smell. If they look dry or have an off smell, it’s time to toss them. You can freeze these bars for longer storage. Cut them into squares before freezing. Wrap each piece in plastic wrap, and then place them in a freezer-safe bag. To thaw, leave them in the fridge overnight. If you need them fast, you can thaw them at room temperature for about 30 minutes. Enjoy your tasty treat! Can I use dark chocolate instead of white? Yes, you can use dark chocolate. It will change the taste. Dark chocolate has a deeper flavor. It pairs well with cranberries. You might want to adjust the sugar level since dark chocolate is less sweet. How can I make these bars vegan? To make these bars vegan, use dairy-free white chocolate. Also, swap the sweetened condensed milk for coconut milk. This will keep the bars creamy and delicious. What is the best way to cut no-bake bars? The best way to cut no-bake bars is to chill them first. Use a sharp knife for clean cuts. Wipe the knife with a damp cloth between cuts. This helps avoid sticking. How to serve no-bake white chocolate cranberry bars? You can serve these bars chilled or at room temperature. Cut them into squares for easy eating. They look great on a platter. Add fresh cranberries or mint leaves for garnish. Suitable occasions for these treats These bars are perfect for parties and holiday gatherings. They make a great dessert for picnics or potlucks. You can also enjoy them as a sweet snack any time. What can I substitute for graham crackers? You can use digestive biscuits or crushed cookies. Gluten-free options like almond flour or oat flour work well too. Just make sure the texture remains similar. Alternatives for sweetened condensed milk? Coconut cream is a great alternative. You can also use homemade cashew cream. Both options add creaminess and flavor without dairy. This blog post outlined how to make delicious no-bake white chocolate cranberry bars. We covered key ingredients, step-by-step instructions, and tips for success. Remember to customize your bars with different ingredients for unique flavors. Proper storage ensures they stay fresh. Enjoy these tasty treats for any occasion, or pack them as gifts. With practice, you’ll perfect your technique. Now, it’s your turn to create and enjoy!
    No-Bake White Chocolate Cranberry Bars Delight
  • - 1 lb Italian sausage - 1 medium onion, diced - 3 cloves garlic, minced - 2 medium carrots, sliced - 2 stalks celery, diced - 4 cups chicken broth - 1 cup heavy cream - 4 cups kale, chopped - 2 medium potatoes, diced - 1 teaspoon thyme - 1/2 teaspoon chili flakes - 2 tablespoons olive oil - Salt and pepper, to taste - Optional: Grated Parmesan cheese for serving For this creamy sausage kale soup, you need: - 1 pound of Italian sausage, which gives great flavor. - 1 medium onion, diced for sweetness. - 3 cloves of garlic, minced for a punch. - 2 carrots, sliced to add color and crunch. - 2 stalks of celery, diced for texture. - 4 cups of chicken broth to form the base. - 1 cup of heavy cream for creaminess. - 4 cups of kale, chopped and hearty. - 2 medium potatoes, diced for heartiness. - 1 teaspoon of thyme for earthy notes. - 1/2 teaspoon of chili flakes to spice things up. - 2 tablespoons of olive oil for sautéing. - Salt and pepper to taste, to enhance flavors. - Optional: Grated Parmesan cheese for a finishing touch. This soup serves 6 to 8 people. Each serving offers: - About 350 calories, depending on specific ingredients. - Macronutrient breakdown: - Protein: 18g from sausage. - Carbohydrates: 30g from potatoes and veggies. - Fat: 20g from cream and sausage. This soup is not just tasty; it is filling and good for you! Each bite brings warmth and comfort, making it perfect for any day. Sautéing vegetables Start by heating 2 tablespoons of olive oil in a large pot over medium heat. Add 1 diced onion. Cook it for about 3-4 minutes until it turns soft and clear. Next, add 3 minced garlic cloves, 2 sliced carrots, and 2 diced celery stalks. Stir the mix and cook for 5 more minutes. The veggies should be tender. Browning sausage Push the veggies to the sides of the pot. Now, add 1 pound of Italian sausage. I like spicy sausage, but you can choose mild if you prefer. Break the sausage into pieces with a spoon. Cook it for about 5-7 minutes until it gets a nice brown color all over. This step brings out the flavor. Combining ingredients Once the sausage is browned, mix it with the veggies. Add 2 diced potatoes, 1 teaspoon of thyme, and ½ teaspoon of chili flakes. Stir well to combine everything evenly. The potatoes add a hearty touch to the soup. Simmering for flavors Pour in 4 cups of chicken broth. Increase the heat to bring it to a boil. Once boiling, lower the heat and let it simmer. Cook uncovered for about 15 minutes. You want the potatoes to be tender. This simmering lets all the flavors blend together. Adding cream and seasoning After 15 minutes, stir in 4 cups of chopped kale and 1 cup of heavy cream. Let it simmer for another 5-10 minutes. The kale will wilt and the soup will heat through. Season with salt and pepper to taste. This step makes the soup creamy and rich. Serving suggestions Serve the soup hot in wide, shallow bowls. Add a sprinkle of grated Parmesan cheese on top for extra flavor. If you want, you can also garnish with fresh parsley. This dish looks great and tastes even better! To get that rich, creamy texture, use heavy cream. It adds a smooth finish. If you want it lighter, use half-and-half. Always stir well after adding cream to blend it in. For spice levels, start with half a teaspoon of chili flakes. Taste the soup and adjust. If you like heat, add more. If not, leave it as is. For one-pot meals, a large pot or Dutch oven works best. Look for one with a thick bottom. This helps prevent sticking and ensures even cooking. Use a wooden spoon for mixing. It is gentle on your pot and perfect for breaking up sausage. A sharp knife makes dicing veggies easy and quick. Prep your ingredients before starting. Dice the onion, slice the carrots, and chop the kale. This speeds up your cooking time. For quick cleaning, soak your pot in warm, soapy water right after serving. It makes scrubbing easier later. You can also use a liner for your pot if you want less mess. {{image_2}} You can easily customize this soup. If you prefer turkey sausage, swap it for the Italian sausage. Turkey sausage gives a leaner option without losing flavor. For greens, try spinach or Swiss chard instead of kale. Both add unique textures and taste. If you need gluten-free options, check the broth label. Many brands offer gluten-free chicken broth. For a dairy-free version, use coconut milk instead of heavy cream. It will still make the soup creamy and delicious! To boost flavor, add herbs like rosemary or basil. These can give your soup a fresh twist. You can also add a splash of lemon juice for brightness. This simple addition brightens the flavors and balances the creaminess. Enjoy the variations! Store leftovers in an airtight container. Let the soup cool to room temperature first. Place it in the fridge. It will stay fresh for about 3 to 4 days. When you are ready to eat, check for any signs of spoilage. To freeze the soup, use a freezer-safe container. Leave some space at the top for expansion. The soup can last for about 3 months in the freezer. When you are ready to enjoy it, thaw it in the fridge overnight before reheating. Reheat the soup on the stove over low heat. Stir it often so it warms evenly. You can also use a microwave. Heat it in short bursts, stirring in between. If it seems too thick, add a little chicken broth or cream. This helps keep the flavor rich and creamy. This soup can last up to four days in the fridge. Make sure to store it in an airtight container. The flavors will meld nicely as it sits. However, the kale may lose some texture after a couple of days. Yes, you can make this soup ahead of time. Just cook the soup and let it cool before storing it. Keep it in the fridge for up to four days. You can also freeze it for up to three months. If frozen, thaw it overnight in the fridge before reheating. This soup pairs well with several side dishes. Here are some great options: - Crusty bread for dipping - A fresh green salad - Garlic bread for extra flavor - Simple cheese toast for a comforting touch These sides add texture and balance to your meal. This blog post shared a detailed guide on making creamy sausage kale soup. You learned about key ingredients, how to prepare each step, and tips for perfecting your dish. I emphasized variations, storage info, and answered common questions. Remember, this soup is not just tasty; it’s flexible and easy to make. Enjoy crafting your own version! With practice, you’ll make it just right for your taste. Happy cooking!
    Creamy Sausage Kale Soup One Pot Simple Delight
  • - 8 oz fettuccine or spaghetti - 2 tablespoons olive oil - 4 cloves garlic, minced - 1 cup heavy cream - 1 cup grated Parmesan cheese - Zest of 1 lemon - Juice of 1 lemon - Salt and pepper to taste - Fresh parsley, chopped (for garnish) - 1 cup cherry tomatoes, halved To create a rich and satisfying dish, you need the right ingredients. Start with 8 ounces of pasta, either fettuccine or spaghetti. This pasta serves as the base for the creamy sauce. The next key player is olive oil, which adds flavor and helps to cook the garlic. Use 2 tablespoons. Garlic is a must for this recipe. You will need 4 cloves, minced to release its strong flavor. Then, grab a cup of heavy cream to make the sauce rich and smooth. For a cheesy touch, include 1 cup of grated Parmesan cheese. Lemon is the star of this dish. The zest from 1 lemon adds fragrance, while the juice gives a zesty punch. You will also want to season your dish with salt and pepper to taste. Finally, sprinkle fresh parsley on top for a pop of color and flavor. If you want to add a twist, consider using 1 cup of halved cherry tomatoes. They bring sweetness and texture to the dish. Bringing water to a boil First, fill a large pot with water. Add a generous amount of salt. Turn the heat to high and wait for the water to boil. This step is key. Salting the water helps flavor the pasta. Cooking pasta until al dente Once the water boils, add 8 oz of fettuccine or spaghetti. Cook it according to the package instructions, usually around 8 to 10 minutes. To check for doneness, taste a piece. It should be firm but not hard. Before draining, reserve ½ cup of the pasta water. Then, drain the pasta and set it aside. Sautéing garlic in olive oil In a large skillet, heat 2 tablespoons of olive oil over medium heat. Once hot, add 4 cloves of minced garlic. Sauté it for about 30 seconds. Keep an eye on it; don’t let it burn. The garlic should smell amazing. Adding heavy cream and Parmesan Lower the heat to medium-low. Pour in 1 cup of heavy cream. Stir and let it simmer for 1 to 2 minutes. Then, whisk in 1 cup of grated Parmesan cheese. Watch it melt into a creamy sauce. If it’s too thick, add a bit of the reserved pasta water. Mixing in lemon zest and juice Now, stir in the zest and juice of 1 lemon. This brightens the sauce. Add salt and pepper to taste. Adjust it until it’s just right for you. Tossing pasta with the sauce Finally, add the drained pasta to the skillet. Toss it well to coat every piece with the creamy lemon sauce. If you like, gently fold in 1 cup of halved cherry tomatoes. They add a nice pop of color and flavor. To get a nice, creamy texture in your sauce, always save some pasta water. This water is starchy and helps the sauce cling to the pasta. After you cook the pasta, set aside about half a cup before draining. If your sauce becomes too thick, slowly add this water until it feels just right. If you want more brightness, add more lemon juice or zest. Start with a little, then taste. You can always add more! When seasoning, balance the salt and pepper carefully. Too much salt can overpower the dish, while too little can make it bland. Taste as you go to find that perfect balance. If you prefer a lighter option, swap the heavy cream for half-and-half or a plant-based milk. These options can cut calories while still giving you a creamy feel. For those needing gluten-free choices, use gluten-free pasta. Many brands have great options that taste just as good! {{image_2}} You can add proteins to this dish for more flavor and nutrition. Grilled chicken works great. Just slice it thin and mix it in. Shrimp is another excellent choice. Cook it until pink and toss it in with the pasta. If you're vegan, try tofu. Just cube it and sauté until golden. This adds a tasty twist and keeps it filling. Adding veggies is a fun way to make this pasta even better. Spinach or arugula can brighten up your dish. Toss in a handful right before serving. They will wilt nicely in the hot pasta. You can also use seasonal veggies. Think cherry tomatoes, zucchini, or bell peppers. These keep your dish fresh and colorful. You can change the flavor with herbs and spices. Basil adds a nice touch to the creamy sauce. Just chop it finely and mix it in. If you like heat, red pepper flakes are perfect. Sprinkle a pinch in for a spicy kick. These little changes can make your pasta unique every time. To keep your creamy pasta fresh, store it in an airtight container. Make sure to cool it down to room temperature first. This helps it keep its great taste. You can refrigerate it for up to three days. Keep in mind that the sauce may thicken as it cools. To keep the texture nice, add a splash of water or cream when you reheat it. When it’s time to eat your leftovers, use a few simple methods. You can reheat it on the stove over low heat. Stir it often to prevent sticking. If you want to use the microwave, place it in a bowl and cover it. Heat it in short bursts, stirring in between, until hot. This way, you will keep the creamy texture without losing flavor. Yes, you can freeze creamy pasta, but it’s not always ideal. Freezing can change the sauce's texture. If you plan to freeze it, do so without the fresh parsley and tomatoes. To freeze, place it in a freezer-safe container. Make sure to leave some space for expansion. When you’re ready to eat, thaw it in the fridge overnight. Reheat it gently on the stove, adding a little cream or water for smoothness. This dish takes just 15 minutes. You spend about 5 minutes prepping. Cooking the pasta takes 8 to 10 minutes. The sauce cooks in just a few minutes after that. Yes, you can! Use coconut cream instead of heavy cream. Nutritional yeast can replace Parmesan cheese. Your pasta will still taste great with these swaps. You can serve this pasta with a fresh green salad. Garlic bread pairs well too. Try adding grilled chicken or shrimp for protein. Roasted vegetables make a nice side as well. In this blog post, we explored how to make creamy lemon garlic pasta step-by-step. We discussed the key ingredients, including fettuccine, garlic, and Parmesan cheese. We shared tips for achieving the perfect creamy texture and suggested fun variations. Remember, adding proteins and veggies can make this dish your own. It’s easy to store and reheat, ensuring you enjoy every bite. With these tips, you can create a tasty meal that everyone will love. Enjoy your pasta adventure!
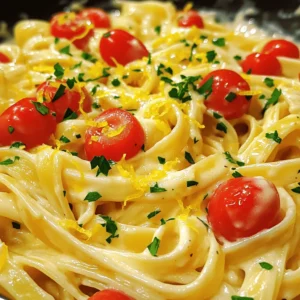
    Creamy Lemon Garlic Pasta 15 Minutes Quick Recipe
  • - 1 cup cream cheese, softened - 1/2 cup unsalted butter, softened - 1 1/2 cups granulated sugar - 3 large eggs - 1 cup canned pumpkin puree - 1 teaspoon vanilla extract - 2 cups all-purpose flour - 1 teaspoon baking powder - 1/2 teaspoon baking soda - 1 teaspoon ground cinnamon - 1/2 teaspoon ground nutmeg - 1/4 teaspoon ground ginger - 1/4 teaspoon salt - 1/2 cup chopped walnuts or pecans (optional) - Powdered sugar for dusting To make this Pumpkin Cream Cheese Pound Cake, gather all your ingredients first. The cream cheese and butter must be soft. This makes mixing easier and gives the cake a nice texture. The canned pumpkin puree adds moisture and flavor. You can choose to add walnuts or pecans for crunch. If you like a sweet finish, keep some powdered sugar ready for dusting. Remember, the spices are key. They bring warmth and depth to the cake. Cinnamon, nutmeg, and ginger work together to create that cozy fall flavor. Make sure to measure everything accurately. This helps the cake rise and bake evenly. Enjoy the process! First, you need to preheat your oven to 350°F (175°C). This step is crucial for even baking. While the oven heats, grab a 9x5 inch loaf pan. Grease it with butter. Then, sprinkle a bit of flour inside. This helps the cake release easily after baking. In a large bowl, blend 1 cup of softened cream cheese with 1/2 cup of softened butter. Beat them together until they are creamy and smooth. Next, add 1 1/2 cups of granulated sugar to this mixture. Keep mixing until it all combines well. Now, add 3 large eggs, one at a time. Make sure to mix well after each egg. Then, stir in 1 cup of canned pumpkin puree and 1 teaspoon of vanilla extract until everything is nicely blended. In another bowl, take 2 cups of all-purpose flour. Add 1 teaspoon of baking powder, 1/2 teaspoon of baking soda, 1 teaspoon of ground cinnamon, 1/2 teaspoon of ground nutmeg, 1/4 teaspoon of ground ginger, and 1/4 teaspoon of salt. Whisk these dry ingredients together until they are well mixed. Now, slowly add this dry mix into the wet mixture. Stir gently just until you see no dry flour. If you like, fold in 1/2 cup of chopped walnuts or pecans for a nice crunch. Pour the batter into your prepared loaf pan. Spread it evenly across the pan. Bake in your preheated oven for 60 to 70 minutes. To check if the cake is done, insert a toothpick into the center. If it comes out clean, your cake is ready. After baking, let the cake cool in the pan for about 10 minutes. Then, carefully move it to a wire rack to cool completely. Once cooled, dust the top with powdered sugar for a sweet finish. Enjoy your rich and soft pumpkin cream cheese pound cake! To get the best texture for your pumpkin cream cheese pound cake, you need to ensure the right consistency. When mixing the cream cheese and butter, make sure they are both soft. This will help them mix well. Beat them until they are creamy and smooth. If the mixture is too cold, it won’t blend properly. To avoid overmixing, mix the dry ingredients separately before adding them to the wet mix. Once you combine them, stir gently. You want to mix just until you don’t see any dry flour. This keeps your cake light and fluffy. To make your cake even tastier, you can add extra spices. Try adding a pinch of allspice or cloves for a warm kick. You can also increase the cinnamon for a bolder flavor. These small changes can create a big difference in taste. If you want to skip the cream cheese frosting, try using a simple glaze. Mix powdered sugar with a bit of milk or orange juice for a sweet topping. This will add a fresh flavor without being too heavy. For a lovely presentation, slice the pound cake and arrange it on a nice platter. Dust the top with powdered sugar for a great look. You can also sprinkle cinnamon on top for a pop of color. When it comes to serving, this cake pairs well with many drinks. Coffee or chai tea complements the spices nicely. You can also serve it with a scoop of vanilla ice cream for a rich dessert. Adding some whipped cream on top makes it even more delightful! {{image_2}} You can play with this pumpkin cream cheese pound cake in fun ways. One option is using different types of squash, like butternut or acorn squash. These varieties add a unique sweetness and texture. You can also try adding chocolate chips or dried fruits, such as cranberries or raisins. Both options bring extra flavor and a delightful surprise in each bite. If you need gluten-free options, you can swap all-purpose flour for a gluten-free blend. Many blends work well in this recipe. For dairy-free alternatives, use vegan cream cheese and butter. These swaps keep the cake rich and soft while meeting your dietary needs. To take the flavor up a notch, try using different extracts. Maple or almond extracts can add a lovely depth. You can also incorporate citrus zest, like orange or lemon, for a fresh and bright twist. Both ideas make this cake even more enjoyable and unique. To keep your pumpkin cream cheese pound cake fresh, you have two main options: room temperature and refrigerator storage. - Room Temperature: If you plan to eat the cake within a few days, store it at room temperature. Wrap it tightly in plastic wrap or place it in an airtight container. This keeps it soft and moist. - Refrigerator: For longer storage, place the cake in the fridge. It can last up to a week when wrapped well. The cool air helps preserve its flavor and texture. - Freezing: If you want to save some for later, freezing is a great option. Wrap the cooled cake in plastic wrap, then in aluminum foil. This double layer keeps out air and moisture. It can last up to three months in the freezer. The shelf life of your pumpkin cream cheese pound cake depends on how you store it. - Fresh Storage: At room temperature, the cake stays fresh for about 3-5 days. In the fridge, it lasts about a week. - Thawing Frozen Cake: When you're ready to enjoy your frozen cake, take it out of the freezer. Leave it in the fridge overnight to thaw. If you need it sooner, you can leave it at room temperature for a few hours. Avoid using the microwave, as it can change the texture. By following these storage tips, your pumpkin cream cheese pound cake will stay delicious and ready for any occasion! To keep your pound cake moist, watch for common causes of dryness. Overbaking is a big one. If you bake too long, the cake can dry out. Another cause is using too much flour. It’s easy to add extra flour by mistake. Make sure to scoop the flour gently and level it off. To fix these issues, you can try a few adjustments. First, check the baking time. Start testing your cake at 60 minutes. If the toothpick comes out clean, it’s done. You can also add a bit more pumpkin puree for extra moisture. A splash of milk or sour cream can help too. These tweaks make your cake rich and soft. Yes, you can use fresh pumpkin! Just know it takes more effort. Start by selecting sugar pumpkins, which are sweeter. Cut them in half, scoop out the seeds, and bake the halves face down on a tray. Bake at 350°F for about 45 minutes until soft. Then, scoop out the flesh and blend it until smooth. Using fresh pumpkin may change the taste a little. It might be a bit less sweet than canned. You may want to adjust the sugar to balance the flavors. If you don’t have cream cheese, there are a few substitutes. You can use Greek yogurt or sour cream. They both give a creamy texture, but with a tangy flavor. You can also use mascarpone cheese. It’s rich and creamy, perfect for this cake. These substitutes may change the taste slightly, but the cake will still be delicious. Just keep in mind the texture and flavor shifts. Yes, you can make this recipe dairy-free! For the cream cheese, use a dairy-free cream cheese option. There are many brands available that work well. For the butter, substitute with coconut oil or a dairy-free butter. Both options will keep the cake moist and tasty. Make sure to check labels for added ingredients. Some brands may add preservatives or sugar. You can make this cake ahead of time! It freezes very well. To freeze, let the cake cool completely first. Then, wrap it tightly in plastic wrap. Place it in a freezer bag for extra protection. It can stay in the freezer for up to three months. If you want to make it a day ahead, store it at room temperature. Just cover it with plastic wrap to keep it fresh. You can dust it with powdered sugar before serving for a nice touch. This blog post covered how to make pumpkin cream cheese pound cake. We explored essential ingredients, step-by-step instructions, and helpful tips. You learned ways to enhance flavors and variations for dietary needs. When baking, remember to control moisture and adjust flavors to your taste. Enjoy this cake fresh or stored properly for later. With practice, you'll master this warm, delicious dessert and impress everyone who tries it. Happy baking!
    Pumpkin Cream Cheese Pound Cake Rich and Soft Delight
  • - 1 pound Brussels sprouts, trimmed and halved - 1/4 cup olive oil - 3 tablespoons pure maple syrup - 2 tablespoons Dijon mustard - 1 tablespoon apple cider vinegar - 1/2 cup pecans, roughly chopped - 1/2 cup dried cranberries - Salt and pepper to taste - 1/4 cup feta cheese, crumbled - Additional toppings When I make this Maple Dijon Brussels Sprouts Salad, I focus on the main ingredients first. Fresh Brussels sprouts are key. They give the salad a nice crunch and earthy taste. I trim and halve them for even cooking. Next, I choose high-quality olive oil. It helps the Brussels sprouts roast perfectly. The oil also adds a rich flavor. I use pure maple syrup for sweetness. It balances the peppery taste of the sprouts. I also add Dijon mustard and apple cider vinegar for zing. The mustard gives a nice kick. The vinegar adds brightness. Together, they make a great dressing. For texture, I toss in chopped pecans and dried cranberries. The nuts add a satisfying crunch. The cranberries bring sweetness and a pop of color. Feta cheese is optional but worth it. It adds creaminess and depth to the salad. You can skip it for a dairy-free option. Feel free to customize with your favorite toppings. You can try seeds or fresh herbs. This salad is all about freshness and flavor. First, trim the ends of the Brussels sprouts. This helps remove any tough parts. Then, cut each sprout in half. This allows them to cook evenly and absorb flavors. Next, place the halved Brussels sprouts in a bowl. Toss them with olive oil, salt, and pepper. Make sure they are well coated. This step adds flavor and helps with roasting. Next, preheat your oven to 400°F (200°C). This high heat will help the sprouts get crispy. Spread the Brussels sprouts on a baking sheet in a single layer. Roast them for 20 to 25 minutes. Stir them halfway through to ensure even cooking. Look for a golden brown color and tenderness. They should be crispy on the outside but soft on the inside. While the Brussels sprouts roast, it’s time to make the dressing. In a small bowl, combine maple syrup, Dijon mustard, and apple cider vinegar. Whisk these ingredients together until they are well mixed. Whisking is key, as it ensures the flavors blend nicely. The sweet and tangy dressing will enhance the salad’s taste. Once the Brussels sprouts have cooled slightly, it’s time to assemble the salad. In a large bowl, mix the roasted Brussels sprouts, chopped pecans, and dried cranberries. Drizzle the maple Dijon dressing over the top. Toss everything gently to combine. If you want, sprinkle crumbled feta cheese on top for extra flavor. This adds a delicious creaminess that pairs well with the dish. To get great Brussels sprouts, roast them at 400°F (200°C). This high heat helps them turn golden brown while making them tender. Roast them for about 20-25 minutes. Check them halfway through to stir. Look for a nice caramel color and a soft texture. If they smell sweet and nutty, they're ready! You can try different ingredients for your dressing. Instead of apple cider vinegar, use balsamic vinegar for a richer taste. For a spicy kick, add a pinch of chili flakes. You might also mix in a bit of honey if you want it sweeter. These choices can change the flavor profile and keep things exciting! For serving, a wide, shallow bowl works best. This presentation lets the colors pop. You can pair this salad with grilled chicken or fish for a balanced meal. It also goes well with roasted veggies or a warm grain, like quinoa. These sides add great nutrition and flavor to your plate! {{image_2}} You can make this salad even better with some fun add-ins. Try different nuts or seeds to add crunch. Pecans work great, but walnuts or sunflower seeds can also shine. Each nut brings a new flavor, so mix and match to find your favorite. Adding fresh herbs can brighten the taste. Chopped parsley or cilantro can add a fresh twist. Just a handful can make a big difference and enhance the overall flavor of the dish. Want to keep it vegan? Simply skip the feta cheese. The salad still tastes great without it. You can also substitute it with a vegan cheese or a sprinkle of nutritional yeast for that cheesy flavor. If you need gluten-free options, rest easy. This salad is naturally gluten-free. Just ensure any additional ingredients you use meet your dietary needs. Using seasonal fruits can really elevate your salad. In the fall, add diced apples or pears for natural sweetness. In the summer, try adding berries for a burst of color and flavor. You can also adapt flavors for special occasions. For a holiday touch, add pomegranate seeds for a festive look. These small changes keep the salad exciting all year round. Store leftover salad in an airtight container. Make sure to seal it well. It will stay fresh for about three days. If possible, keep the dressing separate. This keeps the Brussels sprouts crisp. For best results, use glass containers. They do not stain and are easy to clean. You can also see the contents easily. Plastic containers work, too, but may hold odors. Can it be frozen? I do not recommend freezing this salad. The Brussels sprouts can get mushy when thawed. The texture will not be pleasant. If you do freeze it, separate the dressing. Freeze the salad base without the dressing. For reheating, let it thaw overnight in the fridge. Then, heat in the oven at 350°F (175°C) until warm. This keeps the flavor and improves texture. You can use frozen Brussels sprouts, but the texture will change. Fresh Brussels sprouts are crisp and tender. Frozen ones can become softer when cooked. They also might have a more muted flavor. If you use frozen, try to thaw and drain them first. This helps keep your salad from getting watery. If you run out of maple syrup, don't worry. You can use honey or agave syrup as a sweetener. Both add a nice sweetness. Brown sugar mixed with water also works well. Adjust the amount to your taste. Start with less and add more if needed. Yes, this salad is great for meal prep! You can roast the Brussels sprouts in advance. Store them in the fridge for up to three days. Just keep the dressing separate until you're ready to eat. This keeps everything fresh and tasty. You can mix in the pecans and cranberries right before serving for the best crunch. This blog post covered how to make a delicious Brussels sprouts salad. We talked about key ingredients like Brussels sprouts, olive oil, and maple syrup. I explained how to prepare, roast, and dress the salad. You can also customize it with optional add-ins and variations. I hope you feel ready to try this recipe. Enjoy experimenting and make this salad your own! A fresh and flavorful dish awaits you.
    Maple Dijon Brussels Sprouts Salad Fresh and Flavorful
  • - 2 chicken breasts, cut into bite-sized pieces - 8 oz (225g) penne pasta - 3 tablespoons unsalted butter - 1 tablespoon olive oil The main ingredients in Cowboy Butter Chicken Pasta Skillet are simple yet satisfying. Chicken breasts are the protein star here. I cut them into bite-sized pieces for quick cooking. Penne pasta adds a lovely shape and texture. The butter and olive oil bring rich flavors to the dish. - 4 cloves garlic, minced - 1 teaspoon smoked paprika - 1 teaspoon onion powder - 1 teaspoon garlic powder - 1/2 teaspoon cayenne pepper (adjust to taste) - 1 cup chicken broth - 1 cup cherry tomatoes, halved - 1 cup fresh spinach Seasoning is key to making this dish pop. I use garlic for depth. Smoked paprika gives a warm, smoky taste. Onion powder adds sweetness, while garlic powder boosts flavor. Cayenne pepper adds a bit of heat, but adjust it to your liking. The chicken broth acts as a base, adding moisture. Fresh tomatoes and spinach bring brightness and nutrients. - 1/2 cup grated Parmesan cheese - Fresh parsley, chopped (for garnish) Garnishing lifts the dish. Grated Parmesan cheese adds a creamy finish. I sprinkle fresh parsley on top for color and freshness. It makes the dish look inviting and adds a nice herbal note. - Cut the chicken breasts into small, bite-sized pieces. - Halve the cherry tomatoes and chop the fresh spinach. - Measure 8 oz of penne pasta and 1 cup of chicken broth. - Heat a large skillet over medium heat. - Melt 2 tablespoons of butter with 1 tablespoon of olive oil. - Add the chicken pieces to the skillet. - Season the chicken with salt, pepper, smoked paprika, onion powder, and garlic powder. - Cook the chicken for 5-7 minutes until it is brown and cooked through. - Remove the chicken from the skillet and set it aside. - In the same skillet, add 4 minced garlic cloves. - Sauté the garlic for 1-2 minutes until it smells great. - Pour in 1 cup of chicken broth, scraping the bottom to mix flavors. - Bring the broth to a simmer. - Add the penne pasta and mix it well. - Cook the pasta for 10-12 minutes until it is al dente. - If it gets too dry, add more broth or water. - Once the pasta cooks, return the chicken to the skillet. - Add the halved cherry tomatoes and fresh spinach. - Stir everything together for 2-3 minutes until the spinach wilts. - Take the skillet off the heat. - Stir in the last tablespoon of butter and 1/2 cup of grated Parmesan cheese. - Mix until creamy and well combined. - Taste the dish and adjust the seasoning if needed. To make sure your pasta is just right, follow the package time. Test a piece before draining to check if it’s al dente. This means it should be firm to the bite. If you overcook it, it can turn mushy in the skillet. To keep your chicken juicy, cut it into small pieces. This helps it cook faster and stay moist. Season it well with salt and spices. Cook it until it's golden brown, then remove it from the heat. This prevents it from drying out. Spices can make your dish pop. Consider adding herbs like thyme or oregano for more flavor. You can also add a squeeze of lemon juice for brightness. If you want heat, add more cayenne pepper or some red pepper flakes. Serve the pasta hot to enjoy its full flavor. This dish tastes best right after cooking. If you let it sit too long, it may dry out. You can add a splash of broth when reheating to keep it nice and creamy. Use a large skillet for even cooking. A cast-iron skillet works great. It holds heat well and gives a nice sear to the chicken. For utensils, have a good spatula and a wooden spoon handy. These will help you stir and mix ingredients without scratching your skillet. A set of measuring cups is also useful for precise ingredient amounts. {{image_2}} You can switch up the protein in this dish. Shrimp or tofu works great. Both options add a unique taste. If you're vegan, tofu is a smart pick. For gluten-free pasta, look for rice or corn-based options. They cook well and taste good too. Always check the package for cooking times. Feel free to play with the spices. Try using Italian seasoning for a new twist. You can also add some dried herbs for extra flavor. If you want a richer sauce, add heavy cream. This will make the dish creamy and smooth. Adjust the spice level to your taste. You can make this meal as a one-pot dish or bake it. For a baked version, transfer it to a baking dish before adding cheese. Bake at 350°F until bubbly. You may also add seasonal vegetables. Zucchini, bell peppers, or broccoli make great additions. Just toss them in when you add the spinach. After cooking, let the Cowboy Butter Chicken Pasta cool down. Store leftovers in an airtight container. This keeps your pasta fresh for up to three days. Glass or plastic containers work well. They seal tightly and prevent spills. You can reheat your pasta in two ways: microwave or stovetop. For the microwave, place the pasta in a bowl. Cover it with a damp paper towel. Heat in short bursts, stirring in between. For stovetop, warm a skillet over low heat. Add a splash of chicken broth to keep it moist. Stir often to avoid sticking. If you want to freeze the pasta, let it cool completely first. Place it in a freezer-safe container. It stays good for about three months. When ready to eat, move it to the fridge overnight to thaw. To reheat, use the stovetop method for the best results. Add a bit of broth if it seems dry. How long does Cowboy Butter Chicken Pasta Skillet take to make? It takes about 30 minutes to make. This includes prep and cooking time. You can enjoy a hearty meal in no time! Can I make this recipe ahead of time? Yes, you can make this dish ahead. Just store it in the fridge. Reheat it before serving for best results. Can I use frozen chicken for this recipe? Yes, you can use frozen chicken. Just make sure to thaw it first. Cook it well to ensure it's safe to eat. Is there a dairy-free alternative for the butter and cheese? You can use vegan butter instead of regular butter. For cheese, try nutritional yeast or a dairy-free option. Is this dish suitable for a low-carb diet? No, this dish is not low-carb. The penne pasta adds carbs. You can swap it with zucchini noodles for a low-carb version. How can I make this recipe healthier? To make it healthier, use less butter and cheese. Add more veggies like bell peppers or broccoli. You can also use whole wheat pasta for added fiber. This blog post detailed how to make a tasty Cowboy Butter Chicken Pasta Skillet. We covered main ingredients like chicken, penne pasta, and fresh veggies. You learned step-by-step cooking methods, plus tips to keep your chicken juicy and pasta perfect. We also discussed various ingredient swaps and storage tips to help you enjoy leftovers. In summary, this dish is easy to customize and store. Enjoy experimenting with flavors, and make it your own!
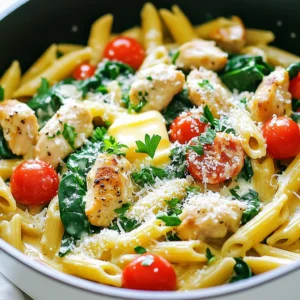
    Cowboy Butter Chicken Pasta Skillet Simple and Savory
  • To make a tasty high-protein cottage cheese berry parfait, gather these main ingredients: - 1 cup low-fat cottage cheese - 1 cup mixed berries (strawberries, blueberries, raspberries) - 2 tablespoons honey or maple syrup - 1/4 cup granola (your choice of flavor) - 1 tablespoon chia seeds - 1 teaspoon vanilla extract - A pinch of cinnamon (optional) These ingredients work well together. The cottage cheese packs in protein, while the berries add a burst of flavor. Honey or maple syrup brings sweetness, and granola adds crunch. You can mix and match your favorite berries for a personal touch. You might want to customize your parfait. Try these optional ingredients: - Sliced bananas for extra sweetness - Nuts for added crunch and healthy fats - Yogurt for a creamier texture - Coconut flakes for a tropical twist - Dark chocolate chips for a sweet treat These options let you create a parfait that suits your taste. Feel free to get creative! Cottage cheese is high in protein. It helps build muscle and keep you full. One cup has about 28 grams of protein. This makes it a great choice for breakfast or a snack. Berries are low in calories but high in vitamins. They are rich in antioxidants, which help your body fight free radicals. Strawberries, blueberries, and raspberries add fiber too. This keeps your digestion healthy. Together, cottage cheese and berries make a nutritious combination. You get protein, fiber, and vitamins in every bite. Enjoying this parfait is a tasty way to fuel your body! First, grab a mixing bowl. Add 1 cup of low-fat cottage cheese. Next, pour in 2 tablespoons of honey or maple syrup. This will sweeten your mix. Add 1 teaspoon of vanilla extract for flavor. If you like, sprinkle in a pinch of cinnamon. Stir everything until it is smooth and well mixed. This step makes your cottage cheese creamy and tasty. Now, it's time to layer. Take serving glasses or bowls. Start with a layer of the cottage cheese mixture at the bottom. Then, add a layer of mixed berries. You can use whole strawberries, blueberries, and raspberries. If you want, slice the berries for easier eating. Next, sprinkle a layer of granola on top. This adds a nice crunch. Repeat this layering: cottage cheese, berries, granola. Finish with a final layer of berries on top. For extra nutrition, sprinkle 1 tablespoon of chia seeds over the top. If you like, drizzle a bit more honey or maple syrup on top. For a great look, garnish each parfait with a few whole berries and a small mint leaf. Using clear glasses shows off the colorful layers, making your parfait visually appealing. Enjoy this delightful treat right away for the best taste! To get a smooth texture, mix the cottage cheese well. Use a fork or a whisk. This helps break up larger curds. Add honey or maple syrup to sweeten it. The vanilla extract adds a nice touch. If you like a creamier feel, blend the cottage cheese. This gives a soft and rich taste. You can switch out the cottage cheese for Greek yogurt if you prefer. It has a similar taste and texture. For a vegan option, try coconut yogurt. You can also use agave syrup instead of honey or maple syrup. This keeps it vegan-friendly. If you're gluten-free, choose gluten-free granola. Try adding nuts for a crunchy twist. Almonds or walnuts work great. For a fruity kick, mix in banana slices or kiwi. You can sprinkle cocoa powder for a chocolate flavor. If you like spices, add a touch of nutmeg or cardamom. Each change makes the parfait unique and tasty! {{image_2}} You can change your parfait with seasonal berries. In spring, use fresh strawberries. In summer, blueberries shine bright. In fall, try chopped apples or pears. Winter calls for frozen berries, which work well too. Each season brings unique flavors and colors to your parfait. Mixing different berries can also create a fun taste. Remember, the best flavors come from using what's in season. If honey or maple syrup isn't your thing, try agave nectar or stevia. Both add sweetness without the extra calories. You can also use yogurt or nut butter to add creaminess. Try topping with nuts or seeds for crunch. If you like chocolate, sprinkle cocoa nibs on top. These options keep your parfait exciting and fresh. For a protein boost, mix in protein powder or Greek yogurt. You can also add nut butter, like almond or peanut butter, for texture. Another great option is to use a scoop of cottage cheese in each layer. These additions keep you full longer and support muscle health. Feel free to experiment with flavors to find your favorite combination. To store leftover parfait, place it in a sealed container. Make sure the lid fits snugly. You can also cover the parfait with plastic wrap. This keeps the flavors fresh and prevents spills. If you have layered it, the berries may soften. Still, it will taste great! When prepping this parfait, make only what you need. If you want to make extras, store the layers separately. Keep the cottage cheese mixture, berries, and granola in separate containers. This way, you can enjoy fresh layers each day. You can also prep the mixture ahead of time. Just stir it well before serving. This parfait stays fresh for about two days in the fridge. After that, the berries may lose their texture. Always check for any signs of spoilage before eating. If the cottage cheese smells sour or the berries look mushy, toss them out. To extend freshness, consume it as soon as possible! Yes, you can use frozen berries. They work well in this parfait. Just let them thaw a bit before you use them. This helps soften them. Thawed berries can add a nice juicy flavor. They mix well with the cottage cheese too. Cottage cheese is an excellent source of protein. One cup has about 28 grams of protein. This makes it great for snacks or meals. Protein helps build muscles and keeps you full longer. It’s a smart choice for anyone wanting a healthy boost. To make this parfait dairy-free, swap cottage cheese for a dairy-free alternative. You can use almond yogurt or coconut yogurt. Both options provide a creamy texture. They also keep the parfait delicious and fresh. Just check the labels for added sugars. We've explored how to make a delicious parfait using cottage cheese and berries. You learned about key ingredients and how to layer them for the best texture. I shared tips for customization and serving, plus variations to keep it interesting. Lastly, we discussed storage for leftovers and answered common questions. Now, it’s your turn to get creative with this tasty treat. Enjoy making your parfait and nourishing your body!
    High-Protein Cottage Cheese Berry Parfait Delight
  • Here’s what you need to make these delicious pumpkin pie cheesecake truffles: - 1 cup cream cheese, softened - 1 cup pumpkin puree - 1/2 cup powdered sugar - 1 teaspoon vanilla extract - 1/2 teaspoon pumpkin pie spice - 1 cup graham cracker crumbs - 1 cup white chocolate chips - 2 tablespoons coconut oil - Crushed pecans or walnuts (for rolling) Each ingredient adds a special touch. Cream cheese gives a rich base. Pumpkin puree adds a smooth texture and fall flavor. Powdered sugar sweetens the mix perfectly. Vanilla extract brings warmth. Pumpkin pie spice gives that cozy flavor. Graham cracker crumbs add crunch. White chocolate coats the truffles in sweetness. Coconut oil helps the chocolate melt smoothly. Finally, crushed nuts add a tasty finish. Gather these items before you start. Having everything ready makes cooking easier and more fun! First, grab a large mixing bowl. Add 1 cup of softened cream cheese, 1 cup of pumpkin puree, 1/2 cup of powdered sugar, 1 teaspoon of vanilla extract, and 1/2 teaspoon of pumpkin pie spice. Mix these ingredients until they are completely smooth. You want a creamy texture that is well combined. Next, gradually fold in 1 cup of graham cracker crumbs. This will help thicken the mixture. Make sure it is thick enough to shape into balls. Cover the mixing bowl with plastic wrap. Place it in the refrigerator for about 30 minutes. This step helps firm up the mixture. After chilling, scoop out about 1 tablespoon of the mixture. Roll it into a ball using your hands. Repeat this step until you shape all the mixture into balls. Place them on a parchment-lined baking sheet. Now, it's time to coat the truffles. In a microwave-safe bowl, combine 1 cup of white chocolate chips and 2 tablespoons of coconut oil. Melt them together in 30-second intervals. Stir well between each interval to avoid burning. Once smooth, dip each truffle into the melted white chocolate. Ensure each one gets a good coat. Let any extra chocolate drip off. Roll the truffle in crushed pecans or walnuts for added flavor. Place the coated truffles back on the baking sheet. To speed up the setting process, you can refrigerate them again for about 15 minutes. To make the best Pumpkin Pie Cheesecake Truffles, you need the right texture. Start with your cream cheese and pumpkin puree. Mix these together well. They should be smooth and creamy. Then add the powdered sugar and spices. Once you mix in the graham cracker crumbs, the mixture should be thick enough to roll. If it's too soft, chill it longer. Chilling is key. After mixing, cover the bowl and place it in the fridge for 30 minutes. This step helps the mixture firm up. It makes rolling easier and keeps the shape. Presentation makes your truffles shine. Use a decorative box or a beautiful platter. Arrange the truffles neatly, making them look inviting. Drizzle melted white chocolate over the top for flair. This adds a nice touch and makes them stand out. You can also sprinkle some pumpkin pie spice on top. It adds flavor and looks festive. Not everyone can use the same ingredients. If you want to swap sweeteners, try using maple syrup or honey. These options can give a unique flavor. If you need a vegan choice for cream cheese, look for brands made from nuts or soy. They work well and keep the truffles tasty. Always remember to check the labels for any allergens. {{image_2}} You can change the flavor of your truffles easily. Adding spices can make a big difference. Consider using cinnamon or nutmeg for a warm touch. You can also try ginger for a spicy kick. Swapping chocolate types is another fun option. While white chocolate gives a sweet taste, dark chocolate can add depth. Milk chocolate offers a nice balance too. Each choice changes the taste and feel. Themed truffles can add fun to any event. For Halloween, roll the truffles in orange or black sprinkles. You could also use ghost-shaped candy eyes for a spooky look. During Thanksgiving, think about adding a pecan on top. This adds a festive touch and flavor. You can also use a sprinkle of cinnamon for a cozy vibe. These small tweaks make your truffles stand out. Pairing these truffles with drinks can enhance the experience. A warm spiced apple cider works well. It complements the pumpkin flavor beautifully. Hot cocoa or coffee also makes a great match. These truffles shine at many occasions. They are perfect for parties, potlucks, or family gatherings. You can even use them as gifts during the holidays. Their rich flavor and cute look make everyone smile. To keep your Pumpkin Pie Cheesecake Truffles fresh, store them in the fridge. Place the truffles in an airtight container. This helps prevent them from drying out. Make sure to separate layers with parchment paper. If you want to save some for later, you can freeze the truffles. First, freeze them on a baking sheet until solid. After that, transfer them to a freezer-safe container. They should last well for up to three months. These truffles can stay fresh in the fridge for about one week. After that, they may start to lose flavor and texture. Look for signs of spoilage, like an off smell or a change in color. If the truffles feel hard or dry, they are past their prime. Trust your senses; if they don’t seem right, it’s best to toss them. Yes, you can make these truffles ahead of time. I often prepare them a day in advance. Just make sure to store them in the fridge. This helps the flavors blend better. You can also freeze them for up to a month. Just allow them to thaw in the fridge before serving. Yes, you can make these truffles gluten-free. Instead of graham cracker crumbs, use gluten-free cookie crumbs. Many brands offer gluten-free options. You can also use crushed nuts or oats. Just ensure these alternatives suit your taste and dietary needs. You can check if the truffles are set by gently touching the coating. It should feel firm to the touch. If it sticks to your finger, give them more time. Chilling them in the fridge for about 15 minutes helps speed up the setting. The chocolate will harden nicely and create a perfect shell. We explored a fun and tasty way to make pumpkin truffles. You learned about the key ingredients, like cream cheese and pumpkin puree. I shared easy steps for mixing, chilling, and coating your truffles. We also discussed tips for texture and presentation, plus fun variations and storage tips. These pumpkin truffles are great for any occasion. Try them at your next party or holiday event. Enjoy the sweet flavors and impress your friends with your skills!
    Pumpkin Pie Cheesecake Truffles Tasty Treats to Love
  • - 500g boneless chicken thighs, cut into bite-sized pieces - 1 cup unsalted cashews - 2 tablespoons soy sauce - 2 tablespoons oyster sauce (or mushroom sauce for a vegetarian option) - 1 tablespoon cornstarch - 3 tablespoons vegetable oil The main ingredients create a rich and tasty base for this dish. Chicken thighs give a juicy texture. Cashews add crunch and flavor. The soy and oyster sauces bring umami notes that make this dish feel gourmet. Cornstarch helps thicken the sauce, giving it a nice glaze. - 1 bell pepper (red or green), sliced - 1 cup broccoli florets For vegetables, I love using bell peppers and broccoli. They add color and nutrition. Bell peppers come in red or green, so pick your favorite. Broccoli brings a nice crunch and pairs well with the chicken and cashews. - Vegetarian options: Use mushrooms instead of chicken. - Gluten-free alternatives: Use tamari instead of soy sauce and mushroom sauce instead of oyster sauce. These substitutions help everyone enjoy this dish. If you want to go vegetarian, mushrooms add a savory depth. For gluten-free options, tamari is a great choice. It tastes just as good without the gluten. First, take your chicken thighs and cut them into bite-sized pieces. In a bowl, mix the chicken with soy sauce, oyster sauce, and cornstarch. Stir until the chicken is well coated. Let it marinate for about 15 to 20 minutes. This step adds flavor and helps tenderize the meat. Next, heat 2 tablespoons of vegetable oil in a large skillet or wok over medium-high heat. Add the marinated chicken in a single layer. Cook the chicken for about 5 to 7 minutes. Stir occasionally until it turns golden brown and is cooked through. Once done, remove the chicken and set it aside. In the same skillet, add 1 tablespoon of vegetable oil. Toss in the minced garlic and ginger. Sauté them for about 30 seconds until they smell great. Then, add the sliced bell pepper and broccoli florets. Stir-fry for about 3 to 4 minutes. You want the vegetables to be tender but still crisp. Now, return the cooked chicken to the pan. Mix in the honey or maple syrup and stir everything together for another minute. This helps blend all the flavors. Toss in the unsalted cashews and chopped green onions. Stir until everything is warm. Season with salt and pepper to taste. Serve your cashew chicken over a bed of jasmine rice for a delicious meal. To get the best results with your cashew chicken, avoid overcooking the chicken. Cook the chicken in a single layer. This helps it brown nicely. Use medium-high heat for cooking. Check for a golden color after about five to seven minutes. For crunchy vegetables, stir-fry your veggies quickly. Cook them just until they are bright and tender. This keeps their crunch. Add bell peppers and broccoli last. They need only a few minutes to stay crisp. To boost flavor, think about adding seasonings. A pinch of red pepper flakes can add heat. You can also sprinkle some sesame seeds for extra taste. Fresh herbs, like cilantro or basil, can brighten the dish. Add them at the end for the best flavor impact. You can also swap the honey for a bit of chili sauce. This gives a sweet and spicy touch. Play around with these options to find what you like best. For stir-frying, a large skillet or wok works best. Both can heat evenly and allow for quick cooking. A non-stick pan can help with easy cleanup. When prepping, keep your tools simple. A sharp knife and cutting board are must-haves. Use measuring spoons for sauces. A spatula will help you stir and flip the chicken easily. Having the right tools makes cooking fun and smooth. {{image_2}} You can easily adapt this cashew chicken for different diets. For a vegetarian or vegan option, swap the chicken for tofu or tempeh. Use mushroom sauce instead of oyster sauce for flavor. This change keeps the dish rich and tasty without meat. If you're following a low-carb plan, use cauliflower rice instead of jasmine rice. You can also skip the honey or maple syrup to cut down on sugar. This way, you can enjoy a healthy meal that fits your diet. You can customize the sauce to fit your taste. If you like a tangy kick, try adding hoisin sauce or sweet and sour sauce. You could also experiment with sesame oil for a nutty flavor. For sweetness, adjust the amount of honey or maple syrup. If you prefer it less sweet, use less syrup. On the other hand, if you love sweet flavors, add a little more. This flexibility makes your cashew chicken unique every time. To spice things up, add chili flakes or sliced fresh peppers. This will bring some heat to the dish. If you want it milder, leave out the spice or use bell peppers only. For families with kids, it's best to keep it mild. You can always add hot sauce at the table for those who like it spicy. This way, everyone can enjoy their meal just the way they want. To keep your cashew chicken fresh, use airtight containers. Glass containers work best for this. You can store leftovers in the fridge for up to three days. Make sure to let the dish cool before sealing it. This helps prevent moisture build-up. When it's time to enjoy your leftovers, heat them gently. The best way is to use a skillet on low heat. Stir often to avoid burning. You can also microwave the dish, but it may lose some crunch. If you want to freeze the cashew chicken, place it in a freezer-safe container. It will stay good for up to three months. Just remember to thaw it in the fridge before reheating. Serve this dish over jasmine rice for a classic touch. You can also try it with brown rice or noodles for a twist. Pair your cashew chicken with a side of steamed veggies or a fresh salad. This adds color and nutrients to your meal. Enjoy experimenting with different combinations! Yes, you can use chicken breast. Chicken thighs add more flavor and stay juicy. Breasts cook faster and can dry out if overcooked. If you prefer a leaner option, go for breasts. Just watch the cooking time closely. To make this dish gluten-free, choose gluten-free soy sauce. For oyster sauce, use gluten-free mushroom sauce. Both options will keep the rich flavor while removing gluten. Always check labels to ensure safety. You can add many vegetables! Snap peas, carrots, or mushrooms work great. Feel free to mix in what you like. Just keep the cooking time in mind. You want them tender but still crisp. Yes, you can meal prep this dish. Cook the chicken and vegetables, then store them in the fridge. Reheat them when you’re ready to eat. This makes dinner quick and easy on busy nights. This blog post covered how to make a tasty cashew chicken dish. We explored the main ingredients, including chicken thighs, cashews, and fresh veggies. I shared step-by-step instructions, tips for perfect texture, and ways to customize the dish for dietary needs. Remember, you can swap sauces or adjust spice levels. Keep these ideas in mind for a fun and delicious meal. Enjoy creating your own version of this classic dish!
    Better-Than-Takeout Cashew Chicken Quick and Easy Meal
  • To make crispy roasted Parmesan green beans, you need: - 1 pound fresh green beans, trimmed - 2 tablespoons olive oil These seasonings bring out the flavor: - 1/2 cup grated Parmesan cheese - 1 teaspoon garlic powder - 1/2 teaspoon onion powder - Salt and pepper to taste Want to spice things up? Try these: - 1/2 teaspoon crushed red pepper flakes - 1 tablespoon lemon zest for a fresh twist Start by preheating your oven to 425°F (220°C). This hot temperature helps the green beans get crispy. Line a baking sheet with parchment paper. This step makes cleanup much easier. A clean sheet allows the beans to roast well. In a large bowl, add 1 pound of trimmed green beans. Pour in 2 tablespoons of olive oil. Then, add 1/2 cup of grated Parmesan cheese. This cheese gives a rich, savory flavor. Next, sprinkle in 1 teaspoon of garlic powder and 1/2 teaspoon of onion powder. These spices add depth to the dish. If you like heat, include 1/2 teaspoon of crushed red pepper flakes. Finally, season with salt and pepper to taste. Toss everything together until the green beans are well-coated. Spread the green beans in a single layer on your baking sheet. Make sure they are not crowded. This helps them roast evenly. Place the sheet in the oven and roast for 15-20 minutes. Halfway through, stir the green beans for even cooking. Look for a crispy, golden-brown color. Once they are done, take them out and sprinkle with lemon zest for a fresh twist. Let them cool for a few minutes before serving. This cooling time helps them crisp up even more. To get your green beans super crispy, start with fresh beans. Trim them well, so they roast evenly. Use a large bowl to toss them with olive oil and seasonings. The oil helps the beans crisp up. Spread them out on the baking sheet in a single layer. This step is key! If they are crowded, they will steam instead of crisp. Stir them halfway through roasting to ensure all sides get that golden brown color. To add extra flavor, sprinkle in garlic powder and onion powder. These spices boost the taste without being overpowering. For a kick, use crushed red pepper flakes. They add a nice heat that pairs well with the cheese. Don’t forget the lemon zest! It brightens the dish and adds freshness. Mix in extra Parmesan cheese before serving for a cheesy explosion. These crispy green beans shine on their own but can also pair well with other dishes. Serve them alongside grilled chicken or fish for a full meal. You can also add them to salads for crunch. For a fun twist, offer a dip like ranch or hummus. Place the green beans on a platter, and garnish with more lemon zest and cheese. This makes for a beautiful presentation. {{image_2}} To make spicy Parmesan green beans, add crushed red pepper flakes. I love the heat! You can start with 1/2 teaspoon for a mild kick. If you want more spice, add more flakes. Toss them in with the green beans before roasting. This adds a fun twist to the flavor. Try balsamic glazed green beans for a sweet and tangy taste. Drizzle 2 tablespoons of balsamic vinegar over the green beans before roasting. This adds a rich flavor that pairs well with the Parmesan. The glaze caramelizes a bit in the oven, giving them a shiny look too. For cheesy herb green beans, mix in fresh herbs like thyme or rosemary. I recommend using 1 tablespoon of finely chopped herbs. You can also add an extra 1/4 cup of Parmesan cheese for more flavor. The herbs bring freshness while the cheese adds richness. This makes the dish even more delicious. Each of these variations gives a new twist to crispy roasted Parmesan green beans. Feel free to mix and match flavors to find your favorite! Store leftover crispy roasted Parmesan green beans in an airtight container. They stay fresh for up to three days in the fridge. Make sure to cool them down before sealing. This keeps them crispy and tasty. If you have many leftovers, divide them into smaller containers. To reheat, use the oven for best results. Preheat the oven to 350°F (175°C). Spread the green beans on a baking sheet. Heat for about 10 minutes, or until hot and crisp again. You can also use an air fryer. Set it to 350°F (175°C) and heat for 5-7 minutes. This method keeps them crunchy. Freezing is not the best option for crispy green beans. They lose their crunch when thawed. If you must freeze them, do so before roasting. Blanch the fresh green beans in boiling water for two minutes. After cooling them quickly in ice water, dry them off well. Place in freezer bags and freeze for up to three months. When ready to cook, roast them straight from the freezer. Adjust cooking time as needed. Yes, you can use frozen green beans. They work well in this recipe. Just remember to thaw them first. Pat them dry with a towel to remove excess moisture. This step helps them get crispy in the oven. Frozen beans may take a few extra minutes to cook. Check for crispiness before removing them from the oven. To make green beans crispy, follow these steps: - Use fresh green beans for the best texture. - Coat them evenly with olive oil and spices. - Spread them in a single layer on the baking sheet. - Roast at a high temperature, around 425°F (220°C). - Stir halfway through cooking to ensure even crispness. These tips help create that crunchy texture you want. The key is to avoid crowding the pan. This allows hot air to circulate around the beans. Several dips pair well with crispy green beans. Here are a few tasty options: - Ranch dressing offers a cool, creamy contrast. - Garlic aioli adds a rich, bold flavor. - Spicy sriracha mayo gives a kick to your green beans. - Honey mustard provides a sweet and tangy option. Try these dips to enhance your snacking experience. You can even mix and match to find your favorite combination! This blog post covered fresh ingredients, essential seasonings, and optional add-ins for green beans. We walked through how to prep, mix, and roast them for that perfect crispiness. I shared tips for enhancing flavor and serving ideas. You learned about delicious variations like spicy Parmesan and cheesy herb options. Remember how to store leftovers and reheat them to keep their taste. By following these steps and tips, you’ll whip up tasty green beans every time. Enjoy your cooking adventure!
    Crispy Roasted Parmesan Green Beans Flavor Boost
  • - 1 lb shrimp, peeled and deveined - 2 tablespoons sweet chili sauce - 3 cloves garlic, minced - 1 tablespoon grated ginger - 1 red bell pepper, sliced - 1 cup snap peas - 2 tablespoons soy sauce - 1 tablespoon olive oil - 1 tablespoon sesame oil - 1 tablespoon lime juice - Cooked jasmine rice or quinoa for serving - Chopped green onions and sesame seeds for garnish Gather these ingredients before you start. The shrimp is the star, bringing a sweet and savory flavor. The sweet chili sauce adds a delightful kick. Minced garlic and grated ginger give depth to the dish. A sliced red bell pepper and snap peas add color and crunch. Soy sauce ties all the flavors together. Olive and sesame oils create a rich base. Lime juice adds brightness. Don’t forget the rice or quinoa for serving. Finally, green onions and sesame seeds make for an attractive garnish. This mix of fresh ingredients makes the dish vibrant and tasty. First, grab a medium bowl. Toss 1 pound of peeled and deveined shrimp with 2 tablespoons of sweet chili sauce, 3 cloves of minced garlic, 1 tablespoon of grated ginger, and 1 tablespoon of lime juice. Mix it well. This blend gives the shrimp a great taste. Let it marinate for about 5 to 10 minutes. This time helps the shrimp soak up all the flavor. Next, heat 1 tablespoon of olive oil in a large skillet or wok over medium-high heat. Once the oil is hot, add the marinated shrimp. Cook for about 2 to 3 minutes. You want them to turn pink and opaque. Be careful not to overcook them! Remove the shrimp from the skillet to keep them tender. Set them aside for now. Now, in the same skillet, add 1 tablespoon of sesame oil, 1 sliced red bell pepper, and 1 cup of snap peas. Stir-fry these for about 2 to 3 minutes. You want them to be tender but still crisp. This adds color and crunch to your dish. After that, return the cooked shrimp to the skillet. Pour in 2 tablespoons of soy sauce. Stir everything together for another minute. This helps combine the flavors perfectly. To save time in the kitchen, focus on quick meal prep. Here are a few tips: - Prep ingredients in advance: Chop your vegetables and measure sauces before you start cooking. This makes the process smoother. - Use frozen shrimp: Frozen shrimp are easy to store and ready to use. Just thaw them under cold water for a few minutes before marinating. Choosing the right sweet chili sauce is key. Look for a sauce with natural ingredients and a balanced taste. A good sauce should be sweet but not overly sugary. - Try different brands: Some sauces are thicker and spicier. Find one that fits your taste. - Balance flavors: You can add a splash of soy sauce or lime juice to enhance the dish. This helps bring out the flavors even more. Presentation matters, especially with a colorful dish like this. Here are some tips to make your meal look appealing: - Garnish wisely: Use chopped green onions and sesame seeds for a fresh touch. They add color and crunch. - Serving ideas: Serve your shrimp stir-fry over jasmine rice or quinoa. These sides soak up the sauce and make your plate pop. {{image_2}} You can switch shrimp for other proteins. Chicken works great if you want a meat option. Tofu is an excellent choice for a plant-based meal. Both options are tasty and easy to prepare. For veggies, consider using broccoli or zucchini. These add great flavor and texture, making the dish even more fun. Want some heat? Add fresh chili peppers or dried chili flakes. They can make your stir-fry exciting. You can also change how much sweet chili sauce you use. If you want it spicier, reduce the sauce a bit. This way, you can find the perfect balance of sweet and heat. If you're looking to cut carbs, try cauliflower rice. It’s a smart swap for jasmine rice. It tastes great and keeps the dish light. You can easily make cauliflower rice by grating fresh cauliflower. This keeps your meal flavorful while being healthy. To store your shrimp stir-fry, place it in an airtight container. This keeps moisture in and prevents other odors from mixing in. You can safely store it in the fridge for up to three days. After that, the shrimp may lose its quality and flavor. When reheating, you have two great options: microwave or skillet. If using a microwave, place the stir-fry in a bowl and cover it with a lid. Heat in short bursts, stirring in between. This helps keep the shrimp from getting tough. If you prefer a skillet, add a splash of water and heat over medium. Stir gently to keep the shrimp tender. To freeze shrimp stir-fry, make sure it cools completely first. Then, transfer it to a freezer-safe bag or container. Remove as much air as possible to prevent freezer burn. Properly stored, it can last up to three months. When you’re ready to eat, thaw it overnight in the fridge. To reheat, follow the same steps as above for best results. Cooking shrimp is quick and easy. When you sauté shrimp, it takes about 2-3 minutes. You should cook shrimp until they turn pink and opaque. This ensures they are fully cooked. If you boil or grill shrimp, the time is similar. Always check to make sure they are not overcooked. Overcooked shrimp can become tough. Yes, you can prepare this dish ahead of time. Marinate the shrimp and chop the veggies in advance. Store them in separate airtight containers in the fridge. You can keep the shrimp for up to 24 hours. The veggies are best used within 2 days. When you are ready to eat, just stir-fry everything together. This saves time and makes dinner quick. If you don’t have sweet chili sauce, there are a few tasty alternatives. You can mix honey with sriracha for a sweet and spicy kick. Another option is to use hoisin sauce, but it is thicker and sweeter. You could also try a mix of ketchup and hot sauce. Each option will give you a different flavor but will still be yummy. This dish can be gluten-free, depending on the soy sauce you use. Regular soy sauce contains gluten. Look for gluten-free soy sauce or tamari instead. These options give you the same taste without the gluten. Always check labels to ensure your ingredients meet your dietary needs. Enjoy your meal worry-free! This blog post covered a tasty shrimp stir-fry. We detailed the ingredients, from shrimp and veggies to sauces. You learned how to marinate, cook shrimp, and stir-fry veggies. We shared tips to save time and perfect flavors. For variety, consider alternatives like chicken or tofu. Proper storage and reheating ensure you enjoy leftovers too. With these insights, you can create delicious meals that impress. Enjoy cooking!
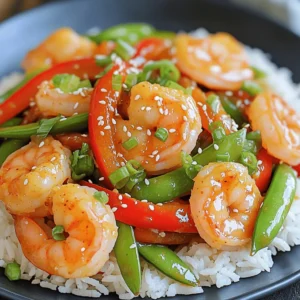
    Minute Sweet Chili Garlic Shrimp Stir-Fry Delight
  • To make Air Fryer Crispy Ranch Chicken Thighs, you need a few key ingredients: - 4 bone-in, skin-on chicken thighs - 2 tablespoons ranch seasoning - 1 tablespoon olive oil - 1 teaspoon garlic powder - 1 teaspoon onion powder - 1/2 teaspoon paprika - 1/4 teaspoon black pepper - 1/4 teaspoon salt - Fresh parsley, chopped (for garnish) Using quality chicken thighs is crucial. Bone-in and skin-on thighs provide great flavor and moisture. The skin crisps up nicely in the air fryer, giving you that delicious crunch. For this recipe, you have options with ranch seasoning. You can choose store-bought or make your own at home. Store-bought is quick and easy, but homemade lets you control the flavors. You can mix dried herbs and spices to create your ranch seasoning. Common ingredients include dried dill, parsley, garlic powder, and onion powder. They all add layers of taste to your chicken. The other spices in this recipe enhance the flavor. Garlic powder gives a savory kick, while onion powder adds depth. Paprika brings a touch of smokiness, and black pepper and salt balance everything perfectly. For a beautiful presentation, garnishing is key. Fresh parsley is not just pretty; it also adds freshness. The bright green color makes your dish pop. Plus, it gives a hint of herbal flavor that complements the chicken. Feel free to get creative with your garnishes. You might add lemon slices or a drizzle of ranch dressing. These little touches can elevate your meal and impress your guests. To get crispy chicken thighs, start by drying them well. Use paper towels to pat the chicken thighs dry. This step is key. Moisture on the skin will make it soggy. Dry skin helps the heat create that lovely crisp. Proper prep makes a big difference in the final dish. Now, let’s mix the seasoning. In a small bowl, combine ranch seasoning, garlic powder, onion powder, paprika, black pepper, and salt. Stir these well to mix them evenly. If you like it spicy, you can add more paprika. Adjust the seasoning to your taste. This mix gives the chicken great flavor. Preheat your air fryer to 400°F (200°C). This takes about five minutes. While it heats, coat the chicken with olive oil. Rub it well to cover all sides. Then, sprinkle the seasoning mix all over the chicken. Place the thighs in a single layer in the basket. Avoid overcrowding for best results. Cook them for 25-30 minutes. Flip them halfway through cooking. Check the internal temperature. It should reach 165°F (74°C) for safety. The skin should be golden brown and crispy. To get that amazing crispy skin, start by drying your chicken thighs. Use paper towels to pat them dry. This step removes moisture, which helps the skin get crispy when cooked. Next, rub olive oil over each thigh. This adds flavor and helps the seasoning stick. For the best results, use a good air fryer. Preheat it to 400°F (200°C) for about 5 minutes before adding the chicken. This ensures even cooking and crispiness. Flipping your chicken thighs halfway through cooking is key. This helps them cook evenly on both sides. It also prevents one side from being soggy. Use tongs to carefully turn them when it’s time. This simple step makes a big difference. Make sure the chicken reaches an internal temperature of 165°F (74°C). This ensures it is cooked properly and safe to eat. After cooking, let the chicken rest for about 5 minutes. This step is important because it keeps the juices inside. Resting helps the meat stay juicy and tender. If you cut into it right away, the juices will spill out. Allowing it to rest makes every bite flavorful. This small wait is worth it for the perfect meal. {{image_2}} You can change the ranch seasoning to suit your taste. Try adding some heat with cayenne pepper or chili powder. For a smoky flavor, use smoked paprika instead of regular. You can also mix in some lemon zest for a fresh twist. If you want a different taste, try using Italian seasoning or taco seasoning as a base. These options add unique flavors and keep things fun in the kitchen. You don’t have to stick with thighs. You can use drumsticks or even chicken breasts. For drumsticks, keep the cooking time similar, about 25-30 minutes. If you choose chicken breasts, they may cook faster. Check them after 20 minutes to keep them juicy. Always ensure the internal temperature reaches 165°F for safety. To make a complete meal, serve your chicken with tasty sides. Roasted veggies like carrots and broccoli go great with the crispy chicken. You can also serve it with a fresh salad or some creamy mashed potatoes. For an easy side, try air-fried potatoes tossed in herbs. These pair well and create a balanced meal for you and your family. To store your air-fried chicken thighs, let them cool first. Place them in an airtight container. This keeps them fresh for up to four days. If you want to keep the flavor and texture, wrap each thigh in foil before placing them in the container. This extra step helps prevent moisture loss. When reheating chicken thighs, the best method is to use the air fryer again. Set it to 350°F (175°C) for about 10 minutes. This method keeps the chicken crispy. You can also use the oven at the same temperature. Avoid using a microwave, as it may make the chicken soggy. To freeze cooked chicken, let it cool completely first. Then, wrap each thigh tightly in plastic wrap. Place them in a freezer-safe bag or container. This method helps prevent freezer burn. For thawing, the best way is to leave the chicken in the fridge overnight. You can also use the microwave on the defrost setting if you're in a hurry. Yes, you can use boneless chicken thighs. They cook faster than bone-in thighs. Boneless thighs take about 20-25 minutes in the air fryer. This makes them a great option if you are short on time. However, they may not be as juicy as bone-in thighs. The bones add flavor and moisture during cooking. If you don't have ranch seasoning, you can make your own. Combine these ingredients: - 1 tablespoon dried dill - 1 tablespoon dried parsley - 1 teaspoon garlic powder - 1 teaspoon onion powder - 1/2 teaspoon salt - 1/4 teaspoon black pepper This mix will give you a similar ranch flavor. You can also use Italian seasoning for a different twist. To check if your chicken is done, use a meat thermometer. The internal temperature should reach 165°F (74°C). This ensures it is safe to eat. The skin should also look golden brown and crispy. If it isn’t, you may need to cook it a bit longer. Always let the chicken rest for a few minutes after cooking. This helps the juices stay in the meat. This blog post covered all you need for perfect air-fried chicken thighs. We discussed key ingredients and the importance of quality. You learned about seasoning options and how garnishes add flair. I shared tips to achieve crispiness, including flipping the chicken and resting time. We also explored variations and storage methods to keep your meal fresh. Use these steps and tips to make tasty chicken thighs that impress. Enjoy your cooking journey!
    Air Fryer Crispy Ranch Chicken Thighs Easy Recipe
  • - 1 cup orzo pasta - 2 cups fresh spinach, chopped - 1 cup mushrooms, sliced (button or cremini) - 1 small onion, finely chopped - 2 cloves garlic, minced - 1 cup vegetable broth - 1 cup heavy cream (or coconut cream for a dairy-free option) - 1 tablespoon olive oil - 1 teaspoon Italian seasoning - Salt and pepper to taste - Fresh parsley for garnish - Grated Parmesan cheese (optional, for topping) The key to this creamy spinach mushroom orzo is its balance of flavors and textures. You need orzo pasta, which is small and perfect for creamy dishes. Fresh spinach gives a nice color and nutrients. Mushrooms add a rich umami taste. Onions and garlic bring depth to the dish. Cream makes it luscious, while vegetable broth keeps it light. The Italian seasoning ties everything together. If you can't find fresh spinach, you can use frozen spinach. Just thaw and squeeze out extra water. For mushrooms, any kind works. Try portobello or shiitake for a different flavor. If you don’t have heavy cream, coconut cream is a great choice for a dairy-free option. You can also use plain yogurt, but it may change the taste a bit. Garnish your orzo with fresh parsley for a pop of color. Grated Parmesan cheese adds a salty, nutty flavor. You can also sprinkle red pepper flakes for a bit of heat. Toasted pine nuts or walnuts bring a nice crunch. Feel free to get creative with toppings to match your taste! Start by boiling salted water in a large pot. Add 1 cup of orzo pasta once the water is bubbling. Cook it according to the package instructions until it is al dente. This usually takes about 8 to 10 minutes. Once done, drain the orzo in a colander and set it aside. Next, heat 1 tablespoon of olive oil in a large skillet over medium heat. Add 1 small finely chopped onion and sauté it until it turns soft and clear, which takes about 3 to 4 minutes. Then, add 2 cloves of minced garlic and 1 cup of sliced mushrooms. Cook this mix for 5 to 6 minutes. The mushrooms should be soft and slightly browned. Now, toss in 2 cups of chopped fresh spinach. Stir and cook until the spinach wilts, around 2 minutes. Now, pour in 1 cup of vegetable broth and bring it to a gentle simmer. Let it cook for 5 minutes. After that, stir in 1 cup of heavy cream and 1 teaspoon of Italian seasoning. Lower the heat and let it simmer until the sauce thickens slightly, which takes about 5 more minutes. Finally, add the cooked orzo to the skillet. Mix well to coat everything in the creamy sauce. Adjust with salt and pepper to taste. To get the best creamy texture, use heavy cream. It adds richness. If you want a lighter option, try coconut cream. This makes it dairy-free. Make sure to simmer the sauce gently. This helps the flavors blend and the sauce thicken. Start with fresh ingredients. Fresh spinach and mushrooms pack more flavor. Sauté the onions first until they are soft. This builds a solid base. Always season your dish with salt and pepper. Taste as you go to make sure the flavors pop. Adding a touch of Italian seasoning gives it a nice herbal note. If your sauce is too thin, let it simmer a bit longer. This will help it thicken up. If it’s too thick, add a splash of broth or water. If your dish tastes bland, check the seasoning. A pinch of salt can make a big difference. If you overcook the orzo, it can get mushy. So, be sure to follow the cooking time on the package. {{image_2}} To make this dish vegan, swap heavy cream for coconut cream. It offers a rich flavor without dairy. Use vegetable broth to keep it plant-based. You can also add nutritional yeast for a cheesy taste. This option is creamy and still full of flavor. You'll love how simple it is to enjoy this dish without animal products. You can boost the protein by adding chicken or tofu. If you choose chicken, cook it first, then set it aside. Add it back when mixing in the orzo. For tofu, use extra-firm and cube it. Sauté it until golden before adding. Both options work well to make the dish heartier. They also add a nice texture that balances the creaminess. Feel free to mix in seasonal veggies for added color and nutrition. In spring, add asparagus or peas. Summer is great for zucchini or bell peppers. Autumn calls for pumpkin or squash, while winter suits root veggies like carrots and parsnips. Each season brings unique flavors that can brighten your orzo. This way, you can enjoy a fresh dish all year round! To store leftover creamy spinach mushroom orzo, let it cool to room temperature. Place it in an airtight container. This keeps it fresh and prevents odors. Store it in the fridge for up to three days. Label the container with the date for easy tracking. Reheating is simple. Take the orzo out of the fridge. You can use a microwave or a skillet. If using a microwave, heat in short bursts. Stir between each burst to heat evenly. If using a skillet, add a splash of broth or cream to keep it creamy. Heat over medium until warm. You can freeze creamy spinach mushroom orzo, but it may change texture. To freeze, let it cool completely. Then, pack it in freezer-safe bags or containers. Remove as much air as possible to avoid freezer burn. It should last for up to three months. When ready to eat, thaw overnight in the fridge. Reheat it gently, adding a splash of liquid to restore creaminess. Yes, you can use other pasta types. For example, penne or fusilli work well. Just cook them according to the package directions. Orzo cooks fast, so make sure to check the timing. You want your pasta to stay al dente. This way, it holds up well in the creamy sauce. To make this dish gluten-free, swap orzo for gluten-free pasta. Many brands offer gluten-free options. You can also use rice or quinoa as a base. Just ensure you adjust the cooking time. Always check the labels for hidden gluten in sauces or broth. You can replace cream with coconut cream for a dairy-free option. This gives a nice flavor. Another option is using cashew cream for a rich taste. Simply soak cashews and blend them with water until smooth. You can also use unsweetened almond milk for a lighter version. This blog post covered how to make creamy spinach mushroom orzo. We reviewed key ingredients, cooking steps, and tips for the best texture and flavor. I shared useful variations, storage options, and answers to common questions. With this knowledge, you can create a delicious dish easily. Embrace your creativity; make it your own. Enjoy each bite of your tasty orzo!
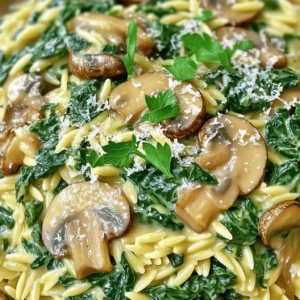
    Creamy Spinach Mushroom Orzo Delightful and Simple
  • Here’s what you need for stuffed zucchini boats. Gather these simple items to start: - 4 medium zucchini - 1 cup cooked quinoa - 1 cup cherry tomatoes, halved - 1/2 cup red bell pepper, diced - 1/4 cup black olives, chopped - 1/2 cup feta cheese, crumbled - 1 teaspoon dried oregano - 1 teaspoon garlic powder - 1/2 teaspoon salt - 1/4 teaspoon black pepper - 1/4 cup olive oil - Fresh parsley, for garnish Each ingredient adds its own flavor. The zucchini acts as a great base. Quinoa gives it a nice texture and fills you up. Cherry tomatoes bring a burst of sweetness. Red bell peppers add crunch. Black olives contribute a salty bite. Feta cheese adds creaminess and tang. Dried oregano and garlic powder give depth. Salt and black pepper enhance all the flavors. Olive oil adds richness and helps with cooking. Finally, fresh parsley makes it pretty and bright. Make sure you have everything ready before you start. This makes cooking easier and more fun! {{ingredient_image_1}} - Preheating the Oven Start by preheating your oven to 375°F (190°C). This step is key for even cooking. - How to Prepare Zucchini Take four medium zucchinis. Slice each in half lengthwise. Use a spoon to scoop out the seeds. Be gentle to avoid piercing the skin. This creates a sturdy boat for the filling. - Making the Stuffing Mixture In a large bowl, mix one cup of cooked quinoa, one cup of halved cherry tomatoes, and half a cup of diced red bell pepper. Add a quarter cup of chopped black olives and half a cup of crumbled feta cheese. Sprinkle in one teaspoon of dried oregano and one teaspoon of garlic powder. Season with half a teaspoon of salt and a quarter teaspoon of black pepper. Stir well to combine. Drizzle a quarter cup of olive oil over the mixture and toss gently. - Filling the Zucchini Take a spoon and fill each zucchini boat evenly. Pack the mixture slightly to ensure they are well-filled. This helps keep the stuffing in place during baking. - Arranging on Baking Sheet Line a baking sheet with parchment paper. Lay the stuffed zucchini boats on the sheet, cut side up. Make sure they are spaced apart for even cooking. - Recommended Baking Time Place the baking sheet in the oven. Bake the zucchini boats for 25-30 minutes. They are done when the zucchini is tender and the tops are golden brown. - Tips for Achieving Golden Topping To get a nice golden crust, you can broil the boats for a few minutes at the end. Keep an eye on them to avoid burning. - Ensuring Proper Zucchini Texture To keep zucchini firm, choose medium-sized ones. Too small can be watery, and too large can be tough. Slice them in half and scoop gently. This helps them hold their shape while cooking. - Best Practices for Even Cooking Make sure all your zucchini boats are the same size. This helps them cook evenly. Place them cut-side up on the baking sheet to ensure the filling heats well. Rotate the baking sheet halfway through baking for better results. - Garnishing Suggestions Fresh parsley adds a pop of color and flavor. Sprinkle it on just before serving. You can also add a drizzle of olive oil for shine and taste. - Serving Ideas for a Complete Meal Pair your stuffed zucchini boats with a light salad. A simple side of steamed veggies works well too. You can also serve with crusty bread for a hearty touch. - Health Benefits of Ingredients Zucchini is low in calories and high in water. Quinoa adds protein and fiber, making this dish filling. Feta cheese gives calcium and flavor, while olives offer healthy fats. - Caloric Information per Serving Each serving of stuffed zucchini boats has about 300 calories. This makes it a great option for a light meal without sacrificing taste. Pro Tips Choose Firm Zucchini: Select zucchini that are firm and have a glossy skin for the best texture and flavor. Customize Your Filling: Feel free to add additional vegetables or proteins like chickpeas or shredded chicken for extra nutrition. Use Fresh Herbs: Incorporate fresh herbs like basil or dill for an aromatic boost that complements the Mediterranean flavors. Check for Doneness: Ensure the zucchini is tender by testing with a fork, but avoid overcooking to keep them from becoming mushy. {{image_2}} Alternatives for Quinoa If you want a change from quinoa, try brown rice or farro. These grains add a nice texture and flavor. You can also use couscous for a quicker option. Each substitute will give you a different taste while keeping your dish hearty. Different Cheese Options Feta cheese adds a nice tang, but you can switch it up. Try mozzarella for a milder flavor. Goat cheese works well too, adding creaminess. For a dairy-free option, use vegan cheese or nutritional yeast for that cheesy taste. Adding Spices for Extra Kick To spice things up, add some red pepper flakes or cayenne. A pinch of smoked paprika can bring warmth and depth. Experiment with fresh herbs like basil or thyme for a bright flavor boost. Incorporating Proteins Want more protein? Add cooked chicken, turkey, or lentils to your filling. These options keep your meal filling and nutritious. For a vegetarian twist, chickpeas are a great choice, adding both protein and texture. Vegetarian & Vegan Modifications This recipe is already vegetarian. To make it vegan, simply replace feta with a vegan cheese. You can also skip the cheese entirely and add more veggies for a fresh taste. Gluten-Free Options This dish is naturally gluten-free if you use gluten-free grains. Quinoa is gluten-free, making it a perfect choice. Always check labels on processed products to ensure they fit your diet. After making stuffed zucchini boats, you may have some leftovers. Store them in an airtight container. Keep the container in the fridge. This way, you keep the flavors fresh. Leftovers will last up to three days. When it comes to reheating, I prefer the oven. It warms the boats evenly and keeps them nice. Set your oven to 350°F (175°C) and bake for about 10-15 minutes. If you use a microwave, heat them in short bursts. This helps avoid soggy zucchini. Freezing is a great option for longer storage. First, let the stuffed zucchini cool completely. Wrap each boat in plastic wrap or place them in a freezer bag. They can last up to three months in the freezer. When you want to enjoy them, thaw in the fridge overnight. Reheat in the oven to keep the texture. Can I use different vegetables? Yes, you can use other vegetables. Bell peppers, eggplants, or squash work well. Choose veggies that bake nicely. Mixing in spinach or kale adds great flavor and nutrition too. How do I know when the zucchini is done baking? The zucchini is done when it's tender and the tops are golden brown. You can test it with a fork; it should pierce easily. This usually takes about 25-30 minutes at 375°F. Can stuffed zucchini be made ahead of time? Yes, you can prepare the stuffed zucchini a day ahead. Just cover and store them in the fridge. When ready to bake, add a few extra minutes to the cooking time. What are some other filling ideas? You can fill zucchini with various ingredients. Try black beans for protein or corn for sweetness. Chopped mushrooms or shredded carrots add texture and flavor. Can I make this without cheese? Absolutely! You can leave out cheese and still have a tasty dish. Add more herbs or spices for flavor. You can also use nutritional yeast for a cheesy taste without dairy. What to do if zucchini boats are too watery? If your zucchini boats are watery, you can try a few tricks. Bake them longer to reduce moisture. You can also sprinkle salt on the zucchini before stuffing to draw out excess water. Is it necessary to scoop out the seeds? Yes, scooping out seeds helps create space for the filling. It also makes the zucchini cook evenly. Just be gentle to avoid breaking the skin. Stuffed zucchini boats are simple, tasty, and healthy. We explored the key ingredients, prep steps, and baking tips. Remember to adjust flavors with spices or swaps to suit your taste. Store leftovers well and enjoy them later. This dish is flexible, so have fun making it your own! Boost your meals with colorful veggies and great flavors. With these tips, you can make delicious zucchini boats every time. Take these ideas and start cooking today!
    Stuffed Zucchini Boats Flavorful and Simple Meal
  • To make a tasty butter chicken, gather these main items: - 2 lbs boneless chicken thighs, cut into bite-sized pieces - 1 onion, finely chopped - 3 cloves garlic, minced - 1 inch ginger, grated - 1 can (14 oz) coconut milk - 1 cup tomato puree - 3 tablespoons butter These ingredients form the base of our creamy dish. The chicken thighs add a rich flavor that pairs well with the spices. The coconut milk and tomato puree create a smooth and creamy sauce. Next, we need the right spices to make this dish pop. Here’s what you’ll need: - 2 tablespoons garam masala - 1 tablespoon ground cumin - 1 teaspoon turmeric powder - 1 teaspoon chili powder (adjust to taste) - Salt to taste These spices give the butter chicken its signature flavor. Garam masala adds warmth, while cumin and turmeric bring depth. Adjust the chili powder based on your spice preference. Now that you have all the ingredients, think about how to serve this dish. Here are some great ideas: - Fresh cilantro, for garnish - Cooked basmati rice or naan, for serving The cilantro adds a fresh touch. Pairing the butter chicken with basmati rice or naan makes it a complete meal. Enjoying it with naan allows you to scoop up the sauce. First, set your Instant Pot to sauté mode. Add three tablespoons of butter. Let it melt fully. Once the butter melts, add one finely chopped onion. Stir it for about five minutes. The onion should turn soft and see-through. Now, add three minced cloves of garlic and one inch of grated ginger. Cook this mix for one to two minutes. The aroma will fill your kitchen. Next, add two pounds of boneless chicken thighs, cut into bite-sized pieces. Sprinkle in two tablespoons of garam masala, one tablespoon of ground cumin, one teaspoon of turmeric powder, and one teaspoon of chili powder. Add salt to taste. Stir the chicken for about four to five minutes. It should brown slightly on all sides. Now, pour in one cup of tomato puree and one can of coconut milk. Stir well to coat the chicken evenly. Cancel the sauté mode. Seal the lid on the Instant Pot and set it to cook on high pressure for ten minutes. After cooking, let the pressure release naturally for five minutes. Then, carefully release any remaining pressure. Open the lid, and give the butter chicken a gentle stir. If you want a thicker sauce, use the sauté mode again. Simmer for a few minutes until it reaches your desired thickness. Finally, taste the dish and adjust the salt if needed. Serve hot, garnished with fresh cilantro, alongside cooked basmati rice or naan. Enjoy your meal! To get the best flavor in your Instant Pot butter chicken, start with fresh ingredients. Use ripe tomatoes and fresh garlic. The spices are key, too. Garam masala gives warmth and depth. Cumin adds earthiness. Don’t skip the butter; it enriches the sauce. Always taste as you cook. Adjust salt and spices to fit your taste. Adding a squeeze of lime can brighten the dish. If you want a thicker sauce, there are easy ways to achieve it. After cooking, switch to sauté mode. Let the sauce simmer for a few minutes. This will help it reduce and thicken. You can also add a bit of cornstarch mixed with water. Stir it in and let it cook for a few more minutes. This will give you a creamy texture. Cooking time can vary based on your chicken’s size. If you cut the chicken smaller, 10 minutes is perfect. For larger pieces, increase the time to 12-15 minutes. Always check the chicken for doneness. It should be tender and easy to shred. If it’s not fully cooked, seal the lid and cook for a few more minutes. Adjusting time helps you get the best results. {{image_2}} You can swap chicken with other meats. Try using turkey or shrimp. Both bring unique flavors. Turkey stays juicy and tender, while shrimp cooks fast. For a vegetarian option, use chickpeas or tofu. Both soak up flavors well, making them great substitutes. This recipe uses coconut milk for creaminess. If you want a dairy-free option, this is perfect. You can also use unsweetened almond milk or cashew cream. Both options keep the dish rich without dairy. Just ensure you add extra spices for depth. Spice level is key for flavor. The recipe calls for chili powder. You can adjust it to suit your taste. For a milder dish, reduce the chili powder. If you want more heat, add fresh green chilies or cayenne pepper. Always taste as you go to find your perfect balance. After enjoying your butter chicken, cool it down first. Place the leftovers in an airtight container. This helps keep it fresh. Store it in the fridge for up to three days. When ready to eat, check for any off smells. Trust your nose! If you want to save some for later, freezing works great. Portion the butter chicken into freezer-safe bags. Remove as much air as you can before sealing. You can freeze it for up to three months. Label each bag with the date. This way, you know when you made it. When you're ready to enjoy your frozen butter chicken, thaw it in the fridge overnight. Heat it gently on the stove or in the microwave. Stir it often to ensure even heating. If the sauce seems thick, add a splash of water or coconut milk. Enjoy it again with fresh rice or naan! Yes, you can use chicken breast. It cooks faster and is leaner. Make sure to cut it into bite-sized pieces. This will help it cook evenly. The flavor will be similar, but the texture may differ. Chicken thighs stay juicy, while breasts can dry out if overcooked. To make butter chicken without coconut milk, you can use heavy cream instead. This will still give you a rich and creamy sauce. You can also use plain yogurt for a tangy taste. Just be careful not to boil yogurt, as it can curdle. Butter chicken pairs well with basmati rice or naan. Rice soaks up the sauce nicely. Naan is great for dipping and adds a nice texture. You can also serve it with a side salad or roasted vegetables for a fresh touch. This article covered the key ingredients and steps for making butter chicken. I shared tips for great flavor and how to adjust for your tastes. You learned about storage options and found answers to common questions. Experiment with the variations to make it your own. Enjoy your cooking journey and savor this amazing dish!
    Instant Pot Butter Chicken Flavorful and Easy Recipe
  • - 1 pound shrimp, peeled and deveined - 2 tablespoons olive oil - 1 tablespoon chili powder - 1 teaspoon cumin - 1 teaspoon smoked paprika - 1/2 teaspoon cayenne pepper (adjust to taste) - Salt and pepper to taste - 8 small corn tortillas - 1 ripe avocado - 1/2 cup sour cream or Greek yogurt - 1 tablespoon lime juice - Salt to taste - Shredded cabbage - Fresh cilantro, chopped - Lime wedges The main ingredients for these spicy shrimp tacos bring bold flavor and freshness. The shrimp must be peeled and deveined to ensure a clean bite. I use olive oil to help the spices stick and enhance the shrimp's taste. A mix of chili powder, cumin, smoked paprika, and cayenne pepper gives the shrimp a kick. Adjust the cayenne for your heat preference. Salt and pepper balance the flavors. For the avocado crema, choose a ripe avocado for smoothness. Sour cream or Greek yogurt adds creaminess, while lime juice brightens the flavor. You can add salt to enhance the taste. Finally, toppings like shredded cabbage and chopped cilantro add crunch and freshness. Lime wedges are perfect for a zesty finish. This mix of ingredients makes these tacos a treat for any meal. - Ingredients needed for the crema: You need one ripe avocado, half a cup of sour cream or Greek yogurt, one tablespoon of lime juice, and salt to taste. - Blending and achieving the perfect texture: Cut the avocado and add it to a blender. Add the sour cream, lime juice, and salt. Blend until smooth and creamy. You want it to be thick but spreadable. If it seems too thick, add a little water to loosen it. Set this mix aside while you prep the shrimp. - Mixing the spices and oil for seasoning: In a bowl, put the peeled and deveined shrimp. Add two tablespoons of olive oil, one tablespoon of chili powder, one teaspoon of cumin, one teaspoon of smoked paprika, half a teaspoon of cayenne pepper, salt, and pepper. - Tips for coating shrimp evenly: Mix everything well. Use your hands or a spoon. Make sure every shrimp gets coated with the spices. This step is key for great flavor. - Best cooking methods for shrimp: Heat a large skillet over medium-high heat. This keeps the shrimp from steaming. - Cooking times and tips for perfect texture: Cook the shrimp for about two to three minutes on each side. They will turn pink and opaque when done. Don’t overcook them or they will become rubbery. Remove them from heat as soon as they are cooked. - Techniques for warming tortillas: Use a separate skillet over medium heat. Put the corn tortillas in for about thirty seconds on each side. - Importance of pliability and avoiding breakage: Warm tortillas become soft and easy to fold. If they are cold, they will break when you fill them. - Layering ingredients for optimal flavor: Take a warm tortilla and add a portion of shrimp. Top with shredded cabbage and a generous dollop of avocado crema. - Tips for presentation: Sprinkle chopped cilantro on top for color. Arrange the tacos neatly on a plate. Serve with lime wedges on the side for a fresh kick. - Ideas for pairing and garnishing: These tacos go well with a side of black beans or corn salad. - Serving temperature recommendations: Serve the tacos warm for the best taste. Enjoy them fresh to keep the flavors vibrant. - Adjust spice levels to taste. If you like heat, add more cayenne. - Try toppings like diced tomatoes, pickled onions, or jalapeños. They add extra zest. - Don’t overcook shrimp. Cook them just until they are pink and opaque. - Avoid making the crema too thick. It should be smooth and easy to spread. - Essential tools: a skillet for cooking shrimp and a blender for the crema. - Optional tools: a taco holder for serving and a food processor for quick blending. {{image_2}} You can switch shrimp for chicken or tofu. For chicken, use 1 pound of boneless thighs or breasts. Cook it for about 6-8 minutes until it's no longer pink. For tofu, press it first to remove water. Cut it into cubes and cook for 4-5 minutes until golden. This keeps your tacos tasty and fun. To make these tacos gluten-free, just use corn tortillas. They are naturally gluten-free and work great. For a vegan avocado crema, swap sour cream for a plant-based yogurt. Blend a ripe avocado with the yogurt and lime juice. It’s creamy and delicious without any dairy. Want to jazz up your tacos? Add fruits like mango or pineapple for sweetness. Diced mango adds a fresh burst. Pineapple gives a nice tang. You can also play with spices. Try adding fresh cilantro or lime zest for extra flavor. Mix it up and discover what you love! To keep your spicy shrimp tacos fresh, store them in a cool place. The best way is to use airtight containers. This helps keep the flavors intact. I recommend using glass or BPA-free plastic containers. Avoid stacking the tacos to keep them from getting soggy. If you want to freeze the tacos, separate the shrimp and tortillas. Wrap the shrimp tightly in plastic wrap or foil. Place them in a freezer bag. For tortillas, stack them and wrap them in foil. When ready to eat, thaw the shrimp in the fridge overnight. Reheat in a skillet over medium heat until hot. Warm the tortillas in a pan for a few seconds before filling. You can keep leftovers in the fridge for up to three days. If you see any signs of spoilage, like a strange smell or color, throw them out. Always trust your senses when it comes to food safety. To make your shrimp tacos spicier, simply add more cayenne pepper. You can also drizzle on hot sauce before serving. This gives you control over the heat level. Start with a little and taste as you go. Adjust until it’s just right for you. Yes, you can use frozen shrimp. Just make sure to thaw them first. Place them in the fridge overnight or run them under cold water. Frozen shrimp may have a slightly different texture but will still be tasty. Always check for any added ingredients in frozen shrimp. Several sides work great with shrimp tacos. Consider serving: - Mexican rice - Black beans - Corn salad - Chips with salsa - Margaritas or iced tea These choices balance the spice and enhance your meal. Enjoy mixing and matching! This blog post covered everything you need for tasty shrimp tacos. We explored key ingredients like fresh shrimp, spices, and creamy avocado sauce. I shared steps to prepare, cook, and assemble your tacos for the best flavor. Plus, I offered tips to enhance taste and avoid common mistakes. In closing, enjoy these tacos with your favorite toppings and sides. Remember, you can always adapt the recipe to your taste. Happy cooking!
    Spicy Shrimp Tacos with Avocado Crema Recipe Reveal
  • - 4 hard-boiled eggs, chopped - 1 ripe avocado, mashed - 2 tablespoons Greek yogurt - 1 tablespoon Dijon mustard - 1 tablespoon fresh lime juice - 1/4 cup red onion, finely chopped - 1/4 cup fresh cilantro, chopped - Salt and pepper to taste - 8 large lettuce leaves (such as Romaine or Butter Lettuce) - Optional: Sliced radishes and cherry tomatoes for garnish To make Avocado Egg Salad Lettuce Wraps, you need fresh and simple ingredients. Start with four hard-boiled eggs. Make sure they are well-cooked and cool. Next, grab one ripe avocado. The creaminess of the avocado makes this dish rich and tasty. You will also need Greek yogurt. This adds moisture and a nice tang. Dijon mustard adds depth and a bit of spice. Fresh lime juice brightens the flavors and keeps the avocado from browning. The red onion gives a crunchy bite, while fresh cilantro adds a fresh taste. Remember to season with salt and pepper to make it sing! For the wraps, choose large lettuce leaves. Romaine or butter lettuce works best. They hold the filling well and add a crisp texture. If you like, add sliced radishes and cherry tomatoes for garnish. They add color and extra crunch. This mix of ingredients creates a delightful meal that's fresh and satisfying. Boiling the eggs To start, fill a pot with water and add your eggs. Make sure the water covers the eggs completely. Turn the heat to high and bring the water to a boil. Once it boils, cover the pot and turn off the heat. Let the eggs sit for 12 minutes. Cooling and peeling After 12 minutes, move the eggs to an ice bath. This helps cool them quickly. Let them sit for a few minutes. Once cool, gently tap each egg on the counter. Roll it to crack the shell, then peel it off. Your eggs are now ready! Combining eggs and avocado In a mixing bowl, chop the hard-boiled eggs into small pieces. Then, add the ripe avocado that you have mashed. Use a fork to mix them together until smooth. Adding yogurt, mustard, and lime juice Next, stir in the Greek yogurt and Dijon mustard. This will make your salad creamy and tasty. Pour in the fresh lime juice too, and mix well until everything is combined. Folding in onion and cilantro Now, carefully fold in the finely chopped red onion and fresh cilantro. Add salt and pepper to taste. Make sure to mix gently to keep the eggs intact. Adjust the seasoning based on your liking. Spoon filling into lettuce leaves Take a large lettuce leaf, like Romaine or Butter Lettuce. Spoon a good amount of the avocado egg salad mixture into the leaf. Garnishing with veggies If you like, add sliced radishes and cherry tomatoes on top. They add color and crunch to your wrap. Roll or fold the lettuce leaf and enjoy your fresh meal right away! To make the best hard-boiled eggs, timing matters. Start by placing eggs in a pot. Cover them with water. Bring the water to a boil. Once boiling, cover the pot and remove it from heat. Let the eggs sit for 12 minutes. After that, cool them in an ice bath. This helps to stop the cooking. Once cooled, peel the eggs under running water for easier shell removal. You can change up your salad easily. If you want an alternative to Greek yogurt, try using sour cream or mayonnaise. Both add creaminess to the mix. For extra flavor, add spices like paprika or cumin. These spices give a nice kick. You can also fold in diced pickles or capers for a tangy twist. For the wraps, you need the right lettuce. Romaine and Butter Lettuce work great for this recipe. They are sturdy and hold the filling well. Other options include iceberg and green leaf lettuce. Each type offers a unique crunch and taste. Choose what you enjoy most for a fresh bite. {{image_2}} You can easily twist the avocado egg salad. Add sautéed vegetables for extra taste. Peppers, spinach, or even zucchini work well. Their warmth adds a nice touch. You can also boost protein with chicken or shrimp. These additions make the meal heartier and more filling. Changing the dressing can make a big difference. Try different mustards like whole grain or spicy brown. You can also add citrus juice like lemon or orange for zest. Spices like paprika or dill can elevate the flavor. A little pinch can go a long way. If you're vegan, swap the eggs with chickpeas or tofu. Mash them just like the avocado. For a lighter version, use less Greek yogurt or replace it with a low-fat option. This keeps the salad creamy without adding too many calories. To keep leftover egg salad fresh, use an airtight container. Place the egg salad in the container and seal it tightly. This helps to lock in moisture and flavor. Store it in the refrigerator right away. Avoid leaving it out at room temperature for long. Avocado egg salad lasts about 2 to 3 days in the fridge. After that, it may spoil or lose its taste. Always check for any off smells or changes in texture before eating. If you see browning on the avocado, it's best to discard it. You can freeze avocado egg salad, but the texture may change when thawed. To freeze, place the salad in a freezer-safe container and seal it well. When you are ready to eat, thaw it in the fridge overnight. Stir it well before serving, and be ready for a slight change in creaminess. To prevent browning, use fresh lime juice. The acidity slows oxidation. After mashing the avocado, mix it right away with the other ingredients. Store leftovers in an airtight container. You can add plastic wrap directly on the surface to limit air contact. Yes, you can prepare the salad ahead of time. Make the avocado egg salad and store it in the fridge. Keep it in an airtight container for up to two days. However, prepare the lettuce wraps just before serving. This keeps the lettuce crisp and fresh. Avocado egg salad wraps pair well with fresh fruit. Try serving them with sliced cucumbers or carrot sticks. A light soup, like gazpacho, complements the meal nicely. For drinks, fresh lemonade or iced tea works great too. - Nutritional information and considerations These wraps are healthy and filling. They provide protein from eggs and healthy fats from avocado. Each wrap is low in carbs and gluten-free. Enjoy these wraps as a light lunch or snack without guilt. This blog post shared a simple and tasty recipe for avocado egg salad lettuce wraps. You learned about making the wraps, mixing fresh ingredients like hard-boiled eggs, ripe avocado, and Greek yogurt. I also shared tips on customizing your salad and storing leftovers. Enjoy experimenting with different flavors while keeping your meals healthy. Healthy food can be fun and easy to make!
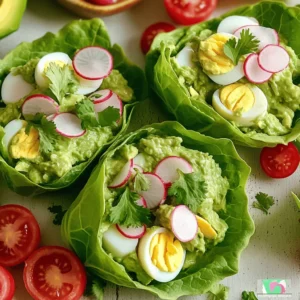
    Avocado Egg Salad Lettuce Wraps Tasty and Fresh Meal
  • To make Caprese Stuffed Chicken Breast, you need: - 4 boneless, skinless chicken breasts - 1 cup fresh mozzarella cheese, shredded - 1 cup cherry tomatoes, halved - 1/2 cup fresh basil leaves, chopped - 2 tablespoons balsamic glaze - 2 tablespoons olive oil - 3 cloves garlic, minced - Salt and pepper to taste - 1 teaspoon Italian seasoning - Toothpicks or kitchen twine for securing If you can't find fresh mozzarella, use shredded provolone or even goat cheese for a tangy twist. For cherry tomatoes, grape tomatoes work great too. You can swap fresh basil with spinach or arugula if you like. Balsamic glaze can be replaced with a simple balsamic vinegar if you prefer a lighter taste. Don't have Italian seasoning? Use oregano and thyme for similar flavor. Each serving of Caprese Stuffed Chicken Breast contains: - Calories: 380 - Protein: 40g - Fat: 20g - Carbohydrates: 8g - Fiber: 1g - Sodium: 450mg This dish is a great way to enjoy lean protein and fresh veggies while keeping it simple and tasty. Start with four boneless, skinless chicken breasts. Use a sharp knife to create a pocket in each breast. Slice it horizontally but do not cut all the way through. This pocket will hold the tasty stuffing. Make sure each pocket is deep enough to hold a good amount of filling. In a mixing bowl, combine the following ingredients: - 1 cup fresh mozzarella cheese, shredded - 1 cup cherry tomatoes, halved - 1/2 cup fresh basil leaves, chopped - 2 tablespoons balsamic glaze - 3 cloves garlic, minced - Salt and pepper to taste - 1 teaspoon Italian seasoning Mix these ingredients well. The flavors blend beautifully, creating a fresh and vibrant stuffing. In a large oven-safe skillet, heat 2 tablespoons of olive oil over medium-high heat. Once hot, add the stuffed chicken breasts. Sear them on both sides until golden brown, about 4 minutes per side. This step adds flavor and color. After searing, transfer the skillet to an oven preheated to 375°F (190°C). Bake the chicken for 20-25 minutes. Use a meat thermometer to check that the internal temperature reaches 165°F (75°C). Once done, carefully remove the chicken from the oven and take out the toothpicks or twine. Let the chicken rest for five minutes before slicing. Drizzle any leftover balsamic glaze over the top to enhance the dish's flavor. To make your Caprese stuffed chicken great, use fresh ingredients. Fresh mozzarella and ripe tomatoes bring out the best flavor. When you slice the chicken, be careful. Cut a pocket, but don’t cut all the way through. This helps keep the filling inside. Stuff each chicken breast well, but don’t overfill it. If you do, the mixture may spill out while cooking. Secure the openings with toothpicks or kitchen twine to keep the filling in place during cooking. Cooking at the right temperature is key. Preheat your oven to 375°F (190°C) before starting. Sear the chicken for about 4 minutes on each side. This gives it a nice brown color. Then, transfer the skillet to the oven. Bake for 20 to 25 minutes. The chicken should reach an internal temperature of 165°F (75°C) to be safe. Use a meat thermometer to check. This ensures you cook it just right, so it’s juicy and tender. To get that golden crust, start with a hot skillet. Heat the olive oil well before adding the chicken. This helps create a nice sear. Sear each side for about 4 minutes. Look for a brown color. If the chicken sticks to the pan, wait a minute before flipping. Patience is key here. After baking, let the chicken rest for 5 minutes. This helps seal in the juices, making every bite delicious. {{image_2}} You can swap the mozzarella for other cheeses. Try using provolone for a sharper taste. Goat cheese gives a creamy texture and tangy flavor. Feta cheese is crumbly and adds a unique twist. Each cheese brings its own charm to the dish. Change up the stuffing with different veggies. Spinach adds a fresh touch and is healthy. Artichoke hearts bring a nice, briny flavor. Roasted red peppers add a sweet and smoky note. Zucchini or mushrooms can also create a hearty filling. Looking for more heat? Add crushed red pepper flakes to the stuffing. A dash of cayenne can bring a nice kick. You can also mix in some pesto for a robust herbal flavor. Experimenting with spices makes each meal special and fun! Store your Caprese stuffed chicken in an airtight container. Let it cool completely first. Place it in the fridge for up to three days. Make sure you keep it sealed tight to preserve flavor and moisture. To reheat, preheat your oven to 350°F (175°C). Place the chicken in a baking dish. Cover it with foil to keep it moist. Heat for about 15-20 minutes until warmed through. You can also use a microwave if you're in a hurry. Heat on medium power for 2-3 minutes. Check the center to ensure it's hot. If you want to freeze the chicken, do it before cooking. Wrap each stuffed chicken breast in plastic wrap, then in foil. This helps prevent freezer burn. You can store it in the freezer for up to three months. When ready to cook, thaw it in the fridge overnight before baking. It takes about 50 minutes to cook Caprese stuffed chicken. This includes 15 minutes for prep and 35 minutes for cooking. You will need to sear the chicken for 4 minutes on each side. Then, bake it in the oven for 20 to 25 minutes. Ensure the chicken reaches an internal temperature of 165°F. This ensures it is safe to eat. Yes, you can make this recipe ahead of time. Prepare the chicken and stuff it, then cover it and store it in the fridge for up to 24 hours. When ready to cook, you can sear and bake it as normal. This saves time on busy days and lets flavors meld. Caprese stuffed chicken pairs well with many sides. Consider serving it over a bed of mixed greens. A light salad with vinaigrette also works nicely. Roasted vegetables or garlic bread make excellent choices too. For a refreshing touch, add sliced avocado or a tomato salad. This blog post covered how to make Caprese Stuffed Chicken. We looked at the ingredients needed and good substitutes. I shared the step-by-step cooking method to help you succeed. You learned tips for perfect stuffing and cooking. We also discussed fun variations to try. Lastly, I provided storage tips to keep your meal fresh. Now, you can impress with this delicious dish. Enjoy cooking, and make it your own!
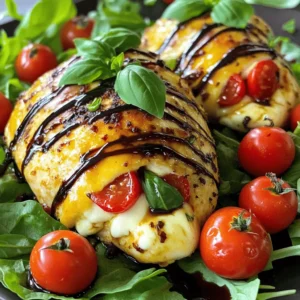
    Caprese Stuffed Chicken Breast Flavorful and Easy Recipe
  • To make coconut lime rice, you need: - 1 cup jasmine rice - 1 cup coconut milk - 1/2 cup water - Zest of 1 lime - Juice of 1 lime - 1 tablespoon brown sugar - 1/2 teaspoon salt - Fresh cilantro, chopped (for garnish) If you want to switch things up, consider these options: - Use basmati rice instead of jasmine for a different flavor. - Try coconut cream for a richer taste. - Substitute honey or maple syrup for brown sugar. - Lime zest can be replaced with lemon zest for a different citrus kick. Using high-quality ingredients makes a big difference. Here are my tips: - Choose fresh lime for the best zest and juice. - Use good brand coconut milk; it should be creamy and rich. - Always rinse your rice to remove excess starch; this helps with texture. - Look for organic jasmine rice for a cleaner taste. First, rinse the jasmine rice. Use cold water until it runs clear. This step removes extra starch. Clean rice helps make fluffier rice. Next, grab a medium saucepan. Add the rinsed rice, coconut milk, and water. Mix in lime zest, brown sugar, and salt. Stir everything until well blended. Heat the mixture over medium heat until it starts to boil. Once it boils, reduce the heat to low. Cover the saucepan and let it simmer for 15 minutes. The rice will soak up all the liquid. After 15 minutes, remove the pan from heat but keep it covered. Let it sit for 5 more minutes. This steaming step adds fluffiness. Now, uncover the saucepan and gently fluff the rice with a fork. Squeeze in the lime juice for a fresh taste. Serve the rice in a large bowl or in individual servings. Top with chopped cilantro for a pop of color and flavor. Enjoy your delicious coconut lime rice! To make sure your rice is fluffy, rinse the jasmine rice well. Do this until the water runs clear. This step removes extra starch. Extra starch can make rice sticky. Once rinsed, combine it with coconut milk and water. Cook it on low heat. After cooking, let it sit covered for five more minutes. This helps steam the rice and keep it fluffy. You can change the sweetness or tanginess to fit your taste. If you want it sweeter, add more brown sugar. Start with one more teaspoon and taste it. For more tang, add extra lime juice. Start with half a tablespoon. Mix well and taste again. Adjust slowly until you find the right balance. Coconut lime rice goes well with many dishes. Try it with grilled chicken or shrimp for a tasty meal. You can also serve it with stir-fried veggies. The creamy and tangy flavor enhances these dishes. For a light meal, pair it with a fresh salad. The bright flavors create a perfect match. Enjoy experimenting with different pairings! {{image_2}} This version is colorful and full of flavor. You can add vegetables like bell peppers, peas, or carrots. Start by sautéing the vegetables in a little oil before you add them to the rice. This step brings out their natural sweetness. Mix them in during the last five minutes of cooking. This way, they stay crisp and bright. Your dish will be both healthy and tasty! If you love heat, this version is for you. Add diced jalapeños or a pinch of cayenne pepper to the rice mixture. You can also stir in some chili flakes right before serving. This adds a nice kick that pairs well with the creamy coconut and zesty lime. Adjust the spice level based on your taste. This dish will wake up your taste buds! For a heartier meal, add protein. Grilled chicken, shrimp, or tofu work well. Cook the protein separately, seasoned with lime juice and salt. Stir it into the rice just before serving. This addition makes the dish filling and satisfying. You can even serve it with a side of fresh salsa for extra flavor. Enjoy a complete meal in one bowl! To keep leftover coconut lime rice fresh, let it cool first. Then, place it in an airtight container. This helps keep the moisture in and prevents it from drying out. Store it in the fridge for up to four days. Make sure to label the container with the date you made the rice. This way, you’ll know how long it has been stored. For reheating, you can use the stove or the microwave. If using the stove, add a splash of water or coconut milk to a pan. Heat it on low and stir until warm. If using the microwave, put the rice in a bowl. Add a little water, cover it, and heat it for one to two minutes. Stir halfway through to heat evenly. This keeps the rice moist and tasty. You can freeze coconut lime rice if you have extra. First, let it cool completely. Then, scoop the rice into freezer-safe bags or containers. Flatten the bags to save space. Label them with the date. It can last in the freezer for up to three months. When you’re ready to eat it, just thaw it overnight in the fridge. Reheat it as explained above for great flavor. The best rice for Coconut Lime Rice is jasmine rice. Jasmine rice has a lovely floral scent and a soft texture. It cooks up fluffy and pairs perfectly with the creamy coconut milk and zesty lime. You can also use basmati rice if you prefer a nuttier flavor. Just remember to rinse it well before cooking. Yes, you can use light coconut milk. It will still give your rice a nice coconut flavor but with fewer calories. The texture may be a bit less creamy, but it will still taste great. If you want a richer flavor, try mixing light coconut milk with a little regular coconut milk. To adjust the recipe for larger servings, simply double or triple the ingredients. If you use two cups of rice, use two cups of coconut milk and one cup of water. Keep the lime zest, juice, sugar, and salt in the same ratio. This way, the flavors will stay balanced. Yes, you can make this dish vegan. The ingredients are already plant-based. Just ensure your brown sugar is vegan, as some sugar is processed with bone char. With these minor checks, you can enjoy a delicious vegan Coconut Lime Rice! In this article, we explored how to make tasty Coconut Lime Rice. We covered key ingredients, cooking tips, and several fun variations. You learned how to keep your rice fluffy and how to store leftovers. Remember, this dish is easy to adjust for taste and can suit any meal. Try out new flavors and enjoy your cooking journey! With these simple steps, you can make delicious rice every time.
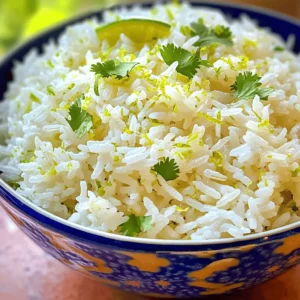
    Coconut Lime Rice Flavorful and Easy Recipe Guide
  • To make this creamy dish, you need just a few key items: - 1 cup orzo pasta - 3 cups vegetable broth - 3 tablespoons butter - 4 garlic cloves, minced - 1 cup heavy cream - 1 cup freshly grated Parmesan cheese - 1 teaspoon dried Italian herbs - Salt and pepper to taste - Fresh parsley, chopped (for garnish) These ingredients work together to create a rich and tasty meal. The orzo acts as the base, soaking up all the flavors. Garlic gives it a nice kick, while butter adds a lovely richness. Heavy cream and Parmesan make it wonderfully creamy. While the core ingredients shine, you can boost the flavor even more with: - A squeeze of lemon juice for brightness - Red pepper flakes for a bit of heat - Cooked vegetables like spinach or peas for added nutrition These extras can really elevate your dish. A touch of lemon can freshen up the creaminess. Red pepper flakes add a fun twist, and veggies make the meal more colorful. If you're out of something or want to switch it up, here are some easy swaps: - Substitute orzo with another small pasta, like ditalini or farro. - Use chicken broth instead of vegetable broth for a meaty flavor. - Swap heavy cream for half-and-half or a non-dairy option like coconut milk. These substitutions help you tailor the dish to your pantry. Don't hesitate to get creative! Each change adds a unique twist to the classic recipe. Start by melting three tablespoons of butter in a large pot. Keep the heat at medium. Once the butter melts, add four minced garlic cloves. Cook the garlic for one to two minutes. Watch it closely to avoid burning. The goal is to get it fragrant. Now, add one cup of orzo pasta. Stir it in and let it toast for one to two minutes. This adds a nice flavor to the orzo. Next, pour in three cups of vegetable broth. Bring this mixture to a boil. After it boils, lower the heat and let it simmer. Cover the pot and let the orzo cook for ten to twelve minutes. Stir it occasionally. The orzo should be al dente and most of the liquid should be absorbed. Once the orzo is cooked, lower the heat again. Add one cup of heavy cream and one cup of freshly grated Parmesan cheese. Stir this mixture well until the cheese melts. It should look creamy and delicious. Sprinkle one teaspoon of dried Italian herbs, along with salt and pepper to taste. Mix everything thoroughly. Remove the pot from heat and let it sit for a couple of minutes. This allows the orzo to thicken up. Finally, serve hot and garnish with freshly chopped parsley. Enjoy your creamy comfort meal! To get that dreamy creamy texture, use heavy cream. It blends well with the Parmesan cheese. Make sure to stir the mixture well after adding the cream and cheese. This helps mix everything evenly. Let it sit for a few minutes after cooking. This resting time helps it thicken just right. If the orzo seems too thick, add a splash more vegetable broth or cream. Adding a splash of lemon juice lifts the flavors. It gives a nice bright taste. Fresh herbs like basil or thyme can also add depth. You might try red pepper flakes for a kick. Don't forget to taste as you go. Adjust salt and pepper to your liking. This way, you make the dish truly yours. One common mistake is not stirring enough. Stirring helps the orzo cook evenly and prevents sticking. Avoid cooking the garlic too long. Burnt garlic can ruin the dish. Lastly, don’t skip letting it rest before serving. This step helps the orzo absorb the sauce. Remember, patience pays off in creamy comfort meals! {{image_2}} You can boost the nutrition of your orzo dish easily. Try adding vegetables like spinach, peas, or cherry tomatoes. Just stir them in when the orzo is almost done cooking. This adds color and taste. You can also use bell peppers or zucchini for more crunch. These veggies will cook quickly and blend well with the creamy sauce. Adding protein makes this meal even heartier. You can mix in cooked chicken, shrimp, or sausage. For a quick option, use rotisserie chicken. If you want to keep it light, try adding canned chickpeas or white beans. Mix in the protein just before serving to heat it through. This makes your dish filling and satisfying. To make a vegan version, swap out the butter and cream. Use olive oil instead of butter and coconut cream or a cashew cream for richness. Replace Parmesan cheese with a vegan cheese alternative or nutritional yeast. This will give you that cheesy flavor without dairy. Follow the same steps, and you’ll have a creamy, plant-based meal that everyone will enjoy. You can store your One-Pot Garlic Parmesan Orzo in the fridge for up to five days. Place the orzo in an airtight container. Make sure it cools down before sealing the lid. This keeps it fresh and tasty for your next meal. If you want to keep it longer, freeze the orzo. Use a freezer-safe container and fill it, leaving space for expansion. It’s best to freeze it within two days of cooking. To thaw, move it to the fridge overnight before reheating. When you’re ready to enjoy your orzo again, reheat it on the stove. Add a splash of vegetable broth or cream to help it regain its creamy texture. Heat over medium-low heat, stirring often. You can also use the microwave; just cover it and heat in short bursts, stirring in between. Yes, you can use other small pasta shapes like ditalini or small shells. The cooking time may change, so check the package for specifics. Make sure to adjust the liquid as needed. For best results, stick to pasta that cooks in about 10-12 minutes. To make this dish gluten-free, simply swap the orzo with a gluten-free pasta. Many brands offer gluten-free orzo or similar shapes. Always check the labels to ensure they meet your dietary needs. The cooking time might vary, so keep an eye on it. This orzo pairs well with grilled chicken or roasted vegetables. A fresh salad with a light vinaigrette also complements the dish nicely. You might enjoy it with crusty bread for a comforting meal. For a fun twist, try serving it with shrimp or scallops. This blog post explored how to make One-Pot Garlic Parmesan Orzo. We discussed essential and optional ingredients, including substitutions. I provided step-by-step instructions to cook orzo with garlic and broth, ensuring creamy results. Helpful tips showed how to enhance flavors and avoid mistakes. We also covered variations with veggies, proteins, and a vegan option. Lastly, we shared best storage practices for leftovers. Enjoy this dish's simplicity and taste, and feel free to experiment with your favorite flavors. You’ll love how easy and satisfying it is!
    One-Pot Garlic Parmesan Orzo Creamy Comfort Meal

Posts pagination

← Newer 1 2 3 4 5 6 … 66 Older →

Footer

↑ back to top

More information

  • Drinks
  • Appetizer
  • Dinner
  • Desserts
  • About
  • Contact
  • Privacy Policy

Our Policies

  • Privacy Policy
  • GDPR Policy
  • Terms Of Use
  • Copyright Policy
  • Cookie Policy
  • Disclaimer

Copyright © 2025 cheftaling