- Egg Muffins with Veggies Healthy and Tasty Breakfast
- Lime Cilantro Rice Fresh and Flavorful Side Dish
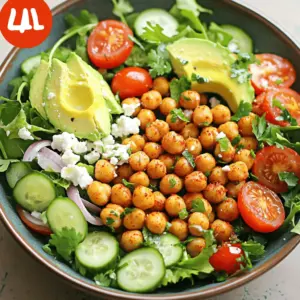
- Crispy Chickpea Salad Fresh and Flavorful Delight
- Sweet and Spicy Meatball Subs Tasty Quick Recipe
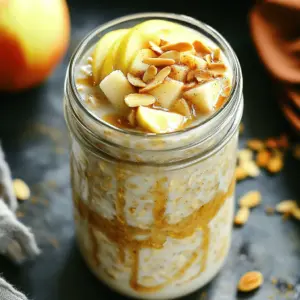
- Apple Cinnamon Overnight Oats Easy and Healthy Recipe
- Cinnamon Roll Overnight Oats Easy and Delicious Recipe
- Chocolate Chip Pancakes Fluffy and Simple Delight
- Lemon Herb Grilled Salmon Fresh and Flavorful Meal
- Maple Glazed Carrots Savory Side Dish Recipe
- Cinnamon Sugar Churros Irresistible Treat Recipe
- Mocha Chip Protein Bars Tasty and Healthy Snack Option
- Garlic Parmesan Roasted Potatoes Crispy and Flavorful
- Pesto Caprese Pasta Salad Flavorful and Fresh Dish
- Irresistible Teriyaki Chicken Skewers Easy Recipe
- Strawberry Banana Smoothie Bowl Flavorful and Fresh Recipe
- Creamy Avocado Pasta Delightful and Easy Recipe
- No-Bake Chocolate Oatmeal Cookies Easy and Delicious
- Savory Honey Mustard Chicken Thighs Simple Recipe
- Buffalo Cauliflower Bites Crunchy and Flavorful Snack
- Creamy Garlic Mashed Potatoes Flavorful Comfort Food
- Crispy Garlic Parmesan Wings Flavorful and Easy Recipe
- Classic Beef Stroganoff Savory Comfort Food Recipe
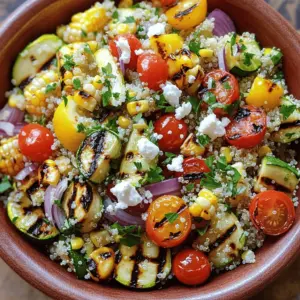
- Grilled Vegetable and Quinoa Salad Deliciously Fresh
- Instant Pot Creamy Mushroom Risotto Easy Comfort Dish
- Savory Teriyaki Chicken Bowls with Rice Recipe
- Honey Mustard Glazed Carrots Tasty and Simple Recipe
- Strawberry Shortcake Trifle Delicious and Simple Treat
- Garlic Parmesan Roasted Brussels Sprouts Flavor Boost
- Spinach Artichoke Dip Bites Irresistible Flavor Treat
- Quick and Easy Vegetable Stir Fry Flavorful and Healthy
- Coconut Lime Shrimp Tasty and Quick Weeknight Meal
- Irresistible Cinnamon Roll Casserole Morning Delight
- Sheet Pan Lemon Garlic Herb Chicken Flavorful Delight
- Quick One-Pot Butter Chicken with Rice Delightful Meal
- Easy No-Bake Tiramisu Delicious Dessert Recipe
- Mango Sorbet Delightful and Refreshing Summer Treat
- Fried Banana With Brown Sugar Irresistible Delight
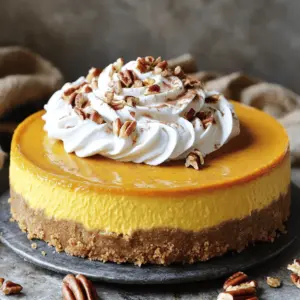
- Best Pumpkin Cheesecake Recipe Simple and Delicious Treat
- Easy Banoffee Pie with Caramel and Cream Delight
- Red Velvet Cake Delightful and Easy To Make
- Irresistible Apple Pie Simple Homemade Recipe Guide
- Best French Toast Muffin Cups Delightfully Easy Recipe


![For the best Garlic Parmesan Roasted Potatoes, gathering the right ingredients is key. Here’s what you need: - 2 pounds baby potatoes (halved or quartered if large) - 4 tablespoons olive oil - 4 cloves garlic, minced - 1 teaspoon dried thyme - 1 teaspoon dried rosemary - Salt and pepper to taste - ½ cup grated Parmesan cheese - 2 tablespoons fresh parsley, chopped (for garnish) These simple ingredients come together to create a dish that is crispy and flavorful. Baby potatoes work well because they cook evenly and have a nice texture. Olive oil adds richness and helps the potatoes crisp up nicely. Garlic brings a strong, savory flavor that pairs perfectly with the cheese. The dried thyme and rosemary add an herbal note, while salt and pepper enhance all the flavors. Parmesan cheese gives that salty, nutty kick that takes these potatoes to the next level. Finally, fresh parsley adds a pop of color and freshness when you serve them. For the full recipe, check out the complete details to make your cooking journey even smoother. - Preheat the oven to 425°F (220°C). - In a large bowl, combine the halved potatoes, olive oil, minced garlic, dried thyme, dried rosemary, salt, and pepper. Toss everything together until the potatoes are well coated in the mixture. - Line a baking sheet with parchment paper for easy cleanup. Spread the seasoned potatoes out in a single layer on the baking sheet, cut side down for maximum crispiness. - Roast the potatoes in the preheated oven for about 25 minutes. After 25 minutes, remove the baking sheet from the oven and sprinkle the grated Parmesan cheese evenly over the potatoes. Return the potatoes to the oven and roast for an additional 10-15 minutes, or until they are golden brown and crispy. - Once done, take the potatoes out and let them cool for a few minutes. Garnish with freshly chopped parsley before serving to add a pop of color. You can find the full recipe above for more details. To get your Garlic Parmesan Roasted Potatoes nice and crispy, place the cut side down. This helps them brown better. Make sure to spread them out in a single layer. I suggest placing your baking sheet in the middle of the oven. This ensures even heat all around. You can boost the flavor by adding herbs and spices. Try using fresh rosemary or oregano for a fragrant kick. You can also mix in some paprika for a little heat. For cheese, Parmesan is great, but you can also use Pecorino Romano. Its sharp taste adds a new twist. For serving, I love to place the potatoes on a large platter. It makes them look inviting. You can garnish with fresh parsley for a pop of color. These potatoes pair well with grilled chicken or a fresh salad. They make any meal feel special. If you want to explore more, check the Full Recipe for additional tips! {{image_2}} You can change the taste of Garlic Parmesan Roasted Potatoes by using different herbs. Try adding oregano or basil for a fresh twist. If you want heat, sprinkle in red pepper flakes or cayenne pepper. These spices give the dish a nice kick. If you don’t have Parmesan, you can use Pecorino Romano. It has a similar flavor and works well. For a vegan option, try nutritional yeast. It adds a cheesy taste without dairy. Vegan cheese can also be a good choice. Just make sure it melts well. You can roast other root vegetables with your potatoes. Carrots, sweet potatoes, and beets taste great together. Mixing seasonal produce can add color and flavor. Try using squash or Brussels sprouts for a unique dish. The more variety, the better the meal! For the full recipe, click [Full Recipe]. Store your Garlic Parmesan Roasted Potatoes in an airtight container. This keeps them fresh longer. Make sure they cool completely before sealing. When stored this way, they can last up to four days. Reheat them in the oven for the best taste. Yes, you can freeze Garlic Parmesan Roasted Potatoes. Let them cool completely before freezing. Use a freezer-safe bag or container for storage. To reheat, bake from frozen at 400°F (200°C) for about 20-25 minutes. This keeps them crispy and warm. Garlic Parmesan Roasted Potatoes last about four days in the fridge. Keep them in an airtight container. If you notice any moisture, they may spoil faster. Always check for any off smells or signs of spoilage before eating. Yes, you can use different potatoes. I love using Yukon Gold or red potatoes. They add unique flavors and textures. Just keep the size similar for even cooking. If you choose larger potatoes, cut them into smaller pieces. To make Garlic Parmesan Roasted Potatoes vegan, simply skip the Parmesan cheese. You can use nutritional yeast instead for a cheesy flavor. Another option is to add vegan cheese. It melts well and tastes great! These potatoes pair well with many dishes. Serve them with grilled chicken, steak, or fish. They also work great alongside roasted vegetables or a fresh salad. For a complete meal, add your favorite protein. Yes, you can make these potatoes in advance. Prep them and keep them in the fridge for up to 24 hours. Just roast them right before serving for maximum crispiness. If you have leftovers, store them in the fridge and reheat in the oven. For the full recipe, check out the detailed instructions above. Garlic Parmesan Roasted Potatoes are simple and tasty. We discussed ingredients, steps, and tips to make them perfect. Remember to preheat your oven and use the right herbs. You can change flavors and add different cheeses too. These potatoes are great as a side dish or snack. Store leftovers wisely to keep them fresh. Enjoy cooking and experimenting with this easy recipe!](https://cheftaling.com/wp-content/uploads/2025/04/9c3f4a32-acc8-4049-a157-7e5c1e52d5f3-300x300.webp)
![For this Pesto Caprese Pasta Salad, you will need: - 2 cups fusilli pasta (or any pasta of your choice) - 1 cup cherry tomatoes, halved - 1 cup fresh mozzarella balls (bocconcini), halved - 1 cup fresh basil leaves, chopped - 1 cup homemade or store-bought basil pesto - 1 tablespoon olive oil - Salt and pepper to taste - 1/4 cup pine nuts, toasted (for crunch) - Optional: Balsamic glaze for drizzling These ingredients come together to create a fresh and flavorful dish. The pasta serves as the base, while the tomatoes and mozzarella add creaminess and sweetness. If you have special dietary needs, you can still enjoy this salad. Here are some alternatives: - Gluten-free pasta: Use gluten-free fusilli or another type of gluten-free pasta. - Vegan option: Swap mozzarella for vegan cheese or avocado. - Nut-free: Omit the pine nuts or use sunflower seeds for crunch. - Low-carb: Substitute pasta with spiralized zucchini or cauliflower rice. These swaps keep the dish tasty while meeting your needs. To make this salad, you will need some key kitchen tools: - Mixing bowls: For combining all the ingredients. - Large pot: To cook the pasta. - Colander: For draining the pasta after cooking. - Utensils: Use a spatula or spoon for mixing and serving. Having the right equipment will make your cooking experience smooth and fun. Start with a big pot of water. Add a good amount of salt to it. Bring this water to a boil. Once it’s bubbling, add your fusilli pasta. Cook it until it is just firm, or "al dente." This usually takes about 8 to 10 minutes. Drain the pasta in a colander and rinse it under cold water. This helps stop the cooking. It also cools the pasta down for your salad. In a large mixing bowl, add the cooled pasta. Now, toss in the halved cherry tomatoes and mozzarella balls. Don’t forget the fresh basil leaves; they add a lot of flavor. In a small bowl, mix your basil pesto with olive oil. This makes the pesto easier to pour. Pour this mixture over your pasta and other ingredients. Gently mix everything together. Make sure every piece gets coated in that delicious pesto. Texture is key for a great pasta salad. Always cook your pasta to al dente. This keeps it firm and prevents it from becoming mushy. When you mix in the tomatoes and mozzarella, do it gently. You want them to stay whole. Adding toasted pine nuts gives a nice crunch. If you want more flavor, drizzle balsamic glaze on top before serving. Let the salad chill in the fridge for at least 30 minutes. This helps all the flavors blend perfectly. For the full recipe, check out the detailed steps above! To make great pesto, start with fresh basil. Use clean leaves and avoid brown spots. Add garlic for a nice kick. Use high-quality olive oil for rich flavor. Blend everything until smooth but leave some texture. Toast your pine nuts lightly to enhance their taste. Remember, you can adjust the salt to your liking. If you want a creamier pesto, add a little Parmesan cheese. To keep pasta firm, cook it al dente. This means it should be slightly firm when bitten. Rinse the pasta in cold water right after cooking. This stops the cooking process and cools it down. Don't forget to toss the pasta with a little olive oil. This helps prevent sticking and keeps each piece separate. For a beautiful dish, serve your salad in a large bowl. Layer the pasta, tomatoes, and mozzarella for a colorful look. Garnish with fresh basil leaves on top. Sprinkle some toasted pine nuts for crunch and texture. Drizzle balsamic glaze around the bowl for a gourmet touch. This makes your dish not just tasty but also eye-catching. For more detailed steps, refer to the Full Recipe. {{image_2}} You can make this dish your own. Try adding grilled chicken or shrimp for protein. You can also use different cheeses like feta or goat cheese. These will bring a new flavor. For a spicy kick, add red pepper flakes. Another fun twist is to mix in some arugula. It adds a peppery taste that works well with the pesto. Use seasonal ingredients to keep things fresh. In summer, you can add fresh corn or zucchini. In fall, consider roasted butternut squash or Brussels sprouts. For winter, try using kale or spinach. These swaps give the salad a new vibe each season. You can also switch up the tomatoes. Use heirloom or grape tomatoes for a flavor boost. Making this salad vegan is easy. Just skip the mozzarella and use a vegan cheese alternative. You can also add avocado for creaminess. For a gluten-free option, choose gluten-free pasta. There are many great options available now. Make sure to check the labels for any hidden gluten. These simple changes keep everyone happy at the table. For the full recipe, visit [Full Recipe]. To keep your Pesto Caprese Pasta Salad fresh, store it in an airtight container. This helps maintain the flavors and prevent the salad from drying out. Place a piece of plastic wrap directly on the salad before sealing the container to keep it even fresher. Avoid adding balsamic glaze until you're ready to serve, as it can make the salad soggy. When stored properly, this salad stays good for up to three days in the fridge. After that, the ingredients may lose their crispness and flavor. Always check for any signs of spoilage, like odd smells or discoloration, before enjoying leftovers. Freezing is not the best option for this salad. The texture of pasta, tomatoes, and mozzarella may change when thawed. If you do want to freeze it, consider freezing the pasta and pesto separately. You can cook fresh ingredients later when you're ready to enjoy the salad. For best results, eat it fresh! For the full recipe, check out the complete details. Yes, you can use store-bought pesto. It saves time and still tastes great. Many brands offer tasty options. Just check the label for quality. If you love homemade, make some for extra flavor. You can use any pasta you like. Fusilli works well, but penne or rotini are great too. Try whole wheat or gluten-free options if you prefer. Just cook pasta until al dente for the best texture. Chilling the salad is a good idea. It helps the flavors blend well. I recommend chilling for at least 30 minutes. You can serve it cold or at room temperature. Adding balsamic glaze right before serving gives it a nice touch. Enjoy your Pesto Caprese Pasta Salad! For the full recipe, check out the recipe section. This blog post shared how to make Pesto Caprese Pasta Salad. You learned about the best ingredients and the tools needed. I gave tips on cooking pasta and making homemade pesto. I also covered storage methods and answered common questions. Try different twists with seasonal ingredients for fun. Experiment with vegan or gluten-free options too. You can impress friends and family with this dish. Enjoy your cooking adventure and make this salad your own!](https://cheftaling.com/wp-content/uploads/2025/04/82f1f4d2-f116-496a-bb8f-d047fbc77c69-300x300.webp)


![To make this creamy avocado pasta, you need these key items: - 12 ounces spaghetti or your choice of pasta - 2 ripe avocados, pitted and peeled - 2 tablespoons olive oil - 2 cloves garlic, minced - 1/4 cup fresh basil leaves - Juice of 1 lemon - Salt and pepper to taste These ingredients create a rich and creamy sauce that clings to the pasta well. You can add these items to enhance flavor and presentation: - 1/4 cup grated Parmesan cheese - Cherry tomatoes, halved (for garnish) - Extra basil leaves for garnish The Parmesan cheese adds a salty kick. Cherry tomatoes bring color and freshness to the dish. Avocado is packed with healthy fats, making it great for your heart. It has fiber, which helps with digestion. Plus, it contains vitamins like K, E, and C. These nutrients help boost your immune system. Eating avocado may also lower bad cholesterol. So, not only does it taste good, but it’s good for you! For the full recipe, check out the [Full Recipe]. Start by boiling a large pot of salted water. Once the water is bubbling, add 12 ounces of spaghetti or your favorite pasta. Cook it according to the package instructions until it is al dente. This usually takes about 8 to 10 minutes. Remember to stir the pasta occasionally to prevent it from sticking. When it’s done, save about 1 cup of the pasta water. Drain the rest and set the pasta aside. While the pasta cooks, you can make the avocado sauce. Take 2 ripe avocados, pit them, and peel off the skin. Put the avocados in a food processor or blender. Add 2 tablespoons of olive oil, 2 cloves of minced garlic, and 1/4 cup of fresh basil leaves. Squeeze in the juice of 1 lemon and sprinkle in some salt and pepper. Blend everything until it turns smooth and creamy. If your sauce is thick, add a bit of the reserved pasta water until it is just right. Once the pasta is cooked and drained, return it to the pot over low heat. Pour in the creamy avocado sauce and gently toss everything together. Make sure the pasta gets well-coated with the sauce. If you want an even creamier dish, feel free to add more reserved pasta water. If you like, stir in 1/4 cup of grated Parmesan cheese for extra flavor. Remove it from heat and serve right away. Top each plate with halved cherry tomatoes and some extra basil leaves for a lovely touch. Enjoy this delightful dish! For the complete recipe, refer to the [Full Recipe]. To get your avocado pasta creamy, use ripe avocados. They should feel soft but not mushy. When you blend the sauce, add a bit of olive oil. This helps make the sauce smooth. If it feels too thick, just add some reserved pasta water. This small step makes a big difference. Mix until it reaches the texture you love. You can boost the flavor of your creamy avocado pasta easily. Try adding lemon zest along with the lemon juice. This gives a fresh taste. Fresh herbs like parsley or cilantro also work great. If you want more kick, add red pepper flakes. They add warmth without overpowering the dish. Don't forget to sprinkle some salt and pepper to bring all the flavors together. One common mistake is using unripe avocados. They will not blend well and can taste bitter. Another mistake is overcooking the pasta. It should be al dente, with a little bite to it. Also, wait to mix the sauce with the pasta until just before serving. This keeps it fresh and prevents it from getting too thick. Follow these tips, and you will enjoy a perfect creamy avocado pasta every time! {{image_2}} You can easily make this dish vegan. Simply skip the Parmesan cheese. Use nutritional yeast instead. It adds a cheesy flavor without dairy. You can also add a splash of almond milk to keep it creamy. If you need gluten-free options, try pasta made from rice or chickpeas. Quinoa pasta works well too. These alternatives hold the creamy avocado sauce nicely. Cooking time may vary, so check the package for details. Feel free to get creative with your pasta! Add fresh spinach for extra nutrients. You can also toss in some cooked peas or broccoli. For a bit of heat, add red pepper flakes. If you want protein, try grilled chicken or chickpeas. Each add-in can change the dish's flavor and texture. For the full recipe, check out the Full Recipe section. To keep your creamy avocado pasta fresh, store it in an airtight container. Place the pasta in the fridge within two hours of cooking. This keeps it safe to eat later. The creamy sauce may darken due to the avocado. To slow this down, add a bit of lemon juice before storing. Use the pasta within three days for the best taste and texture. When you're ready to enjoy the pasta again, reheat it gently. You can use the microwave or a pan on the stove. If using the microwave, heat it in short bursts. Check every 30 seconds to avoid overheating. If using a pan, add a splash of water or olive oil. This helps the sauce stay creamy. Stir constantly until warm. If you want to prep ahead, cook the pasta and sauce separately. Store them in separate containers in the fridge. This way, the pasta won’t soak up the sauce and become mushy. You can combine them right before serving. This keeps your meal fresh and tasty. For added ease, you can chop extra veggies or herbs for quick garnishes later. For the full recipe, check the Full Recipe section above. You can make creamy avocado pasta using a bowl and a fork. Just mash the ripe avocados in a bowl. Use the fork to mix in the olive oil, minced garlic, chopped basil, lemon juice, salt, and pepper. Keep mashing until smooth. This method takes more time, but it works well! Yes, you can add protein to creamy avocado pasta. Grilled chicken, shrimp, or tofu are great choices. Cook your protein separately, then mix it in with the pasta and sauce. This addition makes your meal more filling and adds extra flavor. If you need a substitute for Parmesan cheese, try nutritional yeast. It gives a cheesy flavor and is vegan-friendly. You can also use pecorino Romano or a dairy-free cheese if you prefer. These options keep the dish tasty and enjoyable without compromising on flavor. In this blog post, we explored making creamy avocado pasta. We discussed key ingredients, including optional choices and the benefits of avocado. I shared step-by-step cooking instructions for pasta and sauce, plus tips for a smooth finish. We also covered variations like vegan options and gluten-free pasta. Finally, I explained how to store leftovers and reheating tips. Remember, small changes can make a big taste difference. Enjoy making this dish your own!](https://cheftaling.com/wp-content/uploads/2025/04/ec7d5060-7963-4a18-835a-2de36b1214a8-300x300.webp)
![- 1 cup quick oats - 1/2 cup natural peanut butter - 1/2 cup honey or maple syrup - 1/3 cup unsweetened cocoa powder - 1/4 cup unsweetened shredded coconut (optional) - 1/2 teaspoon vanilla extract - 1/4 teaspoon salt - 1/4 cup dark chocolate chips (optional) You need these simple ingredients to make no-bake chocolate oatmeal cookies. Each one plays a key role in the taste and texture. I love using quick oats because they blend well and give a nice chew. Natural peanut butter adds richness while honey or maple syrup gives sweetness. Unsweetened cocoa powder provides that chocolatey kick. If you enjoy a bit of texture, toss in shredded coconut. Vanilla extract adds a warm note, and salt balances the flavor. Dark chocolate chips can take these cookies over the top. - Alternative nut butters: Try almond or cashew butter for a twist. - Sweetener options: Agave syrup or brown sugar can work well instead of honey. - Cocoa powder variations: Dark cocoa gives a richer flavor if you want more depth. If you don’t have all the ingredients, don’t worry! You can easily swap them. Use any nut butter you like. Explore different sweeteners based on what you have. Cocoa powder can vary in intensity, so choose what suits your taste. - Organic vs conventional products: Organic options may taste better and are often healthier. - Importance of fresh ingredients: Always check dates on your items. Fresh products enhance flavor and texture. Choosing the right ingredients can elevate your cookies. Freshness matters, especially for things like oats and peanut butter. Organic ingredients can also improve your dish. I often notice a big difference when I use high-quality ingredients in my recipes. 1. Start by combining the wet ingredients in a medium saucepan. Set the heat to low. 2. Add the peanut butter, honey (or maple syrup), cocoa powder, and salt to the pan. Stir until smooth, about 2-3 minutes. 3. Remove the pan from the heat. Stir in the vanilla extract. 4. In a large bowl, mix the quick oats and shredded coconut (if you are using it). 5. Pour the warm chocolate mixture over the oats and coconut. Mix well until everything is combined. 6. If you want, fold in the dark chocolate chips gently. 1. Line a baking sheet with parchment paper. 2. Use a cookie scoop for even portions, or use a spoon. Drop spoonfuls onto the tray. 3. Flatten each scoop slightly to form cookie shapes. 1. Place the tray in the refrigerator. Let the cookies set for about 30 minutes. 2. After they set, enjoy your cookies! Store leftovers in an airtight container in the fridge. They stay fresh for up to a week. For the full recipe, check out the ingredients and details above. To make your no-bake chocolate oatmeal cookies just right, adjust the sweetness to match your taste. You can use honey, maple syrup, or even a mix. Start with less and add more if you like it sweeter. The right consistency is key too. If the mixture feels too dry, add a touch more peanut butter or syrup. This helps bind the oats and cocoa well. One common mistake is overheating the mixture. Keep the heat low and stir gently. This prevents burning and keeps the flavors smooth. Another mistake is not mixing well enough. Ensure all ingredients blend fully. If you see dry oats, keep stirring until everything is combined. You can boost nutrition by adding nuts or seeds. Try walnuts, almonds, or chia seeds for crunch and health benefits. Using dark chocolate also helps. It gives a rich taste and has antioxidants. Plus, it makes the cookies feel more gourmet. Want to try this? Follow the Full Recipe for all the details! {{image_2}} You can change the taste of your cookies easily. Try mint chocolate no-bake cookies. Just add a few drops of mint extract to your chocolate mix. This gives a fresh, cool flavor that pairs well with chocolate. Another fun idea is adding spices like cinnamon. A pinch of cinnamon can bring warmth and depth. You will enjoy how these flavors mix with the chocolate and oats. If you follow a vegan diet, you can make some easy changes. Use maple syrup instead of honey for sweetness. Also, check your peanut butter to ensure it is vegan-friendly. For gluten-free options, select certified gluten-free oats. These small swaps let everyone enjoy the cookies without worry. Get creative with your cookies by adding fun ingredients. Dried fruits like raisins or cranberries add a chewy texture. You can also toss in seeds, like chia or flaxseeds, for an extra crunch. If you love chocolate, try using different types. White chocolate chips or milk chocolate can change the taste. Explore the [Full Recipe] to see how to make these delicious no-bake cookies. To keep your no-bake chocolate oatmeal cookies fresh, store them in an airtight container. This prevents air from drying them out. You can use a glass jar or a plastic container with a tight lid. For best results, refrigerate the cookies. This keeps them firm and tasty. You can also freeze them if you want to save them for later. Just make sure to wrap each cookie in plastic wrap before placing them in a freezer bag. In the fridge, these cookies last about one week. They may stay good for longer, but their taste may fade. In the freezer, they can last up to three months. Watch for signs of spoilage. If the cookies feel dry or crumbly, it’s time to toss them. Also, if you see any mold, do not eat them. If you have leftover cookies, get creative! You can blend them into smoothies for a tasty boost. Just add a cookie to your blender for extra flavor. Another fun way to use them is by crumbling them over yogurt or ice cream. This adds a nice crunch and rich flavor to your dessert. For the full recipe, refer to the earlier section. Enjoy your delicious no-bake treats! To make your cookies thicker, you can add more oats. Start with an extra 1/4 cup of quick oats. This gives them more structure. You can also reduce the liquid slightly. If the mixture feels too runny, add more cocoa powder. Yes, you can use rolled oats. However, they may need more time to soften. Quick oats absorb moisture faster, so your cookies may be less chewy. If using rolled oats, consider letting the mixture sit a bit longer before scooping. If you lack peanut butter, try almond or cashew butter. You can also use sun butter for a nut-free option. The flavor will change slightly, but they will still taste great. Just make sure to use a similar amount. You can tell they are set if they feel firm to the touch. After chilling, they should not be sticky. You can also gently lift one cookie. If it holds its shape, they are ready to enjoy! For the full recipe, check above. You learned how to make tasty no-bake chocolate oatmeal cookies using simple ingredients. We discussed options for ingredient swaps and ways to pick quality items. You also saw step-by-step instructions for preparation, shaping, and storage. Lastly, we talked about tips for perfect texture and exciting variations. I hope you'll try these cookies and enjoy making them your way. The process is fun and the result is delicious! Get creative with flavors and share these treats with friends.](https://cheftaling.com/wp-content/uploads/2025/04/1e1b6a7b-cde7-460b-b1d0-d4cc98793dcb-300x300.webp)

![- 1 medium head of cauliflower, cut into bite-sized florets - 1 cup all-purpose flour (or gluten-free flour for a GF option) - 1 cup almond milk (or any plant-based milk) - 1 teaspoon garlic powder - 1 teaspoon onion powder - 1 teaspoon smoked paprika - Salt and pepper to taste - 1 cup buffalo sauce - 2 tablespoons unsalted butter or vegan butter, melted - Optional garnishes: Chopped green onions and celery sticks The first ingredient is a medium head of cauliflower. Make sure to cut it into small, bite-sized pieces. This size helps them cook evenly and get super crispy. Next, you need all-purpose flour. You can swap it for gluten-free flour if needed. This flour helps the batter stick to the cauliflower. For the liquid part, I use almond milk. You can also pick any plant-based milk you like. Then, add some flavor with garlic powder, onion powder, and smoked paprika. These spices give the bites a rich, savory taste. Don’t forget salt and pepper to make everything pop! Now, let's talk about the buffalo sauce. It’s the star of the show! This sauce gives the bites their famous spicy kick. Mix it with melted butter or vegan butter for a creamy finish. Finally, you can add chopped green onions and celery sticks for garnish. These add freshness and crunch when you serve the bites. For the full recipe, check out the detailed steps to make these delicious Buffalo Cauliflower Bites. - Preheat the oven to 450°F (232°C). - Line a baking sheet with parchment paper. - In a bowl, whisk together: - 1 cup all-purpose flour (or gluten-free flour) - 1 teaspoon garlic powder - 1 teaspoon onion powder - 1 teaspoon smoked paprika - Salt and pepper to taste - Gradually add 1 cup of almond milk, stirring until smooth. - Dip cauliflower florets in the batter. Let excess batter drip off. - Arrange coated florets on the prepared baking sheet in a single layer. - Bake for 20-25 minutes until golden brown and crispy. - While the cauliflower bakes, mix 1 cup of buffalo sauce with 2 tablespoons of melted butter in a bowl. - Toss baked cauliflower in the buffalo sauce mixture until well coated. - Return the coated bites to the baking sheet. - Bake for an additional 10-15 minutes until bubbly and crispy. - Remove from oven and let cool a bit. - Garnish with chopped green onions. Serve warm with celery sticks and dipping sauce. You can find the complete instructions in the Full Recipe. To make your Buffalo Cauliflower Bites super crispy, always bake them in a single layer. This way, each piece gets even heat and air. If they are too close together, they will steam instead of crisp. The type of flour you use matters. All-purpose flour gives a nice crunch, but gluten-free flour works well, too. Soak the cauliflower in the batter for a few minutes. This helps the coating stick better and adds to the crunch. Adding spices can really boost the taste of your bites. Try using cayenne pepper for heat or smoked paprika for depth. Marinades can add a fun twist. You can soak the cauliflower in hot sauce or a mix of garlic and lemon juice for a zesty kick. Different hot sauce brands have unique flavors. Experiment with buffalo sauce made from different peppers. This can change the heat level and taste of your dish. For a gluten-free option, use chickpea flour instead of all-purpose flour. It gives a nice taste and is packed with protein. If you want a lower-calorie buffalo sauce, mix hot sauce with Greek yogurt. This adds creaminess without all the calories. You can also use less butter to reduce fat while keeping flavor. These tips will help you create the best Buffalo Cauliflower Bites, full of crunch and flavor. For the full recipe, check the detailed instructions above! {{image_2}} You can spice up your Buffalo Cauliflower Bites in many ways. Try using different spice mixes. Barbecue seasoning adds a sweet twist. Teriyaki sauce gives a nice Asian flair. Even a simple lemon pepper can make a big difference. If you want vegan options, swap out the butter for vegan butter. You can also use a plant-based milk for the batter. This way, you keep the dish cruelty-free but still full of flavor. When it comes to cooking, you have choices. Air frying is a fantastic way to achieve that crunchy texture. It cooks faster and cuts down on oil. Just toss your bites in the air fryer for 15 minutes at 400°F (200°C). Oven baking is the classic method. It takes a bit longer but still gives great results. If you love smoky flavors, try grilling your cauliflower bites. Grilling adds depth and a unique taste that you won’t forget. Pair your Buffalo Cauliflower Bites with a variety of dips. Ranch dressing is a favorite, but blue cheese also works well. For a healthier option, try a yogurt-based dip. Celery sticks are classic sides that add a nice crunch. If you love to meal prep, these bites are perfect. You can make a big batch ahead of time. Just store them in the fridge. They reheat well and make for a quick snack or party treat. For the full recipe, check out the details above! To keep your Buffalo Cauliflower Bites fresh, store them in an airtight container. Place parchment paper between layers to prevent sticking. Refrigerate them for up to three days. If you want to keep them longer, freeze them. Place the bites in a freezer-safe bag or container. They can last up to three months in the freezer. When reheating, the oven works best. Preheat the oven to 350°F (175°C). Place the bites on a baking sheet. Bake for about 10-15 minutes until hot and crispy. If you use the microwave, they may become soft. For the best results, heat them in small batches. You can prepare the cauliflower ahead of time. Cut and batter the florets, then store them in the fridge for up to 24 hours. To freeze, place the battered cauliflower on a baking sheet. Freeze them for about an hour, then transfer to a bag. This way, you can pull out just what you need for quick snacks. To keep your cauliflower bites crispy, follow these tips: - Bake at high heat: Use 450°F (232°C) to ensure crispness. - Single layer: Spread the cauliflower evenly on the baking sheet. - Don’t overcrowd: Give each floret space to breathe. - Check doneness: Bake until golden brown and crispy. Adjusting time helps too. If they aren't crispy, bake a bit longer. Yes, you can prepare these bites ahead. Here’s how: - Store in the fridge: After baking, let them cool. Place them in an airtight container. - Refrigerate for up to 3 days: This keeps them fresh and ready to eat. - Freeze for longer storage: Wrap them tightly in plastic wrap, then in foil. - Reheat before serving: Use the oven to maintain crispiness. Buffalo Cauliflower Bites pair well with many dips and sides: - Ranch or blue cheese dressing: These dips complement the spicy flavor. - Celery sticks: They add a crunchy, fresh bite. - Carrot sticks: These offer a sweet crunch. - Salads: A light green salad balances the heat. The options are endless, so get creative! Yes, Buffalo Cauliflower Bites are a healthy snack choice. Here’s why: - Low in calories: Cauliflower is a low-calorie veggie. - Rich in vitamins: It provides vitamins C and K. - High in fiber: This helps with digestion. Using almond milk and gluten-free flour adds nutritional value. Enjoy this guilt-free treat! For the full recipe, check out the [Full Recipe]. Buffalo Cauliflower Bites are simple, tasty, and fun to make. We covered the key ingredients, steps for cooking, and ways to store leftovers. You can enjoy these bites hot and crispy or prepare them ahead for later. Experiment with flavors and cooking methods to find your favorite version. These bites are a great addition to any meal or snack. With some easy tips, you can enjoy a healthy treat that everyone will love. So, go ahead and dive into this delicious recipe!](https://cheftaling.com/wp-content/uploads/2025/04/58c3a00d-dbb6-4165-98e5-40c1ea12f8f7-300x300.webp)
![- 2 pounds russet potatoes - 4 cloves garlic - ½ cup unsalted butter - 1 cup heavy cream - ½ cup sour cream - Salt and pepper - 1 tablespoon fresh chives (for garnish) - 1 teaspoon paprika (for a smoky flavor) To make creamy garlic mashed potatoes, you need simple yet key ingredients. The russet potatoes are perfect. They have a fluffy texture that mashes well. Garlic adds a rich, savory flavor that elevates the dish. Unsalted butter gives the potatoes a smooth, buttery taste. Heavy cream and sour cream create a luxurious creaminess. Feel free to adjust the flavor with salt and pepper. Add fresh chives for a pop of color and taste. Paprika gives a smoky twist, if you like. Each ingredient adds a layer of flavor, making each bite delicious. For the full recipe, check out the details on how to prepare this comforting dish! Boiling the Potatoes Start by peeling and dicing 2 pounds of russet potatoes. Place them in a large pot. Cover the potatoes with cold water. Add a pinch of salt to enhance flavor. Bring the pot to a boil over high heat. Cook the potatoes for about 15 to 20 minutes. They are done when a fork easily goes in. Draining and Steaming the Potatoes Once the potatoes are fork-tender, drain them in a colander. Return the drained potatoes to the pot. Let them sit for a minute. This helps steam off extra moisture. Sautéing Instructions In a small saucepan, melt ¼ cup of unsalted butter over medium heat. Add 4 cloves of minced garlic to the pan. Sauté until fragrant, usually about 1 to 2 minutes. Be careful to keep an eye on the garlic. Tips for Avoiding Burnt Garlic To prevent burnt garlic, do not cook it too long. Stir it often and remove it from heat right when it smells good. Burnt garlic can ruin the flavor of your dish. How to Achieve the Perfect Creamy Consistency Take a potato masher or ricer to mash the potatoes. Mash until they are smooth and creamy. Avoid over-mashing, as this can make them gummy. Mixing in Additional Ingredients Add the sautéed garlic, the remaining butter, 1 cup of heavy cream, and ½ cup of sour cream to the mashed potatoes. Stir everything together well. Make sure all the ingredients mix fully. Taste and add salt and pepper as needed. If you want, sprinkle in 1 teaspoon of paprika for a smoky touch. For the complete recipe, check out the [Full Recipe]. To get the creamiest garlic mashed potatoes, use the right tools. A potato ricer gives a smooth texture. If you don’t have one, a regular potato masher works too. Just be sure to mash gently to avoid lumps. Heating dairy ingredients is key. Warm butter and cream mix better with potatoes. Cold dairy can make the potatoes dense. So, warm your butter on low heat and warm the cream before mixing. This little step makes a big difference. Seasoning is very important. Start with salt while boiling the potatoes. This helps flavor them from the inside out. After mashing, taste and adjust with more salt and pepper. You can also sprinkle in some paprika for a smoky touch. Choosing the right potatoes matters too. Russet potatoes are perfect for mashing. They are starchy and fluffy. Yukon Gold potatoes are also a great choice. They add a buttery flavor and creamy texture. Creamy garlic mashed potatoes go well with many dishes. They pair nicely with roasted chicken or grilled steak. You can also serve them with a rich mushroom gravy for added flavor. For garnishing, fresh chives are my favorite. They add a nice pop of color and light onion flavor. You can also sprinkle some paprika on top for a pretty touch. Want to impress? Try adding crispy bacon bits or sautéed mushrooms as a topping. For the full recipe, check out the section above! {{image_2}} When making creamy garlic mashed potatoes, the type of potato matters. I often use russet potatoes. They are starchy and mash well. Yukon Gold potatoes are another great choice. They have a buttery flavor and creamy texture. You can even switch to sweet potatoes for a unique twist. Sweet potatoes add a nice sweetness that pairs well with garlic. To enhance the taste, try adding cheese. Cream cheese or cheddar makes the dish richer. You can also mix in different herbs and spices. Fresh thyme or rosemary works well with garlic. A pinch of nutmeg can add warmth. Don’t be afraid to get creative with flavors. For those who want vegan options, replace butter with olive oil. Use coconut cream instead of heavy cream. This keeps the dish rich without dairy. If you need a gluten-free dish, you’re in luck! This recipe is naturally gluten-free. Just ensure all ingredients meet your dietary needs. For the full recipe, check out the details above! To keep your creamy garlic mashed potatoes fresh, store them properly. Here are some tips: - Refrigeration Tips: Allow your mashed potatoes to cool slightly. Transfer them to an airtight container. They will last for 3-5 days in the fridge. When ready to eat, check for any off smells or changes in texture. - Freezing Instructions: For longer storage, freeze your mashed potatoes. Place them in a freezer-safe container or bag. Label it with the date. They will stay good for up to 2 months. When you’re ready to use them, thaw them in the fridge overnight. When reheating mashed potatoes, you have a few options. Each method offers different benefits: - Microwaving vs. Stovetop: The microwave is quick but may dry them out. The stovetop is slower but helps keep the creaminess. If using the microwave, heat in short bursts and stir often. For stovetop, add a splash of heavy cream and heat gently. - Tips for Preserving Creaminess When Reheating: To keep them creamy, add a little butter or cream while reheating. Stir well to mix. This will help restore their smooth texture. Enjoy your creamy garlic mashed potatoes even after storage! For the full recipe, check out the details above. The best types of potatoes for mashed potatoes are russet and Yukon Gold. - Russet Potatoes: - High starch content. - Fluffy and light texture. - Absorb butter and cream well. - Yukon Gold Potatoes: - Medium starch content. - Creamy and buttery texture. - Naturally yellow color adds appeal. Both types yield great results. Choose russet for fluffiness and Yukon Gold for creaminess. You can make your mashed potatoes fluffier with a few easy techniques. - Use a Potato Ricer: - This tool creates a light and airy texture. - Avoids lumps better than a masher. - Heat Your Dairy: - Warm your butter and cream before mixing. - This helps potatoes stay fluffy. - Do Not Overmix: - Mix just until combined. - Overmixing can make them gummy. These tips will ensure your mashed potatoes are soft and light. Yes, you can prepare mashed potatoes ahead of time. - Make-Ahead Tips: - Prepare and mash the potatoes. - Store them in an airtight container in the fridge. - Serving Fresh: - Reheat on the stove with a splash of cream. - Stir gently to keep the texture creamy. Doing this makes mealtime easier without losing flavor. If your mashed potatoes are gummy, don't worry! You can fix them. - Add Liquid: - Stir in warm milk or cream. - This can help restore some creaminess. - Re-Mash: - Use a ricer or a mixer for a lighter texture. - This helps break up the gummy parts. - Avoid Overcooking: - Be careful not to overcook the potatoes. - This can cause a gummy texture. These steps will help you enjoy smooth and creamy mashed potatoes again. Creamy garlic mashed potatoes are a delicious side dish. We covered the main ingredients like russet potatoes and garlic. I shared steps to prep, cook, and mash for perfect texture. Tips for extra flavor and variations make it fun to try new things. Don't forget storage methods and reheating tips for later. Experiment with flavors and make this dish your own. Enjoy creating creamy mashed potatoes that everyone will love!](https://cheftaling.com/wp-content/uploads/2025/04/befce8db-10be-42f0-91c7-4924dd77cbd0-300x300.webp)