- Cheesy Spinach Artichoke Dip Creamy and Flavorful Treat
- Savory Oatmeal with Fried Egg Flavorful Breakfast Delight
- One-Pan Lemon Garlic Chicken and Asparagus Delight
- Homemade Salsa Verde Fresh and Flavorful Recipe
- Chocolate Avocado Mousse Rich and Creamy Delight
- Savory Shrimp Scampi Pasta Bake Easy and Satisfying
- Oven Fried Feta Rolls with Chili Honey Delight
- Delicious Apple Pie Dip with Cinnamon Chips Recipe
- Ground Beef and Potatoes Delightful Casserole Recipe
- Creamy Tuscan Scallops Delightful Dinner Recipe
- Lemon Cake to Die For Irresistible Flavor Awaits
- Homemade Spanish Rice Flavorful and Easy Recipe
- S'mores Dip Simple and Delicious Dessert Idea
- Peanut Butter Bliss Balls Simple and Tasty Treats
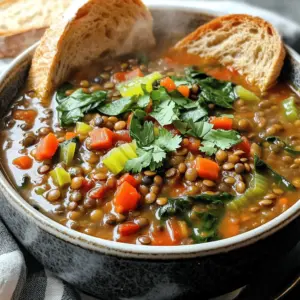
- Spicy Lentil Soup Flavorful and Satisfying Recipe
- Garlic Herb Grilled Shrimp Flavorful and Easy Recipe
- Cranberry Orange Muffins Simple and Tasty Recipe
- Zesty Lemon Bars Refreshing and Simple Delight
- Matcha Green Tea Muffins Delightful and Healthy Treat
- Teriyaki Salmon Bowls Flavorful and Healthy Meal Prep
- Mediterranean Couscous Salad Fresh and Flavorful Dish
- Peach Salsa Fresh and Flavorful Summer Delight
- Sweet Potato Hash Flavorful and Nutritious Meal
- Raspberry Lemon Bars Bright and Zesty Delight
- Buffalo Cauliflower Tacos Flavorful and Simple Recipe
- Crispy Baked Chickpeas Tasty Snack for Everyone
- Cheesy Taco Pasta Bake Easy and Flavorful Meal
- Skillet Creamed Spinach Flavorful and Easy Recipe
- Sweet and Spicy Chicken Wings Tasty Recipe Guide
- Chocolate Peanut Butter Energy Bites Simple Recipe
- Garlic Parmesan Roasted Potatoes Tasty Side Dish
- Blueberry Oatmeal Bake Energizing Breakfast Recipe
- Veggie Loaded Quiche Tasty and Simple Recipe
- Honey Garlic Roasted Carrots Flavorful Side Dish
- Caprese Stuffed Avocados Simple and Tasty Delight
- Strawberry Banana Smoothie Bowl Healthy and Delicious
- Spicy Chickpea Tacos Tasty and Simple Recipe
- Creamy Cilantro Lime Dressing Quick and Flavorful Treat
- 30-Minute Garlic Parmesan Chicken Pasta Bake Delight
- Garlic Parmesan Roasted Cauliflower Simple Side Dish
- Mediterranean Quinoa Bowls Flavorful and Nutritious Meal
- Zesty Lemon Garlic Shrimp Pasta Fresh and Easy Dish


![To make savory oatmeal with a fried egg, you will need simple, fresh ingredients. Here’s what you need: - 1 cup rolled oats - 2 cups vegetable broth - 1 cup fresh spinach, roughly chopped - 1/2 avocado, sliced - 1/4 cup grated Parmesan cheese (optional) - 2 large eggs - 1 teaspoon olive oil - 1 tablespoon soy sauce or tamari - 1/2 teaspoon garlic powder - Salt and pepper to taste - Red pepper flakes, for garnish (optional) These ingredients come together to create a hearty breakfast. Each element adds flavor and nutrition. The rolled oats provide a warm base, while the spinach gives a fresh touch. Avocado offers creaminess, and the fried egg adds protein. You can find the full recipe at the end of this section. Remember that you can adjust the toppings and seasonings. Experiment with your favorites to make this dish your own. Enjoy the process of cooking and the delight of eating. 1. First, bring the vegetable broth to a boil in a medium saucepan. 2. Next, add the rolled oats, garlic powder, and a pinch of salt. 3. Reduce the heat to low and simmer for about 5 minutes. Stir often until the oats are creamy. 1. While the oats cook, heat olive oil in a non-stick skillet over medium heat. 2. Crack the eggs into the skillet. Fry them to your liking, whether sunny side up or over easy. 3. Season the eggs with salt and pepper, then set them aside. 1. Once the oats are creamy, stir in the fresh spinach until it wilts. 2. Mix in the soy sauce or tamari to add flavor. 3. Divide the oatmeal into bowls and top each with a fried egg. 4. You can add sliced avocado and grated Parmesan cheese if you like. 5. For a spicy kick, sprinkle some red pepper flakes on top. This savory oatmeal with fried egg makes a tasty breakfast you can enjoy any day. For the full recipe, check out the earlier section. To make your savory oatmeal just right, pay close attention to the cooking time. If you want creamy oats, simmer them longer. A good rule is to start with five minutes. If you like them thicker, cook a bit longer. You can also play with the liquid. Try using less broth for a denser texture or more for a soupier dish. To boost the taste, add herbs or spices. Fresh thyme adds a nice touch. Smoked paprika gives a warm, rich flavor. You can also try using different broth. Chicken or beef broth can change the profile. Adding bouillon cubes can also deepen the taste. Each option brings a unique twist. Frying eggs can be fun. You might want to try sunny side up or over easy. Sunny side up keeps the yolk runny, while over easy gives a firmer yolk. To avoid sticking, use a good non-stick skillet. Heat the oil well before adding the eggs. This helps them slide right out. You can find the full recipe of savory oatmeal with fried egg to try these tips! {{image_2}} You can change up your savory oatmeal by adding different toppings. One tasty swap is sautéed mushrooms instead of avocado. The mushrooms add a rich, earthy flavor that pairs well with the oats. You can also add diced tomatoes or olives for a burst of freshness. Both options bring their own unique taste and keep your breakfast exciting. If you're looking for a vegan option, replace the fried egg with a tofu scramble. This keeps the meal hearty while making it plant-based. For those with gluten issues, just use certified gluten-free oats. This way, everyone can enjoy this delicious dish without worry. To elevate the taste, think about adding different cheeses. Feta or gouda can bring a creamy richness to your bowl. If you like heat, try adding hot sauce or salsa. These simple changes can transform your savory oatmeal into a gourmet breakfast. You can find the full recipe above to get started! After you enjoy your savory oatmeal, store leftovers in airtight containers. This keeps them fresh. Refrigerate them right away. It’s best to eat leftovers within 2-3 days. This helps maintain their flavor and texture. To reheat, you can use a microwave or stovetop. For the microwave, place the oatmeal in a bowl and cover it. Heat in short bursts, stirring in between. If using the stovetop, add a splash of broth or water. Heat over low heat, stirring until warm. This restores some creaminess to your oatmeal. Can you freeze savory oatmeal? Yes, you can freeze it! However, the texture might change. To freeze, let the oatmeal cool and place it in freezer-safe containers. When ready to eat, thaw it in the fridge overnight. Reheat it carefully, adding a little liquid if needed. Enjoy your meal with those rich flavors! Yes, you can prepare savory oatmeal ahead of time. Cook the oatmeal and store it in the fridge. Use an airtight container to keep it fresh. It stays good for about 2-3 days. When you want to eat it, simply reheat it on the stove or in the microwave. You may need to add a splash of broth or water to get the right texture again. If you want to skip the eggs, there are great alternatives. You can use tofu, chickpeas, or even a dollop of yogurt. Silken tofu works well as a creamy topping. Cooked chickpeas can add a nice texture. You can also try a vegan egg substitute found in stores. These options keep your dish tasty and filling. Boost the nutrition of your savory oatmeal easily. Add more greens like kale or arugula. You can also throw in seeds, like chia or flaxseeds, for fiber and omega-3s. Nuts, like walnuts or almonds, add crunch and healthy fats. For extra flavor, mix in herbs like basil or cilantro. These small changes make a big difference in taste and health. For the full recipe, check out the [Full Recipe]. This blog post explored a tasty savory oatmeal recipe. We discussed the key ingredients, detailed cooking steps, and offered tips to enhance flavor and texture. You learned about variations, storage, and common questions. Incorporating savory oatmeal into your meals can be both fun and healthy. Experiment with toppings and adjust flavors to fit your taste. Enjoy creating your perfect bowl!](https://cheftaling.com/wp-content/uploads/2025/05/604e32e7-1a65-4173-94e8-df5c9164b9f9-300x300.webp)


![- 12 oz uncooked pasta (fusilli or penne) - 1 lb shrimp, peeled and deveined - 4 tablespoons unsalted butter - 4 cloves garlic, minced - 1/2 teaspoon red pepper flakes (adjust to taste) - 1 cup chicken or vegetable broth - 1 cup heavy cream - 1 cup shredded mozzarella cheese - 1/2 cup grated Parmesan cheese - 1 lemon, zested and juiced - 1/4 cup fresh parsley, chopped - Salt and pepper to taste Gather these ingredients before you start. Each item plays a key role in making this dish rich and flavorful. It’s important to use fresh shrimp to get the best taste. The garlic adds aroma, while the red pepper flakes give it a nice kick. The heavy cream and cheeses make the sauce creamy and indulgent. Don’t forget the lemon zest and juice; they brighten up the flavors. Fresh parsley adds a lovely touch at the end. If you want to check out the full recipe, just follow the link. This dish is simple yet satisfying, perfect for any night! - Cook pasta until al dente. - Drain and set aside. To prepare the pasta, start by boiling a large pot of salted water. Once the water is bubbling, add 12 oz of uncooked pasta, like fusilli or penne. Follow the package instructions for cooking time, usually around 8-10 minutes. The key is to stop cooking just before it gets too soft. Drain the pasta in a colander and let it sit while you move on to the next steps. - Sauté garlic and red pepper flakes. - Add shrimp and season. In a large skillet, melt 4 tablespoons of unsalted butter over medium heat. Add 4 minced garlic cloves and 1/2 teaspoon of red pepper flakes. Stir this mix for about one minute until the garlic smells amazing. Next, add 1 lb of peeled and deveined shrimp to the skillet. Cook the shrimp for about 3-4 minutes until they turn pink and opaque. Season with salt and pepper to taste. - Combine broth and cream. - Incorporate cheeses and lemon. Pour in 1 cup of chicken or vegetable broth and 1 cup of heavy cream. Bring this mixture to a gentle simmer. While it simmers, stir in half of the 1 cup of shredded mozzarella cheese and half of the 1/2 cup of grated Parmesan cheese. Add the zest and juice of 1 lemon to brighten the flavor. Mix until the cheese melts and the sauce becomes creamy. - Mix pasta with shrimp and sauce. - Transfer to baking dish and top with cheese. Combine the cooked pasta with the shrimp mixture in the skillet. Stir until the pasta is well coated with the creamy sauce. Then, transfer the mixture into a greased 9x13 inch baking dish. Top it with the remaining mozzarella and Parmesan cheeses to create a delicious crust when baked. - Preheat oven to 350°F (175°C). - Bake until bubbly and golden brown. Preheat your oven to 350°F (175°C). Once preheated, place your baking dish in the oven. Bake for 25-30 minutes, or until the top is bubbly and turns golden brown. This will create a beautiful, cheesy crust that you will love. Enjoy this dish fresh from the oven! For the full recipe, check [Full Recipe]. To avoid overcooking shrimp, cook them quickly. Shrimp only need about 3-4 minutes in the pan. They turn pink and opaque when done. If you cook them too long, they become rubbery. Always keep an eye on them. For even cooking, make sure they are all about the same size. If using frozen shrimp, let them thaw first. This helps them cook evenly. Achieving the right sauce texture is key for a great bake. Start with butter and garlic, then add broth and cream. Bring the mix to a gentle simmer. Stir in the cheeses slowly. This helps them melt evenly. If your sauce is too thick, add a splash of broth. If it’s too thin, let it cook a little longer. You want a smooth, creamy sauce that coats the pasta. To boost flavor, try adding herbs and spices. Fresh parsley works well, bringing brightness to the dish. You can also add a pinch of thyme or basil for depth. For a kick, consider more red pepper flakes. A splash of white wine can add a nice touch, too. Each of these adds layers of flavor that make your dish stand out. {{image_2}} You can boost the nutrition of your Shrimp Scampi Pasta Bake by adding vegetables. Some great options include: - Spinach - Cherry tomatoes - Bell peppers - Zucchini These vegetables add color and flavor. You can sauté them with the garlic before adding the shrimp. This extra step enhances both taste and texture. If you want a change from shrimp, you can use chicken or scallops. Cook the chicken until it is fully done, about 5-7 minutes. For scallops, sear them for 2-3 minutes on each side. Both options work well with the same creamy sauce. This gives you more ways to enjoy this dish. For a gluten-free Shrimp Scampi Pasta Bake, swap out the pasta and dairy. Use gluten-free pasta made from rice or quinoa. For the cream, choose coconut cream or a dairy-free option. This makes the dish safe for those with gluten allergies or intolerances. You can still enjoy the same great flavors and textures without any gluten. Try these variations to keep your Shrimp Scampi Pasta Bake exciting and satisfying. For the Full Recipe, refer to the earlier section in this article. To keep your Shrimp Scampi Pasta Bake fresh, store it in an airtight container. Let it cool to room temperature first. This prevents condensation, which can make your dish soggy. Place it in the fridge and enjoy it within three days. Label the container with the date for easy tracking. If you want to save some for later, freezing is a great option. First, let the dish cool completely. Then, cut it into portions and wrap them tightly in plastic wrap. Place the wrapped portions in a freezer-safe bag. This helps avoid freezer burn. You can freeze it for up to three months. When you’re ready to eat it, thaw it overnight in the fridge. To reheat, avoid drying out your pasta bake. Use an oven for best results. Preheat the oven to 350°F (175°C). Cover the dish with foil to keep moisture in. Heat for about 20-25 minutes. If you prefer using a microwave, place a portion in a microwave-safe dish. Add a splash of broth or cream to keep it moist. Heat it in short bursts, stirring in between. This will help ensure your meal remains creamy and delicious. I recommend using fusilli or penne pasta. These shapes hold the sauce well. Their twists and tubes trap bits of shrimp and garlic, giving each bite great flavor. You can also use rotini or ziti if you like. The key is to pick a pasta that cooks well and pairs nicely with the creamy sauce. Yes, you can prepare this dish in advance. Cook the pasta and shrimp, then mix everything together. Place it in your baking dish. Cover it and store it in the fridge for up to two days. When you're ready to bake, just preheat the oven and cook it as normal. This makes it a great option for busy days. To make the dish less spicy, reduce the red pepper flakes. You can start with a pinch or skip them altogether. You can also add some extra cream or cheese to tone down the heat. This way, you keep the flavor without the kick. Yes, you can use frozen shrimp. Just make sure to thaw them before cooking. Place them in cold water for about 15 minutes. Pat them dry, then cook as you would fresh shrimp. This is a great way to save time while still enjoying tasty shrimp. Pair the bake with a crisp salad or garlic bread. A simple green salad with a lemon vinaigrette works well. Roasted vegetables like asparagus or broccoli also complement the dish nicely. These sides balance the creaminess of the pasta and add freshness. For the complete Shrimp Scampi Pasta Bake recipe, check the [Full Recipe]. This blog post covered the tasty Shrimp Scampi Pasta Bake. We explored key ingredients, step-by-step cooking, and how to enhance flavor. I shared tips for perfect shrimp and creamy sauce. You can also customize this dish with veggies or alternative proteins. Remember, storing and reheating properly keeps it delicious. Enjoy making this dish with your favorite twists! It’s simple and fun to share with friends and family. Your kitchen will be the place everyone wants to be.](https://cheftaling.com/wp-content/uploads/2025/05/d946cc92-29b0-4923-906f-bed1e431a7ea-300x300.webp)
![Here’s what you need for the Oven Fried Feta Rolls with Chili Honey. Gather these fresh ingredients before you start cooking: - Feta cheese - Fresh spinach - Sun-dried tomatoes - Dried oregano - Phyllo dough - Olive oil - Honey - Red chili flakes - Salt and pepper - Fresh parsley Every ingredient plays a role in making this dish stand out. Feta cheese gives a creamy and tangy taste. Fresh spinach adds a nice green crunch. Sun-dried tomatoes bring a sweet and rich flavor. Dried oregano adds a hint of earthiness. Phyllo dough wraps everything up in a crispy shell. Olive oil helps achieve that golden color. Honey sweetens the dish, and red chili flakes give it a spicy kick. Salt and pepper enhance all the flavors, while fresh parsley adds a pop of color. Using fresh ingredients is key to delicious rolls. You can find these items at most grocery stores. Once you have everything ready, you can dive into the fun part: cooking! For the full recipe, check the details above. 1. Preheat your oven to 400°F (200°C). This helps the rolls cook evenly and get crispy. 2. Line a baking sheet with parchment paper. This keeps the rolls from sticking and makes cleanup easy. 3. In a mixing bowl, combine the filling. Add the crumbled feta cheese, chopped spinach, sun-dried tomatoes, oregano, salt, and pepper. Mix well until you have a smooth mixture. 1. Lay one sheet of phyllo dough on a clean surface. Brush it lightly with olive oil. 2. Place a second sheet on top and brush it with oil again. Repeat this step for a total of four sheets. This gives you a strong base for the rolls. 3. Cut the stacked phyllo sheets into strips. Aim for about 3 inches wide, making it easy to fill. 4. Place a tablespoon of the feta mixture at one end of each phyllo strip. 5. Fold the sides of the strip over the filling. Roll it up tightly into a roll. Repeat this until all the filling is used. 1. Place the rolls seam-side down on the baking sheet. Brush the tops with olive oil to help them brown. 2. Bake in the preheated oven for 15-20 minutes. You want them golden brown and crispy. 3. While the rolls bake, prepare the chili honey. Heat honey in a small pan over low heat, then add red chili flakes. Stir well. Remove from heat. 4. Once the rolls are done, drizzle the chili honey over them while they are still warm. 5. Garnish with fresh parsley before serving. This adds color and flavor to your dish. For the full recipe, you can refer to the previous sections. Enjoy your delicious oven fried feta rolls! To get crispy phyllo, you must work fast. Use fresh phyllo dough and keep it covered. Brush each layer with olive oil. This helps layers stick and crisp up nicely. Store your feta rolls in an airtight container. If you have leftovers, keep them in the fridge. They taste best when eaten within two days. To reheat, use the oven to keep them crispy. These feta rolls pair well with dips. Try hummus or tzatziki for a fresh kick. You can also serve them with a simple tomato salsa. For drinks, a crisp white wine works great. You can also enjoy sparkling water with lemon. Both choices enhance the flavors of the rolls. If you want the full recipe, check out the [Full Recipe]. {{image_2}} You can easily change the cheese in this recipe. Goat cheese can add a tangy taste. Cream cheese gives a creamy texture. Both are great options. Adding vegetables can also change the flavor. Try roasted red peppers for a sweet kick. Artichoke hearts add a unique taste and texture. Zucchini or mushrooms can work well too. Spices and herbs can change a dish's flavor. Try adding garlic powder for depth. A sprinkle of smoked paprika gives a nice warmth. Fresh herbs like basil or dill can freshen things up. You can also play with sauces. Swap the chili honey for a spicy aioli. A yogurt dip can add creaminess and coolness. Experiment with different sauces to find your favorite mix. For the full recipe, check out the details above. To keep your feta rolls fresh, place them in an airtight container. Store them in the fridge for up to three days. This will help maintain their flavor and texture. If you want to save them longer, you can freeze them. Wrap each roll in plastic wrap, then put them in a freezer bag. They can last up to three months in the freezer. When it comes to reheating, the oven is the best choice. Preheat your oven to 350°F (175°C). Place the rolls on a baking sheet and heat for about 10 minutes. This will help restore their crispiness. If you're in a hurry, you can use the microwave. However, this method may make them a bit soggy. To avoid that, try placing a paper towel under the rolls. This helps absorb some moisture. Yes, you can make these rolls ahead of time. You can prepare them and freeze them before baking. Just make sure to wrap them well. When you're ready, bake them straight from the freezer. This method helps keep them crispy. If you don’t have phyllo dough, you can use puff pastry or egg roll wrappers. Both options work well. Puff pastry gives a nice, flaky texture, while egg roll wrappers are thicker. Adjust baking time if needed to ensure they cook through. To make the chili honey spicier, add more red chili flakes. You can also use fresh chopped chili instead. Just remember to taste as you go. This way, you can control the spice level based on your preference. For the full recipe, check the section above. In this post, we covered feta rolls, from ingredients to cooking tips. You learned how to make crispy phyllo, mix the perfect filling, and pair your rolls with tasty dips. Remember, you can personalize the recipe with different cheeses and spices. Store any leftovers properly, and reheat them for a quick snack. Enjoy experimenting with variations to make this dish your own. These feta rolls are sure to impress and satisfy everyone. Happy cooking!](https://cheftaling.com/wp-content/uploads/2025/05/892a48d6-bf56-4ac3-a736-7bd28699d18b-300x300.webp)
![- Apples and their varieties - You need 2 large apples. I suggest using Granny Smith or Honeycrisp. They give a nice tartness that balances sweetness. - Cream cheese and sweeteners - Grab 1 cup of softened cream cheese. You will also need 1/4 cup of brown sugar and 1/2 cup of powdered sugar. These sweeteners enrich the dip. - Tortilla and baking essentials - For the cinnamon chips, use 4 large flour tortillas. You’ll also need 3 tablespoons of melted butter and 1/4 cup of granulated sugar mixed with 1 tablespoon of cinnamon. This mix creates a sweet, crunchy chip. For the full recipe, check out the instructions next! Prepping the apples First, peel and core the apples. I like to use Granny Smith or Honeycrisp. They add a nice tartness. Next, dice the apples into small pieces. In a medium bowl, mix the diced apples with 1/4 cup of brown sugar, 1 teaspoon of cinnamon, and 1 tablespoon of lemon juice. Stir this mixture well. This will help the apples stay fresh and tasty. Combining the cream cheese mixture In another bowl, add 1 cup of softened cream cheese. Then, mix in 1/2 cup of powdered sugar and 1 teaspoon of vanilla extract. Use a hand mixer or a whisk. Blend until the mixture is smooth and creamy. This cream cheese layer will be rich and sweet. Layering the ingredients Now, take a serving dish or pie plate. Spread the cream cheese mixture evenly across the bottom. Next, layer the apple mixture on top. Make sure to spread the apples out evenly. This way, every bite will have both the creamy dip and the sweet apples. Cutting the tortillas For the cinnamon chips, grab 4 large flour tortillas. Cut each tortilla into triangles. You can use a pizza cutter for quick and easy cuts. Preparing and baking the chips Next, brush one side of each triangle with 3 tablespoons of melted butter. Then, mix 1/4 cup of granulated sugar with 1 tablespoon of cinnamon. Sprinkle this mixture over the buttered side of the tortilla triangles. Place them on a baking sheet, sugar side up. Bake in a preheated oven at 350°F for 10-12 minutes. They should be golden and crispy. After baking, let the chips cool for a moment. Now you are ready to enjoy the warm apple pie dip with the crunchy cinnamon chips! For the complete recipe, check out the [Full Recipe]. For the best apple pie dip, choose the right apples. I love using Granny Smith or Honeycrisp apples. These apples give a great balance of sweet and tart. Their firm texture holds up well when cooked. To enhance the apple flavor, add a splash of lemon juice. This brightens the taste and keeps the apples from browning. You can also sprinkle a little extra cinnamon on the apples. This adds warmth and depth to the dish. To make a smooth cream cheese mixture, let the cream cheese sit out for a bit. It should be soft before mixing. This helps it blend well with the powdered sugar and vanilla extract. Use a hand mixer for the best results. Adjusting sweetness is key to your dip’s flavor. Start with the 1/2 cup of powdered sugar. Taste it and add more if you like it sweeter. Everyone's taste is different, so make it just how you like! For the full recipe, check out the complete instructions above. {{image_2}} You can easily change the flavor of the dip. Adding nuts or raisins gives it a nice crunch. Chopped pecans or walnuts work great. Just mix them in with the apples. You can also try adding raisins for a sweet twist. They pair well with the apples and spices. If you want to change the spices, you can. Instead of cinnamon, use nutmeg or allspice. These spices add warmth and depth. You can even mix spices for a unique flavor. Experiment and find what you like best! You don’t have to use just flour tortillas for the chips. You can try corn tortillas for a different taste. They add a nice texture and flavor. If you want, you could even use whole wheat tortillas. This gives a fun twist to the classic chip. When it comes to cooking the chips, you have options. Baking them is a healthier choice. They turn out crispy and less oily. Frying gives a rich taste but adds extra calories. Choose the method that fits your diet and mood. For the full recipe, check out the details above. Enjoy creating your perfect apple pie dip! To keep your apple pie dip fresh, store it in an airtight container. Place it in the fridge. It can stay good for up to three days. If you have leftover cinnamon chips, store them in a separate container. Keep them in a cool, dry place. They will stay crisp for one to two days. To reheat the dip, use a microwave-safe dish. Heat it in the microwave for about 30 seconds. Stir the dip after heating to warm it evenly. If you want to refresh the cinnamon chips, pop them in the oven at 350°F for about 5 minutes. This will make them crispy again and ready for dipping. Enjoy your apple pie dip with warm chips! For the complete recipe, check out the Full Recipe. You can serve many tasty treats with apple pie dip. Here are some fun ideas: - Graham crackers - Pretzel bites - Vanilla wafers - Fresh fruit slices like bananas or strawberries - Marshmallows These options add more flavor and fun to your snack. You can mix and match to find the best pairings for you. Yes, you can prepare this dip ahead of time. Here’s how to do it: - Make the dip and store it in a sealed container in the fridge. - Mix the apple filling but add it right before serving. This keeps the apples fresh. - You can also prep the cinnamon chips. Store them in an airtight container to keep them crispy. Making this dip in advance saves time and lets you enjoy the moment! The apple pie dip lasts about 3-4 days in the fridge. Here are some tips for keeping it safe: - Always store it in a sealed container. - Keep it cold until you are ready to serve. - If you notice any change in smell or color, it’s best to throw it away. By following these tips, you can enjoy your delicious dip longer! You can find the full recipe [Full Recipe]. You learned how to make a tasty apple pie dip. We discussed key ingredients like apples, cream cheese, and tortillas. I shared steps to prep and bake, plus tips to select the best apples. You can try fun variations and storage tips to enjoy this dip longer. Remember, homemade dip tastes best fresh, but you can keep it safe too. Enjoy creating this treat with friends and family, and let your own flavors shine!](https://cheftaling.com/wp-content/uploads/2025/05/22b338ca-8f66-483a-8a2d-54503a930f1b-300x300.webp)

. Enjoy your delightful meal! One mistake is not drying the scallops well. When they are wet, they do not sear properly. This makes them chewy instead of crispy. Another big mistake is overcrowding the pan. If you add too many scallops, they will steam instead of sear. Lastly, be careful with the heat. Too high and they burn; too low and they cook unevenly. To get a nice sear, start with dry scallops. Use a paper towel to pat them dry. Season them with salt and pepper. Heat olive oil in a hot skillet. When the oil shimmers, gently add the scallops. Cook them for 2-3 minutes on each side. You want a golden crust. Flip them only once to keep that crust. Add more garlic for a bolder taste. You can also use fresh herbs like thyme or parsley. A squeeze of lemon juice brightens the dish. If you want heat, try a pinch of red pepper flakes. Serve with crusty bread to soak up the creamy sauce. Don't forget to check the [Full Recipe] for all the details! {{image_2}} You can swap scallops with shrimp or chicken. Shrimp cook fast and soak up flavors well. Chicken gives a hearty touch, ideal for a filling meal. Just adjust cooking times. Cook shrimp for about 2-3 minutes per side. For chicken, sear each piece for 5-7 minutes until cooked through. For a vegetarian twist, skip the scallops and use mushrooms instead. Portobello or cremini mushrooms work great. They add a meaty texture and soak up that creamy sauce. Use the same cooking steps, just replace scallops with 8 ounces of sliced mushrooms. They will take about 5-7 minutes to soften and brown. Spice things up with fresh herbs or different spices. Add red pepper flakes for heat or lemon zest for brightness. Fresh parsley or cilantro can add a fresh note. You can also try smoked paprika for a deeper flavor. Experiment with what you love! Each change can make this dish feel new and exciting. For more recipes and ideas, check out the Full Recipe. To store leftover creamy Tuscan scallops, place them in an airtight container. Make sure to let them cool to room temperature first. This helps keep the sauce and scallops fresh. Use a container that fits snugly to avoid air exposure. Store it in the fridge for best results. When you are ready to enjoy your leftovers, the best method is gentle reheating. You can use a skillet or a microwave. If using a skillet, add a bit of cream or water to the pan. Heat over low heat, stirring slowly until warm. In the microwave, use a microwave-safe dish. Heat in short bursts, stirring in between, until warm. The shelf life of cooked scallops is about three days in the fridge. The heavy cream and cheese can last longer, but once mixed, use them quickly. If you freeze the dish, it can last for about two months. However, freezing may change the texture. Always check for signs of spoilage before eating. You can pair Creamy Tuscan Scallops with many sides. A light salad works well. You can also serve it with pasta or rice to soak up the sauce. Garlic bread is a great choice too. It adds a nice crunch. Roasted vegetables can be a colorful addition. They add nutrition and flavor. Remember to keep the sides light. This way, the scallops stay the star of the meal. Yes, you can use frozen scallops. Just make sure to thaw them first. Place them in the fridge overnight. If you're in a hurry, use cold water. Avoid hot water to ensure safety. After thawing, pat them dry. This helps them sear nicely. Frozen scallops may have a bit less flavor. However, they can still taste great when cooked properly. Creamy Tuscan Scallops are rich in flavor and nutrients. Here’s a breakdown per serving: - Calories: About 450 - Protein: 30g - Fat: 35g - Carbohydrates: 8g - Fiber: 1g Remember, these numbers can vary based on how you prepare the dish. The heavy cream and butter add richness. However, fresh spinach and tomatoes provide vitamins. This meal can be a good balance of flavors and nutrients. For the full recipe, check the detailed steps above. This blog post covered how to make delicious Creamy Tuscan Scallops. You learned about key ingredients, cooking tools, and how to pick fresh scallops. I shared easy steps for preparation and cooking the perfect sauce. We also discussed tips for searing scallops and ways to enhance their flavor. Lastly, I provided storage tips and answered common questions. With these insights, you can now create a dish that impresses everyone. Enjoy your cooking journey!](https://cheftaling.com/wp-content/uploads/2025/05/3ae07265-429e-4838-96a6-2036d0811cd8-300x300.webp)
![To make this lemon cake, gather the following items: - 1 ½ cups all-purpose flour - 1 cup granulated sugar - ½ cup unsalted butter, softened - 3 large eggs - ½ cup buttermilk - Zest of 2 lemons - ¼ cup fresh lemon juice - 1 teaspoon baking powder - ½ teaspoon baking soda - ¼ teaspoon salt - Powdered sugar for dusting (optional) - Fresh berries for garnish (optional) Each ingredient plays a big role in flavor and texture. - All-purpose flour gives structure to the cake. - Granulated sugar adds sweetness and helps with browning. - Unsalted butter keeps the cake moist and rich. - Eggs provide lift and binding. - Buttermilk adds tang and moisture. - Lemon zest and juice bring a bright, fresh flavor. - Baking powder and baking soda help the cake rise. - Salt balances the sweetness. You can swap some ingredients if needed. - For gluten-free, use a gluten-free flour blend. - If you lack buttermilk, mix milk with vinegar or lemon juice. - Instead of unsalted butter, you can use coconut oil. - If you want less sugar, try using honey or maple syrup. - For a dairy-free option, use almond milk with a splash of vinegar. For the full recipe, check out the instructions mentioned above. Start by preheating your oven to 350°F (175°C). Grease and flour a 9-inch round cake pan. In a large mixing bowl, cream ½ cup of softened butter and 1 cup of sugar together. Mix until it looks light and fluffy, about 3-4 minutes. Then, add 3 large eggs, one at a time. Mix well after each egg. Next, stir in the zest of 2 lemons and ¼ cup of fresh lemon juice. In another bowl, whisk together 1 ½ cups of flour, 1 teaspoon of baking powder, ½ teaspoon of baking soda, and ¼ teaspoon of salt. Gradually mix the dry ingredients into the wet mixture. Alternate adding ½ cup of buttermilk with the flour. Start and end with the flour, mixing just until combined. Pour the cake batter into the prepared pan and smooth the top. Place it in your preheated oven. Bake for 25-30 minutes. To check if it's done, insert a toothpick in the center. If it comes out clean, the cake is ready. When the cake is baked, let it cool in the pan for about 10 minutes. After that, gently transfer it to a wire rack to cool completely. Once cooled, you can dust the top with powdered sugar if you like. For a fun touch, add fresh berries as a garnish. Enjoy each bite of this wonderful lemon cake! For the full recipe, check out the details above. To bake the best lemon cake, start with room temperature ingredients. This includes butter and eggs. Room temperature helps them mix better. Always measure your ingredients carefully. Too much flour can dry your cake out. When mixing, don't overdo it. Mix until just combined. This keeps the cake light and fluffy. One common mistake is not preheating your oven. Always preheat to 350°F before baking. This helps the cake rise properly. Another mistake is opening the oven door too soon. Wait until the cake is nearly done. This keeps the heat inside. Also, be careful not to skip the lemon zest. It packs in tons of flavor! Want more zing? Add a lemon glaze on top. Mix powdered sugar with fresh lemon juice for a sweet-tart kick. You can also fold in some poppy seeds for a nice crunch. Fresh berries on the side brighten the plate. For a twist, try adding a bit of vanilla extract. It complements the lemon well. For the full recipe, check out the previous sections! {{image_2}} Lemon drizzle cake is a bright twist on the classic. You start with the same lemon cake batter. After baking, poke holes in the warm cake. Mix lemon juice and sugar for the drizzle. Pour it over the cake. This makes a sweet and tart topping that soaks into the cake. You end up with a moist treat bursting with flavor. Serve it with tea for a perfect afternoon snack. Lemon blueberry cake is a delicious combo of flavors. You can add fresh or frozen blueberries to the batter. Fold them in gently to keep them whole. The blueberries add sweetness and a pop of color. This cake is perfect for summer gatherings or brunch. Top with a light lemon glaze for extra zing. Your guests will love this fruity twist! If you need a gluten-free option, it's easy to adapt. Simply replace the all-purpose flour with gluten-free flour. You can use a blend that includes rice and almond flour. This will keep the cake light and moist. Be sure to check the baking powder too; some brands contain gluten. Enjoy a slice without worry, and share the joy of lemon cake with everyone! For the complete recipe, check the [Full Recipe]. To keep your lemon cake fresh, place it in an airtight container. This helps retain moisture. You can also cover the cake with plastic wrap. Store it at room temperature for up to three days. If you want to keep it longer, consider refrigeration. You can freeze leftover lemon cake. First, let the cake cool completely. Then, slice it into pieces for easy serving. Wrap each piece tightly in plastic wrap. Place the wrapped slices in a freezer bag. Your cake can last up to three months in the freezer. When you’re ready to enjoy, just thaw it in the fridge overnight. To reheat your lemon cake, preheat your oven to 350°F (175°C). Place the cake on a baking sheet. Cover it loosely with aluminum foil to prevent drying. Heat the cake for about 10-15 minutes. You can also microwave individual slices for about 20-30 seconds, but keep an eye on it to avoid overheating. Enjoy your cake warm for that fresh-baked taste! To make your lemon cake moist, try adding an extra egg. Eggs add moisture and a rich taste. Another option is to add a bit more buttermilk. You can also try soaking the cake with a lemon syrup after baking. Mix lemon juice and sugar for a sweet soak. This will give your cake a lovely, moist texture. Yes, you can use different flours! All-purpose flour is great, but you can try cake flour for a more tender cake. If you want a gluten-free option, use almond flour or a gluten-free blend. Just remember, each type of flour may change the texture slightly, so keep that in mind. If you don’t have buttermilk, don’t worry! You can make a quick substitute. Mix one cup of milk with one tablespoon of vinegar or lemon juice. Let it sit for five minutes. This will thicken and sour the milk, making it a good stand-in for buttermilk. You can also use plain yogurt or sour cream mixed with milk. Lemon zest is not strictly necessary, but I highly recommend it. The zest adds a bright, fresh flavor that enhances the cake. If you skip it, your cake may taste less lemony. If you want a lighter flavor, you can use less zest, but do try to include some! For the best flavor, use fresh lemons. This blog post covered all you need to bake a delicious lemon cake. You learned about key ingredients and smart substitutions. I provided easy steps for preparing, baking, and decorating. Tips helped you avoid common errors and enhance flavor. We explored fun variations, like lemon blueberry cake and gluten-free options. Lastly, I shared the best ways to store and reheat your cake. Baking a great lemon cake is simple and fun. Enjoy every bite of your tasty creation!](https://cheftaling.com/wp-content/uploads/2025/05/c77bf1ba-1e30-41e9-a99e-83dddd94b162-300x300.webp)


![To make Peanut Butter Bliss Balls, you need simple and easy-to-find items. Here’s what you will need: - 1 cup natural peanut butter - 1/2 cup honey or maple syrup - 1 cup rolled oats - 1/2 cup ground flaxseed - 1/2 cup dark chocolate chips (you can use dairy-free if you like) - 1 tsp vanilla extract - A pinch of salt - Optional: 1/4 cup shredded coconut (for coating) These ingredients work together to create a tasty treat. Natural peanut butter gives a rich flavor. Honey or maple syrup adds sweetness. Rolled oats provide a chewy texture. Ground flaxseed boosts nutrition and helps bind the balls. Dark chocolate chips make each bite fun and delicious. A hint of vanilla adds warmth. Salt balances the sweetness perfectly. If you want a fun twist, roll your bliss balls in shredded coconut. For the full recipe, check out the detailed instructions above. You will love how easy it is to make these treats! 1. Mixing the peanut butter and sweetener Start with a large bowl. Add 1 cup of natural peanut butter and 1/2 cup of honey or maple syrup. Mix them well until the mixture is smooth. 2. Incorporating dry ingredients Next, add 1 cup of rolled oats, 1/2 cup of ground flaxseed, and 1/2 cup of dark chocolate chips. Don’t forget 1 teaspoon of vanilla extract and a pinch of salt. Mix until everything is sticky and combined. 3. Forming the bliss balls Use your hands to scoop out about 1 tablespoon of the mixture. Roll it into a ball shape. Place each ball aside on a plate or baking sheet. 4. Optional coating with coconut If you want a fun twist, take 1/4 cup of shredded coconut. Place it on a plate. Roll each bliss ball in the coconut to coat it. This adds a nice texture and flavor. 5. Refrigeration process Once all balls are shaped, put them on a baking sheet lined with parchment paper. Refrigerate them for at least 30 minutes. This will help them firm up nicely. These simple steps make delicious Peanut Butter Bliss Balls. You can find the Full Recipe for more details. Enjoy your tasty treats! To get the best bliss balls, you may need to adjust the consistency. If your mix is too sticky, add more rolled oats or ground flaxseed. Keep adding until it feels just right. This balance helps the balls hold their shape. You can also add fun flavors to your bliss balls. Try tossing in dried fruits like cranberries or raisins. You can even swap the dark chocolate chips for white chocolate or butterscotch chips. Each choice gives a new twist. For serving, make your bliss balls look extra special. Place them in a pretty bowl. You can drizzle melted chocolate over them for a fancy touch. If you use shredded coconut, roll the balls in it first. This adds flavor and makes them look great. The full recipe is easy to follow, and these tips will help you make them even better! {{image_2}} For a vegan version, swap honey with maple syrup. This keeps the bliss balls sweet and plant-based. You can also use agave syrup. It works well too. To make these bliss balls gluten-free, use gluten-free rolled oats. Check the label to be sure. This small change keeps the treat safe for those with gluten issues. Want to add a twist? Try using other nut butters like almond or cashew. You can mix in sunflower seed butter for a nut-free option. Add seeds or dried fruits for extra flavor and texture. If you like, try mixing in spices like cinnamon or cocoa powder. These can enhance the taste and make your bliss balls unique. For more fun, you can coat the bliss balls in different toppings. Try crushed nuts, seeds, or more chocolate chips. Each twist makes your snack special and fun to eat. Feel free to experiment with flavors and find your favorite blend. Each bite of your creation will be a delicious surprise! For the full recipe, check out the details provided above. To keep your Peanut Butter Bliss Balls fresh, use airtight containers. Glass jars or plastic containers work well. This prevents moisture and keeps them tasty. Store the bliss balls in the fridge. They last up to one week. If you want to keep them longer, freezing is a great choice. For freezing, place the bliss balls on a baking sheet. Freeze them for about one hour. Once firm, transfer them to a freezer-safe bag. Label the bag with the date. They can stay in the freezer for up to three months. Enjoy these treats any time! You can grab them straight from the fridge or freezer. They make a quick snack or dessert. Check the Full Recipe for more ways to enjoy them. How to make Peanut Butter Bliss Balls vegan? To make these bliss balls vegan, use maple syrup instead of honey. Choose dairy-free chocolate chips. These swaps keep the treat tasty and plant-based. What can I substitute for honey or maple syrup? You can use agave syrup or brown rice syrup. Both work well as sweeteners. They give a similar taste and texture to the bliss balls. How long do these snacks last in the fridge? These snacks stay fresh for about one week in the fridge. Store them in an airtight container for best results. Can I make these without chocolate chips? Yes, you can skip the chocolate chips. Try adding dried fruit, nuts, or seeds instead. This adds different flavors and textures to your bliss balls. What is the nutritional value of Peanut Butter Bliss Balls? Each bliss ball has protein from the peanut butter and healthy fats from flaxseed. They also provide fiber from oats. For exact nutrition, check the [Full Recipe] for details. You learned how to make Peanut Butter Bliss Balls today. We covered the needed ingredients, step-by-step instructions, and helpful tips. Variations like vegan options and gluten-free tips will suit different diets. Remember to store them right to keep them fresh. These snacks are easy to make and fun to enjoy. Now, it’s your turn to create these tasty treats in your kitchen! Happy snacking!](https://cheftaling.com/wp-content/uploads/2025/05/d31e9711-61aa-42fd-92c0-dd10a479c1b4-300x300.webp)
![This Garlic Herb Grilled Shrimp recipe is simple and quick. It serves four and takes about 40 minutes from start to finish. You blend fresh herbs with garlic and olive oil to make a tasty marinade. The shrimp soak in the flavors and grill to perfection. To make this dish, you will need: - 1 pound large shrimp, peeled and deveined - 4 cloves garlic, minced - 1/4 cup fresh parsley, chopped - 2 tablespoons fresh basil, chopped - 1 tablespoon fresh oregano, chopped - 1/4 cup olive oil - 1 tablespoon lemon juice - 1 teaspoon red pepper flakes (optional) - Salt and pepper to taste - Lemon wedges for serving These ingredients come together to create a dish that bursts with flavor. Fresh herbs make the shrimp taste bright. Garlic adds depth, and olive oil keeps everything moist. You can add a few extras to boost flavor: - A splash of white wine can deepen the taste. - Other herbs like thyme or cilantro work well too. - If you like heat, try adding more red pepper flakes. These enhancements let you customize the dish to your taste. Don't be afraid to experiment! Enjoy your cooking journey with this Garlic Herb Grilled Shrimp recipe. To make the marinade, gather your ingredients. You will need minced garlic, chopped parsley, chopped basil, chopped oregano, olive oil, lemon juice, red pepper flakes, salt, and pepper. In a large bowl, mix the minced garlic and herbs first. Then, add olive oil and lemon juice. This blend gives the shrimp a tasty boost. Adjust salt and pepper to your liking. Now, it’s time to marinate the shrimp. Take your peeled and deveined shrimp and add them to the bowl. Toss the shrimp well to coat them in the marinade. Cover the bowl and let it sit in the fridge. Aim for at least 30 minutes, but two hours gives better flavor. The longer it sits, the more the shrimp absorb the tasty marinade. Next, prepare your grill. Preheat it to medium-high heat. If you use wooden skewers, soak them in water for 15 minutes. This helps prevent burning. Once the grill is hot, thread the marinated shrimp onto the skewers. Leave space between each shrimp for even cooking. Grill the shrimp for 2-3 minutes on each side. Watch closely; shrimp cook fast. They are ready when they turn pink and opaque. Once done, take the skewers off the grill. Let them rest for one minute. Serve with lemon wedges on the side for extra zest. For the full recipe, check the section above. The best temperature for grilling shrimp is medium-high heat. This heat cooks the shrimp fast and keeps them juicy. Aim for a grill temperature of about 400 to 450°F. You can test the heat by holding your hand about six inches above the grill. If you can hold it there for 3 to 4 seconds, it’s just right for shrimp. Shrimp cook quickly, so watch them closely. Overcooked shrimp become tough and rubbery. Cook them for only 2 to 3 minutes on each side. They turn pink and opaque when done. If you see them curl into a tight “C” shape, they are likely overcooked. Use a timer to help you keep track of cooking time. To boost the flavor of your garlic herb grilled shrimp, add more herbs. Fresh thyme or dill can add a nice twist. You can also try adding a bit of rosemary for a stronger flavor. Mix these herbs into your marinade along with the garlic and olive oil. This will create layers of flavor that will impress anyone you serve. For more details on the full recipe, check out the [Full Recipe]. {{image_2}} You can brighten up the garlic herb shrimp with citrus. Use fresh lime or orange juice instead of lemon juice. This twist adds a zesty kick that enhances the shrimp's flavor. You can also add lime zest for extra citrus flavor. Just mix these into the marinade with the other ingredients. If you like heat, this version is for you. Increase the red pepper flakes to two teaspoons or add fresh chopped jalapeños. The extra spice pairs well with the garlic. Serve this spicy shrimp with a cooling dip, like yogurt or sour cream. This will balance the heat and make each bite worthwhile. For a colorful and healthy meal, pair shrimp with veggies. Bell peppers, zucchini, and cherry tomatoes work well. Thread the shrimp and vegetables onto skewers, alternating them. This adds texture and flavor. Marinate everything together for a delicious taste. Grill as you would the shrimp alone, ensuring all ingredients cook evenly. For the full recipe, check out the detailed steps above! Store leftover shrimp in an airtight container. Place the shrimp in the fridge. They can stay fresh for up to two days. If you want to keep them longer, consider freezing. Make sure to label the container with the date. If you have marinated shrimp left, you can freeze them. Put the shrimp and marinade in a freezer bag. Squeeze out the air before sealing. This helps prevent freezer burn. The shrimp can last up to three months in the freezer. When you're ready to use them, thaw them in the fridge overnight. To reheat shrimp, avoid using the microwave. Instead, heat them on the stove over low heat. Add a splash of olive oil to keep them moist. Stir gently until warmed through. This method helps keep the shrimp tender and flavorful. You can also reheat them on the grill for a smoky touch. Yes, you can use frozen shrimp. Just make sure to thaw them first. Place the shrimp in a bowl of cold water for about 15-20 minutes. This will help them thaw quickly. After thawing, pat them dry with a paper towel. This step is important. Dry shrimp will absorb more flavor from the marinade. A gas or charcoal grill works well for shrimp. Gas grills heat up fast and give you good control. Charcoal grills add a nice smoky flavor. You can also use a grill pan if you don’t have an outdoor grill. A grill pan allows you to cook shrimp on the stovetop. Just make sure it’s hot before adding the shrimp. You can marinate shrimp for 30 minutes to 2 hours. This gives shrimp enough time to soak up the flavors. If you marinate shrimp too long, they may become mushy. Aim to keep it around 1 hour for the best taste and texture. This balance lets the shrimp stay firm and flavorful. For the full recipe, check the section above. In this blog post, we explored how to grill shrimp perfectly at home. We covered the key ingredients, step-by-step instructions, and tips to avoid overcooking. I shared fun recipe variations and important storage info. Using these methods, you can enjoy flavorful shrimp dishes. Remember, practice makes perfect. Enjoy the grilling process and share your results with others. With time, you'll become a shrimp grilling pro!](https://cheftaling.com/wp-content/uploads/2025/05/fbe40d5b-a889-4ac2-a464-cf3739df5ff1-300x300.webp)
![To make my cranberry orange muffins, you need these key ingredients: - 1 ½ cups all-purpose flour - ½ cup granulated sugar - 1 tablespoon baking powder - ½ teaspoon salt - 1 teaspoon ground cinnamon - ¼ cup unsalted butter, melted - 1 large egg - ¾ cup milk - Zest of 1 orange - 1 cup fresh or frozen cranberries (chopped if large) - ½ cup chopped walnuts or pecans (optional) - 2 tablespoons orange juice These ingredients create a tasty balance of sweet and tart flavors. The orange zest brings brightness, while cranberries add a fun pop. You can easily swap some ingredients if needed: - Use whole wheat flour for a denser muffin. - Replace granulated sugar with brown sugar for a richer taste. - Substitute almond milk for regular milk to make it dairy-free. - You can use coconut oil instead of butter for a vegan option. These changes keep the muffins delicious while catering to your needs. Want to make your muffins even better? Consider these add-ins: - Dark chocolate chips for a sweet twist. - Dried fruits like apricots or raisins for texture. - Orange zest from another orange for extra flavor. - Spices like nutmeg or ginger for a warm touch. Feel free to mix and match these options to create your perfect muffin! For the complete recipe, check out the Full Recipe section. Start by gathering all your ingredients. You will need flour, sugar, baking powder, salt, cinnamon, butter, egg, milk, orange zest, cranberries, and optional nuts. This helps make the process smooth. Next, preheat your oven to 375°F (190°C). Line a muffin tin with paper liners or grease it well. This step ensures your muffins do not stick. In a big bowl, mix the dry ingredients: flour, sugar, baking powder, salt, and cinnamon. Use a whisk to blend everything well. In another bowl, whisk the melted butter, egg, milk, orange zest, and orange juice. This mixture should be smooth. Now, pour the wet mix into the dry mix. Stir gently with a spatula. You want it combined but don’t overmix. A few lumps are okay. Add the cranberries and nuts if you like, folding them in carefully. Divide the batter into the muffin cups, filling them about three-quarters full. This allows room for rising. Place the muffin tin in the oven and bake for 18-20 minutes. Look for a golden top and check with a toothpick. It should come out clean when done. Once baked, let the muffins cool in the pan for about five minutes. Then, transfer them to a wire rack to cool completely. This helps keep them from getting soggy. For serving, I love to dust my muffins with powdered sugar. You can add a few fresh cranberries or orange slices on the side for a nice touch. Enjoy your cranberry orange muffins warm for the best flavor from the [Full Recipe]. To get perfect muffins, follow these simple steps. First, measure your flour correctly. Spoon it into the cup and level it off. Too much flour can make muffins dry. Next, avoid overmixing the batter. Stir until just combined for fluffy muffins. Lastly, let your oven preheat fully. This helps the muffins rise evenly. Store your muffins in an airtight container. This keeps them fresh for up to three days. For longer storage, wrap them tightly and freeze. When you want to eat them, just thaw at room temperature. You can also reheat them in the oven at 350°F (175°C) for about 5 to 10 minutes. This refreshes their taste and texture. Avoid these common mistakes to ensure great muffins. Don't skip the baking powder; it helps muffins rise. Also, mix the batter gently. Overmixing can lead to tough muffins. Lastly, keep an eye on baking time. If you leave them in too long, they might dry out. Follow these tips, and you’ll make delicious cranberry orange muffins every time. For the full recipe, check out the [Full Recipe]. {{image_2}} You can mix in other fruits to change the flavor. Try blueberries, raspberries, or even diced apples. Each fruit brings its own taste. For a tropical twist, add some diced pineapple. Just keep the same amount of fruit. This way, your muffins stay moist and tasty. You can make these muffins gluten-free! Use a gluten-free flour blend instead of all-purpose flour. Look for blends that contain xanthan gum. This will help give your muffins good texture. Also, check that your baking powder is gluten-free. Enjoy your muffins without worry! Add a pinch of nutmeg or ginger for extra warmth. You can also mix in a splash of vanilla extract to boost flavor. For a sweet touch, add chocolate chips or coconut flakes. These small changes make a big difference in taste. You can even drizzle a bit of honey or maple syrup on top. Just be creative and have fun with it! For the full recipe, check out the details above! To keep your cranberry orange muffins fresh, store them in an airtight container. Place a paper towel at the bottom to absorb moisture. This helps prevent sogginess. You can also wrap them tightly in plastic wrap. Avoid leaving muffins exposed to air, as they can dry out. If you want to save some muffins for later, freezing works well. Let the muffins cool completely. Then, wrap each muffin in plastic wrap. Place the wrapped muffins in a freezer bag. Make sure you remove as much air as possible. These can last up to three months in the freezer. When stored properly, cranberry orange muffins stay fresh for about four days at room temperature. If you refrigerate them, they can last about a week. However, freezing is best for long-term storage. Enjoy your muffins when they are fresh for the best taste! For the full recipe, check out the details above. Yes, you can use frozen cranberries in your muffins. Just toss them in some flour before adding them to the batter. This helps keep them from sinking. Frozen cranberries work well and still give a great tart flavor. To make muffins less dense, avoid overmixing the batter. Stir gently until just combined. Also, make sure your baking powder is fresh. Using room temperature ingredients can help too. These tips ensure your muffins rise well and stay light. If your muffins don’t rise, check your baking powder. It should be fresh and active. Also, ensure you don’t overmix the batter. If the batter is too thick, add a bit more milk. This can help create air pockets and lead to fluffier muffins. For more tips and a complete guide, check out the Full Recipe. To sum up, this blog covered everything you need to make great muffins. We looked at the must-have ingredients and handy substitutes. You learned step-by-step how to prepare, bake, cool, and serve them. I shared tips for perfecting your muffins and avoiding common mistakes. We explored tasty variations and how to store them properly. Use this guide to create delicious muffins every time. With the right methods, anyone can become a muffin expert. Enjoy baking!](https://cheftaling.com/wp-content/uploads/2025/05/e3035d69-f81a-46bd-8800-3221947641a9-300x300.webp)

![- 1 cup all-purpose flour - 1/2 cup almond flour - 2 teaspoons matcha green tea powder - 1/2 teaspoon baking powder - 1/2 teaspoon baking soda - 1/4 teaspoon salt - 1/2 cup granulated sugar - 1/4 cup honey - 1/2 cup Greek yogurt - 2 large eggs - 1/4 cup vegetable oil - 1 teaspoon vanilla extract - 1/4 cup white chocolate chips (optional) - 2 tablespoons shredded coconut (for garnish) I love to use fresh ingredients for my matcha green tea muffins. Each part plays a role in making them tasty and healthy. For example, the matcha green tea powder gives a bright green color and unique flavor. It's rich in antioxidants, which help my body fight off free radicals. I always choose high-quality matcha for the best results. Almond flour adds a nutty taste and moist texture. It also has healthy fats that keep you full longer. Greek yogurt adds protein and moisture, making the muffins tender. When I bake, I mix my dry and wet ingredients separately. This helps me avoid overmixing. Overmixing can make muffins tough instead of soft. I also like to add white chocolate chips for a sweet surprise. They melt slightly and create pockets of sweetness in each bite. Finally, I sprinkle shredded coconut on top. It adds an extra crunch and tropical vibe. It's a simple touch that makes these muffins even more delightful. For the full recipe, check out the section above. Enjoy these muffins as a snack or breakfast treat! 1. Preheating the oven and preparing the muffin tin: Start by preheating your oven to 350°F (175°C). This step is key for even baking. Line a muffin tin with paper liners or grease it lightly with oil. This helps the muffins release easily after baking. 2. Mixing dry and wet ingredients separately: In a large bowl, whisk together the dry ingredients: all-purpose flour, almond flour, matcha powder, baking powder, baking soda, and salt. This ensures even distribution of the matcha flavor. In another bowl, combine granulated sugar and honey. Add Greek yogurt, eggs, vegetable oil, and vanilla extract. Whisk until smooth and creamy. - How to properly combine wet and dry ingredients without overmixing: Gradually pour the wet ingredients into the dry mix. Use a spatula or wooden spoon to stir gently. Mix just until you see no dry flour. Overmixing can lead to tough muffins. - Importance of adding chocolate chips: If you like a touch of sweetness, fold in white chocolate chips. They melt slightly while baking, adding a delightful surprise in each bite. Plus, the contrast of flavors with matcha is nice! - Recommended muffin baking times: Spoon the batter into your prepared muffin tin, filling each cup about two-thirds full. Bake in your preheated oven for 15 to 18 minutes. Keep an eye on them towards the end for that perfect golden color. - Checking doneness with a toothpick: To check if your muffins are done, insert a toothpick into the center of a muffin. If it comes out clean, they are ready. If not, give them a couple more minutes. Once done, let them cool in the tin for five minutes. Then transfer them to a wire rack to cool completely. To get the best matcha green tea muffins, avoid common baking mistakes. Make sure to measure your flour correctly. Too much flour can make your muffins dry. Use the spoon-and-level method for accuracy. Next, mix your dry and wet ingredients in separate bowls first. This helps to avoid overmixing. When you combine them, mix just until they are blended. A few lumps are okay! To achieve the perfect texture, it's key to use room temperature eggs and yogurt. Cold ingredients can lead to dense muffins. Also, don't forget to preheat your oven. If it’s not hot enough, the muffins won’t rise well. Presentation matters! Serve your muffins warm on a pretty platter. Dust them with a little matcha powder for that extra flair. You can also sprinkle some shredded coconut on top for color. Pair these muffins with a hot cup of green tea. The flavors of matcha and tea blend beautifully together. You could also enjoy them with a glass of almond milk. This adds a nice touch to the healthy treat. To store your muffins, keep them in an airtight container. This prevents them from drying out. You can leave them at room temperature for 2-3 days. If you want to keep them longer, freeze them. For freezing, wrap each muffin in plastic wrap, then place them in a freezer bag. When ready to eat, thaw them at room temperature. You can also reheat them in the microwave for 15-20 seconds. This keeps them warm and soft for your snack time. {{image_2}} You can easily change the flavor of your matcha green tea muffins. Adding fruit is a great way to do this. Blueberries or raspberries mix well with matcha. Their tartness contrasts nicely with the earthy taste of green tea. You can also fold in chopped nuts or seeds. Walnuts, almonds, or even pumpkin seeds add a delightful crunch. These simple tweaks make each muffin unique and tasty. If you need gluten-free muffins, use almond flour or a gluten-free blend. These options work well and keep the muffins moist. For those who want dairy-free muffins, substitute the Greek yogurt with a non-dairy yogurt. This keeps the recipe creamy without using dairy. Making these swaps allows everyone to enjoy the muffins. Seasonal flavors can make your muffins special throughout the year. In fall, try adding pumpkin puree and a pinch of cinnamon. This gives your muffins a warm, cozy taste. In spring, consider adding diced apples or fresh strawberries. The fruits add sweetness and freshness to your muffins. Seasonal changes keep your baking exciting and tailored to the time of year. For the complete recipe, check out the [Full Recipe]. To keep your matcha green tea muffins fresh, use an airtight container. Glass or plastic containers work well. Avoid metal containers, as they can affect the taste. You can store muffins at room temperature for up to three days. If you want them to last longer, put them in the fridge. They can stay fresh for about a week in the fridge. Just remember to let them cool completely before storing. Freezing muffins is a great way to keep them tasty for longer. To freeze, wrap each muffin in plastic wrap. Then, place them in a freezer bag. Make sure to remove as much air as you can. This helps keep them fresh. When you're ready to eat one, take it out of the freezer. You can thaw it in the fridge overnight. If you want it warm, microwave it for 15-20 seconds. Just watch it closely to avoid overheating. Enjoy your muffins anytime with these simple storage tips! For the full recipe, check out the details above! Matcha is a special type of green tea. It comes from Japan. Unlike regular tea, you use the whole leaf. This gives matcha a rich flavor and bright color. You can use matcha in many ways. You can drink it, bake with it, or mix it in smoothies. It is full of antioxidants, which are good for your health. Yes, you can use other flours! If you want a gluten-free option, try almond flour or coconut flour. You can mix different flours, too. Just keep the same total amount. For example, if you use almond flour, use less all-purpose flour. This way, you keep the right texture in your muffins. Check the muffins after 15 minutes. Insert a toothpick in the center. If it comes out clean, they are done! If it has wet batter, bake for a few more minutes. The tops should look golden and spring back when you touch them. This means they are fluffy and ready to eat. You can easily adjust the sweetness! If you like your muffins sweeter, add more sugar or honey. Just remember that too much can change the texture. Start with one extra tablespoon and see how it tastes. You can also use maple syrup or agave syrup for a different flavor. No Greek yogurt? No problem! You can use regular yogurt or sour cream instead. Both will keep your muffins moist. If you want a dairy-free option, use applesauce or a plant-based yogurt. These substitutes work well and still taste great in your muffins. For the full recipe, check above. These matcha muffins combine flavor and health benefits. You learned about essential ingredients, their health perks, and how to bake perfectly. I also shared tips on storage and creative variations. You can customize these muffins to fit your tastes and dietary needs. Remember, baking takes practice. Don't worry if they aren't perfect the first time. Enjoy the process and savor each bite. Try these muffins, share them, and make them your own!](https://cheftaling.com/wp-content/uploads/2025/05/bd67ad96-8a9d-408e-a57d-01c07d3408e1-300x300.webp)

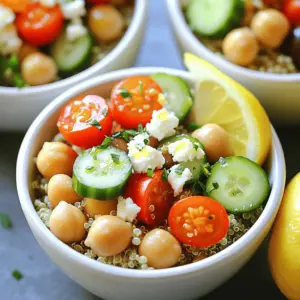
![- 1 cup couscous - 1 1/4 cups vegetable broth - 1 cup cherry tomatoes, halved - 1 cucumber, diced - 1/2 red onion, finely chopped - 1/2 cup Kalamata olives, pitted and halved - 1/4 cup feta cheese, crumbled - 1/4 cup fresh parsley, chopped - 1/4 cup extra virgin olive oil - 2 tablespoons lemon juice - 1 teaspoon dried oregano - Salt and pepper to taste To make a great Mediterranean Couscous Salad, you need simple, fresh ingredients. Each one adds its flavor and texture. You start with couscous, a quick-cooking grain that acts as the base. I use vegetable broth to boost its taste. This adds depth to the dish. Next, I add bright cherry tomatoes. Their sweetness pairs well with the crunch of a diced cucumber. The red onion gives a little bite. Kalamata olives add a salty, briny flavor that sings of the Mediterranean. Feta cheese brings creaminess and tang. Fresh parsley adds a burst of color and freshness. Olive oil and lemon juice create a zesty dressing that ties everything together. I sprinkle dried oregano for an herbal touch. This salad is not just tasty; it is also healthy. Each ingredient brings its own nutrients to the table. I love how they work together for a fresh, colorful dish. You can find the full recipe [Full Recipe]. To start, grab a medium saucepan. Pour in 1 1/4 cups of vegetable broth. Heat it on high until it boils. This step is key for flavor. Once boiling, stir in 1 cup of couscous. Cover the pot and remove it from heat. Let it sit for about 5 minutes. This lets the couscous absorb all the broth. After 5 minutes, fluff it with a fork. Set it aside to cool while you prepare the other ingredients. Next, take a large mixing bowl. Combine 1 cup of halved cherry tomatoes, 1 diced cucumber, and 1/2 finely chopped red onion. Add in 1/2 cup of pitted and halved Kalamata olives. Crumble 1/4 cup of feta cheese and toss it in too. Now, gently fold in the cooled couscous with this fresh mix. Make sure everything is well combined but be careful not to mash the veggies. In a small bowl, whisk together 1/4 cup of extra virgin olive oil and 2 tablespoons of lemon juice. Add 1 teaspoon of dried oregano, along with salt and pepper to taste. This dressing adds flavor and ties everything together. Pour the dressing over your couscous salad. Toss gently to coat all the ingredients evenly. Finally, sprinkle 1/4 cup of chopped fresh parsley on top and give it one last gentle toss. Enjoy this fresh and vibrant dish! To ensure your couscous is fluffy, start with the right amount of broth. Use 1 1/4 cups of vegetable broth for every cup of couscous. Bring the broth to a boil, then quickly stir in the couscous. Cover the pot and remove it from heat. Let it sit for about five minutes. This method helps the couscous absorb all the liquid and stay light. Fluff it with a fork to separate the grains. When choosing herbs, fresh is best for flavor. Fresh parsley adds a bright taste. Dried oregano works too, but fresh herbs shine in this dish. If you use dried herbs, reduce the amount slightly. This helps keep the flavor balanced. For a stunning look, serve the salad in a large, colorful bowl. You can also use individual cups for each guest. This adds a fun touch. Garnish your salad with extra parsley on top for a fresh pop. A lemon wedge on the side gives a nice splash of color and flavor. To boost the flavor of your salad, consider adding spices. A pinch of cumin or smoked paprika can add warmth. Fresh herbs like basil or mint can also give it a new twist. Marinating the salad before serving enhances the taste. Let it sit in the fridge for at least an hour. This allows the flavors to mix and deepen. For the best results, try marinating overnight. This way, each bite bursts with flavor. For the full recipe, check out the detailed instructions provided earlier. {{image_2}} You can easily change this salad to fit your taste. Adding proteins like chickpeas or grilled chicken boosts the nutrition. Chickpeas add fiber, while chicken gives it a hearty feel. If you prefer a different cheese, try goat cheese instead of feta. Goat cheese adds a creamy tang that pairs well with the other flavors. Fresh, seasonal vegetables can change the game. For example, adding bell peppers gives a sweet crunch. You can also use local produce to make the salad more vibrant. Farmers' markets often have great options that inspire new flavors. You have choices when it comes to dressings. A balsamic vinaigrette can add depth and sweetness. You can also play with flavors. If you like it spicy, add red pepper flakes. For a tangy twist, a bit more lemon juice works well. Explore these options to find what you love best. For the full recipe, check [Full Recipe]. To store your Mediterranean couscous salad, keep it in an airtight container. This helps keep it fresh and safe. It stays good in the fridge for about 3 to 5 days. Make sure to check for any signs of spoilage before serving leftovers. If it looks or smells unusual, it's best to toss it. You can freeze couscous salad, but it's not the best option. Freezing may change the texture of the veggies. If you decide to freeze it, use a freezer-safe container. When you're ready to eat, thaw the salad in the fridge overnight. After thawing, freshen it up with a splash of olive oil or lemon juice. Meal prepping this salad is easy and fun! You can make it a day ahead. Store the dressing separately to keep everything crisp. When you're ready to eat, mix it all together. Use your favorite veggies and protein for customization. This way, you can enjoy fresh meals all week long! Couscous is a tiny pasta made from semolina wheat. It cooks quickly and has a light, fluffy texture. Often used in salads, couscous absorbs flavors well. You can find it in many stores, often near rice or pasta. It is a staple in North African cuisine. Yes, you can make this salad ahead of time. It tastes even better after sitting for a few hours. Store it in the fridge for up to three days. Just remember to keep the dressing separate if you want extra crunch. Mix it in just before you serve. To make this salad vegan, simply leave out the feta cheese. You can add extra veggies or use a vegan cheese if you like. Chickpeas can also add protein and texture. This change keeps the salad fresh and tasty without any animal products. Absolutely! You can use any olives you prefer. Green olives or even stuffed olives work well. Each type will change the flavor a bit. Just make sure to pit and slice them before adding to the salad. This salad pairs well with grilled vegetables or fish. It also goes great with hummus and pita bread. You can serve it as a side dish or a light main course. For a complete meal, add a protein like chicken or shrimp. This blog post shared a simple Mediterranean Couscous Salad recipe. You learned the key ingredients, like couscous and veggies, and how to prepare them. I discussed tips for flavor, presentation, and easy substitutions. Remember, you can customize this salad with different proteins or herbs to suit your taste. It’s nutritious and fun to make! Enjoy your culinary adventure and savor every bite of this vibrant dish.](https://cheftaling.com/wp-content/uploads/2025/05/685d823a-45e9-47cb-b3bd-4b870b790acd-300x300.webp)


. One big mistake is not drying the chickpeas well. Wet chickpeas will not get crispy. Make sure to pat them dry with a paper towel. Avoid overcrowding the baking sheet. If they are too close, they will steam instead of bake. This prevents that nice crunch. Feel free to change the spices to suit your taste. If you want more heat, add extra cayenne. For a smoky flavor, try adding more smoked paprika. You can even mix in herbs like rosemary or thyme. Always taste before baking to find your favorite mix. Drying the chickpeas is key for crispiness. After rinsing, lay them on a towel and press down. This step removes excess moisture, which helps them turn crunchy in the oven. If you skip this step, your chickpeas might come out chewy and soft. Trust me, drying makes all the difference! Check the full recipe for more tips on making these crispy baked chickpeas. {{image_2}} To add some heat, try spicy baked chickpeas. Simply increase the cayenne pepper to one teaspoon. You can also add chili powder or crushed red pepper. These spices give your chickpeas a fiery kick. Perfect for those who love bold flavors! For a sweet twist, you can make sweet cinnamon chickpeas. Replace the savory spices with one tablespoon of cinnamon and two tablespoons of brown sugar. Toss the chickpeas in this mix after coating with olive oil. Bake them as usual. This creates a snack that's both crunchy and sweet. You can mix and match spices for different flavors. Try Italian herbs like oregano and basil for an herbaceous touch. Or use taco seasoning for a fun snack. Experiment with your favorite spices to find your perfect combo. The options are endless! These variations make crispy baked chickpeas a fun snack for everyone. You can enjoy them in many ways! For full details, refer to the Full Recipe. After you enjoy your crispy baked chickpeas, store any leftovers in an airtight container. This keeps them fresh and tasty. Let them cool completely before sealing. If you don't cool them first, they can get soggy. I recommend using glass containers with tight lids. These keep moisture out better than plastic. If you use plastic, choose ones marked for food storage. They should seal tightly to keep crispiness. If stored properly, crispy baked chickpeas last for about 3 to 5 days. You can reheat them in the oven or air fryer. This helps restore their crunch. Set the oven to 350°F (175°C) and bake for about 10 minutes. Watch closely to avoid burning. For a quick fix, use the microwave, but they may lose some crispiness. For the best taste, eat them fresh from the oven. Follow the Full Recipe for the best results! Crispy baked chickpeas can stay fresh for about 3 to 5 days. Store them in an airtight container at room temperature. Avoid moisture, which can make them soggy. If you notice they lose their crunch, you can re-bake them for a few minutes. This will help bring back their crispy texture. Yes, you can use dried chickpeas. However, you need to cook them first. Start by soaking the dried chickpeas overnight. Then, boil them until tender. Once cooked, you can follow the same steps as the canned chickpeas in the Full Recipe. This gives you more control over the texture and flavor. Chickpeas are packed with nutrients. They are a great source of protein, fiber, and vitamins. Here are some health benefits: - High in Protein: Great for plant-based diets. - Rich in Fiber: Helps with digestion and keeps you full. - Low in Fat: A healthy snack option. - Full of Vitamins: Contains B vitamins and minerals like iron and magnesium. These benefits make chickpeas a smart choice for snacks and meals. In this post, I covered everything about making crispy baked chickpeas. We explored key ingredients, substitutions, and their nutritional value. I shared step-by-step instructions for preparation and cooking, along with tips for the perfect crunch. We also discussed common mistakes and how to adjust flavors. Finally, I provided storage tips and answered frequently asked questions. Crispy chickpeas are easy to make and offer health benefits. Enjoy experimenting with flavors and variations to find your favorite!](https://cheftaling.com/wp-content/uploads/2025/05/14639f41-1295-402b-9ab8-8f81d4546fe7-300x300.webp)


. Enjoy your energy bites! To make uniform balls, wet your hands with water. This helps the mix not stick to your fingers. Roll the mixture gently in the palms of your hands. You want each ball to be about one inch. If you want sweeter bites, add more honey or maple syrup. Just taste as you go. You can boost flavor by adding spices. A sprinkle of cinnamon works great. You might also try a dash of nutmeg or a hint of sea salt. If you want more protein, consider adding protein powder or nuts. Chopped almonds or walnuts can add crunch and flavor. For serving, arrange the energy bites on a nice plate. Sprinkle extra chia seeds on top for flair. If you want to gift them, use cupcake liners. You can also place them in a jar and tie it with a ribbon. This makes a lovely gift for friends or family. For the full recipe, check out the detailed instructions above. {{image_2}} You can switch up the flavor by using different nut butters. Almond butter works great if you want a nutty twist. It adds a subtle sweetness and creaminess. When it comes to chocolate, you have options too. Milk chocolate gives a sweeter bite, while dark chocolate offers a rich, bold flavor. You can even mix them for a unique taste! If you want to keep your energy bites vegan, you can swap honey for maple syrup. Maple syrup gives a nice sweetness without any animal products. For those who need gluten-free options, be sure to use certified gluten-free oats. This way, everyone can enjoy these tasty bites without worry. To make your energy bites even better, consider adding superfoods. Flaxseeds and hemp seeds boost nutrients and add a nice crunch. You can also mix in dried fruits like raisins or cranberries for extra flavor. These additions make your bites delicious and packed with goodness. For the full recipe, check out the [Full Recipe]. Store your chocolate peanut butter energy bites in an airtight container. This keeps them fresh. They last about one week in the fridge. If you want them to stay tasty, do not leave them out. To freeze these bites, place them in a single layer on a baking sheet. Freeze them for about an hour. Once they are firm, move them to a freezer-safe bag. This way, they can keep for up to three months. When you want to eat them, take out the number you need. Let them thaw in the fridge overnight for the best texture. If you like your energy bites warm, you can reheat them. Place a few bites on a plate. Heat them in the microwave for 10-15 seconds. Check to see if they are warm enough. Don't overheat them, or they might lose their nice texture. Enjoy them fresh and tasty! To make these energy bites vegan, replace honey with maple syrup. Maple syrup is a great plant-based sweetener. You can also use agave nectar if you prefer. Both options work well and keep the bites tasty. Yes! To make energy bars, spread the mixture in a lined baking dish. Press it down evenly. Chill for about 30 minutes to set. Then, cut into bars of your desired size. This way, you have a quick snack option ready to go. For serving, I recommend two bites per person. You can pair them with milk or a smoothie for a nice treat. Arrange them on a colorful plate to make them pop. They look great and taste even better! You can find the full recipe in the earlier sections. These Chocolate Peanut Butter Energy Bites are simple and tasty. We looked at key ingredients, step-by-step instructions, and tips for success. You can also explore fun variations and storage methods. Making these bites is easy and rewarding. Enjoy them as snacks or share with friends. With the right mix and a bit of creativity, you’ll have delicious, healthy energy bites ready to fuel your day.](https://cheftaling.com/wp-content/uploads/2025/05/90bd493e-3f8c-42ff-a885-9dcccd32467c-300x300.webp)

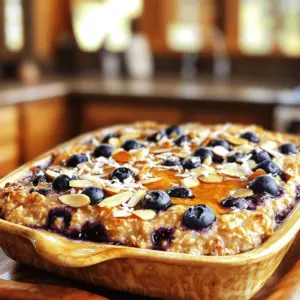

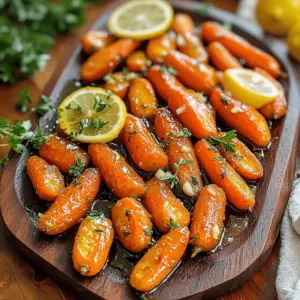
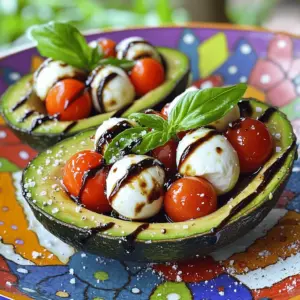


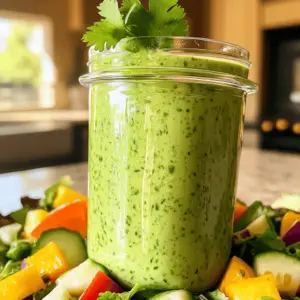
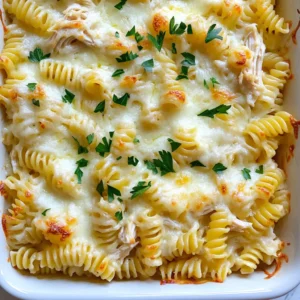
. Start by cleaning the cauliflower. Rinse it under cool water to remove dirt. Next, cut the cauliflower into bite-sized florets. Aim for uniform pieces to ensure even cooking. In a large mixing bowl, add the florets. Pour in the olive oil, then add minced garlic, salt, and black pepper. Mix well to coat each piece evenly with the seasoning. This step builds flavor in every bite. Preheat your oven to 425°F (220°C). Line a baking sheet with parchment paper for easy cleanup. Spread the seasoned cauliflower on the sheet in a single layer. Roast it in the oven for about 20 minutes. Stir the cauliflower halfway through to help it cook evenly. After 20 minutes, take it out and sprinkle grated Parmesan cheese and Italian seasoning on top. Gently toss the cauliflower to mix in the cheese. Return it to the oven for another 5 to 7 minutes. This will melt the cheese and create a nice, bubbly top. Once the cauliflower is golden brown, remove it from the oven. Let it cool for a minute. Before serving, garnish with fresh parsley. This adds color and a fresh taste. To get that perfect golden brown color, make sure the florets are not crowded on the baking sheet. Spacing helps them roast well. Enjoy your Garlic Parmesan Roasted Cauliflower as a simple side dish or a tasty snack. For the full recipe, check the earlier section! To make sure your cauliflower is tender, start with fresh florets. Cut them into even pieces. This helps them cook at the same rate. You want a nice bite but not mushy. Spacing is key on the baking sheet. If the florets are too close, they will steam instead of roast. Spread them out in a single layer. This allows for even cooking and crispiness. Adjust the garlic and cheese amounts to fit your taste. If you love garlic, add more. For a cheesy bite, sprinkle on extra Parmesan. Don't be afraid to try other herbs. Add a touch of thyme or rosemary for a new twist. You can also mix in some red pepper flakes for heat. Check for doneness after about 20 minutes. The cauliflower should be golden and soft. If it’s not quite there, roast a bit longer. Be careful not to over-roast. You want a nice brown color, not burnt edges. Keep an eye on it during the last few minutes. This ensures a perfect finish. For the full recipe, check out the link provided. {{image_2}} You can easily change this dish by adding more veggies. Broccoli and carrots work well here. They add color and crunch. Mix the florets with the cauliflower for a fun twist. You can also try adding spices for heat. A pinch of red pepper flakes gives it a nice kick. You can adjust the amount based on your taste. If you need gluten-free options, this recipe is naturally safe. Just check your Parmesan cheese label. Many brands are gluten-free. For a vegan version, swap the Parmesan for a plant-based cheese. Nutritional yeast is another great choice. It adds a cheesy flavor without dairy. You can cook this dish in an air fryer for a crispier texture. Set your air fryer to 400°F (200°C). Cook for about 15 minutes, shaking halfway through. Grilling is also a fun option. Use a grill basket to hold the cauliflower. Grill on medium heat for about 10-15 minutes. Both methods give you delicious results with less oil. For the full recipe, check out the main article. After enjoying Garlic Parmesan Roasted Cauliflower, store any leftovers in the fridge. Place the cooled cauliflower in an airtight container. This keeps it fresh for up to three days. When you're ready to eat, reheat it in the oven at 350°F (175°C) for about 10 minutes. You can also microwave it for a quick fix, but the oven will keep the cauliflower crispier. For long-term storage, you can freeze Garlic Parmesan Roasted Cauliflower. First, let it cool completely. Then, spread the cauliflower on a baking sheet in a single layer and freeze for about an hour. After that, transfer it to a freezer bag or container. It will stay good for up to three months. When you’re ready to use it, you can throw it straight into soups or stir-fries for a quick meal. Understanding freshness is key to enjoying your garlic parmesan treat. Fresh cauliflower should feel firm, with no dark spots or soft areas. If it starts to turn yellow or brown, it's best to toss it. Once cooked, Garlic Parmesan Roasted Cauliflower stays tasty for about three days in the fridge. Always check for signs of spoilage before eating. To make Garlic Parmesan Roasted Cauliflower, follow these steps: 1. Preheat your oven to 425°F (220°C) and line a baking sheet with parchment paper. 2. In a bowl, mix cauliflower florets with olive oil, minced garlic, salt, and black pepper. 3. Spread the cauliflower on the baking sheet in one layer. 4. Roast for 20 minutes, stirring halfway through. 5. Add Parmesan cheese and Italian seasoning, then roast for another 5-7 minutes. 6. Garnish with parsley and serve. This simple method gives you a tasty and crispy side dish. Yes, you can use frozen cauliflower. Thaw it first and pat it dry. This helps remove excess moisture. Fresh cauliflower gives a better texture, but frozen works well in a pinch. Adjust cooking time slightly, as frozen florets may need a bit longer to become tender. This dish pairs well with many main options. Try it with grilled chicken or steak for a hearty meal. It also complements pasta dishes nicely. Serve it alongside a fresh salad for a lighter option. The flavors blend well with a variety of cuisines. To keep your cauliflower crispy, space the florets out on the baking sheet. Avoid crowding them, as this can trap steam. Also, roast at a high temperature. Stir halfway through to ensure even cooking. A quick final roast after adding cheese keeps it crunchy. You can prepare Garlic Parmesan Roasted Cauliflower ahead of time. Store it in the fridge for up to three days. Reheat in the oven at 350°F (175°C) to keep it crispy. Avoid microwaving, as this can make it soggy. Enjoy it as a quick side for your meals. Garlic Parmesan Roasted Cauliflower is easy and tasty. We covered key ingredients, tools, and steps you need. Prepping cauliflower and roasting it right leads to great flavor. Remember to keep pieces spaced for a perfect texture. You can even switch up ingredients for fun variations. Enjoy your dish fresh, or store leftovers properly for later. This recipe is flexible and fits many diets, making it a great addition to your meals. Happy cooking!](https://cheftaling.com/wp-content/uploads/2025/04/08227cfd-fcbc-4683-bd73-7fb03684988f-300x300.webp)