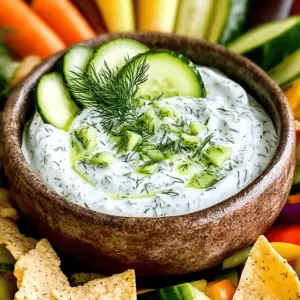
- Cucumber Dill Yogurt Dip Flavorful and Fresh Delight
- Sweet Peach Iced Tea Refreshing Summer Delight
- Zucchini Apple Crisp Delightful and Simple Dessert
- Vegan Zucchini Bread Enhance Your Baking Skills
- One Pot Mac & Chorizo Tasty Weeknight Recipe
- Cheesy Spinach Bake Flavorful and Easy Recipe Delight
- Easy Green Goddess Lentil Tacos Simple and Tasty Meal
- Air Fryer Maple Glazed Carrots Savory and Simple Recipe
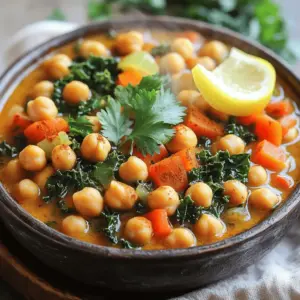
- One-Pot Spicy Chickpea Stew Flavorful Comfort Meal
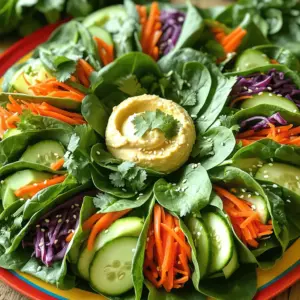
- No-Cook Rainbow Veggie Wraps Crisp and Colorful Delight
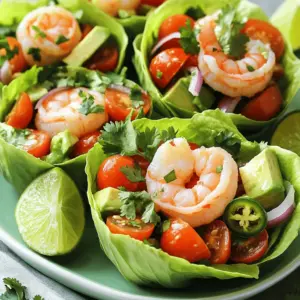
- Zesty Shrimp & Avocado Salad Cups Fresh and Flavorful
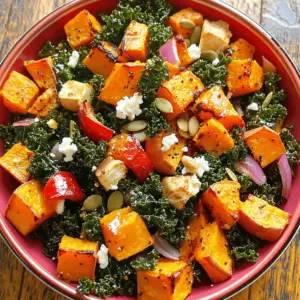
- Roasted Sweet Potato & Kale Medley Flavor Boost
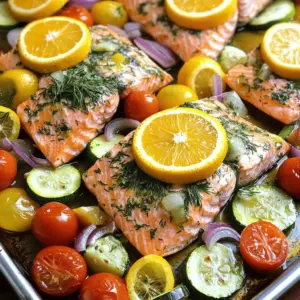
- Sheet Pan Citrus Herb Salmon Flavorful and Easy Recipe
- Garden Fresh Quinoa Power Bowls Energizing Meal Idea
- Crispy Lemon Garlic Chicken Bites Simple and Delicious
- Summer Veggie Skillet Stir-Fry Simple and Tasty Dish
- Charred Corn & Black Bean Salsa Cups Delightful Snack
- Crispy Sweet Potato Fritter Sliders Delightful Recipe
- Garlic-Herb Zoodle Bowls Flavorful and Easy Recipe
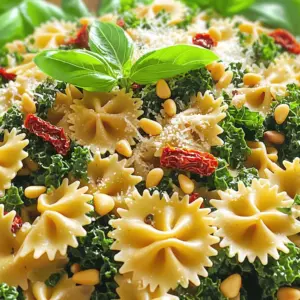
- Tuscan Kale & Sun-Dried Tomato Pasta Flavor Boost
- Mango Coconut Chia Parfaits Simple and Tasty Treat
- Spicy Roasted Cauliflower Tacos Flavorful Vegan Meal
- Zesty Avocado Chicken Skewers Flavorful and Easy Meal
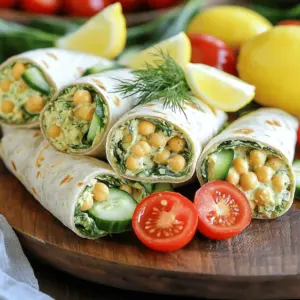
- Lemon-Dill Chickpea Wraps Fresh and Flavorful Recipe
- Grilled Peach & Arugula Flatbread Flavorful Delight
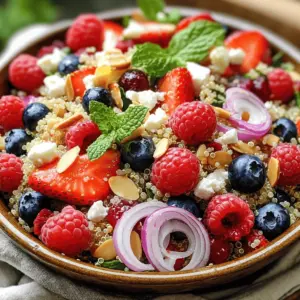
- Summer Berry Quinoa Salad Fresh and Flavorful Dish
- Classic Macaroni Salad Simple and Tasty Recipe
- Homemade Pretzel Bites Tasty and Fun Snack Idea
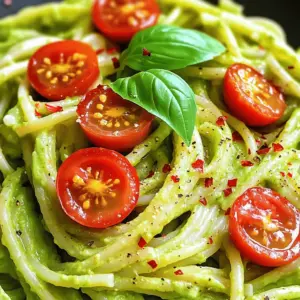
- Creamy Avocado Pasta Simple and Delicious Recipe
- Cheesy Taco Stuffed Shells Flavorful and Easy Recipe
- Easy Chicken Tikka Masala Flavorful Dinner Delight
- Savory Slow Cooker Beef Stroganoff Easy Comfort Meal
- Roasted Garlic Parmesan Carrots Flavorful Side Dish
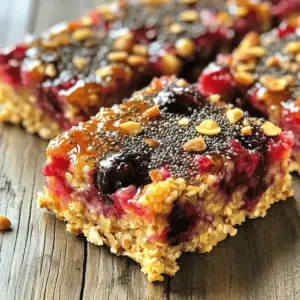
- Wholesome Berry Chia Breakfast Bars Easy Snack Recipe
- Fresh Mango Jalapeño Salsa Tacos Flavorful Delight
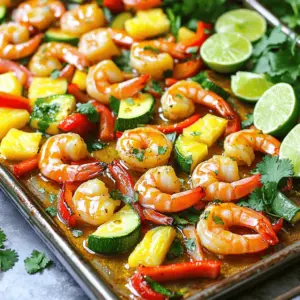
- Sheet Pan Honey-Lime Shrimp Flavorful and Easy Meal
- Spicy Roasted Cauliflower Bites Flavorful Snack Idea
- Creamy Avocado Herb Pasta Flavorful and Easy Recipe
- Spring Green Quinoa Stir Fry Nutritious and Simple Dish
- One-Pan Garlic Lemon Chicken & Veggies Delight
- Vegan Harvest Sweet Potato Salad Flavorful and Quick
- Zesty Grilled Citrus Salmon Fillets Fresh and Easy Meal


. Enjoy the process of mixing these ingredients and watching them transform into a delightful dessert! First, you need to grate the zucchini. Grate it until you have about two cups. This adds moisture and a nice texture. Next, prepare the apples. Peel, core, and slice them into thin pieces. I prefer Granny Smith apples. They offer a nice tartness that balances well with the sweet crisp. In a big mixing bowl, combine the rolled oats, brown sugar, all-purpose flour, cinnamon, nutmeg, and salt. Stir them together until they mix well. This blend creates a tasty topping. The spices add flavor, making it warm and inviting. Now, combine the grated zucchini and sliced apples in one bowl. Mix them well. Then, pour the melted butter over the dry mixture. Stir until crumbly. If you want, fold in chopped walnuts or pecans for extra crunch. Spread the zucchini and apple mix in a greased baking dish. Then, sprinkle the oat mixture on top. Bake it at 350°F (175°C) for 35-40 minutes. The top should turn golden brown, and the apples will bubble. This recipe ensures an easy and delightful dessert that impresses everyone. For the complete instructions, check the Full Recipe. To grate zucchini, you can use a box grater or a food processor. Both methods work well. A box grater gives you control over the size. A food processor saves time if you're making a large batch. Whichever tool you choose, make sure your zucchini is fresh. Grate it just before using it for the best flavor. You can enhance the flavor of your Zucchini Apple Crisp with extra spices. Consider adding a pinch of ginger for warmth or a splash of vanilla extract for sweetness. You might also try a bit of lemon zest. These small additions can bring out the best in your ingredients. Experiment to find your perfect flavor mix. Serving your Zucchini Apple Crisp warm is a must. It pairs perfectly with a scoop of vanilla ice cream or a dollop of whipped cream. For a fun twist, try drizzling caramel sauce over the top. You can also sprinkle some chopped nuts for crunch. These simple additions make your dessert even more special and delicious. Don't forget to check the Full Recipe for more ideas! {{image_2}} You can use different apples for this recipe. Try Fuji, Honeycrisp, or Gala apples. Each type brings a unique flavor. You can also mix in other fruits. Pears or berries work great too. They add extra sweetness and color. Feel free to experiment and find your favorite mix! If you have nut allergies, you can skip the nuts. The crisp still tastes great without them. You can also swap in seeds. Sunflower seeds or pumpkin seeds add crunch and nutrition. They keep the recipe safe and tasty for everyone. To make this dessert healthier, try reducing the sugar. You can cut the brown sugar by half. Another option is to use honey or maple syrup. These natural sweeteners work well and add flavor. You can also use whole wheat flour instead of all-purpose flour. This adds fiber and makes it more nutritious. For a low-calorie option, use a sugar substitute. This way, you can enjoy a delicious treat without too much sugar. For the complete details on making this delightful dish, check out the Full Recipe. To keep your Zucchini Apple Crisp fresh, let it cool down first. Place it in an airtight container. Store it in the fridge for up to four days. Make sure to cover it well. This helps keep the moisture in and prevents it from drying out. You can freeze Zucchini Apple Crisp if you want to enjoy it later. First, let it cool completely. Then, cut it into portions. Wrap each piece tightly in plastic wrap. Place the wrapped pieces in a freezer bag. Squeeze out any air, and seal it up. It can last in the freezer for about three months. When you are ready to eat it, just thaw it in the fridge overnight. Reheating your Zucchini Apple Crisp should keep it tasty. Preheat your oven to 350°F (175°C). Place the crisp in an oven-safe dish. Cover it with foil to prevent it from burning. Heat for about 15 minutes. If you want, you can microwave it for about one minute. Make sure to check it, so it doesn't get too hot. Enjoy it warm, and consider adding a scoop of ice cream to make it even better! Yes, you can use frozen zucchini or apples. Make sure to thaw them first. This helps keep the dessert from getting too watery. Drain any excess liquid after thawing. This way, you get a nice crisp without the sogginess. Yes, this dessert is quite healthy! Zucchini adds moisture and fiber. Apples provide vitamins and natural sweetness. Both have low calories and can fit into many diets. You get nutrients while enjoying something sweet. It’s a win-win! To make this dish gluten-free, swap the all-purpose flour. Use gluten-free flour blends instead. Make sure your oats are certified gluten-free. This way, you can enjoy the same great taste without gluten. This blog post covered a tasty Zucchini Apple Crisp recipe. We discussed the key ingredients needed for this dish. I shared easy steps for prepping and baking, along with helpful tips to enhance flavor. We also explored variations and healthy modifications for your tastes and needs. Finally, I provided storage tips to keep your dessert fresh. Enjoy making this simple, delicious treat! It’s a great way to sneak in some veggies while satisfying your sweet tooth.](https://cheftaling.com/wp-content/uploads/2025/06/d2a864f0-7c48-4963-b543-8b2169f2305a-300x300.webp)


![To make your Easy Green Goddess Lentil Tacos, gather these key items: - 1 cup green or brown lentils, rinsed - 2 cups vegetable broth - 1 tablespoon olive oil - 1 small onion, diced - 2 cloves garlic, minced - 1 teaspoon ground cumin - 1 teaspoon smoked paprika - Salt and pepper to taste - 8 small corn tortillas - 1 avocado, sliced - 1 cup cherry tomatoes, halved - ½ cup fresh cilantro, chopped - ½ cup Greek yogurt (or vegan sour cream for a dairy-free option) - Juice of 1 lime These ingredients work together to create a tasty and healthy taco. Lentils are protein-rich and filling. The spices add warmth and depth. The fresh veggies provide crunch and color. Feel free to jazz up your tacos with these optional toppings: - Shredded lettuce - Sliced jalapeños - Crumbled feta or queso fresco - Hot sauce for added spice - Lime wedges for extra zest These toppings can enhance flavor and texture. Choose what you like best to make each taco your own. If you have dietary needs, consider these easy swaps: - Use quinoa instead of lentils for a gluten-free option. - Swap Greek yogurt for a dairy-free yogurt or avocado for creaminess. - Replace corn tortillas with lettuce wraps for a low-carb choice. These substitutions ensure everyone can enjoy these tacos. Adapt the recipe to fit your needs while keeping it delicious. You can find the full recipe linked above for detailed steps! Start by rinsing 1 cup of green or brown lentils in cold water. This helps remove dirt and debris. In a medium saucepan, add the rinsed lentils and 2 cups of vegetable broth. Bring the mixture to a boil over high heat. Once boiling, reduce the heat to low and cover the pot. Let the lentils simmer for about 20 to 25 minutes. You want them tender but not mushy. If there is extra liquid, drain it away. This step is key for flavor and texture. While the lentils cook, take a skillet and heat 1 tablespoon of olive oil over medium heat. Once the oil is hot, add 1 small diced onion. Sauté for about 5 minutes, or until the onion turns translucent. Then, add 2 minced garlic cloves to the skillet. Cook for another 1 to 2 minutes until the garlic is fragrant. This adds a rich depth to your tacos. Next, stir in the cooked lentils, along with 1 teaspoon of ground cumin, 1 teaspoon of smoked paprika, salt, and pepper to taste. Cook this mixture for another 5 minutes, stirring occasionally. This helps the flavors blend beautifully. Now it’s time to put it all together. First, warm 8 small corn tortillas in a separate skillet for about 30 seconds on each side until they are soft. On each tortilla, spoon a generous amount of the lentil mixture. Top it with sliced avocado, halved cherry tomatoes, and a drizzle of the lime-cilantro yogurt sauce. To make this sauce, mix ½ cup of Greek yogurt with the juice of 1 lime, some salt, and half of the chopped cilantro. Finally, garnish your tacos with the remaining cilantro. Serve with lime wedges for an extra zing. Enjoy your Easy Green Goddess Lentil Tacos! For the full recipe, check out the [Full Recipe]. To get the best texture for your lentils, rinse them well. This step removes dust and dirt. Use green or brown lentils. They cook well and hold their shape. Simmer them in vegetable broth. This adds flavor and keeps them moist. Watch the cooking time. You want them tender, not mushy. If they seem dry, add a bit more broth. This keeps them creamy and full of taste. These tacos shine with fresh toppings. Avocado adds creaminess, while cherry tomatoes bring sweetness. Cilantro gives a fresh kick. A squeeze of lime brightens every bite. You can also serve these with a side of rice or a salad. Try some pickled red onions for an extra tang. This adds crunch and color to your plate. Don’t forget to pair them with your favorite hot sauce for a spicy twist! You can make the Green Goddess sauce your own. Start with Greek yogurt, or use vegan sour cream for a dairy-free option. Mix in lime juice for tang and salt for flavor. Add herbs like dill or parsley for more depth. Want it spicy? Toss in some chopped jalapeños or a dash of hot sauce. You can even blend in some avocado for creaminess. This sauce should match your taste, so feel free to experiment! For the full recipe, check out the Easy Green Goddess Lentil Tacos. {{image_2}} You can easily make these tacos even more veggie-packed. Try adding sautéed bell peppers or zucchini. These veggies add color and flavor. You can also mix in spinach for extra greens. Just toss them in while cooking the lentils. They will wilt nicely and blend in. This recipe is already close to vegan! To make it fully vegan, use vegan sour cream instead of Greek yogurt. You can find many brands in stores. They taste great and offer a creamy texture. Also, check the tortillas. Some may contain dairy, so pick corn tortillas that are 100% vegan. Want more protein? You can add cooked quinoa or black beans to the lentil mix. Both options boost protein and fiber. If you like meat, shredded chicken or beef works well too. Just make sure to season them with the same spices for a unified flavor. Store any leftover lentil tacos in an airtight container. This helps keep them fresh. You can keep them in the fridge for up to three days. For best taste, eat them soon. If you have extra lentil filling, store it separately from the tortillas. This way, the tortillas stay soft. To reheat, place the lentil filling in a skillet over medium heat. Stir often until it's warm. You can also use the microwave. Just put the lentils in a bowl and cover it. Heat for about one to two minutes. Tortillas can be warmed in a dry skillet for about 30 seconds on each side. This keeps them soft and tasty. You can freeze the lentil filling for later use. Place it in a freezer-safe bag or container. It lasts for up to three months in the freezer. When ready to eat, thaw the filling overnight in the fridge. Reheat it as mentioned before. Avoid freezing the tortillas, as they may become tough. Instead, wrap them in foil and store in the fridge. Enjoy your Easy Green Goddess Lentil Tacos whenever you want! For the full recipe, check [Full Recipe]. Lentil tacos stay fresh in the fridge for about 3 to 5 days. Store them in an airtight container. Keeping the lentil filling and toppings separate helps maintain flavor and texture. When you're ready to eat, just reheat the lentils. Warm the tortillas quickly in a pan. This keeps everything tasty and fresh. Yes, you can make the green goddess sauce ahead of time. It stays good in the fridge for about 3 to 4 days. Store it in a sealed container. This makes your meal prep easier. Just mix the sauce before serving the tacos. It adds a nice touch to the dish. Many side dishes go great with lentil tacos. Here are a few tasty ideas: - Mexican rice: A flavorful side that complements the tacos well. - Black beans: Rich in protein and perfect for adding variety. - Corn salad: A fresh and crunchy dish that brightens the meal. - Guacamole: Creamy and smooth, it pairs nicely with the tacos. - Grilled vegetables: Adds color and a smoky taste to your plate. Feel free to mix and match these sides based on your taste! For the full recipe, check out the Easy Green Goddess Lentil Tacos. In this article, we explored how to make easy green goddess lentil tacos. We covered key ingredients and optional toppings. I shared tips on cooking lentils and assembling tacos, plus ideas for personalizing your sauce. You learned about vegetarian and vegan options and how to store and reheat leftovers. These tasty tacos are simple and full of flavor. Enjoy making them your own!](https://cheftaling.com/wp-content/uploads/2025/06/97cb063d-ea5e-45f2-a7d8-84f316e97fd4-300x300.webp)

![- 1 cup quinoa, rinsed - 2 cups vegetable broth or water - 1 cup cherry tomatoes, halved - 1 cucumber, diced - 1 bell pepper (red or yellow), chopped - 1 cup corn (frozen and thawed or fresh) - 1 avocado, sliced - 1 cup spinach or mixed greens - ½ cup feta cheese, crumbled (optional) - ¼ cup fresh parsley, chopped The core of the Garden Fresh Quinoa Power Bowls starts with quinoa. This grain is packed with protein and fiber. It cooks easily and adds a nice texture. Next, we use fresh garden vegetables. Cherry tomatoes bring sweetness, while cucumbers add crunch. A bell pepper adds color and flavor. Corn completes the mix with its sweetness. You can add proteins like chicken or chickpeas for more nutrition. Toppings like avocado and feta cheese create a rich taste. - 2 tablespoons olive oil - 1 tablespoon fresh lemon juice - Salt and pepper to taste - ½ teaspoon cumin (optional) The dressing is simple yet tasty. Olive oil gives a smooth feel, while lemon juice adds a fresh zing. Salt and pepper enhance all the flavors. Cumin is optional but provides an earthy note. Together, these seasonings make the meal pop. - Calories per serving: Approximately 350 - Macronutrient breakdown: - Protein: 12g - Carbohydrates: 50g - Fat: 15g This meal packs a good punch in nutrients. Each serving brings around 350 calories, making it a filling choice. The protein helps build muscles, while carbs give you energy. Healthy fats from olive oil and avocado keep you full longer. You can enjoy this dish guilt-free! For the full recipe, check [Full Recipe]. To cook the quinoa, start by rinsing it well. Rinsing removes the bitter coating called saponin. Use a fine mesh strainer for best results. After rinsing, combine 1 cup of quinoa with 2 cups of vegetable broth or water in a medium saucepan. Bring it to a boil over high heat. Once boiling, reduce the heat to low, cover the pot, and let it simmer for 15 minutes. The quinoa should absorb all the liquid. After cooking, remove the pot from heat and let it sit for 5 minutes. Finally, fluff the quinoa with a fork for a light texture. While the quinoa cooks, prepare your vegetables. Start with the cherry tomatoes. Cut them in half and set them aside. Next, dice the cucumber and chop the bell pepper. Make sure to keep your cuts uniform for even mixing. If using corn, thaw it if frozen. Combine all the chopped vegetables in a large mixing bowl. This way, they mix well and create a tasty base for your power bowl. Now for the dressing! In a small bowl, whisk together 2 tablespoons of olive oil, 1 tablespoon of fresh lemon juice, and season with salt and pepper. If you like, add ½ teaspoon of cumin for extra flavor. Taste and adjust as needed. Once the quinoa is cool, add it to the bowl with the veggies. Pour the dressing over the mixture. Gently combine everything until it is evenly coated. Divide the mixture into serving bowls. Top each bowl with sliced avocado and, if you wish, crumbled feta cheese. Enjoy your fresh and energizing meal! For the full recipe, check the recipe section above. - Making ahead for quick lunches: Prepare the quinoa and veggies in advance. Store them in separate containers. This helps keep them fresh. You can mix them just before eating. - Storing tips for freshness: Keep the bowls in the fridge for up to two days. Use airtight containers to keep everything crisp. Add avocado just before serving to prevent browning. - Vegan and gluten-free alternatives: Use brown rice or millet instead of quinoa. Swap feta with a vegan cheese or omit it. Choose a gluten-free broth to keep it safe for all diets. - Seasonal vegetable suggestions: In summer, add zucchini or bell peppers. In winter, try roasted root veggies like carrots or sweet potatoes. These swaps add new flavors and colors to your bowl. - Overcooking quinoa: Cook quinoa until it is fluffy and water is absorbed. If you overcook, it can become mushy. Keep an eye on the time and liquid. - Imbalance of flavors: Ensure the dressing has enough seasoning. Taste as you mix. Add more salt, lemon juice, or cumin if needed. This helps create a well-rounded flavor in each bite. For the full recipe, check out the Garden Fresh Quinoa Power Bowls. {{image_2}} You can easily boost the protein in your quinoa power bowl. Chickpeas and black beans add great flavor and texture. They are also easy to prepare. Just rinse them well and toss them in. Grilled chicken or shrimp also work well. They add a nice, hearty feel to the meal. Cook them simply with salt and pepper for best results. To change up the taste, you can add different flavors. For a Mediterranean twist, mix in olives. They add a briny taste that pairs well with the fresh veggies. If you prefer a Southwestern flair, add beans and spices. You can use cumin, chili powder, or smoked paprika to give it a kick. This will make your bowl more exciting. Using local produce makes your dish fresh and fun. Visit your farmer's market to find seasonal fruits and veggies. For example, ripe tomatoes or fresh corn can enhance your bowl. You can also swap in whatever is in season. This keeps your meals interesting and supports local farmers. Store any leftover quinoa power bowls in the fridge. Use airtight containers to keep them fresh. Label the containers with the date. This way, you know when you made them. Keep the bowls in the fridge for up to 2 days. If you want to keep them longer, consider freezing. You can freeze quinoa power bowls. To do this, let the bowls cool completely. Then, place them in freezer-safe containers. Make sure to leave some space for expansion. When you’re ready to eat, thaw in the fridge overnight. Reheat in the microwave or on the stove until hot. Quinoa power bowls last for about 2 days in the fridge. If they smell sour or look off, they may be spoiled. Check for any mold or changes in texture. If you see any signs, it’s best to throw them away. Always trust your senses when it comes to food safety. To cook quinoa perfectly, start by rinsing it. Rinse under cold water for a few minutes. This removes the bitter coating. Use a ratio of 1 cup quinoa to 2 cups broth or water. Bring it to a boil, then lower the heat. Cover and simmer for 15 minutes. Once the liquid is absorbed, let it sit for 5 minutes. Fluff it with a fork for light and fluffy quinoa. Yes, you can make these bowls ahead of time. They are great for meal prep! Cook the quinoa and store it in the fridge for up to 4 days. Prepare the veggies and dressing separately. Mix everything together before serving. This keeps the veggies fresh and crunchy. Quinoa is a superfood packed with nutrients. It is high in protein and fiber. It contains all nine essential amino acids. Quinoa is gluten-free, making it great for many diets. It also has vitamins and minerals that support overall health. Eating quinoa can help you feel full longer. Absolutely! You can add any veggies you like. Try carrots, broccoli, or bell peppers. Use seasonal vegetables to keep it fresh. You can also mix in roasted vegetables for a different flavor. The options are endless, so customize it to your taste! Making a vegan dressing is simple! Swap out any dairy for plant-based options. Combine olive oil and lemon juice for a fresh taste. You can add herbs like basil or dill for extra flavor. Use salt and pepper to season. This way, your dressing stays light and healthy. For more details, check out the Full Recipe. You learned how to make delicious quinoa power bowls with fresh vegetables and tasty dressings. We covered main ingredients, cooking tips, and nutritional facts. I shared storage methods and answered common questions. Keep experimenting with flavors and toppings. This will make your meals fun and healthy. Enjoy your cooking, and remember, the best meals come from creativity and fresh ingredients!](https://cheftaling.com/wp-content/uploads/2025/06/f915e79d-4eac-41ab-b276-f90c41951754-300x300.webp)

![For a tasty Summer Veggie Skillet Stir-Fry, you need fresh veggies from the season. Here’s a list of what I recommend: - 2 tablespoons olive oil - 1 bell pepper (red, yellow, or orange), sliced - 1 small zucchini, sliced - 1 cup corn kernels (fresh or frozen) - 1 cup cherry tomatoes, halved - 1 cup snap peas, trimmed - 2 cloves garlic, minced - 1 tablespoon fresh ginger, grated - 2 tablespoons soy sauce (or tamari for gluten-free) - 1 teaspoon sesame oil - Salt and pepper to taste - Chopped fresh basil or cilantro for garnish I love using colorful bell peppers and sweet corn. They add nice flavor and look great in the dish. You can swap the zucchini for yellow squash if you want. Both work well! For pantry staples, olive oil is my choice for cooking. If you run out, avocado oil works too. Soy sauce gives the stir-fry a savory taste. Tamari is a great gluten-free option. Lastly, garnishes can elevate your dish. I suggest using fresh basil or cilantro. They add a burst of color and flavor. Serve your stir-fry in colorful bowls for a stunning look. For the full recipe, check the earlier section. Enjoy cooking this easy and delightful dish! Start by heating your skillet. Place it on medium-high heat and add 2 tablespoons of olive oil. This oil works well for stir-frying. It has a nice flavor and a high smoke point. Once the oil shimmers, you are ready for the next step. Now, add 2 cloves of minced garlic and 1 tablespoon of grated ginger. Stir them for about 30 seconds. You want to release their strong flavors. Be careful not to let them burn. If they burn, they will taste bitter. Next, it’s time for the veggies! Add 1 sliced bell pepper, 1 small sliced zucchini, and 1 cup of trimmed snap peas to the skillet. Stir-fry for about 3-4 minutes. This helps them soften but still remain crunchy. Then, toss in 1 cup of corn kernels and 1 cup of halved cherry tomatoes. Cook everything for another 2-3 minutes. The tomatoes should get slightly blistered, adding great flavor. Once the veggies look good, drizzle 2 tablespoons of soy sauce and 1 teaspoon of sesame oil over them. Stir well to mix the flavors. Taste and adjust with salt and pepper. This step is key for balancing flavors. When your stir-fry looks bright and colorful, remove the skillet from the heat. This helps prevent overcooking. To finish, sprinkle chopped fresh basil or cilantro on top for a beautiful look. You can serve your Summer Veggie Skillet Stir-Fry right away. For a complete meal, pair it with steamed rice or quinoa. Enjoy this simple and tasty dish! For the full recipe, check out the details above. To get that perfect stir-fry texture, use high heat. It helps cook the veggies fast and keeps them crisp. Heat your skillet until it’s hot before adding oil. This way, food will sear instead of steam. Quick cooking maintains the vibrant colors and fresh flavors of your veggies. One big mistake is overcrowding the skillet. When too many veggies are in, they won’t cook evenly. This can lead to soggy stir-fry. Cook in batches if needed. Also, pay attention to when you add each vegetable. Softer veggies, like tomatoes, should go in last. This keeps them from getting mushy. For stunning visuals, serve your stir-fry in colorful bowls. Top it with fresh herbs like basil or cilantro. These not only look great but also add flavor. Pair your stir-fry with jasmine rice or noodles for a complete meal. This combination makes every bite satisfying and delicious. For the full recipe, check out the Summer Veggie Skillet Stir-Fry. {{image_2}} You can easily change up this dish to fit your taste. Here are some ideas for proteins: - Tofu - Chicken - Shrimp Feel free to swap out vegetables based on the season. Some great choices are: - Broccoli - Carrots - Bell peppers Each of these will bring a new flavor to your skillet stir-fry. To make this dish gluten-free, simply use tamari instead of soy sauce. If you want to go vegan, replace any animal protein with tofu or add more veggies. You can also enhance the dish by adding nuts for added crunch. To boost the flavor, try adding some of these sauces or spice blends: - Sriracha for heat - Teriyaki for sweetness - Hoisin sauce for depth Consider herbs like cilantro or basil to brighten the dish. A sprinkle of sesame seeds can add extra crunch. You can mix and match these ideas to create your perfect summer veggie skillet stir-fry. For the full recipe, check here: [Full Recipe]. To keep your Summer Veggie Skillet Stir-Fry fresh, follow these steps: - Refrigerator Storage: Place leftovers in an airtight container. This helps keep moisture in and prevents odors from mixing. - Freezing Tips: If you want to freeze it, use a freezer-safe bag. Remove as much air as possible before sealing. This will help prevent freezer burn. To reheat your stir-fry and keep it tasty, use these methods: - Stovetop Method: Heat a skillet over medium heat. Add a splash of water or oil, then add your stir-fry. Stir often for about 5 minutes or until it’s hot. - Microwave Method: Place the stir-fry in a microwave-safe dish. Cover it with a lid or microwave-safe wrap. Heat for 2-3 minutes, stirring halfway to ensure even heating. These steps will help you enjoy your stir-fry again without losing flavor or texture. For the complete recipe, check out the Full Recipe section! Yes, you can use frozen vegetables. Frozen veggies are quick and easy. They are picked at peak ripeness. This keeps their flavor and nutrients. However, they may have more water. This can make your stir-fry a bit soggy. To avoid this, cook them a little longer. Sauté for a few extra minutes to help them cook evenly. You can tell vegetables are cooked by their color and texture. Bright colors mean freshness. For bell peppers, they should be tender but still crisp. Zucchini should be soft but not mushy. Snap peas should be bright green and tender. Tomatoes should be slightly blistered. Always taste a piece to check if they are done. This stir-fry pairs well with many sides. Here are some tasty options: - Steamed jasmine rice - Quinoa or brown rice - Noodles, like soba or rice noodles - A fresh green salad - Grilled chicken or tofu for protein To make your stir-fry more filling, add grains or protein. You can mix in cooked rice or quinoa. This adds bulk and nutrition. For protein, try adding tofu, chicken, or shrimp. Cook the protein first, then add your veggies. This way, you get a balanced meal. Enjoy the Full Recipe to explore more! You now have the tools to create a delicious Summer Veggie Skillet Stir-Fry. We covered essential ingredients, step-by-step cooking instructions, and tips for best practices. Remember to choose fresh veggies and right oils for flavor. Avoid common mistakes, like overcrowding the skillet. Experiment with add-ins to make it your own and ensure leftovers are stored well. This stir-fry is flexible and can fit various diets. Enjoy cooking and savoring this vibrant dish with your favorite sides. Your kitchen adventure starts now!](https://cheftaling.com/wp-content/uploads/2025/06/79c2b2c9-23c8-4b57-b18f-8311fb41d505-300x300.webp)
![- 2 cups fresh corn kernels (about 4 ears of corn) - 1 can (15 oz) black beans, rinsed and drained - 1 red bell pepper, finely diced - 1 small red onion, finely chopped - 2 cloves garlic, minced - 1 jalapeño, deseeded and minced - 1/4 cup fresh cilantro, chopped - Juice of 2 limes - 2 tablespoons olive oil - 1 teaspoon ground cumin - Salt and pepper to taste - Mini tortilla cups (store-bought or homemade) - Large skillet - Mixing bowls - Whisk - Serving platter To make the best Charred Corn & Black Bean Salsa Cups, use fresh ingredients. Fresh corn gives a sweet flavor. Start with about 4 ears of corn. Shuck the corn and cut off the kernels. You need 2 cups of kernels for the salsa. Next, black beans add a creamy texture. Use one can, rinsed and drained. This saves time, but you can use dry beans if you prefer. Just cook them first. Red bell peppers add color and crunch. Dice one finely for a nice bite. A small red onion brings sweetness. Chop it finely to avoid overpowering the other tastes. Garlic is key for flavor. Use 2 cloves, minced. A jalapeño adds heat. Make sure to remove the seeds if you want less spice. Cilantro gives a fresh taste. Use a quarter cup, chopped. For the dressing, squeeze the juice of 2 limes. Add 2 tablespoons of olive oil and 1 teaspoon of ground cumin. Season with salt and pepper to taste. You can serve the salsa in mini tortilla cups. You can buy these or make them at home. These cups hold the salsa well. They add a fun touch to your snack! For a complete guide, check the Full Recipe. To start, you need to char the corn. Heat a large skillet over medium-high heat. Add 1 tablespoon of olive oil to the skillet. Once hot, add 2 cups of fresh corn kernels. Cook these corn kernels for about 7 to 10 minutes, stirring occasionally. You want them to get a nice char. This gives the corn a sweet, smoky flavor. After charring, remove the corn from heat and let it cool slightly. While the corn cools, gather your other salsa ingredients. You will need one can of black beans, a finely diced red bell pepper, a small finely chopped red onion, two minced garlic cloves, one deseeded and minced jalapeño, and 1/4 cup of chopped fresh cilantro. Take a large bowl and combine all these ingredients along with the charred corn. Next, let’s dress the salsa. In a small bowl, whisk together the juice of 2 limes, 2 tablespoons of olive oil, 1 teaspoon of ground cumin, and some salt and pepper to taste. This dressing adds a zesty kick to the salsa. Pour this mixture over the salsa ingredients. Gently toss everything together until well mixed. The flavors will blend nicely as you mix. Now, it’s time to fill the mini tortilla cups. Take each cup and fill it with the corn and black bean salsa mixture. Make sure to fill them generously, but don’t overfill. Arrange the filled cups on a serving platter. This makes for a beautiful presentation. For a final touch, you can garnish each cup with a sprig of cilantro and a lime wedge on the side. This adds color and a fresh look to your dish. Enjoy making these Charred Corn & Black Bean Salsa Cups! For the complete instructions, check out the Full Recipe. To get the best char on your corn, heat your skillet first. A hot skillet will give you that nice, crispy texture. Use medium-high heat for the best results. Add a tablespoon of olive oil before the corn. Stir the corn occasionally as it cooks. This helps it char evenly and not burn. You can make the salsa a bit before the party. Keep the corn and black beans separate from the other veggies. This helps keep everything fresh. Mix the salsa right before serving. This way, your salsa stays bright and tasty. To make your salsa cups look great, add a sprig of cilantro on top. You can also place a lime wedge next to each cup. This adds color and freshness. When you arrange the cups on a platter, keep them close but not touching. This makes it easy for guests to grab one. For a fun touch, use a colorful platter that matches your theme. For the full recipe, check out the [Full Recipe]. {{image_2}} You can easily switch beans or veggies in this salsa. Try using pinto beans or kidney beans for a new taste. You can also add avocado or diced mango for a sweet touch. If you prefer a different citrus flavor, swap lime juice for lemon juice. This small change can brighten the dish in a new way. Adjusting the heat in your salsa is simple. If you like more spice, add more jalapeño. You can also toss in a pinch of cayenne pepper for an extra kick. On the other hand, if you want it milder, cut back on the jalapeño. Always taste as you go to get it just right for your palate. If you follow a gluten-free diet, look for gluten-free tortilla cups. Many brands create tasty options that fit your needs. For a vegan-friendly version, make sure to use plant-based dressings. You can blend olive oil, vinegar, and herbs for a fresh, tasty topping. These changes allow everyone to enjoy this dish without worry. To keep salsa fresh, store it in an airtight container. Make sure to refrigerate it right after your meal. This will help prevent spoilage. When you store the salsa, try to press plastic wrap directly on the surface. This reduces air exposure. For the tortilla cups, keep them in a separate bag or container. They stay crispy longer this way. Avoid stacking them to prevent breakage. You can freeze salsa, but it may change in texture. To freeze, pour the salsa into a freezer-safe bag. Remove as much air as possible before sealing. Label the bag with the date, then place it in the freezer. When you're ready to eat it, thaw the salsa overnight in the fridge. Reheat it gently on the stove or in the microwave. Stir well before serving. In the fridge, salsa usually lasts about 3 to 5 days. Always check for signs of spoilage. Look for changes in color or smell. If it smells off or has mold, throw it away. The tortilla cups can last about a week when stored properly. Keep an eye on them for any signs of moisture. If they feel soft, it's best to discard them. Enjoy your Charred Corn & Black Bean Salsa Cups while fresh for the best taste! For the complete recipe, check the Full Recipe section. To add spice, you can use more jalapeño. You can also add a pinch of cayenne pepper. Another option is to mix in some hot sauce. Taste as you go to find your perfect heat level. Yes, you can serve the salsa in small bowls or on crispy tortilla chips. You can even use lettuce leaves for a fresh wrap. This makes it fun for gatherings and adds variety. It takes about 15 minutes to prep and 15 minutes to cook. So, in total, you will spend around 30 minutes. This quick time makes it easy to whip up for any event. These salsa cups are great for parties, game days, or family gatherings. Pair them with guacamole or fresh salsa for a complete snack spread. They also go well with drinks like margaritas or iced tea. This blog post covered how to make Charred Corn & Black Bean Salsa Cups. We explored fresh ingredients, essential tools, and simple steps for preparation. You learned tips for making the salsa ahead of time and keeping it fresh. We also discussed delicious variations and storage tips. Now you have all you need to impress your guests with this tasty dish. Enjoy sharing your salsa cups at your next gathering!](https://cheftaling.com/wp-content/uploads/2025/06/9a15d43e-3638-4694-bba8-ad42f9efa39a-300x300.webp)

![- 4 medium zucchinis (zoodles) - 2 tablespoons olive oil - 4 cloves garlic, minced - 1 teaspoon dried oregano - 1 teaspoon dried basil - 1/2 teaspoon red pepper flakes (optional) - Salt and pepper to taste - 1 cup cherry tomatoes, halved - 1/4 cup fresh parsley, chopped - 1/4 cup grated Parmesan cheese (optional for serving) Gathering fresh, high-quality ingredients is key to making Garlic-Herb Zoodle Bowls. The zucchinis serve as the base, giving you those delightful zoodles. I love using medium zucchinis for the right texture. Olive oil brings richness, while garlic adds that aromatic kick. Herbs like oregano and basil bring the dish alive. They pair perfectly with the fresh tomatoes. If you enjoy a little heat, add the red pepper flakes. Everyone has their own taste, so feel free to skip them if you prefer milder flavors. Once you have your ingredients ready, season with salt and pepper. This step enhances all the flavors. Topping your dish with parsley and Parmesan makes it look and taste amazing. It’s all about those finishing touches! For a complete guide, check out the Full Recipe. To start, spiralize the zucchinis. A spiralizer works best for this. It creates long, curly strands. If you lack a spiralizer, use a vegetable peeler. Just peel the zucchini into thin strips. Both methods give you tasty zoodles. Next, heat the olive oil in a large skillet over medium heat. Once it's hot, add the minced garlic. Sauté the garlic for about one minute. You want it fragrant but not burnt. Then, add the zoodles to the skillet. Cook for 3 to 4 minutes. Toss them often so they cook evenly. You want them tender but still slightly crunchy. Now, sprinkle dried oregano and basil over the zoodles. If you want some heat, add red pepper flakes. Season with salt and pepper to taste, and toss everything together. After that, add the halved cherry tomatoes. Cook for another 2 minutes, warming them through. Finally, remove the skillet from heat. Stir in the fresh parsley for a burst of flavor. Serve the zoodle bowls warm. If you like, top them with grated Parmesan cheese. This adds a nice creaminess. For the full recipe, check the provided link. Enjoy your meal! To avoid soggy zoodles, follow these tips: - Spiralize your zucchinis just before cooking. This keeps them fresh and firm. - After spiralizing, sprinkle salt on the zoodles. Let them sit for 10 minutes, then pat dry. This removes excess moisture. - Cook zoodles over medium heat for 3-4 minutes. This time keeps them tender yet crunchy. To elevate the taste of your zoodle bowls, consider these herbs: - Fresh basil or thyme can add bright flavors. - Chopped chives or dill can give a nice twist. For spice lovers, add more red pepper flakes. You can also use crushed red pepper for extra heat. Making zoodles in advance is simple. - Spiralize and store them in an airtight container in the fridge for up to 2 days. - Keep leftover zoodles and sauce separate. This maintains their texture. - Reheat zoodles gently in a skillet. Add a splash of olive oil to keep them from drying out. For the full recipe, check out the complete Garlic-Herb Zoodle Bowls recipe! {{image_2}} For a vegan version of Garlic-Herb Zoodle Bowls, skip the Parmesan cheese. You can use nutritional yeast for a cheesy flavor without dairy. Swap olive oil for a plant-based oil if you prefer. If you need a gluten-free dish, rest easy. Zucchini is naturally gluten-free. Just ensure that any sauces you use are gluten-free. You can switch out zoodles for other vegetables. Try spiralized carrots or sweet potatoes for a fun twist. These add different flavors and textures to your meal. For a heartier dish, add protein. Grilled chicken, shrimp, or chickpeas work well. They boost the protein content and make the meal more filling. While the garlic and herbs shine in this recipe, other sauces can add flair. Consider using pesto for a fresh taste. Tomato sauce or a light vinaigrette also pairs nicely with zoodles. For creamy variations, try adding a dollop of Greek yogurt or a splash of coconut cream. This gives a rich texture and a new flavor to your Garlic-Herb Zoodle Bowls. Explore these variations to find your perfect bowl! For the complete recipe, check out the Full Recipe. You can store leftover Garlic-Herb Zoodle Bowls in the fridge. They last for about three days. Use an airtight container to keep them fresh. Glass containers work well. They do not absorb smells or stains. Plastic containers are also fine but may stain over time. Freezing zoodles is a smart way to keep them fresh longer. Start by blanching zoodles in boiling water for one minute. Quickly transfer them to ice water to stop the cooking. Drain and pat them dry. Place zoodles in a freezer-safe bag. Remove as much air as possible before sealing. They can last up to three months in the freezer. When you're ready to use them, thaw zoodles in the fridge overnight. You can also thaw them in warm water for a quick option. To reheat, sauté them in a pan for just a few minutes. When reheating zoodles, keep the texture in mind. You want them warm but not mushy. Heat a skillet over medium heat. Add a splash of olive oil and toss in the zoodles. Sauté for about two to three minutes. Stir often to avoid sticking. Adding a splash of water can help steam them gently. This keeps the zoodles tender yet firm. Always season again if needed. Enjoy your zoodle bowls just as good as when you made them! For the full recipe, check out the [Full Recipe]. Zoodles are noodles made from zucchini. They are a low-carb, healthy alternative to pasta. Zoodles are light and fresh, perfect for many dishes. They add color and nutrients to your meals. Zoodles keep well, and they absorb flavors nicely. You can enjoy them raw or cooked. Yes! If you don’t have a spiralizer, use a vegetable peeler. A peeler can create thin strips of zucchini. You can also use a box grater to make smaller zoodles. Just be sure to cut the zucchini into even pieces for cooking. Each method works well and gives you tasty zoodles. To make these zoodle bowls gluten-free, focus on your ingredients. Olive oil, garlic, and veggies are naturally gluten-free. For cheese, use gluten-free options or skip it. Be careful with pre-made sauces; always check labels. Fresh herbs and spices add flavor without gluten. You can enjoy a delicious meal without worry. Zoodle bowls pair well with many proteins. Grilled chicken or shrimp adds a nice touch. Try adding chickpeas for a plant-based option. You can also serve zoodles with a side salad for extra crunch. A slice of crusty bread complements the meal too. Explore these options to enhance your zoodle experience. In this blog post, we explored how to create delicious garlic-herb zoodle bowls. We covered key ingredients like zoodles, olive oil, and various seasonings. You learned to prepare zoodles, cook them perfectly, and add finishing touches. We shared tips for storage, meal prep, and variations to suit your dietary needs. These zoodle bowls are easy to make and fun to customize. Enjoy experimenting with flavors and ingredients to make this dish your own.](https://cheftaling.com/wp-content/uploads/2025/06/7d803c44-bd25-4021-8554-485f76ecda2a-300x300.webp)


![- 20 jumbo pasta shells - 1 lb ground beef (or turkey) - 1 packet taco seasoning (store-bought or homemade) - 1 cup black beans - 1 cup corn kernels - 1 cup salsa - 2 cups shredded cheddar cheese - 1 cup sour cream - 1/4 cup chopped fresh cilantro - Salt and pepper to taste Gathering your ingredients is key. Start with the jumbo pasta shells. They hold the filling well and make each bite tasty. Ground beef is my go-to, but turkey works too if you want a leaner dish. Next, the taco seasoning adds that classic flavor we all love. Black beans and corn are great for extra texture and nutrients. Salsa brings moisture and a bit of zest. Then there's the shredded cheddar cheese, which melts into gooey goodness. Sour cream adds a creamy touch when serving. Lastly, a sprinkle of fresh cilantro brightens the dish. - Large pot - Skillet - Baking dish - Measuring cups and spoons You’ll need a large pot to boil the pasta shells. A skillet helps cook the meat and mix in the fillings. A baking dish holds everything together in the oven. Don't forget measuring cups and spoons for precise amounts. Having the right tools makes cooking easier and more fun! Set your oven to 375°F (190°C). This step is key for even cooking. Boil a large pot of salted water. Cook the jumbo pasta shells until they are al dente. This usually takes about 8-10 minutes. Drain the shells and set them aside to cool. In a large skillet, brown 1 pound of ground beef over medium heat. This will take around 5-7 minutes. Once the meat is cooked, drain any excess fat. Stir in 1 packet of taco seasoning, along with 1 cup of black beans, 1 cup of corn, and 1 cup of salsa. Cook this mixture for another 3-5 minutes. It helps all the flavors blend together. Season with salt and pepper to taste. Take each cooked shell and fill it with the taco mixture. Be generous with the filling! Place the stuffed shells in a greased baking dish with their open side facing up. Sprinkle 2 cups of shredded cheddar cheese evenly over the stuffed shells. This will melt and create a delicious topping. Cover the baking dish with aluminum foil. Bake for 20 minutes. After that, remove the foil and bake for an additional 10 minutes. This helps the cheese become bubbly and slightly golden. Enjoy making this dish with the full recipe, and get ready for a tasty meal! To get the best texture for your shells, cook them al dente. This means they should be firm but not hard. Follow the package instructions, but check a minute or two early. This helps avoid mushy shells later. After cooking, drain them and let them cool slightly. This makes them easier to handle when you stuff them. Want to give your cheesy taco stuffed shells a twist? You can add spices like cumin or chili powder. If you enjoy a bit more crunch, consider adding diced bell peppers or jalapeños. Also, you can swap out the ground beef for turkey or chicken for a lighter meal. Don’t be shy—mix in your favorite ingredients! Make your dish look as good as it tastes. After baking, drizzle sour cream on top of the shells. This adds a creamy touch and enhances the flavor. Sprinkle chopped cilantro over the dish for a pop of color. The green herbs make your meal visually appealing and fresh. For more ideas, check out the Full Recipe. {{image_2}} You can change up the protein in your cheesy taco stuffed shells. Ground turkey or chicken works well. These meats are leaner but still pack great flavor. Just brown them the same way as ground beef. The taco seasoning will make them taste amazing. If you want a meat-free version, try lentils or extra beans. Lentils have a nice texture and soak up spices. You can also use black beans, pinto beans, or even chickpeas. Just mix them into the filling. This way, you still get the cheesy goodness without meat. Cheese is key to this dish. While cheddar is classic, feel free to explore other types. Monterey Jack adds a creamy twist. Pepper jack gives a spicy kick. You can even mix different cheeses for more flavor. Just make sure to use cheese that melts well. For the full recipe, check out the [Full Recipe]. To store leftovers, let the cheesy taco stuffed shells cool first. Then, place them in an airtight container. Make sure to cover the top with plastic wrap or foil. This keeps them fresh. They will last in the fridge for about 3 to 5 days. Always check for any signs of spoilage before eating. Freezing is a great way to keep cheesy taco stuffed shells for later. First, let them cool completely. Then, pack them in a freezer-safe container. You can also wrap each shell in foil for extra protection. They can stay in the freezer for up to 3 months. Just remember to label the container with the date. To reheat, you can use the oven or the microwave. For the oven, preheat it to 350°F (175°C). Place the shells in a baking dish, cover with foil, and heat for 20 minutes. This keeps the shells moist. If using a microwave, place a shell on a plate. Heat for 1 to 2 minutes, checking often. Enjoy your cheesy taco stuffed shells warm and tasty! Yes, you can make cheesy taco stuffed shells in advance. Prepare the filling and stuff the shells. Place them in a baking dish. Cover the dish with plastic wrap and store it in the fridge. You can do this a day before baking. When you're ready, just bake it straight from the fridge. This saves time and makes for a quick meal. If you don't have taco seasoning, you can create your own mix. Combine chili powder, cumin, garlic powder, onion powder, and paprika. Use equal parts of each spice. This gives a great flavor boost. You can also try Italian seasoning for a fun twist. To add heat, include diced jalapeños or hot sauce in the filling. You can also mix in crushed red pepper flakes. Another option is to use spicy salsa instead of regular salsa. Start with a small amount and adjust to your taste. Yes, you can easily make this recipe gluten-free. Use gluten-free jumbo pasta shells. Many brands offer these now. Check the label to ensure it's gluten-free. This way, everyone can enjoy cheesy taco stuffed shells. For the filling, just make sure your taco seasoning is gluten-free too. For the complete recipe, check out the [Full Recipe]. In this blog post, we explored how to create delicious cheesy taco stuffed shells. We covered key ingredients, cooking tools, and step-by-step instructions. You can customize the dish with various proteins or fresh toppings. Remember to store any leftovers properly for later enjoyment. This dish is versatile and easy, perfect for any table. Transform dinner with these tasty shells that your friends and family will love. Enjoy the process and make it your own!](https://cheftaling.com/wp-content/uploads/2025/06/85548e47-b62b-4707-a899-1bf24ca5c5fa-300x300.webp)
![- 1 lb boneless, skinless chicken thighs, cut into chunks - 1 cup plain yogurt - 2 tablespoons lemon juice - 2 teaspoons ground cumin - 2 teaspoons ground coriander - 1 teaspoon garam masala - 1 teaspoon turmeric - 1 teaspoon paprika - 4 cloves garlic, minced - 1-inch piece fresh ginger, grated - 1 onion, finely chopped - 1 can (14 oz) crushed tomatoes - 1 cup coconut milk - Salt, to taste - Fresh cilantro, for garnish 1. In a bowl, mix yogurt, lemon juice, cumin, coriander, garam masala, turmeric, paprika, garlic, and ginger. 2. Add chicken chunks and coat them well. Cover the bowl. 3. Refrigerate for at least 1 hour. For best taste, marinate overnight. 1. Heat vegetable oil in a large skillet over medium heat. 2. Add chopped onion and sauté until soft and clear. This takes about 5-7 minutes. 3. Add the marinated chicken to the skillet and cook for about 7-8 minutes. Stir until chicken is no longer pink. 1. Add crushed tomatoes and coconut milk to the skillet. Stir to combine. 2. Bring the mixture to a gentle simmer. 3. Reduce heat to low and let it cook for 15-20 minutes. This helps the flavors mix well and the sauce thicken. 4. Season with salt to taste. To dive deeper into this recipe, check the Full Recipe for more details! To make your chicken tikka masala even tastier, try these spice tips: - Add more heat: If you like spice, increase the garam masala. - Sweeten the sauce: A little sugar balances the heat. - Citrus twist: A splash of lime juice brightens the dish. Pair your meal with these side dishes for a complete dinner: - Fluffy basmati rice: It soaks up the rich sauce well. - Warm naan bread: Perfect for scooping up the tikka masala. Sautéing is key for great flavor. Here’s how to do it right: - Heat oil in a skillet until hot. - Add onions and stir until they turn soft and golden. Simmering is essential too. It lets the flavors mix well: - After adding tomatoes and coconut milk, lower the heat. - Let it cook gently for 15-20 minutes to thicken the sauce. Want to switch things up? Try these proteins: - Shrimp: Cook quickly and soak up flavors. - Tofu: A great plant-based option that absorbs spices well. For a vegetarian twist, use chickpeas instead of chicken: - They add protein and texture. Just cook them until tender. Serve your chicken tikka masala with these pairings: - Rice: Basmati is the best choice for this dish. - Naan: Soft and warm, it’s perfect for dipping. For a special touch, garnish your dish with: - Fresh cilantro: It adds color and flavor. - Lemon wedges: A squeeze enhances the taste. You can find the Full Recipe for more details on how to make this dish. After you finish your meal, let the chicken tikka masala cool down. This step helps keep it fresh. Once cool, place it in a clean container. Use airtight containers to keep moisture in and air out. Glass or plastic containers both work well. Label the container with the date. This way, you’ll know how old it is. When you want to enjoy your leftovers, reheating properly is key. The best way is to use a stove. Pour the chicken tikka masala into a pot. Heat it on low, stirring often. This helps keep the flavors rich. If you want to use a microwave, put the dish in for short bursts. Stir in between each burst to heat evenly. If you have more leftovers than you can eat, freezing is a great option. You can freeze the chicken tikka masala in a freezer-safe container. Make sure to leave some space at the top for expansion. You can keep it in the freezer for about three months. When you’re ready to eat it, thaw it in the fridge overnight. Then reheat it as you normally would. For the Full Recipe, check the link for step-by-step instructions. {{image_2}} You should marinate the chicken for at least one hour. For best results, I recommend marinating it overnight. This lets the flavors soak in deeply. The yogurt helps tenderize the chicken, making it juicy and tasty. Yes, you can make chicken tikka masala in advance! Cook the dish and let it cool. Store it in an airtight container in the fridge. When you are ready to eat, reheat it on the stove over low heat. Stir it often to keep it from sticking. You can also freeze it for up to three months. Just thaw it overnight in the fridge before reheating. If you don't have coconut milk, there are good substitutes. You can use heavy cream for a rich taste. If you want a non-dairy option, almond milk works well. Just add a little more spice to keep the flavor strong. You can also blend silken tofu with some water. This will give you a creamy texture without the coconut flavor. To make a tasty Chicken Tikka Masala, gather these simple ingredients: - 1 lb (450g) boneless, skinless chicken thighs, cut into chunks - 1 cup plain yogurt - 2 tablespoons lemon juice - 2 teaspoons ground cumin - 2 teaspoons ground coriander - 1 teaspoon garam masala - 1 teaspoon turmeric - 1 teaspoon paprika - 4 cloves garlic, minced - 1-inch piece fresh ginger, grated - 1 tablespoon vegetable oil - 1 onion, finely chopped - 1 can (14 oz) crushed tomatoes - 1 cup coconut milk - Salt, to taste - Fresh cilantro, for garnish Start by mixing yogurt, lemon juice, spices, garlic, and ginger in a bowl. This mix becomes your marinade. Next, add the chicken chunks and coat them well. Cover the bowl and let the chicken sit in the fridge for at least one hour. For best results, marinate it overnight. Now, heat the vegetable oil in a large skillet. Add the chopped onion and cook until it turns soft and clear. This step usually takes about 5-7 minutes. Then, add the marinated chicken, leaving out any extra marinade. Stir the chicken for 7-8 minutes until it turns white and is no longer pink. Next, pour in the crushed tomatoes and coconut milk. Mix everything together and bring it to a gentle simmer. Lower the heat and let it cook for about 15-20 minutes. This helps all the flavors mix well and the sauce to thicken. Adjust the salt to your taste. Finally, garnish with fresh cilantro before serving. For a great meal, serve it over fluffy basmati rice and with warm naan. For detailed steps, check the [Full Recipe]. This blog post covered how to make a simple and tasty chicken tikka masala. You learned about the main ingredients, from chicken thighs to spices. We went through marinating, cooking, and adding a rich sauce of tomatoes and coconut milk. You now have tips to enhance flavors and even variations to try. Remember to store leftovers properly and reheating tips to keep that delicious taste. Enjoy your cooking adventure and feel free to explore other options. Happy cooking!](https://cheftaling.com/wp-content/uploads/2025/06/a1732122-e948-4be8-9648-efabc0e2994b-300x300.webp)


![To make spicy roasted cauliflower bites, you need a few key items: - 1 large head of cauliflower, cut into bite-sized florets - 3 tablespoons olive oil - 1 teaspoon smoked paprika - 1 teaspoon garlic powder - 1/2 teaspoon cayenne pepper (adjust for spice level) - 1 teaspoon ground cumin - Salt and pepper to taste These ingredients create a tasty base. Each adds its own flavor. The smoked paprika gives a warm, smoky taste. Garlic powder adds depth, while cayenne brings the heat. You can add a few extras for more flavor: - 2 tablespoons grated Parmesan cheese (for a cheesy kick) - Fresh parsley, chopped (for garnish) The cheese melts and creates a rich layer. Parsley brightens the dish and adds color. Feel free to mix and match based on your taste! For a fun touch, try serving these bites with: - Yogurt dip - Hummus - A squeeze of lemon juice These options add creaminess and balance the spice. Each bite becomes a new experience! Want to create this dish? Check out the Full Recipe for all the details. To start, gather your ingredients. You will need one large head of cauliflower and some spices. Cut the cauliflower into bite-sized florets. This helps them roast evenly. Next, take a large bowl and add three tablespoons of olive oil. Then, add one teaspoon of smoked paprika, one teaspoon of garlic powder, and half a teaspoon of cayenne pepper. Adjust the cayenne if you want less heat. Add one teaspoon of ground cumin, salt, and pepper to taste. Mix these well to form a spicy marinade. Once mixed, add the cauliflower florets. Toss them well in the marinade until each piece is coated. This step infuses the flavor into the cauliflower. Preheat your oven to 425°F (220°C). To make cleanup easier, line a baking sheet with parchment paper. After preheating, spread the coated cauliflower florets in a single layer on the baking sheet. Make sure they are not crowded. Roast the cauliflower for 25-30 minutes. Flip them halfway through for even cooking. You want them golden brown and crispy on the edges. If you like cheese, sprinkle two tablespoons of grated Parmesan cheese on top in the last five minutes of roasting. This adds a nice cheesy flavor. For crispy bites, do not overcrowd the baking sheet. Give each piece space to breathe. Another tip is to flip the florets halfway through cooking. This ensures they brown evenly. If you want extra crunch, try using a convection setting if your oven has one. When done, let the cauliflower cool for a few minutes. Garnish with fresh chopped parsley before serving. Enjoy your tasty spicy roasted cauliflower bites! For the full recipe, check out the recipe section. To get the right spice, start with cayenne pepper. Use half a teaspoon for a mild kick. If you love heat, add more. Taste the marinade before coating the cauliflower. This lets you adjust the spice to your liking. You can also add chili powder or hot sauce for extra flavor. Roasting at 425°F (220°C) gives the best texture. Make sure to cut the cauliflower into even pieces. This helps them cook at the same rate. Don't crowd the baking sheet. Space the florets out so they crisp up nicely. Flipping them halfway through ensures even browning. You can boost flavor in many ways. Try adding lemon juice or zest before serving for brightness. Fresh herbs like thyme or rosemary can add a lovely aroma. A sprinkle of smoked salt can deepen the taste. For a cheesy twist, mix in nutritional yeast before roasting. Follow the [Full Recipe] for the main steps, but feel free to explore! {{image_2}} For a tasty twist, you can add cheese. Use grated Parmesan cheese for a rich flavor. Just sprinkle it on top during the last five minutes of roasting. The cheese melts beautifully, creating a crispy crust. You'll love how it enhances the bites! You can easily make this snack vegan. Simply skip the cheese altogether. The spices and olive oil provide plenty of flavor. You won’t miss the cheese at all. This version is still creamy and satisfying. Feel free to mix up the spices to fit your taste. Here are some ideas: - Curry Powder: Add a warm, earthy flavor. - Chili Powder: For an extra kick, use more heat. - Italian Herbs: Basil and oregano give a fresh twist. - Smoked Paprika: Add depth and a hint of sweetness. Experimenting with spices can create new and exciting flavors. Each option offers a unique taste experience, keeping your snack time fresh and fun! For the full recipe, check out the Spicy Roasted Cauliflower Bites 🥦 section. To store leftover spicy roasted cauliflower bites, let them cool first. Place them in an airtight container. They stay fresh for up to three days in the fridge. Make sure to cover them well to keep moisture out. This helps maintain their flavor and texture. When you're ready to enjoy your leftovers, reheating is key. Preheat your oven to 375°F (190°C). Spread the cauliflower bites on a baking sheet in a single layer. Heat them for 10-15 minutes. This method helps them regain their crispy edges. Avoid using the microwave, as it can make them soggy. You can freeze these bites for later use. First, let them cool completely. Then, arrange them in a single layer on a baking sheet. Freeze for about an hour until solid. After that, transfer the bites to a freezer-safe bag. They can last up to three months in the freezer. When you're ready to eat, bake them from frozen. Adjust the cooking time to ensure they heat through and crisp up nicely. For the full recipe, check out the section above. Yes, you can make spicy roasted cauliflower bites gluten-free. The main ingredients are safe. Just make sure to use gluten-free options for any dips or sauces you serve with them. Many store-bought sauces contain gluten, so check labels. To change the spice levels, adjust the cayenne pepper. If you like it hot, add more. For a milder flavor, reduce the amount. You can also add other spices like chili powder or paprika. Taste the marinade before adding cauliflower to find your perfect heat. You can serve these bites with many tasty options. Try a cool yogurt dip or creamy hummus for balance. Fresh veggies or a simple salad also make great side dishes. For something hearty, pair them with rice or quinoa. They are perfect for snacking or as a side! For the full recipe, check out the Spicy Roasted Cauliflower Bites section. In this article, we explored how to make spicy roasted cauliflower bites. You learned about the main and optional ingredients, along with serving suggestions. We covered preparation steps, roasting methods, and tips for crispiness. Remember, you can adjust spice levels to suit your taste. These bites can delight as a snack or a side dish. Keep experimenting with flavors and enjoy the crunchy goodness fresh or reheated. Try these tips for great results every time. Enjoy your cooking!](https://cheftaling.com/wp-content/uploads/2025/06/64d510a1-9ffd-4c18-9129-5f004802fbde-300x300.webp)
![To make this creamy avocado herb pasta, gather the following ingredients: - 12 oz pasta (linguine or fettuccine works well) - 2 ripe avocados, halved and pitted - 1/4 cup fresh basil leaves - 1/4 cup fresh parsley leaves - 2 cloves garlic, minced - 2 tablespoons lemon juice - 1/4 cup Greek yogurt (or a dairy-free alternative) - 1/4 cup grated Parmesan cheese (optional, or use nutritional yeast for a vegan option) - 1 tablespoon olive oil - Salt and pepper to taste - Cherry tomatoes, halved (for garnish) - Crushed red pepper flakes (optional, for heat) You can add your touch to this dish with these optional ingredients: - Grilled chicken or shrimp for protein - Spinach or kale for extra greens - Sun-dried tomatoes for a burst of flavor - Pine nuts or walnuts for crunch Using quality ingredients makes a difference. Here are some trusted brands and substitutes: - Pasta: Barilla or De Cecco are good choices. - Avocados: Look for Hass avocados for the best flavor. - Greek Yogurt: Fage or Chobani for creamy texture. - Parmesan Cheese: Bel Gioioso or Grana Padano for rich taste. - Olive Oil: Extra virgin olive oil from California Olive Ranch or Kirkland. Feel free to explore these options to suit your taste. For the full recipe, check the link above! To start, boil a large pot of salted water. Add 12 ounces of pasta, like linguine or fettuccine. Cook it according to the package directions. You want it to be al dente, which means it should still have some bite. This usually takes about 8 to 10 minutes. Before you drain, save 1 cup of the pasta water. This starchy water helps the sauce stick. After saving the water, drain the pasta and set it aside. Next, grab a food processor to make the sauce. Cut two ripe avocados in half and remove the pit. Scoop the flesh into the processor. Add 1/4 cup fresh basil leaves, 1/4 cup fresh parsley leaves, and two minced garlic cloves. Pour in 2 tablespoons of lemon juice and 1/4 cup of Greek yogurt. For a richer taste, include 1/4 cup of grated Parmesan cheese, but this is optional. Drizzle in 1 tablespoon of olive oil. Blend everything until smooth. If the sauce is too thick, slowly add some reserved pasta water until you reach a creamy texture. Now it's time to mix the pasta and sauce. In the pot you used for cooking the pasta, combine the drained pasta with the avocado sauce. Toss everything together well. Make sure each piece of pasta is coated in that creamy goodness. If the sauce seems thick, add a bit more reserved pasta water, one tablespoon at a time. Finally, taste your pasta and season with salt and pepper. If you like some heat, sprinkle in crushed red pepper flakes. Serve your creamy avocado herb pasta on plates and top with halved cherry tomatoes for a fresh touch. You can also add more herbs if you want. For the full recipe, check out the section above. To get the best creamy texture, start with ripe avocados. They should be soft but not brown. Use a food processor for blending. This tool helps mix everything well. When mixing, add a little pasta water slowly. This helps reach the right smoothness. If your sauce is still thick, keep adding water. The goal is a creamy sauce that coats the pasta nicely. A common mistake is not reserving enough pasta water. Always save at least one cup before draining. This water is starchy and helps the sauce stick. If you skip this step, your pasta may feel dry. Another mistake is overcooking the pasta. Follow the package instructions closely for al dente. Overcooked pasta can turn mushy and lose its flavor. You can make this dish even better with extras. Add a squeeze of lime juice for a zesty kick. Try mixing in some sun-dried tomatoes for a sweet touch. If you want heat, crushed red pepper flakes work well. You can also stir in cooked chicken or shrimp for protein. Fresh herbs like cilantro or dill can add a new twist. Feel free to experiment and find what you love! For the full recipe, check out [Full Recipe]. {{image_2}} You can easily make this creamy avocado herb pasta vegan. Just swap Greek yogurt with a plant-based yogurt. Use nutritional yeast instead of Parmesan cheese for a cheesy flavor. This keeps the dish creamy without dairy. You won’t miss a thing! Want more protein? Add cooked chicken, shrimp, or chickpeas to the pasta. Grilled chicken adds nice flavor and texture. Shrimp cooks fast and tastes great with the sauce. For a plant-based option, chickpeas give a nice bite and extra protein. Just mix them in before serving. You can make this dish even healthier by adding greens. Spinach or kale works well. Just chop the greens and stir them in after mixing the pasta and sauce. They will wilt slightly but still add vibrant color and nutrition. It’s a simple way to boost your meal. For the full recipe, check out the link above. After enjoying your creamy avocado herb pasta, you may have some left. To store it, place the pasta in an airtight container. Make sure it is cool before sealing. This helps keep the pasta fresh. It will last in the fridge for up to three days. If you notice the sauce thickening, add a splash of water when reheating. When you are ready to eat the leftovers, reheating is simple. You can use the microwave or the stove. If you use the microwave, heat it in short bursts. Stir between each burst to warm it evenly. On the stove, add a little water to the pan. This prevents sticking and keeps it creamy. Stir frequently to ensure even heating. You can freeze this pasta, but it may change the texture. If you want to freeze it, do so right after cooking. Use a freezer-safe container to prevent freezer burn. It will keep for about one month. When you are ready to eat, thaw it in the fridge overnight. For the best taste, I recommend refrigerating if you plan to eat it soon. For more details, check out the full recipe to enjoy your dish again! Yes, you can make this dish ahead of time. Cook the pasta and prepare the avocado sauce. Keep them separate until you are ready to eat. This way, the pasta stays fresh and does not get soggy. You can store both in the fridge. When you are ready, simply mix them together. Heat the pasta slightly, if needed. If you want to skip Greek yogurt, you have great options. You can use sour cream, silken tofu, or a dairy-free yogurt. These will give you a nice creamy texture. You can also use more avocado for a richer taste. Just blend it well to keep the sauce smooth. The avocado sauce stays fresh for about 2 days in the fridge. To keep it from turning brown, cover it tightly with plastic wrap. This helps keep the air out. If the color changes a bit, it’s still safe to eat, but it may not look as nice. Always give it a quick smell and taste before using. For the full recipe, check out the detailed instructions above. You learned how to make creamy avocado herb pasta with fresh ingredients and easy steps. By customizing with optional ingredients, you can make this dish your own. Use tips to avoid mistakes and get the perfect texture. Variations let you suit your taste and diet. Store your leftovers properly to keep them fresh. Overall, this dish is not only tasty but also simple. I hope you enjoy making and sharing it!](https://cheftaling.com/wp-content/uploads/2025/06/d3468d24-5f93-4aa9-b9b6-b560320e7df4-300x300.webp)
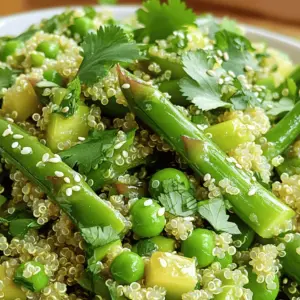
![Chicken and Vegetables This dish needs: - 4 boneless, skinless chicken breasts - 3 cups mixed vegetables (like broccoli, bell peppers, and cherry tomatoes) First, the chicken is the star. It stays juicy and flavorful. The mixed veggies add color and crunch. You can choose your favorites for this dish. Marinade Components For the marinade, gather: - 4 cloves garlic, minced - 1 large lemon (zested and juiced) - 3 tablespoons olive oil - 1 teaspoon dried oregano - 1 teaspoon salt - ½ teaspoon black pepper These ingredients blend to create a bright and tasty marinade. Garlic adds depth, while lemon gives a refreshing zing. The olive oil helps keep the chicken moist. Oregano, salt, and pepper enhance the flavor. Fresh Herbs Chopped fresh parsley is a great choice. It adds a pop of color and freshness. You can sprinkle it on top before serving. Other herbs like basil or thyme work too. Additional Flavor Enhancers For extra flavor, consider adding lemon slices on top. They add a bright look and a citrus hint. You can also serve with a side of warm bread to soak up the juices. For the full recipe, check out the [Full Recipe]. - Preheat the Oven First, set your oven to 400°F (200°C). This high heat helps cook the chicken and veggies quickly. - Prepare the Marinade In a small bowl, mix together: - 4 cloves garlic, minced - Juice and zest of 1 large lemon - 3 tablespoons olive oil - 1 teaspoon dried oregano - 1 teaspoon salt - ½ teaspoon black pepper Stir well until combined. This marinade is key for flavor. - Arranging Chicken and Vegetables Grab a large baking sheet. Place 4 boneless, skinless chicken breasts on one side. On the other side, arrange 3 cups of mixed vegetables like broccoli, bell peppers, and cherry tomatoes. - Coating with Marinade Pour half of the marinade over the chicken. Rub it in well. Drizzle the rest over the veggies. Toss them gently to ensure even coating. - Baking Instructions Slide the baking sheet into the preheated oven. Bake for 25-30 minutes. The chicken should be golden, and the veggies tender. - Checking for Doneness Use a meat thermometer to check the chicken. It should reach 165°F (74°C). If it’s not done, give it a few more minutes. Let everything rest for a few minutes after baking. For a detailed guide, refer to the Full Recipe. Ensuring Juicy Chicken To keep your chicken juicy, marinate it well. The mix of lemon juice and olive oil works wonders. Let the chicken sit in the marinade for at least 15 minutes. This time lets the flavors really soak in. For even better results, you can marinate it overnight in the fridge. When cooking, make sure the chicken reaches an internal temperature of 165°F (74°C). This ensures it is safe to eat and still juicy. Proper Vegetable Cooking Times Different veggies cook at different rates. For this dish, use vegetables like broccoli and bell peppers. These cook well within the same time frame as the chicken. Cut them into similar-sized pieces for even cooking. If you want to add softer veggies, like zucchini, add them halfway through cooking. This keeps them from getting mushy. Substituting Ingredients Feel free to mix and match ingredients. If you don’t have chicken breasts, try thighs or even tofu. You can also change the vegetables based on what you have. Green beans, carrots, or asparagus work great too. Use whatever is fresh and in season for the best taste. Adding Extra Seasonings Want to boost the flavor? Add spices like paprika or red pepper flakes for a kick. You can also try fresh herbs like thyme or rosemary. Toss them in with the veggies for an extra layer of taste. A little squeeze of lemon just before serving adds brightness too. This recipe is all about making it your own! For the full recipe, check the details above. {{image_2}} Different Proteins You can switch the chicken for other proteins. Try using turkey, pork, or tofu. Each choice brings a unique taste. Turkey works well with the same marinade. Pork adds a richer flavor. Tofu absorbs the marinade nicely, making it a great plant-based option. Seasonal Vegetable Options Feel free to use different veggies based on the season. In spring, add asparagus or snap peas. Summer calls for zucchini or corn. In fall, try Brussels sprouts or sweet potatoes. Winter is perfect for root vegetables like carrots and parsnips. Mixing and matching keeps the dish fresh and exciting. Stovetop Variation If you prefer the stovetop, heat a large skillet over medium-high heat. Add olive oil and sear the chicken for about 5-6 minutes on each side. Once browned, add the veggies and the marinade. Cover and cook for about 15 minutes, until everything is tender and cooked through. Slow Cooker Approach For a slow cooker option, place the chicken and veggies in the cooker. Pour the marinade over them. Cook on low for 6-8 hours or high for 3-4 hours. This method makes the chicken very tender and lets the flavors blend beautifully. You can serve this with rice or quinoa for a hearty meal. For the full recipe, check out the details in the earlier sections. After you enjoy your One-Pan Garlic Lemon Chicken & Veggies, store the leftovers properly. - Refrigeration Guidelines: Place the chicken and veggies in an airtight container. They stay fresh for about 3 to 4 days in the fridge. Always let the dish cool before sealing it. This helps prevent moisture buildup. - Freezing Tips: If you want to keep the dish longer, freeze it! Use a freezer-safe container or a heavy-duty freezer bag. Make sure to remove as much air as possible. The meal will keep well for up to 3 months. When you're ready to eat, just thaw it overnight in the fridge. Reheating the dish correctly keeps it tasty and fresh. - Best Practices for Reheating: Use the oven or microwave. If you use the oven, preheat it to 350°F (175°C). Place the chicken and veggies on a baking sheet. Heat for about 15-20 minutes, until warmed through. If using a microwave, cover with a microwave-safe lid. Heat in short bursts, stirring in between. - Maintaining Flavor and Texture: To keep the chicken juicy, add a splash of chicken broth or a drizzle of olive oil during reheating. For the veggies, a quick stir can prevent them from becoming soggy. How do I know when the chicken is cooked? You can check if the chicken is done by using a meat thermometer. The chicken should reach 165°F (74°C). If you don't have a thermometer, cut into the thickest part. The meat should be white and juices should run clear. Can I use frozen vegetables for this recipe? Yes, you can use frozen vegetables. They are quick and easy. Just keep in mind they may release some water while cooking. Drain any excess liquid to avoid soggy veggies. Can I make this with skin-on chicken? Definitely! Skin-on chicken adds crispy texture. Just adjust the cooking time. Skin may take a bit longer to crisp up. Make sure to check the internal temperature to ensure it's safe to eat. What are some suitable side dishes to serve with this? You can serve this dish with rice or quinoa for a hearty meal. A fresh salad also pairs nicely. Consider garlic bread for a tasty addition. Enjoy experimenting with different sides to match your taste! This blog post covered the essentials for making a delicious dish. We discussed main ingredients like chicken and veggies, and how to create a tasty marinade. I walked you through step-by-step instructions for preparation, assembling, and cooking. I shared tips for juicy chicken and cooking times for veggies. You can also explore fun variations and learn how to store leftovers properly. With practice, you will master this recipe and enjoy delightful meals. Embrace your inner chef and get cooking!](https://cheftaling.com/wp-content/uploads/2025/06/ad5254af-7e45-4513-be23-a5b039c7e1fd-300x300.webp)
![The right mix of ingredients makes Vegan Harvest Sweet Potato Salad a delight. Here’s what you need to gather: - Sweet Potatoes - Quinoa - Dried Cranberries - Walnuts - Baby Spinach - Red Onion - Fresh Parsley - Olive Oil - Maple Syrup - Apple Cider Vinegar - Salt and Pepper Each ingredient plays a key role in flavor and texture. Sweet potatoes add creaminess and a natural sweetness. Quinoa offers a nutty taste and protein boost. Dried cranberries bring a hint of tartness, while walnuts add crunch. Baby spinach adds freshness and color. Red onion gives a sharp bite, and fresh parsley provides a bright finish. For the dressing, olive oil offers richness, while maple syrup adds sweetness. Apple cider vinegar helps balance the flavors with a tangy touch. Salt and pepper enhance everything, making this salad stand out. You can find the full recipe in the article. Enjoy creating your delicious salad! Preheating the Oven First, preheat your oven to 400°F (200°C). This step ensures the sweet potatoes roast nicely. A hot oven gives them that soft and sweet texture we love. Roasting the Sweet Potatoes Next, take your cubed sweet potatoes and spread them on a baking sheet. Drizzle with olive oil and sprinkle some salt and pepper. Roast them in the oven for 25 to 30 minutes. Flip them halfway through to ensure they cook evenly. They should be tender and slightly caramelized when done. Cooking the Quinoa While the sweet potatoes roast, it’s time to cook the quinoa. In a saucepan, combine 1 cup of rinsed quinoa with 2 cups of water and a pinch of salt. Bring it to a boil, then lower the heat. Cover and let it simmer for about 15 minutes. The quinoa should be fluffy and all the water should be absorbed. Combining Ingredients Once both the sweet potatoes and quinoa are ready, grab a large bowl. Combine the cooked quinoa, roasted sweet potatoes, finely chopped spinach, dried cranberries, walnuts, red onion, and parsley. Mix them gently to keep the sweet potatoes intact. Adding the Dressing In a small bowl, whisk together 2 tablespoons of maple syrup and 1 tablespoon of apple cider vinegar. Pour this dressing over your salad mix and toss it gently. This adds a nice zing to the flavors. Adjusting Seasoning Finally, taste your salad. If needed, add more salt and pepper to suit your taste. Let the salad sit for about 10 minutes before serving. This wait allows the flavors to blend nicely. For the complete recipe, check the [Full Recipe]. How to Roast Sweet Potatoes Roasting sweet potatoes makes them sweet and tender. Start by preheating your oven to 400°F (200°C). Cube the sweet potatoes into bite-sized pieces. Spread them on a baking sheet and drizzle with olive oil. Add a sprinkle of salt and pepper to enhance the flavor. Roast for 25-30 minutes, flipping halfway. Look for a golden brown color for perfect doneness. Best Practices for Cooking Quinoa Quinoa is easy to cook and is packed with protein. Rinse one cup of quinoa under cold water to remove bitterness. In a saucepan, combine the rinsed quinoa with two cups of water and a pinch of salt. Bring it to a boil. Then, lower the heat, cover, and simmer for 15 minutes. The quinoa is ready when it’s fluffy, and all the water is absorbed. Balancing Flavors This salad shines with a mix of flavors. Sweet potatoes bring sweetness, while cranberries add a fruity touch. The walnuts give a nice crunch, and the spinach offers freshness. A simple dressing of maple syrup and apple cider vinegar ties it together. Taste as you go! Adjust the salt and pepper to find the right balance that you love. Serving Suggestions Serve the salad in a large, colorful bowl to make it pop. This allows each ingredient to shine. You can also layer the salad for a beautiful display. Start with quinoa, then add sweet potatoes and the rest of the ingredients. This creates a delightful visual. Garnishing Ideas Garnish with extra chopped walnuts and parsley for color. You can also add a sprinkle of sesame seeds or a few slices of avocado for a creamier texture. These small touches make your salad look gourmet and inviting. For the full recipe, check the instructions above. Enjoy creating this vibrant dish! {{image_2}} Substituting Nuts If you don't like walnuts, you can swap them out. Try using sunflower seeds or pumpkin seeds instead. These options add crunch and nutrition. You can also skip nuts if allergies are a concern. The salad will still taste great without them. Adding Additional Vegetables Feel free to get creative with your veggies. You can add bell peppers for color or cucumbers for crunch. Roasted zucchini or carrots also work well. The goal is to make it your own. Just remember to keep the balance of flavors. Different Dressings to Try The dressing is key to flavor. You can switch up the maple syrup and apple cider vinegar. Try a tahini dressing or a lemon vinaigrette for a zesty twist. A balsamic glaze also pairs nicely with sweet potatoes. Taste and adjust until it suits you. Herb Variations Herbs can elevate your salad. Fresh basil or mint can add a new layer of flavor. If you want something stronger, try dill or cilantro. Just chop them finely and mix them in. Fresh herbs brighten the dish and make it more inviting. For the full recipe, check out the Vegan Harvest Sweet Potato Salad. Enjoy experimenting! To keep your Vegan Harvest Sweet Potato Salad fresh, store it in an airtight container. This helps keep the flavors intact. Make sure to refrigerate it right after serving. If you leave it out too long, bacteria can grow. When reheating, I suggest using a microwave. Heat it in short bursts to avoid overcooking. Stir it gently to heat evenly. You can also enjoy it cold, which gives a refreshing taste. In the fridge, the salad lasts about three to five days. Keep it sealed to prevent odors from other foods. If you notice any off smells or changes in texture, it might be best to toss it. You can freeze the salad, but some ingredients may change. If you plan to freeze it, skip the fresh spinach and parsley. They don’t freeze well. Instead, pack the rest in a freezer-safe bag. It can last up to three months in the freezer. When you’re ready to eat, thaw it in the fridge overnight before serving. Can I make this salad ahead of time? Yes, you can make this salad ahead of time. The flavors blend well after some time in the fridge. Just store it in an airtight container. It stays fresh for up to three days. What can I serve with Vegan Harvest Sweet Potato Salad? You can serve this salad with many dishes. It pairs well with grilled veggies, tofu, or a warm grain bowl. For a full meal, add a side of crusty bread or a light soup. Is this salad gluten-free? Yes, this salad is gluten-free. The ingredients, like sweet potatoes and quinoa, do not contain gluten. Always check labels to ensure no hidden gluten in ingredients. How healthy is a sweet potato salad? Sweet potato salad is very healthy. Sweet potatoes are rich in vitamins and fiber. Quinoa adds protein and iron. This salad is a filling option for any meal. What are the health benefits of the ingredients used? Each ingredient has health benefits: - Sweet Potatoes: High in beta-carotene and fiber. - Quinoa: A complete protein with all nine essential amino acids. - Dried Cranberries: Packed with antioxidants. - Walnuts: Good source of omega-3 fatty acids. - Baby Spinach: Rich in iron and vitamins A and K. - Red Onion: Offers anti-inflammatory properties. - Parsley: Supports digestion and is high in vitamin C. - Olive Oil: Healthy fat that aids heart health. - Maple Syrup: Natural sweetener with minerals. - Apple Cider Vinegar: May help with blood sugar control. This blog post covered a vibrant sweet potato salad that combines healthy ingredients. You learned how to roast sweet potatoes, cook quinoa, and mix in fresh greens and nuts. I shared tips on flavors, presentation, and storage to help make this dish shine. Remember, you can always adjust the recipe to fit your taste! Experiment with different nuts or dressings for unique flavors. Enjoy your cooking!](https://cheftaling.com/wp-content/uploads/2025/06/f66d8a20-7124-4d1b-b5de-339957d81b53-300x300.webp)