• Home
  • Recipe Index
    • Desserts
    • Dinner
    • Appetizer
    • Drinks
  • About
  • Contact
  • Privacy Policy
menu icon
go to homepage
  • Home
  • Recipe Index
    • Desserts
    • Dinner
    • Appetizer
    • Drinks
  • About
  • Contact
  • Privacy Policy

search icon
Homepage link
  • Home
  • Recipe Index
    • Desserts
    • Dinner
    • Appetizer
    • Drinks
  • About
  • Contact
  • Privacy Policy

×
Natalie

Natalie

Natalie is a passionate food storyteller and recipe developer at Taling’s Recipes, where she brings her love of seasonal ingredients and approachable cooking to life.

Her culinary path started in farmers’ markets, where she discovered the beauty of cooking with what’s fresh and local. Over time, she honed her skills in home kitchens and community gatherings, creating comforting meals that balance flavor with simplicity. Today, Natalie shares her recipes with a global audience, inspiring home cooks to embrace creativity, confidence, and joy in everyday meals.

  • - 4 boneless, skinless chicken breasts - 1 cup fresh cranberries (or frozen, if out of season) - 1 orange, zested and juiced - 2 tablespoons honey - 1 tablespoon olive oil - 1 teaspoon garlic powder - 1 teaspoon onion powder - Salt and pepper to taste - Fresh parsley, chopped, for garnish Use fresh chicken for the best flavor. Look for breasts that are pink and firm. Fresh cranberries should feel hard and smooth. If using frozen, check they are not freezer burned. For the orange, choose one that feels heavy for its size. This means more juice. Honey should be pure and raw if possible. This adds a rich taste to your dish. You can swap chicken for tofu or tempeh for a plant-based meal. For a low-sugar option, replace honey with a sugar-free sweetener. If you are allergic to cranberries, use pomegranate seeds. For a gluten-free version, ensure your seasonings are free of gluten. This recipe is flexible and can fit many diets! {{ingredient_image_1}} Start by patting the chicken breasts dry with paper towels. This helps the seasonings stick. Next, season both sides with salt, pepper, garlic powder, and onion powder. This mix adds great flavor. Make sure to cover the entire surface for the best taste. Heat a large skillet over medium-high heat and add the olive oil. Once the oil is hot, add the seasoned chicken breasts. Cook for 6-7 minutes on each side. You want them golden brown and fully cooked. Check the thickest part to ensure it's no longer pink. Once done, remove the chicken from the skillet. Set it aside on a plate while you make the sauce. In the same skillet, toss in the fresh cranberries, orange zest, orange juice, and honey. Stir well, scraping up all the tasty bits stuck to the pan. This adds depth to the sauce. Let the mixture simmer for 5-6 minutes. You will see the cranberries pop and create a nice sauce. It should thicken up nicely. Once ready, return the chicken to the skillet. Spoon the cranberry orange sauce over the chicken. Cook for an extra 2-3 minutes to warm everything through. This step makes the chicken juicy and flavorful. To get that perfect golden-brown chicken, start by drying the chicken breasts. Use paper towels to remove any moisture. This step helps the chicken sear better. Season both sides well with salt, pepper, garlic powder, and onion powder. Heat olive oil in your skillet until it shimmers. Cook the chicken for about 6-7 minutes on each side. Don't rush this; the golden color comes from a good sear. If the skillet is too crowded, the chicken will steam instead of brown. Give each piece space! The sauce in this dish should be thick and rich. After cooking the chicken, use the same skillet to make the sauce. Add fresh cranberries, orange zest, orange juice, and honey. Stir well, scraping the tasty bits from the bottom. Let it simmer for 5-6 minutes. Watch for the cranberries to burst. This creates a lovely sauce. If it seems too thin, let it simmer a bit longer. Remember, the sauce should cling to the chicken nicely. Fresh herbs can elevate your dish. For this recipe, I recommend using chopped fresh parsley as a garnish. It adds a nice pop of color and freshness. You can also experiment with other herbs like thyme or rosemary. Add them to the sauce for extra flavor. Just remember to chop them finely. This way, they mix well with the sauce and chicken. Fresh herbs make every bite more exciting! Pro Tips Use Fresh Cranberries: Fresh cranberries offer the best flavor and texture. If you can find them, they will enhance the dish significantly. Don't Overcook the Chicken: To ensure the chicken stays juicy, avoid overcooking it. Use a meat thermometer to check for an internal temperature of 165°F (75°C). Adjust Sweetness: Depending on your taste, you can adjust the amount of honey. Start with less, and add more if you prefer a sweeter sauce. Garnish for Color: Fresh parsley not only adds a pop of color but also a fresh flavor that complements the cranberry orange sauce beautifully. {{image_2}} You can swap chicken for turkey or pork. Turkey cutlets work well and stay juicy. Pork tenderloin also adds a nice touch. Just adjust cooking times to ensure they are done. For a plant-based option, try tofu. Press and marinate it in the orange juice for flavor. Cook it until golden and crispy for a tasty twist. Adding veggies makes this dish even better. Try green beans or spinach for color and nutrition. You can sauté them in the skillet after cooking the chicken. Bell peppers or carrots can also add sweetness. Just make sure they cook well before adding the sauce. This change will enhance the meal and make it more filling. Spices can elevate your Cranberry Orange Chicken Skillet. Add a pinch of cinnamon for warmth. A bit of cayenne pepper adds heat and depth. You can also sprinkle in some rosemary or thyme for an earthy flavor. These spices work well with the sweetness of the cranberries and orange. Mix and match to find your favorite flavor profile! To keep your Cranberry Orange Chicken Skillet fresh, let it cool first. Place the chicken and sauce in an airtight container. Store it in the fridge for up to three days. This way, the flavors stay nice and bright. If you want to keep it longer, freezing is a great option. When you are ready to enjoy the leftovers, reheat the chicken in a skillet. Add a splash of water or broth to keep it moist. Heat over medium until warm. You can also use the microwave. Just cover it with a lid or wrap it to avoid drying out. To freeze, divide the chicken and sauce into portions. Use freezer-safe bags or containers. Remove as much air as possible from the bags. Label them with the date so you know how long they have been stored. It can stay in the freezer for up to three months. When you are ready to eat, thaw it overnight in the fridge before reheating. Yes, you can use dried cranberries. They will add sweetness and chewiness. However, you may need to adjust the honey. Dried cranberries are sweeter, so use less honey. If you want a tart flavor, consider adding a splash of orange juice. This dish pairs well with several sides. Here are some ideas: - Rice or quinoa for a filling base. - Mashed potatoes for a creamy texture. - Steamed green beans or broccoli for crunch. - A simple salad for freshness. These sides balance the sweet and tangy flavors of the chicken. Cranberry Orange Chicken Skillet lasts about three to four days in the fridge. Make sure to store it in an airtight container. When you reheat, use low heat to keep the chicken moist. Enjoy it as a quick meal on busy days. This blog post covered all the key points for making Cranberry Orange Chicken. We discussed the essential ingredients, tips for quality, and possible substitutions for different diets. You learned how to prepare, cook, and make that tasty sauce. I shared tips for golden brown chicken and sauce consistency. Now you have options for variations, storage, and answers to common questions. Enjoy creating your dish and feel free to experiment. Each step can lead to a delicious meal that fits your tastes perfectly.
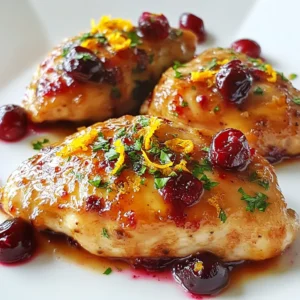
    Cranberry Orange Chicken Skillet Flavorful Weeknight Meal
  • - 4 boneless, skinless chicken thighs - 1 can (20 oz) pineapple chunks, drained (reserve juice) - 1 red bell pepper, sliced - 1 green bell pepper, sliced - 1 red onion, sliced - 3 cloves garlic, minced - 1 tablespoon fresh ginger, grated - 2 tablespoons soy sauce - 2 tablespoons olive oil - 1 tablespoon honey - 1 teaspoon sesame oil - Salt and pepper to taste - Chopped green onions and sesame seeds for garnish For this recipe, you need: - 4 chicken thighs (about 1.5 pounds) - 1 can of pineapple (20 oz) - 1 red bell pepper - 1 green bell pepper - 1 red onion - 3 cloves of garlic - 1 tablespoon of ginger - 2 tablespoons soy sauce - 2 tablespoons olive oil - 1 tablespoon honey - 1 teaspoon sesame oil - Salt and pepper to taste Preparation methods include: - Slice the bell peppers and onion. - Mince the garlic. - Grate the ginger. If you want to switch things up, consider these options: - Use chicken breasts instead of thighs for a leaner choice. - Try firm tofu or shrimp for a different protein. - Use seasonal veggies like zucchini or snap peas for fresh flavor. - Swap pineapple for mango for a unique twist. {{ingredient_image_1}} Preheating the oven First, set your oven to 425°F (220°C). This high heat helps the chicken cook quickly and stay juicy. Marinating process In a bowl, mix the reserved pineapple juice, soy sauce, olive oil, honey, minced garlic, grated ginger, sesame oil, salt, and pepper. This marinade adds great flavor. Place the chicken thighs in a zip-top bag and pour half of the marinade over them. Seal the bag tight. Let it marinate in the fridge for at least 30 minutes. If you have time, two hours will give even more taste. Combining ingredients in a bowl In another large bowl, add the sliced red and green bell peppers, red onion, and pineapple chunks. Pour the rest of the marinade over the veggies and fruit. Tossing methods for even coating Use your hands or a spoon to toss everything well. This step ensures every piece is covered in the tasty marinade. Arranging ingredients on the sheet pan Now, take the marinated chicken from the bag and place it in the middle of the sheet pan. Arrange the vegetable and pineapple mix around the chicken. Cooking times and temperatures Bake everything in the oven for 25-30 minutes. The chicken is done when it reaches an internal temperature of 165°F (75°C). Optional broiling steps for caramelization For a crispy finish, broil the dish for an extra 2-3 minutes. This step adds a nice char to the chicken and veggies, making them even more delicious. For great flavor, marinate the chicken for 30 minutes to 2 hours. This time helps the chicken soak in all the tasty juices. If you marinate too long, the chicken can become mushy. A good rule is to stick to the 2-hour mark. Always keep the chicken in the fridge while it marinates. To know when your chicken is done, check its internal temperature. It should reach 165°F (75°C). You can use a meat thermometer for accuracy. If you don’t have one, look for clear juices when you cut into the chicken. If the juices run clear, it’s ready! Also, the meat should be firm and no longer pink. For a fun presentation, serve the chicken right from the sheet pan. This brings a family-style feel to your meal. You can also plate the chicken over rice for a nice touch. Drizzle some extra marinade on top for flavor. Finally, sprinkle chopped green onions and sesame seeds to add color and texture to your dish. Pro Tips Marinate for Maximum Flavor: Letting the chicken marinate for at least 2 hours (or overnight) enhances the flavor and tenderness of the meat. Use Fresh Ingredients: Fresh garlic and ginger can significantly elevate the dish's flavor profile compared to dried versions. Customize Your Veggies: Feel free to add other colorful vegetables like zucchini or snap peas for added texture and nutrition. Perfectly Cooked Chicken: Ensure your chicken reaches an internal temperature of 165°F (75°C) for safe consumption and optimal juiciness. {{image_2}} You can easily switch out the protein in this dish. If you want a plant-based option, try tofu. Tofu soaks up the marinade well, giving you great flavor. If you prefer seafood, shrimp works nicely too. Just remember, shrimp cooks faster than chicken. For veggies, use what’s in season. Zucchini, asparagus, or broccoli can add a fun twist to this recipe. To boost the flavor, add some spices or herbs. A pinch of red pepper flakes can add heat. Fresh cilantro or basil can also enhance the dish. You can try different sauces too. For a kick, use teriyaki or sweet chili sauce. If you want a tangy flavor, a splash of lime juice can work wonders. This meal pairs well with rice, salad, or grains. Serve it over fluffy jasmine rice for a tasty combo. You can also try it with quinoa for a healthy twist. If you have leftovers, get creative! Shred the chicken and use it in tacos or wraps. You can also toss it in a salad for a quick lunch. Store any leftover Hawaiian chicken in an airtight container. This keeps it fresh and tasty. You can keep it in the fridge for up to four days. Always let it cool before sealing. This helps prevent moisture buildup. To freeze, place the chicken and veggies in a freezer-safe bag. Remove as much air as possible. This helps prevent freezer burn. You can freeze it for up to three months. When ready to eat, thaw it in the fridge overnight. Reheat in the oven at 350°F (175°C) until hot. This recipe is great for meal prep. You can make a double batch and store it. Divide into portions for easy lunches or dinners. Cook once and enjoy multiple meals! It saves time and keeps you on track with healthy eating. Yes, you can use chicken breasts. However, chicken thighs have more fat, which gives them a juicier flavor. Thighs also stay tender when cooked. Breasts can dry out if overcooked. If you prefer breasts, check the cooking time closely. The ideal marinating time is 30 minutes to 2 hours. This helps the chicken soak in the flavors. If you are short on time, even 30 minutes will add a nice taste. For the best results, aim for 1 to 2 hours. You can serve Hawaiian chicken with many sides. Here are some great options: - Steamed rice or jasmine rice - Quinoa for a healthy choice - A fresh green salad - Grilled vegetables for extra flavor - Coconut rice for a tropical twist These sides complement the sweet and savory chicken well. In this post, I covered key ingredients for Hawaiian chicken, preparation steps, and helpful tips. You learned how to effectively marinate and cook chicken thighs, as well as alternative ingredients to try. Remember, the right preparation and serving can elevate your dish. Feel free to experiment with flavors and sides that suit your taste. Enjoy creating your own delicious version of this meal!
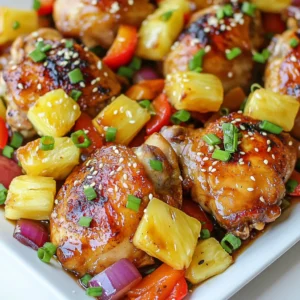
    Sheet Pan Hawaiian Chicken Deliciously Simple Dinner
  • To make Honey Sriracha Chicken Bites, gather these ingredients: - 1 pound chicken breast, cut into bite-sized pieces - 1/2 cup all-purpose flour - 1/2 teaspoon salt - 1/2 teaspoon black pepper - 1 teaspoon garlic powder - 1/2 teaspoon paprika - 1/4 cup honey - 1/4 cup Sriracha sauce - 2 tablespoons soy sauce - 1 tablespoon rice vinegar - 1 tablespoon sesame oil - 2 green onions, chopped (for garnish) - Sesame seeds (for garnish) You can swap some ingredients if needed. Use cornstarch instead of flour for a gluten-free option. Honey can be replaced with maple syrup for a vegan twist. If you want less heat, use a mild chili sauce instead of Sriracha. For soy sauce, try coconut aminos for a lower-sodium choice. Lastly, add minced garlic if you prefer fresh over garlic powder. To prepare this dish, you'll need a few tools: - A medium bowl for mixing the flour mixture - A large skillet for frying the chicken - A small bowl for whisking the sauce - Tongs or a slotted spoon to handle the chicken - A paper towel-lined plate to drain excess oil - A serving platter for presentation With these ingredients and tools, you're ready to create a delicious snack that everyone will love! {{ingredient_image_1}} First, gather your chicken breast. Cut it into bite-sized pieces. This helps them cook evenly. In a medium bowl, mix the flour, salt, pepper, garlic powder, and paprika. This blend adds flavor and crunch. Toss the chicken pieces in this mixture. Make sure each piece gets coated well. This step is key for a crispy bite. Next, heat a few tablespoons of oil in a large skillet over medium-high heat. When the oil is hot, add the coated chicken pieces in batches. Don't crowd the pan; this helps them brown nicely. Cook each batch for about 4-5 minutes. Look for a golden brown color and ensure they are cooked through. Once cooked, place the chicken on a paper towel-lined plate to drain excess oil. Now it’s time to make the sauce. In a small bowl, whisk together honey, Sriracha sauce, soy sauce, rice vinegar, and sesame oil. Mix until well combined. This sauce gives the bites their sweet and spicy kick. Adjust the Sriracha amount to your taste for more heat or sweetness. Lower the heat to medium. Add the cooked chicken back into the skillet. Pour the honey Sriracha sauce over the chicken. Toss to coat all the pieces evenly. Cook for an additional 2-3 minutes. This helps the sauce thicken and stick to the chicken. Once done, transfer the glazed chicken bites to a serving platter. Garnish with chopped green onions and a sprinkle of sesame seeds for a nice touch. Enjoy your tasty snack! To make the best Honey Sriracha Chicken Bites, start with fresh chicken breast. Cut the chicken into even pieces. This helps them cook at the same time. Coating the chicken in the flour mixture is key. Make sure each piece gets a good layer. This adds crunch and flavor. Cook the chicken in batches. If you overcrowd the pan, they won’t brown well. Keep the heat at medium-high for a nice golden color. Always check if the chicken is fully cooked; it should be 165°F inside. For more flavor, try adding a pinch of cayenne pepper to the flour mix. It gives a nice kick. You can also swap honey for maple syrup for a different sweetness. For a tangy taste, add a splash of lime juice to the sauce. Mixing in a teaspoon of ginger can bring a fresh zing. These small changes make the dish fun and different every time you cook it. Serve these chicken bites as a snack or a meal. They pair great with rice or a fresh salad. You can also serve them with veggie sticks for a crunchy bite. Remember to add a side of extra Sriracha for those who love heat. Garnishing with chopped green onions and sesame seeds makes the dish look nice too. Enjoy your Honey Sriracha Chicken Bites hot for the best taste! Pro Tips Coating Consistency: Ensure the chicken pieces are evenly coated in the flour mixture to achieve a crispy texture when frying. Batch Cooking: Cook the chicken in batches to prevent overcrowding the skillet, ensuring even cooking and browning. Adjusting Spice Level: Modify the amount of Sriracha in the sauce to cater to your desired spice level; you can also add some honey for more sweetness. Letting the Sauce Thicken: Allow the sauce to cook for a few extra minutes to achieve a glossy, sticky finish that clings to the chicken. {{image_2}} If you love heat, you can boost the spice. Add more Sriracha to the sauce. You can also mix in chili flakes or diced jalapeños. If you want a milder taste, reduce the Sriracha. You can balance the heat with extra honey. This way, you keep the sweet and spicy flavor. You can cook these chicken bites in several ways. Try baking them for a healthier option. Preheat your oven to 400°F. Place the coated chicken on a baking sheet. Bake for about 20 minutes, flipping halfway. You can also air fry them. Set your air fryer to 380°F and cook for 10-12 minutes. Both methods give you crispy bites without frying. You can swap ingredients to fit dietary needs. If you're gluten-free, use gluten-free flour. For a low-sodium option, choose low-sodium soy sauce. You can also replace honey with maple syrup for a vegan twist. If you want less sugar, use a sugar-free sweetener. These swaps keep the dish tasty while fitting your needs. After enjoying your Honey Sriracha Chicken Bites, let them cool down. Place the bites in an airtight container. They can stay fresh in the fridge for up to three days. Make sure to use a container that seals well to keep moisture out. If you want to keep the bites longer, consider freezing them. First, let the chicken bites cool completely. Then, spread them out on a baking sheet and freeze for about two hours. Once frozen, transfer them to a freezer bag. They will last for up to three months in the freezer. Label the bag with the date for easy tracking. To reheat your chicken bites, you can use an oven or a microwave. For the oven, preheat it to 350°F (175°C). Place the bites on a baking sheet and heat for about 10-15 minutes until warm. If using a microwave, put them on a microwave-safe plate and heat in 30-second intervals until hot. This method keeps them moist and tasty. Enjoy your flavorful snack! It takes about 30 minutes to cook Honey Sriracha Chicken Bites. This includes 15 minutes for prep and 15 minutes for cooking. You will love how quick and easy it is to whip up this tasty snack! Yes, you can use frozen chicken. Just make sure to thaw it first. Once thawed, cut it into bite-sized pieces. This will help it cook evenly and taste delicious. You can serve Honey Sriracha Chicken Bites with many sides. Here are a few ideas: - Steamed rice - Crispy salad - Veggie sticks with dip - Noodles tossed in soy sauce Each option pairs well with the sweet and spicy flavor of the chicken bites! You now have all the details to make delicious Honey Sriracha Chicken Bites. We covered the ingredients, step-by-step instructions, and helpful tips for perfect results. You learned how to adjust flavors and swap ingredients for dietary needs. Remember to store leftovers properly and use the reheating tips provided. Enjoy your tasty dish! Try it out and share your thoughts. You’ll impress everyone with your cooking skills!
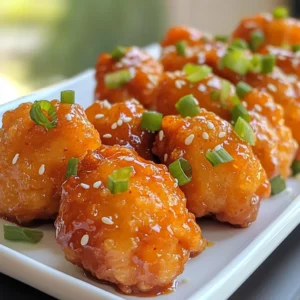
    Honey Sriracha Chicken Bites Flavorful and Easy Snack
  • For the soup, you'll need: - 4 jalapenos, diced (remove seeds for less heat) - 1 medium onion, chopped - 3 cloves garlic, minced - 4 cups chicken or vegetable broth - 1 cup cream cheese, softened - 1 cup shredded cheddar cheese - 1 cup fresh corn (or canned, drained) - 1 teaspoon cumin - 1/2 teaspoon smoked paprika - Salt and pepper to taste - 2 tablespoons olive oil For the grilled cheese, gather: - 1 loaf sourdough bread - 1/2 cup grated mozzarella cheese - 4 tablespoons butter To finish your soup, consider: - A sprinkle of shredded cheese - A slice of jalapeno for color - Fresh herbs like cilantro or parsley for added flavor Each ingredient plays a key role in bringing this dish to life. The jalapenos give that spicy kick, while the cream cheese and cheddar create a rich, creamy base. The grilled cheese adds a comforting crunch. These simple ingredients come together to make a delightful meal that warms you up inside! {{ingredient_image_1}} First, grab a large pot and heat the olive oil over medium heat. Add the chopped onion and sauté it until it turns soft and clear, which takes about five minutes. Next, mix in the minced garlic and diced jalapenos. Cook this for another two to three minutes until you smell that spicy goodness. Now, pour in four cups of chicken or vegetable broth and bring it to a gentle simmer. Once it simmers, add in the cream cheese. Stir it well until it melts and blends with the broth. Then, toss in the shredded cheddar cheese, corn, cumin, smoked paprika, salt, and pepper. Let it simmer for about ten minutes, stirring from time to time. While your soup is bubbling away, let’s make the grilled cheese. Heat a skillet over medium heat. Take a slice of sourdough bread and spread butter on one side. On the unbuttered side, sprinkle a quarter of the grated mozzarella cheese. Place another slice of bread on top. Put the sandwich in the skillet, buttered side down. Grill it until it turns a lovely golden brown, which takes about three to four minutes. Flip it over, and grill the other side until it’s also golden and the cheese melts. Repeat this for the other sandwiches. Once your soup has cooked and is nice and creamy, it’s time to blend. Use an immersion blender to make it smooth. If you don’t have one, you can carefully blend it in batches using a regular blender. After blending, taste and adjust the seasoning if needed. Serve the soup hot, and don’t forget to cut your grilled cheese into triangles for easy dipping. Enjoy each bite of this spicy soup with the cheesy goodness of your sandwich! To make your soup creamy, use softened cream cheese. It mixes well with warm broth. Stir it in slowly to avoid lumps. Use an immersion blender for a smooth finish. This tool helps blend the soup right in the pot. If you don't have one, blend in batches in a regular blender. Be careful; hot soup can splatter. If you want less heat, remove the seeds from the jalapenos. This is key to controlling spice. You can also add more cream cheese to cool it down. A splash of lime juice can help brighten the flavors without adding heat. Try adding a dollop of sour cream on top for a creamy finish. For a perfect grilled cheese, start with good bread like sourdough. Butter one side well for a golden crust. Use a hot skillet but not too hot to burn the bread. Grill each side for 3-4 minutes. Make sure the cheese is fully melted inside. You can add more cheese for extra gooeyness. Cut the sandwich into triangles for easy dipping into your soup. Pro Tips Adjust the Heat: For a milder soup, make sure to remove all the seeds and inner membranes of the jalapenos. You can also substitute with milder peppers if desired. Perfectly Grilled Cheese: Use low and slow heat when grilling your cheese sandwiches to ensure the cheese melts evenly without burning the bread. Add Extra Flavor: Enhance the depth of flavor by adding a splash of hot sauce or a squeeze of lime juice to the soup just before serving. Make it Vegetarian: Substitute the chicken broth with vegetable broth and skip the grilled cheese or use a plant-based cheese alternative for a vegetarian version. {{image_2}} You can make this soup vegetarian easily. Just swap the chicken broth for vegetable broth. The rest of the recipe stays the same. This change keeps all the great flavors while making it meat-free. Want to kick up the flavor? You can add black beans or diced tomatoes. These add-ins boost both taste and nutrition. Try adding a squeeze of lime juice for a fresh kick. You can also sprinkle fresh cilantro on top before serving. A classic grilled cheese is great, but you can mix it up. Use pepper jack for a spicy twist. Try gouda or fontina for a creamy melt. Mixing different cheeses can create a rich flavor. Don’t forget to add some goat cheese for a tangy surprise! To store leftover soup, let it cool first. Pour it into an airtight container. Make sure to leave some space at the top. This helps avoid spills when it freezes. You can keep it in the fridge for up to three days. For longer storage, freeze it for up to three months. Just remember to label the container with the date! Store grilled cheese sandwiches in a paper towel. This keeps them from getting soggy. Place them in an airtight container. You can keep them in the fridge for up to two days. If you want to freeze them, wrap each sandwich in plastic wrap. Then, place them in a freezer bag for up to a month. To reheat the soup, pour it into a pot. Heat it over medium heat until warm. Stir it well to mix the flavors. If it’s too thick, add a splash of broth or water. For grilled cheese, use a skillet. Heat it on low to medium heat. This keeps the bread crispy and warms the cheese inside. Enjoy every warm, cheesy bite! Yes, you can use different types of cheese. You can try pepper jack for extra heat. Monterey Jack works well for a milder flavor. Mixing cheeses adds depth and richness to the soup. Just ensure the cheese melts easily for that creamy texture. The soup has a nice kick from the jalapenos. Removing the seeds makes it milder. You can adjust the heat by using fewer jalapenos. If you like more spice, add a dash of hot sauce or some crushed red pepper. Grilled cheese pairs perfectly with this soup. You can also serve a fresh salad or tortilla chips for crunch. A light avocado salad adds freshness and balances the heat. You might enjoy cornbread on the side for a comforting touch. Yes, you can make this soup ahead of time. It stores well in the fridge for about three days. Just reheat on the stove, adding a splash of broth if needed. The flavors deepen when it sits, making it even better! This blog post covered making Spicy Jalapeno Popper Soup and Grilled Cheese. We discussed the main ingredients, tips for a creamy texture, and how to balance heat. You can try different cheese and add flavors for variety. Don't forget to store leftovers right to keep them fresh. This dish is easy to make and perfect for sharing. Enjoy the comfort of good food, and remember to experiment with your own twists. Happy cooking!
    Spicy Jalapeno Popper Soup with Grilled Cheese Delight
  • - 1 lb ground turkey - 2 cups cooked brown rice or quinoa - 1 small onion, chopped - 2 cloves garlic, minced - 1 cup cherry tomatoes, halved - 1 avocado, diced - Fresh cilantro, chopped - 1 tablespoon chili powder - 1 teaspoon cumin - 1 teaspoon smoked paprika - 1 tablespoon olive oil - Salt and pepper to taste In this healthy turkey taco bowl, I focus on fresh, wholesome ingredients. Ground turkey offers lean protein, while brown rice or quinoa adds fiber and nutrients. The chopped onion and minced garlic bring depth to the dish. I love using cherry tomatoes for their sweetness and color. Avocado adds creaminess and healthy fats, making the bowl satisfying. Fresh cilantro gives it a bright finish. For seasoning, I use chili powder, cumin, and smoked paprika. These spices create warmth and flavor. I cook everything in olive oil, which is a heart-healthy choice. Salt and pepper enhance the taste, making each bite enjoyable. This combination makes a nutritious and flavorful meal. You’ll love how easy it is to pull together! {{ingredient_image_1}} 1. Heat 1 tablespoon of olive oil in a large skillet over medium heat. 2. Add 1 small chopped onion. Sauté for about 3-4 minutes until soft. 3. Add 2 minced garlic cloves. Cook for 1 more minute until it smells great. 4. Increase the heat to medium-high. Add 1 pound of ground turkey. 5. Cook for 5-7 minutes, breaking it apart until it is browned and cooked. 6. Stir in 1 tablespoon of chili powder, 1 teaspoon of cumin, and 1 teaspoon of smoked paprika. 7. Season with salt and pepper to taste. Mix well so the turkey is coated with spices. 1. Mix in 1 cup of black beans, rinsed and drained. 2. Add 1 cup of corn (fresh, frozen, or canned). 3. Stir everything together. Heat for another 3-4 minutes until it is warm throughout. 1. In a serving bowl, layer 2 cups of cooked brown rice or quinoa as the base. 2. Top it with the turkey mixture. Add 1 cup of halved cherry tomatoes and 1 diced avocado. 3. Garnish with fresh cilantro. Serve with lime wedges on the side for a zesty kick. To make your turkey taco bowl shine, start by sautéing the onion and garlic. Heat the olive oil in a large skillet over medium heat. Add the chopped onion and cook for 3 to 4 minutes. This softens the onion and builds flavor. Next, add the minced garlic and cook for just one more minute. This step brings out the garlic's fragrance. To get a perfectly browned turkey, increase the heat to medium-high. Add the ground turkey to the skillet. Cook for 5 to 7 minutes, breaking it up with a spoon. Make sure it cooks all the way through. The turkey should turn a nice golden color. This browning adds depth to your dish. When serving your taco bowl, think about how it looks. Use colorful bowls to make it pop. Layer your ingredients in sections. For example, place the rice at the bottom, followed by the turkey, beans, corn, and then the tomatoes and avocado. This creates a vibrant look. Garnishing makes a big difference too! Sprinkle fresh cilantro on top for color. Serve lime wedges on the side. A squeeze of lime adds a fresh twist that brightens the flavors. To kick up the flavor, consider adding a pinch of cayenne pepper or some onion powder. These spices can add a nice kick without overpowering the dish. You might also try paprika or taco seasoning for extra depth. For sauces, I recommend serving with salsa or a dollop of Greek yogurt. This adds creaminess and a touch of tang. You can also use hot sauce if you love heat. Each addition can make your taco bowl unique! Pro Tips Use Lean Turkey: Opt for lean ground turkey to keep the dish healthy while still delivering great flavor. Spice it Up: Adjust the amount of chili powder based on your spice tolerance for a customized heat level. Fresh Ingredients: Use fresh produce when possible, especially for the tomatoes and avocados, to enhance taste and nutrition. Meal Prep Friendly: Prepare a larger batch and store leftovers in the fridge for quick meals throughout the week. {{image_2}} You can easily swap out ground turkey for other meats. Try ground chicken, beef, or even tofu for a plant-based option. Each choice adds a different flavor and texture. For grains, consider using cauliflower rice instead of brown rice or quinoa. Cauliflower rice is low in carbs and adds a nice crunch. It cooks quickly, making it a great choice for busy nights. Change up the spices to create your perfect taco bowl. Instead of chili powder, use taco seasoning for more heat. You can also try adding smoked chipotle for a smoky kick. Feel free to include seasonal vegetables, too! Bell peppers, zucchini, or even sweet potatoes can boost flavor and nutrition. You can roast them or sauté them with the turkey for added depth. To make this meal low-carb, skip the rice and use lettuce leaves. This creates a fresh base for your turkey mix. You can also add more veggies to fill you up. For gluten-free or dairy-free options, make sure your spices and toppings fit your needs. Use gluten-free grains and skip cheese if you're dairy-free. This way, you can still enjoy a delicious meal that meets your dietary needs. To keep your Healthy Turkey Taco Bowl fresh, use airtight containers. Store the leftover taco bowl in the fridge. It will stay good for about three to four days. If you want to save it longer, you can freeze it. Just make sure to separate the grains from the turkey mixture. This helps maintain the texture. Use freezer-safe bags or containers to prevent freezer burn. For the best taste, reheat your taco bowl gently. You can use the microwave or stovetop. If using the microwave, place it in a bowl and cover it. Heat it for 1-2 minutes until warm. Stir halfway through for even heating. For stovetop, add a little olive oil to a pan. Heat on medium until warm, stirring often. This method keeps the flavors bright. Consume your leftovers within four days when stored in the fridge. If frozen, they can last up to three months. Always check for spoilage before eating. Signs include a sour smell, changes in color, or a slimy texture. If you notice any of these, it's best to toss it out. Keeping track of how long your food lasts ensures you enjoy it safely. You can enjoy many side dishes with a turkey taco bowl. Here are some great choices: - Spanish rice: This adds a nice flavor. - Guacamole: It brings creamy goodness. - Salsa: Fresh salsa adds a tasty kick. - Chips: Tortilla chips are fun to crunch. - Salad: A light salad can balance the meal. Yes, you can switch proteins easily. Here are some options: - Chicken: Use ground chicken for a leaner choice. - Beef: Ground beef gives a rich flavor. - Turkey sausage: This adds spice and zest. - Meat alternatives: Try lentils or plant-based meat for a vegan option. To make the taco bowl friendly for kids, try these tips: - Mild spices: Cut back on chili powder and cumin. - Add cheese: Sprinkle shredded cheese on top for extra flavor. - Serve separately: Let kids build their own bowls. - Use fun toppings: Add colorful veggies they like. Yes, this taco bowl is great for meal prep. Here’s how: - Cook in bulk: Make a large batch of the turkey mix. - Store separately: Keep the rice or quinoa and toppings apart to stay fresh. - Reheat easily: Use a microwave or stovetop to warm up. - Lasts well: Store in the fridge for up to four days. This blog post covered a delicious turkey taco bowl recipe. You learned about the key ingredients, from the main protein and grains to spices and toppings. The step-by-step instructions made cooking simple and enjoyable. We also discussed tips for cooking, presentation, flavor enhancements, and healthy variations. Remember, storing and reheating your leftovers properly can make meals last longer. Keep experimenting with flavors and ingredients to make this dish your own. Enjoy your cooking journey with this tasty and versatile recipe!
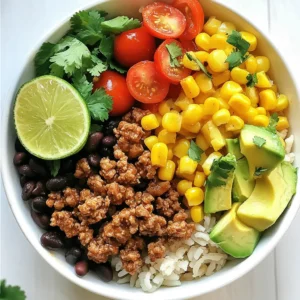
    Healthy Turkey Taco Bowl Nutritious and Flavorful Meal
  • - 4 boneless, skinless chicken breasts - 2 tablespoons olive oil - 1 teaspoon garlic powder - 1 teaspoon onion powder - 1 teaspoon smoked paprika - 1 teaspoon dried oregano - Salt and pepper to taste - Fresh parsley, chopped (for garnish) - Lemon wedges (for serving) This recipe uses simple yet flavorful ingredients. You need boneless, skinless chicken breasts for a quick cook. The olive oil helps the spices stick and keeps the chicken moist. Garlic powder adds a nice depth, while onion powder gives it sweetness. Smoked paprika brings a bit of smokiness. For seasoning, dried oregano adds a nice Mediterranean flavor. Salt and pepper are essential for taste. After baking, I love to sprinkle fresh parsley on top for color. Serving with lemon wedges brightens up the dish. Gather these items, and you’ll be ready to create a tasty meal in just 20 minutes. Remember, the key to juicy chicken is the right balance of spices and a quick bake! {{ingredient_image_1}} - Preheat the oven to 400°F (200°C). - Pat the chicken breasts dry with paper towels. This helps them bake better. - In a small bowl, mix 2 tablespoons of olive oil, 1 teaspoon of garlic powder, 1 teaspoon of onion powder, 1 teaspoon of smoked paprika, 1 teaspoon of dried oregano, salt, and pepper. - Rub the spice paste all over each chicken breast. Make sure every inch is covered. - Place the seasoned chicken breasts on a baking sheet. You can use parchment paper or aluminum foil for easy cleanup. - Bake the chicken for 15-20 minutes. Check that the internal temperature reaches 165°F (74°C). - After baking, let the chicken rest for 5 minutes. This keeps it juicy. - Garnish with chopped fresh parsley. Serve with lemon wedges for extra flavor. Resting the chicken is key. When you pull it from the oven, let it sit for five minutes. This helps the juices stay inside. If you cut it right away, the juices run out. Moisture retention is also vital. Use olive oil in the spice paste. It creates a barrier that keeps the chicken moist during baking. Feel free to change the spices! Try adding cumin or chili powder for a kick. You can also mix in Italian herbs for a different flavor. Adjust the salt and pepper to your taste. Start with less and add more if needed. Always taste the spice paste before using it. Use a sturdy baking sheet for easy cleanup. Parchment paper or foil can help too. A meat thermometer is essential. It ensures your chicken reaches 165°F (74°C) without overcooking. This tool helps you achieve perfect, juicy chicken every time. Pro Tips Pat the Chicken Dry: Ensuring the chicken breasts are dry before seasoning helps the spice paste adhere better and promotes even browning during baking. Use a Meat Thermometer: To guarantee perfectly cooked chicken, use a meat thermometer to check that the internal temperature reaches 165°F (74°C) for safe consumption. Let it Rest: Allowing the chicken to rest for 5 minutes after baking helps retain its juices, resulting in a more flavorful and moist bite. Customize the Spice Blend: Feel free to experiment with different herbs and spices based on your preference, such as adding cayenne pepper for heat or thyme for an earthy flavor. {{image_2}} You can change the flavor of your chicken easily. For an Asian-inspired taste, mix soy sauce, ginger, and sesame oil into your spice paste. This will give the chicken a nice umami kick. For a Mediterranean twist, add lemon zest, thyme, and oregano. This will make the chicken bright and fragrant. Both of these options will give you a new way to enjoy your juicy chicken. Grilling is a great way to cook chicken. It adds a smoky flavor that makes the meat even better. Just preheat your grill and cook the chicken for about 6-8 minutes on each side. You’ll get those nice grill marks and a charred taste. If you have an air fryer, that works too! Just set it to 375°F and cook for about 12-15 minutes. This method keeps the chicken juicy and cuts down on cooking time. Pair your chicken with fresh sides. Roasted vegetables are a perfect match. You can also serve it with rice or a salad. These sides will make your meal colorful and tasty. Creative sauces can take your chicken up a notch. A tangy BBQ sauce or a creamy garlic dip works well. You can even make a simple chimichurri for a fresh twist. These additions will impress your family and friends at dinner. After cooking, allow the chicken to cool down. Place leftovers in an airtight container. Store in the fridge for up to three days. This keeps the chicken fresh and safe to eat. Keep it away from strong-smelling foods to avoid flavor changes. To freeze cooked chicken, let it cool completely first. Wrap each breast tightly in plastic wrap. Then place the wrapped chicken in a freezer bag. Remove as much air as you can. Label the bag with the date. You can freeze it for up to three months. For reheating, the oven works best. Preheat the oven to 350°F (175°C). Place the chicken in a baking dish. Add a splash of chicken broth for moisture. Cover with foil to keep it from drying out. Heat for about 15–20 minutes, or until warm. This method keeps the chicken juicy and tasty. You should bake chicken breasts at 400°F for 15 to 20 minutes. This time will help them cook through but remain juicy. Always check the internal temperature to ensure it reaches 165°F. Resting the chicken allows the juices to settle. This makes the meat more tender and moist. Cutting right away can let the juices run out, making the chicken dry. I do not recommend using frozen chicken breasts. Thawed chicken cooks better and ensures even cooking. If you must use frozen, allow for extra cooking time. The best way to check is to use a meat thermometer. Insert it into the thickest part of the chicken. It should read 165°F when done. You can also check if the juices run clear. Many side dishes pair well with baked chicken. Here are a few ideas: - Roasted vegetables - Garlic mashed potatoes - Fresh salad - Steamed rice - Quinoa with herbs These sides add color and flavor to your meal. Baking juicy chicken breasts can be simple and rewarding. We explored key ingredients like chicken, spices, and olive oil. I shared step-by-step instructions and helpful tips to ensure moist, flavorful results. You can customize flavors and even try different cooking methods. Remember to store leftovers properly for future meals. With these insights, you can make a delicious dish that impresses. Cook, share, and enjoy your tasty creations!
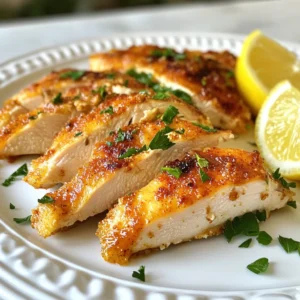
    Juicy 20-Minute Oven Baked Chicken Breast Recipe
  • - 1 medium head of cauliflower (riced) - 1 cup shredded mozzarella cheese - 1/2 cup shredded parmesan cheese - 1 large egg - Spices and seasonings: garlic powder, dried oregano, salt, black pepper - 1/2 cup sugar-free marinara sauce - Optional garnish: fresh basil leaves To make tasty cauliflower bites, you need a few simple ingredients. First, grab one medium head of cauliflower. You will rice it, which means you will chop it into tiny pieces. This makes it easier to mix. Next, you’ll need cheese. Use one cup of shredded mozzarella and half a cup of shredded parmesan. You also need one large egg to bind everything together. For flavor, add spices like garlic powder, dried oregano, salt, and black pepper. These give the bites a nice taste. Lastly, you will want half a cup of sugar-free marinara sauce for dipping. If you like, you can add fresh basil leaves as a garnish. These ingredients come together to create delicious bites. They are perfect for a low-carb or keto diet. Each ingredient plays an important role in taste and texture. So, make sure you have everything ready before you start cooking. {{ingredient_image_1}} - Preheat your oven to 425°F (220°C). Line a baking sheet with parchment paper. - Take a medium head of cauliflower and rice it until you have about 3 cups. - Put the riced cauliflower in a microwave-safe bowl. Microwave it for 5-7 minutes until soft. - Let the cauliflower cool for a few minutes. Then, put it in a clean kitchen towel. Squeeze out all the moisture. - In a large mixing bowl, combine the drained cauliflower, 1 cup of shredded mozzarella cheese, and 1/2 cup of shredded parmesan cheese. - Add 1 large egg, 1 teaspoon of garlic powder, 1 teaspoon of dried oregano, 1/2 teaspoon of salt, and 1/4 teaspoon of black pepper. - Mix everything until it’s well combined. Use your hands to form small, round pizza bites, about 2 inches wide. - Place the formed bites on the prepared baking sheet. - Bake the pizza bites in the preheated oven for 15-20 minutes. Look for a golden brown color and a crispy texture. - Remove them from the oven and let them cool slightly. Serve warm with 1/2 cup of sugar-free marinara sauce for dipping. You can add fresh basil leaves for garnish if you like. - How to properly rice cauliflower: Start with a medium head of cauliflower. Cut it into florets. Use a food processor to pulse them until they resemble rice. If you don’t have a processor, you can grate the cauliflower with a box grater. This gives you a fine texture to work with. - Tips for reducing moisture: After microwaving the riced cauliflower, let it cool. Then, place it in a clean kitchen towel. Squeeze out as much moisture as you can. This step is key. Too much moisture will make your bites soggy. - Best dips and sauces for pizza bites: Serve these bites warm with sugar-free marinara sauce. This adds a nice flavor. You can also try ranch or garlic aioli. They make great dips too. - Additions for flavor enhancement: Consider adding cooked pepperoni or sautéed veggies to your mixture. This gives your bites extra taste. Fresh herbs like basil can also add a burst of flavor. - Essential kitchen tools for making and baking: You’ll need a microwave-safe bowl for steaming the cauliflower. A food processor or box grater will help with ricing. A mixing bowl and baking sheet lined with parchment paper are also essential. - Recommended products for beginners: I suggest using a good quality microwave-safe bowl. A reliable food processor can save you time. A sturdy baking sheet ensures even cooking. These tools make your cooking easier and more enjoyable. Pro Tips Use Fresh Cauliflower: Fresh cauliflower will yield the best texture and flavor for your pizza bites. Avoid using frozen cauliflower as it may retain excess moisture. Don’t Skip Squeezing: Squeezing out moisture from the riced cauliflower is crucial. This step ensures your pizza bites are crispy rather than soggy. Experiment with Cheeses: Feel free to mix different types of cheese, such as cheddar or provolone, to create unique flavors in your pizza bites. Customize Toppings: Add your favorite pizza toppings like pepperoni, bell peppers, or olives into the mixture for extra flavor and personalization. {{image_2}} You can switch up the cheese in your cauliflower bites for fun flavors. Try using cheddar cheese for a sharper taste. Gouda adds a nice smokiness. You can also mix in some cream cheese for a richer texture. Each option can change the taste and make it more exciting! Feel free to add more ingredients to make these bites your own. You can mix in diced pepperoni for a meaty kick. Chopped bell peppers or spinach can add color and nutrients. If you need gluten-free options, these bites are already safe since they don’t use flour. Get creative with your mix-ins! You can form your cauliflower mixture into mini pizza bites or larger ones, depending on your mood. Mini bites are great for parties or snacks. You can top them with your favorite sauces, like pesto or ranch, for dipping. Larger bites can be served as a main dish with a salad on the side. Enjoy experimenting with sizes and toppings! To keep your cheesy cauliflower pizza bites fresh, place them in an airtight container. This helps keep moisture out. You can store them in the fridge for up to three days. If you want to keep them longer, freezing is a great option. To reheat your pizza bites, preheat your oven to 350°F (175°C). Place the bites on a baking sheet. Heat them for about 10-15 minutes. This keeps them crispy on the outside. You can also microwave them, but they may not stay as crunchy. You can freeze these pizza bites for easy meal prep. Let them cool completely before freezing. Arrange them in a single layer on a baking sheet and freeze for 1-2 hours. After that, transfer them to a freezer-safe bag or container. They can last up to three months in the freezer. When ready to eat, bake from frozen or thaw overnight in the fridge. What is a ketogenic diet? A ketogenic diet is low in carbs and high in fats. This diet helps your body burn fat for energy. You eat foods like meat, cheese, eggs, and non-starchy veggies. How many carbs can I consume on a keto diet? Most people aim for 20 to 50 grams of carbs per day. This amount depends on your body and goals. Tracking your carbs helps you stay on track. Can I make these pizza bites in advance? Yes, you can make these pizza bites ahead of time. Prepare them, bake, and let them cool. Then, store them in the fridge for up to three days. What if I don't have all the ingredients? You can swap ingredients if needed. For example, use any cheese you have on hand. You can also try different spices to suit your taste. How to adapt recipes for keto-friendly meals? To adapt recipes, replace high-carb items with low-carb alternatives. Use cauliflower instead of rice, or almond flour instead of wheat flour. Think about what fits your keto plan. Are there any keto meal prep tips for beginners? Yes! Start by planning your meals for the week. Cook in batches, like making these pizza bites. Store portions in containers to make meals easy and quick. You have learned how to make tasty cauliflower pizza bites. We covered all the ingredients needed, from cauliflower to cheese, and even some fresh herbs. I walked you through each step, from preparation to baking. Remember, tips like reducing moisture and trying different cheeses can make a big difference. Lastly, these bites are easy to store and reheat. Enjoy making and sharing this simple, healthy treat!
    Beginner Friendly Keto Meals Tasty Cauliflower Bites
  • - 4 chicken thighs, bone-in and skin-on - 1 cup pineapple juice - 1/4 cup soy sauce - 1/4 cup brown sugar - 4 garlic cloves, minced - 1 inch ginger, grated - 1 tablespoon ketchup - 1 tablespoon apple cider vinegar - 1 teaspoon ground black pepper - 1 teaspoon sesame oil The main ingredients create the delicious flavor of Huli Huli chicken. The chicken thighs give you juicy, tender meat. Pineapple juice adds sweetness and tang. Soy sauce brings saltiness and umami. Brown sugar enhances the sweetness. Garlic and ginger add a nice kick. - 1/2 teaspoon chili flakes (optional) - Fresh pineapple slices (for grilling) - Green onions, sliced (for garnish) You can add chili flakes for some heat. Grilling fresh pineapple slices adds flavor and a fun texture. Green onions make a great garnish. They add color and a mild onion taste. - Pair with steamed rice or a fresh salad. - Serve on a platter with grilled pineapple. - Garnish with sliced green onions for a pop of color. Pairing Huli Huli chicken with steamed rice makes a filling meal. A fresh salad adds crunch and brightness. For presentation, serve the chicken on a nice platter. Add grilled pineapple and sprinkle green onions on top. This makes the dish look as good as it tastes. {{ingredient_image_1}} To start, grab a large bowl. You will need to mix the marinade. Combine these ingredients in the bowl: - 1 cup pineapple juice - 1/4 cup soy sauce - 1/4 cup brown sugar - 4 minced garlic cloves - 1 inch of grated ginger - 1 tablespoon ketchup - 1 tablespoon apple cider vinegar - 1 teaspoon ground black pepper - 1 teaspoon sesame oil - 1/2 teaspoon chili flakes (optional) Whisk everything together until the sugar dissolves. This blend gives the chicken its sweet and tangy flavor. Next, you will marinate the chicken. Place the chicken thighs in a resealable bag or a shallow dish. Pour the marinade over the chicken. Seal the bag or cover the dish. Refrigerate it for at least 2 hours. For best results, let it sit overnight. This time helps the chicken soak up all the good flavors. Now, it’s time to grill! Preheat the grill to medium heat. Remove the chicken from the marinade. Let the excess drip off. Keep the leftover marinade for basting later. Grill the chicken thighs skin-side down for about 7-10 minutes. Look for a nice brown color. Then, flip the chicken over and brush some reserved marinade on top. Cook for another 7-10 minutes. Use a meat thermometer to check for doneness. The chicken should reach an internal temperature of 165°F (75°C). In the last few minutes, add fresh pineapple slices to the grill. Cook them until they have grill marks, about 2-3 minutes per side. Finally, remove everything from the grill. Let the chicken rest for 5 minutes before you serve it. Enjoy your tasty Huli Huli chicken! To get perfect grill marks, heat your grill to medium. Place the chicken skin-side down and don’t move it for the first few minutes. This helps sear the skin and gives those nice lines. Flip the chicken only once to keep it juicy. Common mistakes include starting with a cold grill and overcrowding it. A cold grill won’t sear the chicken well. Overcrowding stops the heat from circulating. Cook in batches if needed. To make the marinade even better, add a splash of fresh lime juice. It brightens the flavor. You can also mix in some chopped herbs like cilantro for a fresh touch. Experimenting with spices can change the dish. Try smoked paprika for a smoky taste or add a pinch of cumin for warmth. These small tweaks can make a big difference. Resting the chicken is key. Let it sit for five minutes after grilling. This keeps it juicy. If you skip this step, your chicken might be dry. For a stunning platter, arrange the chicken on a large serving dish. Surround it with grilled pineapple slices. Garnish with sliced green onions for color. This makes your meal look appealing and fun. Serve with steamed rice or a fresh salad for a complete dish. Pro Tips Marinate Longer for Best Flavor: For deeper flavor, marinate the chicken thighs overnight. This allows the marinade to penetrate the meat more effectively. Use a Meat Thermometer: To ensure the chicken is cooked perfectly, use a meat thermometer to check that it reaches an internal temperature of 165°F (75°C). Grill Pineapple for Extra Sweetness: Grilling pineapple enhances its natural sweetness and adds a nice caramelized flavor. Don't skip this step! Rest the Chicken: Allow the grilled chicken to rest for at least 5 minutes before slicing. This helps retain the juices, keeping the meat moist and delicious. {{image_2}} You can use different chicken cuts for Huli Huli chicken. Chicken thighs work great because they stay juicy. If you want a leaner option, use chicken breasts. They will still taste good but may dry out more easily. Chicken wings are another fun choice. They cook fast and are perfect for parties. Just remember to adjust the cooking time. If you want to switch up the sweetener, try honey or agave syrup. Both add a nice sweetness to the marinade. Honey gives a floral taste, while agave is milder. You can use the same amount as brown sugar. This change makes the dish a bit different but still tasty. You can make Huli Huli chicken vegan by using tofu or tempeh. Marinate the tofu in the same mix for great flavor. Press the tofu first to remove extra water. Cut it into thick slices to keep it firm on the grill. Tempeh is another great choice. It has a nutty flavor and works well with the marinade. Grill until golden and serve just like the chicken. These options let you enjoy Huli Huli chicken in many ways. To keep Huli Huli chicken fresh, wrap it well. Use an airtight container or plastic wrap. Store in the fridge for up to 3 days. Make sure it cools down first. This keeps the chicken juicy and safe to eat. Always label the container with the date. You can freeze leftover grilled chicken. First, let it cool to room temperature. Then, wrap each piece in plastic wrap. Place them in a freezer bag to save space. Remove as much air as possible from the bag. You can freeze it for up to 3 months. When you're ready to eat, thaw it in the fridge overnight. To reheat your chicken, use a low heat. The oven works best. Preheat it to 350°F (175°C). Place the chicken in a dish with a splash of water or broth. Cover it with foil to keep moisture in. Heat for about 20 minutes, or until warm. This keeps the chicken juicy and tasty. You can also use a microwave, but be careful not to dry it out. Huli Huli Chicken comes from Hawaii. It started in the 1950s at a local festival. The name "Huli" means "turn" in Hawaiian. This dish features grilled chicken marinated in a sweet and tangy sauce. It reflects Hawaii's diverse culture and flavors. Huli Huli Chicken is often served at gatherings and barbecues. It’s a symbol of island hospitality and joy. For the best flavor, marinate the chicken for at least 2 hours. If you can, let it sit overnight. This gives the chicken time to soak up all the tasty flavors. Make sure to keep it in the fridge while marinating. This keeps the chicken safe to eat and delicious. Yes, you can make Huli Huli Chicken in the oven. Preheat your oven to 400°F (200°C). Place the marinated chicken in a baking dish. Bake for about 30-35 minutes. Turn the chicken halfway through. This helps it cook evenly. Use a meat thermometer to check that it reaches 165°F (75°C). Huli Huli Chicken goes great with many sides. Here are some popular choices: - Steamed rice - Grilled vegetables - Fresh salad - Macaroni salad - Pineapple slices These sides add color and flavor to your meal. They also balance the sweetness of the chicken. In summary, I covered how to make Huli Huli Chicken, from key ingredients to grilling tips. I shared ways to enhance flavors and offered serving ideas. Whether you choose chicken thighs or a vegetarian option, the marinade packs a punch. Remember to rest the chicken before serving for the best taste. With these steps, you can easily impress your family and friends with a delicious meal. Enjoy the process and savor each bite!
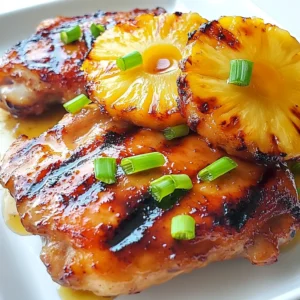
    Huli Huli Chicken Flavorful Grilling Guide
  • - 2 pounds of chicken wings - 1 cup of buttermilk - Seasonings: cayenne pepper, garlic powder, onion powder, salt, and pepper For buttermilk fried chicken wings, the main ingredients are simple yet flavorful. The chicken wings provide the base, while the buttermilk adds moisture and tang. The seasonings enhance the taste, giving it a spicy kick with cayenne pepper and a savory touch with garlic and onion powder. Salt and pepper are essential to bring everything together. - 1 cup all-purpose flour - 1 teaspoon baking powder - Additional salt and pepper When dredging the wings, use all-purpose flour mixed with baking powder. The flour helps create a crispy coating. The baking powder makes the crust light and airy. Adding salt and pepper enhances the flavor of the crust, ensuring every bite is tasty. - 1/2 cup unsalted butter - 4 cloves of minced garlic - 1/2 cup grated Parmesan cheese - 2 tablespoons fresh parsley - 1 tablespoon lemon juice The garlic Parmesan glaze is where the magic happens. Start with unsalted butter, melting it to create a rich base. Minced garlic adds a strong flavor, while grated Parmesan cheese brings creaminess and umami. Fresh parsley adds a pop of color, and lemon juice gives brightness to the sauce. This glaze coats the wings beautifully, making them irresistible. First, gather your chicken wings, buttermilk, and seasonings. In a large bowl, combine them well. Make sure each wing is fully coated in the buttermilk. This step is key for juicy and tender wings. Cover the bowl and refrigerate them for at least 2 hours. If you have time, marinating overnight gives the best flavor. While the wings marinate, you can prepare the dredging mixture. Take another bowl and whisk together the flour, baking powder, and a pinch of salt and pepper. This mix will give the wings a crispy outer layer when fried. Make sure there are no lumps in the flour for even coating. Next, heat your oil to 350°F (175°C). You can use a deep fryer or a large pot. Carefully remove the wings from the buttermilk. Let any excess liquid drip off. Dredge each wing in the flour mixture, ensuring they are fully coated. Shake off the extra flour. Fry the wings in batches for 8-10 minutes. They should be golden brown and reach an internal temperature of 165°F (75°C). Once done, place the wings on paper towels to drain excess oil. For the glaze, melt butter in a small saucepan over medium heat. Add the minced garlic and sauté until it becomes fragrant, which takes about 1-2 minutes. Remove from heat and stir in the grated Parmesan cheese, chopped parsley, and lemon juice. This mix offers a rich, savory flavor that pairs perfectly with the wings. In a large bowl, toss your fried chicken wings with the garlic Parmesan glaze. Make sure each wing is fully coated in the glaze. Transfer them to a serving platter. You can garnish with extra parsley or freshly grated Parmesan for a nice touch. Your wings are now ready to enjoy! For the best flavor, marinate the wings for at least 2 hours. I often marinate overnight. This gives the buttermilk time to tenderize the meat. It also allows the spices to seep in deeply. When cutting the wings, use a sharp knife. Cut at the joint for even sizes. This helps them cook evenly. If you want, use kitchen shears for a quicker cut. Fry the wings in small batches. This prevents sogginess. Too many wings at once cool the oil. Keep the oil temperature at 350°F (175°C). A thermometer helps to check this. Use a deep pot or fryer for the best results. The wings need room to float. Always let excess batter drip off before frying. This keeps them crispy. You can change the glaze if you want. Try adding hot sauce for some heat. Use smoked paprika for a different flavor twist. If you like less spice, cut back on cayenne. You can also add honey for sweetness. Adjust the garlic for more or less flavor. Taste as you go to find your perfect mix. {{image_2}} You can switch up the flavor of your wings with different glazes. Spicy buffalo glaze is a great choice if you love heat. Mix hot sauce with melted butter for a classic taste. Toss the fried wings in this mix for a fiery kick. Another tasty option is a honey mustard glaze. Combine honey, Dijon mustard, and a touch of vinegar. This mix gives a sweet and tangy flavor that pairs well with the crispy wings. Drizzle it on or toss the wings in the glaze for a mouthwatering treat. If you want a healthier version, try baking the wings. Preheat your oven to 400°F (200°C). Place the dredged wings on a baking sheet with parchment paper. Bake for about 40-45 minutes until crispy, flipping halfway through. This method gives you golden wings without the oil. For a quick option, use an air fryer. Preheat the air fryer to 375°F (190°C). Cook the wings in batches for about 25-30 minutes, shaking the basket halfway through. This method keeps them crispy while cutting down on cooking time. These wings shine when paired with dips. Ranch or blue cheese dressing complements the garlic Parmesan glaze well. You can also serve them with celery and carrot sticks for a crunchy side. For side dishes, consider coleslaw or potato wedges. Coleslaw adds a fresh crunch, while potato wedges offer a hearty option. Both sides balance the richness of the wings and make your meal complete. To keep your chicken wings fresh, refrigerate them right away. Place the wings in an airtight container. You can also wrap them tightly in plastic wrap. This will help keep them moist and tasty. For the best results, reheat your wings in an oven. Preheat the oven to 375°F (190°C). Place the wings on a baking sheet. Heat them for about 10-15 minutes. This method helps them stay crispy. You can also use an air fryer. Set it to 350°F (175°C) and heat for 5-7 minutes. You can freeze wings before or after frying. If freezing raw, marinate them in buttermilk first. Then, place them in a freezer-safe bag. If freezing cooked wings, let them cool completely. Store them in a freezer-safe container or bag. They can be frozen for up to three months. Yes, you can use frozen chicken wings. Just remember to thaw them first. Thawing helps them cook evenly. If you skip this step, they may cook on the outside while staying raw inside. If you don’t have buttermilk, use milk with vinegar or lemon juice. Mix one cup of milk with one tablespoon of vinegar or lemon juice. Let it sit for five minutes. This creates a tangy flavor like buttermilk. Check the internal temperature of the wings. Use a meat thermometer to ensure they reach 165°F (75°C). Insert the thermometer into the thickest part of the wing. This assures they are safe to eat. Yes, you can use gluten-free flour instead of all-purpose flour. Look for gluten-free all-purpose flour blends. They work well for dredging your wings. You can also try almond flour for a different flavor. In this post, we explored how to make delicious buttermilk fried chicken wings. We covered main ingredients, marinating, frying, and making a tasty garlic Parmesan glaze. I also shared tips for perfecting your wings and options for different glazes and cooking methods. Remember, the secret to great wings lies in the marinade and cooking technique. Whether you fry, bake, or air fry, you can create a tasty dish. Enjoy experimenting with flavors and serve your wings with sides and dips. Happy cooking!
    Buttermilk Fried Chicken Wings with Garlic Parmesan Glaze Delight
  • - 4 large chicken thighs, bone-in and skin-on - 4 large chicken drumsticks For the best flavor, use bone-in and skin-on chicken. The skin helps keep the meat juicy. It also gives you that nice crunch you crave. I love using thighs and drumsticks for their rich taste. - 2 cups buttermilk - 1 tablespoon hot sauce (optional) - 2 cups all-purpose flour - 1 teaspoon paprika - 1 teaspoon garlic powder - 1 teaspoon onion powder - 1 teaspoon cayenne pepper (adjust to taste) - 1 teaspoon salt - 1/2 teaspoon black pepper Buttermilk is key for this recipe. It tenderizes the chicken and adds a tangy flavor. Mixing in hot sauce gives it a nice kick. The seasoned flour creates a crispy crust. Combine the spices well to coat every piece evenly. - Vegetable oil for frying Choose vegetable oil for frying. It has a high smoke point. This means you can heat it without burning. A deep skillet or cast-iron pan works best. This helps you get that perfect golden brown color. First, grab a large bowl. Pour in 2 cups of buttermilk. If you like a kick, add 1 tablespoon of hot sauce. This step makes your chicken juicy and flavorful. Place the chicken thighs and drumsticks in the bowl. Make sure they are fully covered. Cover the bowl with plastic wrap and refrigerate. Let the chicken marinate for at least 4 hours. For best results, let it sit overnight. This gives the flavors time to soak in. In another bowl, mix 2 cups of all-purpose flour. Add 1 teaspoon of paprika, 1 teaspoon of garlic powder, and 1 teaspoon of onion powder. Next, sprinkle in 1 teaspoon of cayenne pepper, 1 teaspoon of salt, and 1/2 teaspoon of black pepper. This mix will give your chicken that tasty kick. Whisk everything together until it is well combined. Set this seasoned flour aside for later. Heat about 1 inch of vegetable oil in a large skillet. Get the oil to 350°F (175°C). Carefully take the chicken out of the buttermilk. Let any extra buttermilk drip off. Dredge each piece in the seasoned flour. Press down to make sure the flour sticks. Shake off any extra flour. Now, add chicken pieces to the hot oil. Start with the thighs, then add the drumsticks. Do not overcrowd the pan. Fry the chicken for 12-15 minutes on one side. Flip it and fry for another 10-12 minutes. The chicken should look golden brown and crispy. Make sure the inside reaches 165°F (75°C). Use a slotted spoon to lift the chicken out. Place it on a wire rack or a plate with paper towels. This helps drain the oil. Let the chicken rest for 5-10 minutes before serving. This keeps it juicy and crispy. To get that perfect crunch, you must start with good prep. Before you fry, let the chicken soak in buttermilk. This helps keep it moist. The buttermilk adds flavor and tenderizes the meat. After marinating, coat each piece well in the seasoned flour. Press down firmly to ensure it sticks. The oil should be hot, around 350°F. This hot oil cooks the chicken fast, sealing in the juices. Do not crowd the pan when frying. If you add too much chicken at once, the temperature drops. This makes your chicken soggy instead of crispy. Fry in batches to keep the oil hot. Give each piece space to cook evenly. You want that golden color on every side. After frying, let the chicken rest for 5-10 minutes. This step is key. It allows the juices to settle inside the meat. If you cut into it too soon, all those tasty juices run out. Resting also keeps the coating crispy. Use a wire rack or paper towels to drain the excess oil. This ensures your chicken stays delicious until it's time to eat. {{image_2}} You can boost the flavor of your fried chicken by adding more spices. Try adding cumin or smoked paprika for an earthy taste. A pinch of thyme or oregano can also give your chicken a nice twist. If you like heat, add more cayenne or chili powder. You can even mix in some lemon zest for a fresh kick. Experiment with your favorite spices to make it your own. Not everyone loves frying. You can bake your chicken for a healthier option. Preheat your oven to 425°F (220°C). After dredging the chicken, place it on a wire rack over a baking sheet. This allows hot air to circulate all around the chicken. Bake for about 30-35 minutes. Flip halfway through to get that crispy texture. You'll still enjoy a tasty meal without the extra oil. Pair your crispy chicken with classic Southern sides. Coleslaw adds crunch and creaminess. Cornbread is a perfect match for soaking up juices. You can also serve it with mashed potatoes for a hearty meal. Don't forget a tangy dipping sauce like ranch or honey mustard. These sides will make your meal feel like a true Southern feast! After enjoying your crispy chicken, let it cool. Place the chicken in an airtight container. Make sure to separate layers with parchment paper. This keeps the chicken from sticking together. Store it in the fridge for up to four days. The flavor stays great, and the chicken stays safe to eat. To reheat the chicken, use the oven for the best results. Preheat the oven to 375°F (190°C). Place the chicken on a wire rack over a baking sheet. This helps the heat circulate all around. Bake for about 15-20 minutes or until hot. The skin will turn crispy again. You can also reheat it in an air fryer if you have one. Set it to 350°F (175°C) and heat for about 8-10 minutes. If you have extra chicken, freezing is a great option. Wrap each piece tightly in plastic wrap. Then place them in a freezer-safe bag or container. Remove as much air as possible to prevent freezer burn. You can freeze the chicken for up to three months. To eat, thaw it overnight in the fridge before reheating. This keeps the chicken juicy and tasty. You can use regular milk with vinegar or lemon juice. Mix one cup of milk with one tablespoon of vinegar or lemon juice. Let it sit for five minutes to thicken. This gives you a similar tangy taste. You can also use yogurt mixed with water. This keeps your chicken moist and tasty. Check the chicken's color and temperature. It should be golden brown and crispy. Use a meat thermometer to check the inside. The chicken should reach 165°F (75°C) for safety. If you don't have a thermometer, cut into the thickest part. The juices should run clear. No pink meat means it's done! Yes, you can! Use gluten-free flour instead of all-purpose flour. Many brands offer blends that work well for frying. You can also try almond flour or rice flour. Both give a nice crunch. Just make sure to check labels for any hidden gluten. Enjoy your crispy chicken worry-free! This chicken recipe shows you how to create crispy, tasty fried chicken. We covered the best ingredients, like chicken, buttermilk, and cooking oil. I shared steps on marinating, seasoning, and frying. Plus, you learned tips for extra crispiness and avoiding overcrowding. Variations let you try different spices or cooking methods, like oven-baking. Storing and reheating tips help you save leftovers too. Enjoy making and sharing this delicious dish! You now have the tools to impress anyone with your fried chicken.
    Crispy Southern Buttermilk Fried Chicken Delight

Posts pagination

← Newer 1 … 7 8 9

Footer

↑ back to top

More information

  • Drinks
  • Appetizer
  • Dinner
  • Desserts
  • About
  • Contact
  • Privacy Policy

Our Policies

  • Privacy Policy
  • GDPR Policy
  • Terms Of Use
  • Copyright Policy
  • Cookie Policy
  • Disclaimer

Copyright © 2025 cheftaling