
Pineapple Teriyaki Meatballs Flavorful and Easy Recipe
If you crave a dish that bursts with flavor, you’ll love Pineapple Teriyaki Meatballs. This easy recipe combines sweet and
If you crave a dish that bursts with flavor, you’ll love Pineapple Teriyaki Meatballs. This easy recipe combines sweet and
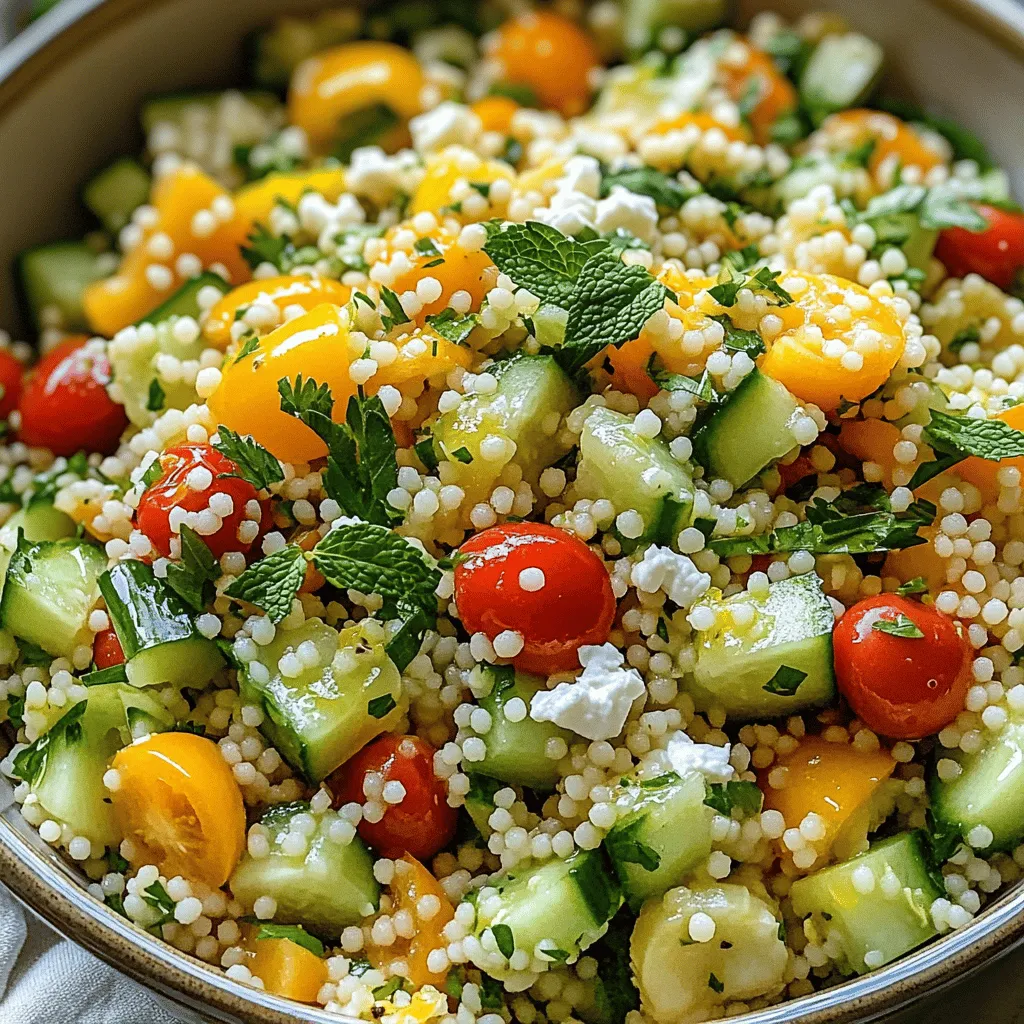
Looking for a refreshing dish that bursts with flavor? Try my Lemon Herb Couscous Salad. This salad combines fluffy couscous
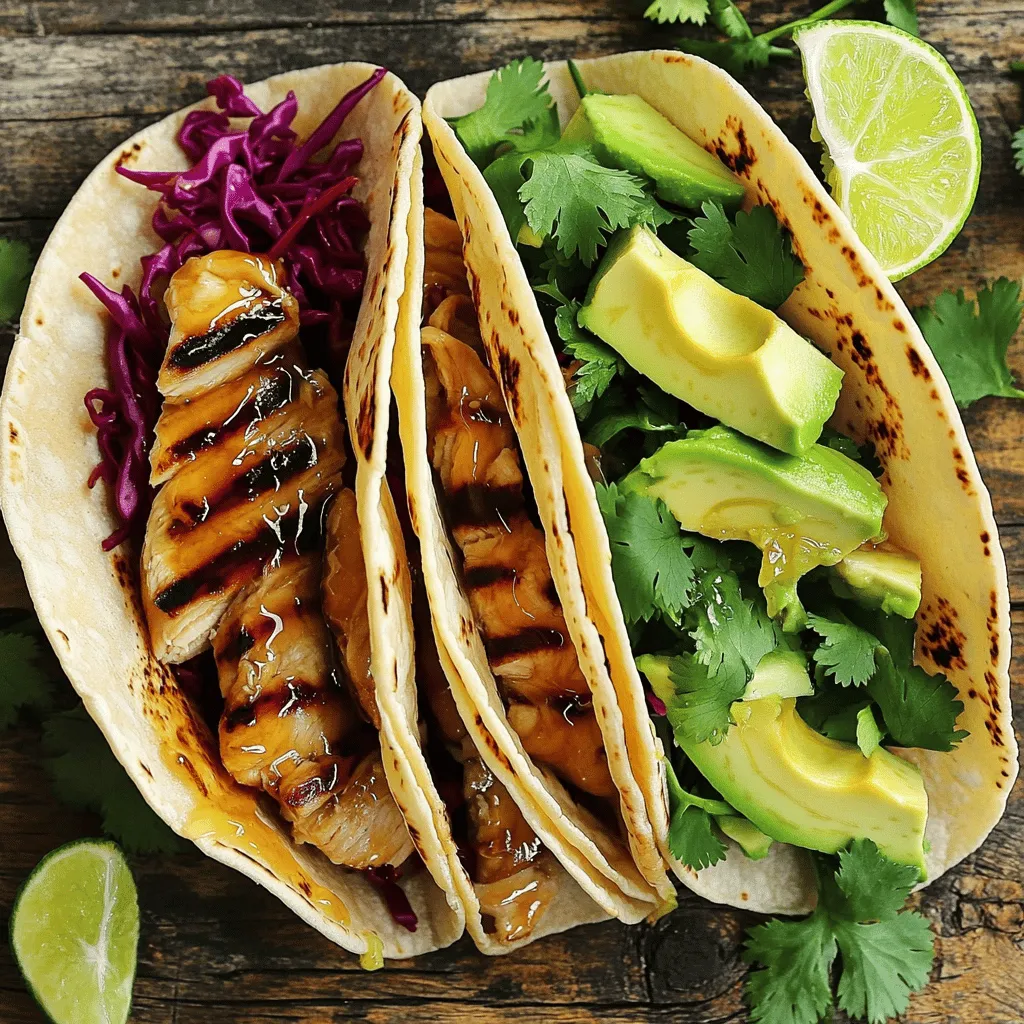
If you’re craving tacos that burst with flavor, you’re in the right place! This Honey Lime Chicken Tacos recipe is
![- 20 jumbo pasta shells - 1 cup ricotta cheese - 1 cup fresh spinach, chopped - 1 cup shredded mozzarella cheese - 1/2 cup grated Parmesan cheese - 2 cloves garlic, minced - 1 teaspoon Italian seasoning - 1/2 teaspoon red pepper flakes (optional) - 2 cups marinara sauce - Salt and pepper to taste - Fresh basil leaves for garnish To make these spinach ricotta stuffed shells, you need simple yet fresh ingredients. Each ingredient plays a role in the flavor and texture of the dish. The jumbo pasta shells hold the creamy filling, while ricotta cheese gives a rich taste. Spinach adds a nice pop of green and nutritional value. The mozzarella cheese melts beautifully on top, creating a gooey layer. Parmesan adds a salty punch to the filling. Garlic and Italian seasoning bring warmth and depth. If you like a little heat, the red pepper flakes are a great touch. Marinara sauce bathes the shells and keeps them moist. - Calories per serving: 350 - Macronutrient breakdown: - Protein: 20g - Carbohydrates: 40g - Fat: 15g This dish is a balanced meal. It offers protein from cheese and shells. Spinach boosts the vitamins while keeping the dish light. With each bite, you enjoy both flavor and nutrition. For the full recipe, check out the instructions above! First, cook the jumbo shells. Follow the package instructions carefully. I usually boil them for about 10 minutes. They should be al dente, or firm to the bite. After cooking, drain them in a colander. Let them cool for a few minutes, so you can handle them easily. In a large bowl, combine the ricotta cheese and chopped spinach. I like to mix in half a cup of mozzarella cheese for extra creaminess. Add the grated Parmesan cheese next. Mince two cloves of garlic and toss them in. Sprinkle in the Italian seasoning and red pepper flakes if you want some heat. Season with salt and pepper. Mix everything until it is well combined. Now, it's time to fill the pasta shells. Use a spoon or a piping bag to make it easy. Carefully fill each shell with the ricotta and spinach mixture. Don't overstuff; a little filling goes a long way. Next, grab a baking dish. Spread a thin layer of marinara sauce on the bottom. This keeps the shells from sticking. Place the stuffed shells in the dish, seam side up. Pour the remaining marinara sauce over the shells. Sprinkle the rest of the mozzarella cheese on top. Cover the dish with aluminum foil. Bake in your preheated oven at 375°F (190°C) for 25 minutes. After that, remove the foil and bake for another 10-15 minutes. You want the cheese to be bubbly and golden. Let the dish cool for a few minutes before serving. Garnish with fresh basil leaves for a nice touch. For the full recipe, check the earlier section! To make perfect spinach ricotta stuffed shells, cook the shells until al dente. This means they should be firm but not hard. If they are too soft, they may break when you fill them. After cooking, drain the shells and cool them slightly. For a tastier filling, add fresh herbs like parsley or basil. A pinch of nutmeg can also bring out the flavors. If you like a little heat, include red pepper flakes for a spicy kick. These stuffed shells pair well with a simple salad. A Caesar or mixed greens salad adds freshness. Garlic bread is also a great side that everyone loves. When serving, arrange the shells neatly on a plate. Drizzle extra marinara sauce over them for color. Garnish with fresh basil for a bright touch. Using the right tools makes cooking easier. A large mixing bowl helps combine the filling well. A spoon or piping bag is great for filling the shells without mess. For baking, choose a deep dish. A 9x13 inch baking pan works well for even cooking. Cover it with aluminum foil to keep the shells moist while baking. For the full recipe, check out the main article. {{image_2}} You can change up your spinach ricotta stuffed shells in fun ways. First, try different cheeses. Instead of ricotta, use cottage cheese for a lighter taste. Goat cheese adds a tangy kick. Mixing mozzarella and provolone gives a nice stretch and flavor. Next, think about adding meat or more veggies. Ground beef or Italian sausage adds richness. If you want a veggie-packed option, try mushrooms, zucchini, or artichokes. These swaps keep the dish fresh and exciting. If you need to make this dish gluten-free, choose gluten-free pasta shells. Many brands offer tasty options that cook well. Check the package for cooking times, as they can vary. For vegan adaptations, swap ricotta with blended tofu or cashew cream. Use nutritional yeast to get a cheesy flavor. Instead of mozzarella, you can use vegan cheese or skip it entirely. These changes make the dish plant-based but still delicious. Explore the [Full Recipe] for more ideas! To store your leftover spinach ricotta stuffed shells, first let them cool. Place them in an airtight container. Store in the fridge for up to three days. If you want to keep them longer, consider freezing. For freezing, place the stuffed shells in a single layer on a baking sheet. Freeze them until solid, then transfer to a freezer-safe container or bag. They can last for up to three months this way. Label the container with the date for easy tracking. When it's time to enjoy your stuffed shells again, here are some methods for reheating: - Oven: Preheat to 350°F (175°C). Place the shells in a baking dish. Add a splash of marinara sauce to keep them moist. Cover with foil and heat for about 20 minutes. - Microwave: Place a few shells on a microwave-safe plate. Add a bit of sauce on top. Heat in short bursts of 1-2 minutes. Check often to avoid overheating. To maintain texture and flavor, avoid reheating multiple times. If you have a lot, reheat only what you will eat. Enjoy your stuffed shells just like the first time! How do you prevent the shells from breaking? To prevent breaking, cook the shells until just al dente. Be gentle when draining and rinsing them. Lay them flat on a towel to cool. This will help keep their shape. Can I make this recipe ahead of time? Yes, you can prepare these shells a day early. Assemble them, cover well, and store in the fridge. Bake them right before serving. What can I use instead of ricotta cheese? You can use cottage cheese or cream cheese as a substitute. Both will give a good texture and flavor. What temperature should stuffed shells be served at? Stuffed shells taste best when served hot. Aim for about 165°F (74°C) for safe eating. How long do stuffed shells last in the fridge? They can last in the fridge for up to three days. Just make sure to store them in an airtight container. Can I use a different sauce besides marinara? Absolutely! You can try Alfredo sauce or a homemade pesto. Both pair well with the flavors of the stuffed shells. For the full recipe, check the detailed instructions above. In this post, we explored a delicious stuffed pasta shell recipe. We covered the key ingredients, step-by-step cooking instructions, and helpful tips. With options for dietary needs and storage advice, it’s easy to make this dish your own. Whether you serve it for a family dinner or a special occasion, it’s sure to please. Enjoy creating your own version of these comforting stuffed shells, and don’t hesitate to get creative with variations that suit your taste or needs. Happy cooking!](https://cheftaling.com/wp-content/uploads/2025/07/a7013946-172e-4769-81aa-222a6044ce40.webp)
Are you ready to delight your taste buds? This Savory Spinach Ricotta Stuffed Shells Recipe is a winner that everyone
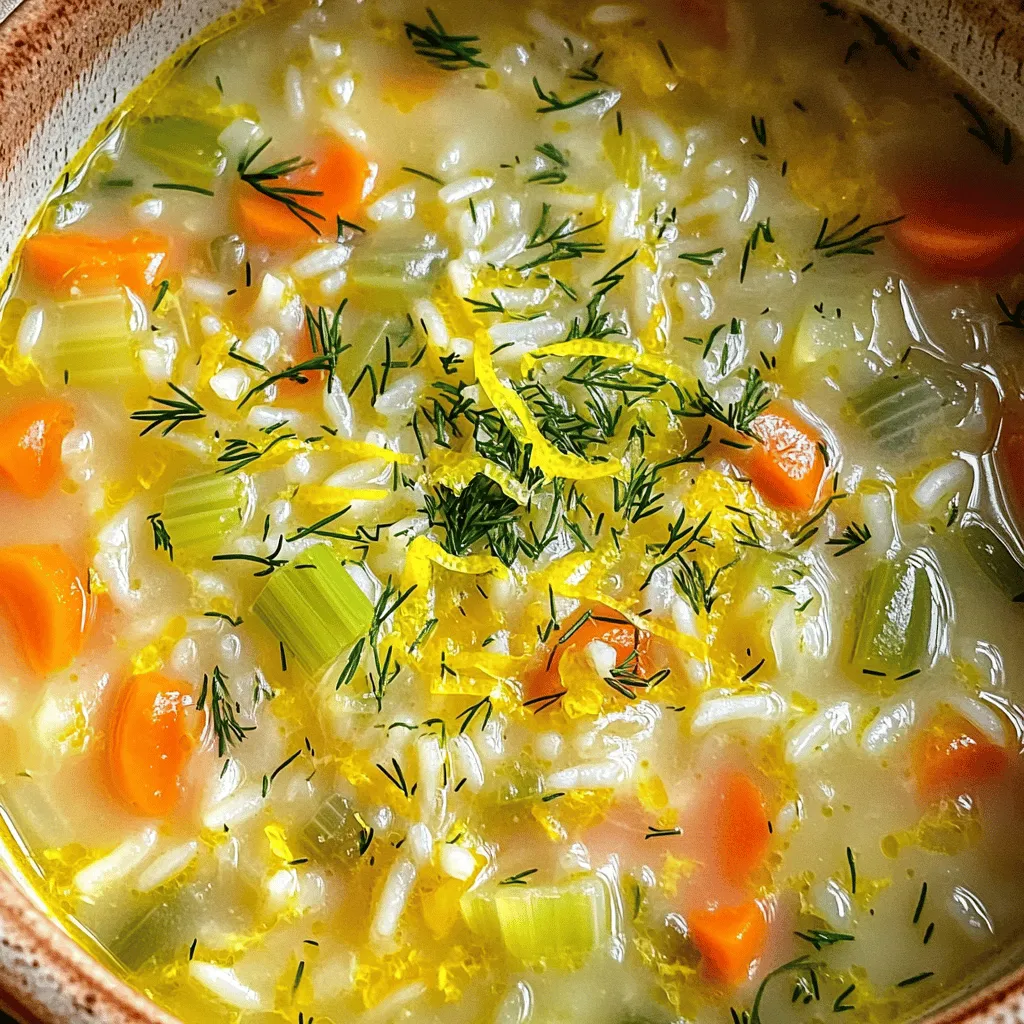
Greek Lemon Rice Soup is a warm hug in a bowl, perfect for any meal. With its bright lemon flavor

If you’re craving a warm, gooey treat, look no further than caramel pecan sticky buns! With their sweet caramel topping
![- 1 cup quinoa, rinsed - 2 cups vegetable broth or water - 1 can (15 oz) black beans, rinsed and drained - 1 cup corn kernels (fresh, frozen, or canned) - 1 red bell pepper, diced - 1 cup cherry tomatoes, halved - 1 avocado, diced - 1/4 cup red onion, finely chopped - 1/2 cup fresh cilantro, chopped The main stars of this salad are the quinoa and black beans. Quinoa is a great grain. It is full of protein and fiber. Black beans add a creamy texture and taste. The corn gives a sweet crunch. Fresh veggies like tomatoes and peppers boost the flavor. I love adding avocado for its creaminess. Cilantro adds a fresh touch, making every bite pop. Each ingredient brings a unique taste and many nutrients. - Juice of 2 limes - 3 tablespoons olive oil - 1 teaspoon cumin - 1 teaspoon chili powder - Salt and pepper to taste The dressing is simple yet so tasty. Lime juice gives a zesty kick. Olive oil makes it smooth. Cumin and chili powder add warmth and depth. I adjust salt and pepper to balance the flavors. This dressing brings the whole salad together. It enhances each ingredient, making it shine. This salad is packed with nutrition. Each serving has about 250 calories. It is high in protein due to quinoa and beans. The fiber from all the veggies helps digestion. This salad is vegan and gluten-free, making it a great choice for many diets. You can feel good about enjoying this fresh dish! If you want to make it, check out the Full Recipe for details. Step 1: Combining quinoa with broth Start by rinsing 1 cup of quinoa under cold water. This step removes the bitter coating. In a medium pot, combine the rinsed quinoa with 2 cups of vegetable broth or water. This broth adds flavor. Step 2: Simmering and fluffing quinoa Bring the pot to a boil over medium-high heat. Once boiling, lower the heat. Cover the pot and let it simmer for 15 minutes. This allows the quinoa to absorb the liquid. After 15 minutes, take the pot off the heat. Let it sit for 5 more minutes. Finally, fluff the quinoa with a fork. Step 3: Chopping vegetables While the quinoa cooks, chop your veggies. Dice 1 red bell pepper and halve 1 cup of cherry tomatoes. Dice 1 avocado and finely chop 1/4 cup of red onion. Rinse and drain 1 can of black beans, and prepare 1 cup of corn. Fresh, frozen, or canned corn works well. Step 4: Combining salad ingredients in a bowl In a large bowl, mix all these ingredients together. Add the black beans, corn, red pepper, cherry tomatoes, avocado, red onion, and 1/2 cup of chopped cilantro. This mix adds color and nutrition. Step 5: Whisking dressing ingredients In a small bowl, whisk together the juice of 2 limes, 3 tablespoons of olive oil, 1 teaspoon of cumin, and 1 teaspoon of chili powder. This dressing gives the salad its signature taste. Step 6: Adjusting seasoning After whisking, taste your dressing. Add salt and pepper as needed. Adjust the lime juice for extra zing if you like. Step 7: Adding quinoa and dressing to salad Once the quinoa is fluffy, add it to the large bowl with the salad ingredients. Pour the dressing over the top. Step 8: Tossing to combine Gently toss everything together until well mixed. You want the dressing to coat all the ingredients evenly. Enjoy your Southwest Quinoa Salad! For the full recipe, check out the details above. - Rinsing quinoa for better taste: Always rinse your quinoa before cooking. This step removes the saponins, which can taste bitter. Rinsing also makes the quinoa fluffier. Just place it in a fine-mesh strainer and rinse under cold water for a minute. - Timing for perfectly cooked quinoa: Cook quinoa on medium heat. When it boils, lower the heat and cover it. Let it simmer for about 15 minutes. After that, let it sit for 5 more minutes. Fluff it gently with a fork for the best texture. - Presentation tips for serving: Serve your salad in a large bowl to show off the colors. For individual servings, clear glass bowls work well. They highlight the beautiful layers of the salad. - Garnishing ideas for added flavor: Garnish with fresh cilantro and lime wedges. This adds a bright touch and enhances the flavor. You can also sprinkle some feta cheese for a creamy twist. - Adding spices or herbs to the dressing: Don’t hesitate to experiment! Add extra spices like smoked paprika or cayenne for a kick. Fresh herbs like parsley or dill can also brighten the dressing. - Customizing based on personal preferences: Make the salad your own! If you love heat, toss in some jalapeños. Prefer a sweeter taste? Add diced mango or pineapple for a tropical flair. For the full recipe, check out the [Full Recipe]. {{image_2}} You can easily switch up the beans in this salad. While black beans give great flavor, kidney beans work too. They add a nice color and a bit of sweetness. If you want to use different veggies, go for it! Try zucchini or bell peppers. You can also use frozen corn if fresh isn’t available. It’s all about what you like. Want a creamier dressing? Mix Greek yogurt with lime juice and spices. It adds richness and pairs well with the salad. If you’re short on time, grab a store-bought dressing. Look for one with bold flavors, like a spicy ranch or a cilantro lime option. This can save you time and still make your salad tasty. Seasonal produce can change your salad game. In summer, add fresh cucumber or radishes. In fall, roasted squash adds warmth. You can also swap out ingredients based on what you find at the market. This way, your salad stays fresh and exciting all year round. To keep your Southwest Quinoa Salad fresh, store it in an airtight container. Place it in the fridge right after serving. This will help maintain its bright flavors. The salad stays fresh for up to 3 days. However, the avocado may brown after a day. To prevent this, you can add lime juice to the avocado before storing. You might wonder, can you freeze quinoa salad? Yes, you can! Freezing is a great way to save extra portions. However, I recommend freezing only the quinoa and beans. The fresh veggies do not freeze well. To freeze, place the quinoa salad in a freezer-safe bag. Remove as much air as possible to avoid freezer burn. When you're ready to eat, thaw it overnight in the fridge. For reheating quinoa, the best method is to use the microwave. Place the quinoa in a microwave-safe bowl. Add a splash of water to keep it moist. Heat in short bursts of 30 seconds, stirring in between. You can also serve the quinoa cold for a refreshing meal. Many enjoy the crisp veggies and bright flavors chilled. It’s a versatile dish perfect for any occasion! To make this salad vegan, you can use plant-based options for the dressing. Instead of using honey or dairy, opt for agave syrup or skip the sweetener altogether. You can also add more fresh herbs, like cilantro or parsley, to boost flavor. Yes, you can make this salad ahead of time. I recommend prepping it no more than 24 hours in advance. This allows the flavors to blend while keeping the veggies fresh. Just store it in the fridge in an airtight container until you're ready to eat. Quinoa is a superfood packed with nutrients. It's high in protein and contains all nine essential amino acids. Quinoa is also a good source of fiber, which helps digestion. Additionally, it is gluten-free and rich in vitamins and minerals, such as magnesium and B vitamins. Yes, rinsing quinoa is essential. It removes the saponins, which can taste bitter. Rinsing also helps improve the overall flavor of the quinoa. Just place the quinoa in a fine-mesh strainer and rinse it under cold water for a minute or two before cooking. This Southwest Quinoa Salad combines healthy ingredients into a tasty dish. You learned how to prepare the salad, make a zesty dressing, and even mix in variations. Remember, quinoa is packed with nutrients and is quick to make. Enjoy this salad fresh or save it for later. It's versatile and easy to adjust based on what you have. Dive into this healthy option and make it yours!](https://cheftaling.com/wp-content/uploads/2025/07/f1bcfd56-8b7e-4656-9624-b24802ef15c1.webp)
Are you ready to spice up your meals? This Southwest Quinoa Salad is fresh, colorful, and packed with flavor! It
![- 1 ripe mango, peeled and diced - 1 cup fresh pineapple chunks - 1 banana, sliced - 1 cup coconut water (or regular water) - 1/2 cup plain Greek yogurt (or dairy-free alternative) - 1 tablespoon honey or agave syrup (optional) - A handful of fresh mint leaves (for garnish) - Ice cubes (optional) The key to a delicious mango pineapple smoothie lies in its fresh ingredients. You want ripe fruits for the best flavor. The mango should feel soft when you squeeze it gently. Pineapples should smell sweet and fruity. This smoothie combines sweet mango, tangy pineapple, and creamy banana. Coconut water adds hydration, while Greek yogurt gives it a nice creaminess. You can add honey for extra sweetness if you like. Mint leaves add a refreshing touch when you serve it. Each ingredient plays a role in making this smoothie flavorful and refreshing. Trust me, using fresh ingredients will make a big difference in taste! To make this smoothie, start by gathering your main ingredients. You need a ripe mango, fresh pineapple, and a banana. 1. In a blender, combine the diced mango, pineapple chunks, and banana slices. This mix brings a burst of tropical flavor. 2. Next, add one cup of coconut water to the blender. This not only hydrates but also adds a refreshing twist. 3. For creaminess, pour in half a cup of plain Greek yogurt. If you want it sweeter, drizzle in one tablespoon of honey or agave syrup. 4. Blend on high until the mixture is smooth and creamy. If you like your smoothie chilled, toss in a few ice cubes and blend again until they are fully mixed in. 5. After blending, taste your smoothie. If it needs to be sweeter or thicker, add more honey or coconut water as needed. Once your smoothie is ready, it’s time to serve it. I recommend using tall glasses to show off the vibrant color. For a fun touch, garnish each glass with a few fresh mint leaves on top. This not only looks nice but also adds a fresh aroma. Enjoy your delicious Mango Pineapple Smoothie! For the Full Recipe, please refer back to the ingredient list and instructions. To get your smoothie just right, focus on creaminess. Use ripe fruits like mango and banana. The Greek yogurt adds a nice, smooth texture. If you want a richer taste, try full-fat yogurt. For a lighter feel, use low-fat or dairy-free yogurt. Adjust the thickness by adding more liquid. Coconut water is great for this. If your smoothie is too thick, just pour in a bit more. Blend again until it’s just how you like it. If you want a thicker smoothie, add more banana or ice cubes. Boosting flavor can take your smoothie to the next level. Try adding spices like cinnamon or ginger. These spices not only add warmth but also great health benefits. A dash of cinnamon can make the smoothie taste cozy. A pinch of ginger gives it a nice kick. You can also use flavored yogurts for extra taste. Vanilla or coconut yogurt work well. If you want sweetness, think about honey or agave syrup. These can make your smoothie more enjoyable. For a fun twist, try adding a splash of vanilla extract. It will add a lovely aroma to your drink. For a full taste experience, explore the [Full Recipe]. {{image_2}} You can change the fruit in your smoothie to keep it fresh. Adding strawberries or blueberries gives a sweet twist. These berries add a nice color and taste. You can also try using other tropical fruits like papaya or kiwi. These fruits bring new flavors and nutrients to your drink. Each fruit will change the smoothie’s taste and make it unique. If you want a dairy-free smoothie, swap the Greek yogurt for a plant-based option. Almond, coconut, or soy yogurt works well. These alternatives keep your smoothie creamy without dairy. For sweeteners, you can use maple syrup or agave syrup for a vegan choice. These options add sweetness while keeping your drink plant-based. Enjoy the fruity goodness in many ways! Don't forget to check the Full Recipe for more ideas. You may have some smoothie left after making your Mango Pineapple Smoothie. To keep it fresh, use a glass jar or a BPA-free plastic container. Seal it tightly to prevent air from spoiling the flavor. Store it in the fridge for up to 24 hours. After that, it may lose some taste and texture. If you want to enjoy the smoothie later, freezing is a great option. Pour the smoothie into ice cube trays or freezer-safe bags. Leave some space in the bags for expansion. You can freeze it for up to three months. When you’re ready to drink it, take out what you need. Thaw it in the fridge overnight or blend it straight from the freezer for a slushy treat. Enjoy your refreshing Mango Pineapple Smoothie anytime! Yes, you can make this smoothie ahead of time. If you want to save it, store it in an airtight container. Keep it in the fridge for up to one day. The smoothie may separate, so stir it well before you drink it. If you don’t have coconut water, use regular water or fruit juice instead. Fruit juice can add a nice flavor. You can also try almond milk for a creamier touch. Just remember, the taste will change a bit based on what you use. To make the smoothie thicker, add more Greek yogurt or a banana. You can also use frozen fruit instead of fresh. Frozen fruit gives you a nice, thick texture. Just blend it well, and you’ll get a creamy drink. Yes, this smoothie is great for kids! It is packed with fruits and tastes sweet. You can adjust the sweetness by adding less honey. The bright colors and fresh flavors will appeal to children, making it a fun treat. You can find the Full Recipe for the Tropical Bliss Mango Pineapple Smoothie above in this article. This will guide you through every step to create your own refreshing drink. This blog post covers a simple and tasty smoothie recipe. You learned about the key ingredients and their nutritional benefits. I provided steps to prepare and serve the smoothie perfectly. Tips for texture and flavor help you make it your own. You can explore variations to suit your tastes or dietary needs. Don’t forget storage tips to keep leftovers fresh. Enjoy your smoothie making journey. It’s all about trying new things and having fun!](https://cheftaling.com/wp-content/uploads/2025/07/bf96e18e-1baf-4c74-be68-960086dbf8ca.webp)
Are you ready to turn your kitchen into a tropical paradise? This Mango Pineapple Smoothie is a delightful mix of
![- 1 ½ cups graham cracker crumbs - ½ cup unsalted butter, melted - 2 cups cream cheese, softened To start, we need some graham cracker crumbs for the crust. These crumbs add a crunchy texture. Next, we melt unsalted butter. This butter helps bind the crumbs together. Then, we mix in softened cream cheese for a rich filling. It gives the cheesecake its creamy base. - 1 cup pumpkin puree - 1 tablespoon pumpkin spice blend (cinnamon, nutmeg, ginger, and cloves) - ½ cup strong brewed coffee, cooled Now, let's talk about flavors. We use pumpkin puree to give the cheesecake its smooth texture and rich taste. The pumpkin spice blend adds warmth. It makes every bite cozy and inviting. Lastly, we add strong brewed coffee. This coffee enhances the pumpkin flavor and makes it special. - 1 cup granulated sugar - 3 large eggs - 1 teaspoon vanilla extract For sweetness, we use granulated sugar. It balances the flavors well. Next, we need three large eggs. They help set the cheesecake and keep it rich. Lastly, we include vanilla extract for a hint of warmth. This blend of ingredients creates a delightful dessert. For the full recipe, refer to the [Full Recipe]. First, I mix the graham cracker crumbs with melted butter in a bowl. I want this mix to feel like wet sand. Next, I press it firmly into a 9-inch springform pan. This makes a nice base for the cheesecake. Then, I bake the crust in a preheated oven at 325°F (160°C) for 8-10 minutes. The crust should be lightly golden. Once done, I take it out and let it cool completely. In a large bowl, I beat the softened cream cheese and granulated sugar together. I mix until it’s smooth and creamy. Then, I add the pumpkin puree, pumpkin spice blend, and vanilla extract. I blend these ingredients well. After that, I add the eggs one at a time. I mix carefully after each addition. Finally, I slowly pour in the cooled brewed coffee. I blend until everything is smooth and well combined. Now, I pour the pumpkin cheesecake filling over the cooled crust. I smooth the top with a spatula. I place the cheesecake in the oven and bake it for 50-60 minutes. I check for doneness by looking for set edges and a slight jiggle in the center. Once it’s done, I turn off the oven and crack the door open. I let the cheesecake cool for about 1 hour. After it cools, I refrigerate it for at least 4 hours, or overnight if I can wait. This helps it set properly. To make a creamy filling, mix your cream cheese until it’s smooth. Start with room-temperature cream cheese for the best results. If you beat it cold, it can stay lumpy. Add your sugar gradually. This helps dissolve it fully, giving you a silky texture. When you mix in the eggs, do it one at a time. This way, the batter stays light and fluffy. To prevent cracks, avoid overbaking. The center should jiggle slightly when you take it out. Also, let it cool slowly in the oven with the door cracked. This helps avoid sudden temperature changes that cause cracks. Pumpkin Spice Latte Cheesecake shines with whipped cream on top. A dollop adds a nice touch. Sprinkle ground cinnamon for extra flavor and a warm look. Pair it with coffee or tea for a cozy dessert experience. A scoop of vanilla ice cream also works well. Serve it on a pretty plate to impress your guests. A soggy crust can happen if the butter is too warm. Make sure it cools slightly before mixing. Also, bake your crust long enough. It should feel firm to the touch. For storing leftovers, keep your cheesecake in the fridge. Cover it tightly with plastic wrap. This keeps it fresh for up to five days. If you freeze it, wrap it well to prevent freezer burn. {{image_2}} You can play with flavors in your Pumpkin Spice Latte Cheesecake. Two great options are chocolate and maple. - Chocolate Pumpkin Spice Latte Cheesecake: Mix in cocoa powder or melted chocolate. This twist adds rich chocolate flavor. It pairs well with the pumpkin spice. Use the same base recipe. Replace some sugar with cocoa powder to balance flavors. - Maple Pumpkin Spice Latte Cheesecake: Add pure maple syrup to your mix. This will give your cheesecake a sweet, warm flavor. It pairs nicely with the pumpkin spice. Replace some granulated sugar with maple syrup for a delicious twist. You can easily adjust the recipe for dietary needs. Here are some tasty ideas. - Gluten-free crust option: Use gluten-free graham crackers or almond flour. Mix it with melted butter just like the original crust. This keeps the texture and flavor intact. - Dairy-free substitutions: Swap cream cheese with non-dairy cream cheese. Use coconut cream for a rich texture. This makes the cheesecake creamy without dairy. You can adjust the size of your cheesecake to fit your needs. - Scaling the recipe up or down: If you need more or less cheesecake, scale the ingredients. Just keep the same ratios. A larger cheesecake will take longer to bake, so check it often. - Mini cheesecake options: Instead of one big cheesecake, create mini versions. Use a muffin tin or small ramekins. This makes for cute individual servings, perfect for parties or gatherings. Adjust baking time to about 20-25 minutes for mini cheesecakes. For the full details on making this delightful dessert, check out the full recipe. To keep your cheesecake fresh, refrigerate it as soon as it cools. Wrap it tightly in plastic wrap or store it in an airtight container. This keeps it from drying out and absorbing other smells. If you want to freeze it, make sure it is fully cooled first. Slice the cheesecake into portions, then wrap each slice in plastic wrap. Place them in a freezer-safe bag or container. This will help keep the flavors intact. In the fridge, your cheesecake will last about five days. Keep an eye on it for any signs of spoilage. If it develops an odd smell, changes color, or feels slimy, it’s best to throw it away. These signs mean the cheesecake has gone bad. If you freeze the cheesecake, thaw it in the fridge overnight before serving. This helps maintain its texture. For added flair, serve it with a dollop of whipped cream and a sprinkle of ground cinnamon. You can also drizzle some caramel or chocolate sauce for extra sweetness. Enjoy this delicious treat with friends or family! Pumpkin Spice Latte Cheesecake is a rich dessert that blends sweet and spicy flavors. It combines the warmth of pumpkin with the cozy notes of coffee. You get a creamy texture from the cream cheese and a hint of warmth from the spices. The crust is crunchy and buttery, made from graham crackers. This cheesecake captures the essence of fall in every bite. You can taste cinnamon, nutmeg, and a touch of ginger, just like your favorite pumpkin spice latte. Yes, you can make this cheesecake ahead of time. It actually tastes better after chilling in the fridge. I recommend making it the day before you serve it. This allows the flavors to blend well. After baking, let it cool completely. Then, wrap it tightly and refrigerate. It will stay fresh for up to five days. Just add whipped cream and cinnamon on top before serving. If you need a substitute for cream cheese, try using mascarpone or ricotta cheese. Both have a creamy texture that works well in cheesecake. You can also use Greek yogurt for a lighter option. Just remember that this may change the flavor a bit. If you're dairy-free, consider using a vegan cream cheese made from nuts or soy. Each option offers a unique taste while keeping the cheesecake delicious. You learned how to make a tasty Pumpkin Spice Latte Cheesecake. We covered key ingredients and steps to bake it right. I shared tips for perfect texture and serving ideas. Don't forget about fun variations and storage tips. Enjoy experimenting with this recipe. You can impress friends and family with your baking skills!Making this cheesecake can bring warmth to any occasion. Try it out and savor every bite.](https://cheftaling.com/wp-content/uploads/2025/07/533a376c-97a8-461f-9b36-08e57339cd9b.webp)
Are you ready to indulge in a dessert that screams fall? Meet the Pumpkin Spice Latte Cheesecake, your new favorite
![- 2 boneless, skinless chicken breasts, cut into bite-sized pieces - 2 tablespoons Cajun seasoning - 1 bell pepper (red or green), sliced - 1 medium onion, diced - 3 cloves garlic, minced - 8 ounces of penne pasta - 4 cups chicken broth - 1 cup heavy cream - 1 cup cherry tomatoes, halved - 1 cup corn kernels (frozen or fresh) - Salt and pepper to taste Chicken is the star of this dish. I use boneless, skinless chicken breasts for easy cooking and great flavor. Cajun seasoning adds a spicy kick that makes each bite exciting. You can choose red or green bell peppers for sweetness and color. Diced onions and minced garlic build a strong base of flavor. Penne pasta holds the sauce well and cooks perfectly in one pot. The liquids are just as important. Chicken broth adds depth and richness. Heavy cream brings creaminess and helps blend all the flavors. Cherry tomatoes and corn are my go-to veggies for freshness and texture. Don’t forget to season with salt and pepper to taste! - 1 tablespoon olive oil - Kosher salt and black pepper - Fresh parsley, chopped (for garnish) - Grated Parmesan cheese (optional, for serving) Olive oil is key for cooking the chicken and vegetables. I use kosher salt and black pepper to control the seasoning easily. Fresh parsley adds a pop of color and a fresh taste when you serve the pasta. Grated Parmesan cheese is an optional touch, but it adds a rich flavor that pairs nicely with the Cajun spices. For the full recipe, check [Full Recipe]. Start by seasoning the chicken pieces with Cajun seasoning. Use about two tablespoons for great flavor. Make sure to coat each piece well. This step adds a kick to your dish. Heat a large pot or Dutch oven over medium-high heat. Pour in one tablespoon of olive oil. Once hot, add the seasoned chicken. Sauté until browned, which takes about 5 to 7 minutes. Then, remove the chicken from the pot and set it aside. In the same pot, add one diced onion and one sliced bell pepper. Sauté for about 3 to 4 minutes until both are softened. Next, add three minced garlic cloves and cook for another minute. This will make your kitchen smell amazing! Now, add 8 ounces of penne pasta to the pot. Pour in 4 cups of chicken broth and stir well to combine. Bring this mixture to a boil. Once boiling, reduce the heat to a simmer. Add in 1 cup of halved cherry tomatoes and 1 cup of corn. Don’t forget the browned chicken! Cover and cook for about 12 to 15 minutes. Stir occasionally until the pasta is al dente. Remove the pot from heat and stir in 1 cup of heavy cream. This gives the dish a rich and creamy texture. Mix until everything is well incorporated. Season with salt and pepper to taste. Let the pasta sit for about 5 minutes to thicken. Finally, fluff the pasta with a fork before serving. For a lovely touch, serve the dish in shallow bowls. Garnish with fresh parsley and a sprinkle of grated Parmesan cheese if you like. Enjoy this hearty and easy dish that brings big flavors to your table! For the complete recipe, check out the Full Recipe. To boost the taste of your One-Pot Cajun Chicken Pasta, start with homemade Cajun seasoning. This mix gives you control over the spice level. Blend paprika, oregano, thyme, and cayenne pepper for a fresh kick. You can also add more vegetables. Try diced zucchini or sliced mushrooms for extra texture and nutrients. They cook well and soak up the Cajun flavor, making your dish even better. Ensure your pasta cooks evenly by stirring it well when you add it to the pot. This helps prevent clumping. Keep an eye on the heat. If it boils too fast, the pasta may cook unevenly. To adjust sauce consistency, you can add more chicken broth if it looks too thick. If it's too thin, let it simmer a bit longer. This way, your pasta will be creamy and flavorful. Pair your pasta with fresh bread or a light salad for a complete meal. Garlic bread is a great choice, as it complements the dish's spice. For storage, let the pasta cool before placing it in an airtight container. It lasts up to three days in the fridge. When reheating, add a splash of chicken broth to keep it creamy and delicious. Enjoy a flavorful meal every time! {{image_2}} You can change the main protein in this dish. If you want a lighter option, use shrimp. Shrimp cooks fast and adds a nice touch. Sausage is another great swap. It brings a hearty flavor and pairs well with spices. For gluten-free options, try using gluten-free pasta. Many brands offer pasta made from rice or chickpeas. These options work well in this recipe. They will give you the same tasty dish without gluten. If you love spice, add jalapeños or red pepper flakes. They boost the heat and make the dish exciting. You can also add hot sauce for more zing. For creaminess variations, mix in cream cheese or sour cream. These ingredients create a rich texture. You can also use a lighter milk, like almond milk, for a healthier twist. Each option brings its own unique flair to the dish. Explore these variations to make One-Pot Cajun Chicken Pasta suit your taste. For the complete recipe, check out the [Full Recipe]. After you make the One-Pot Cajun Chicken Pasta, let it cool down. Store it in an airtight container in the fridge. It will stay fresh for about 3 to 4 days. If you want to keep it from drying out, place a piece of plastic wrap directly on the pasta before sealing the lid. For longer storage, you can freeze the pasta. First, let it cool completely. Then, portion it into freezer-safe bags or containers. Squeeze out the air to prevent freezer burn. This dish can last up to 3 months in the freezer. When you're ready to eat, just thaw it in the fridge overnight. To reheat, you can use the microwave or stove. If using the microwave, place the pasta in a bowl and add a splash of broth or cream. This keeps it moist. Heat it in short bursts, stirring often. If using the stove, warm it on low heat, stirring frequently. This helps the flavors stay strong and the texture right. Enjoy your tasty One-Pot Cajun Chicken Pasta! To make One-Pot Cajun Chicken Pasta, it takes about 30 minutes. You need 10 minutes for prep. The cooking time is around 20 minutes. This quick meal is great for busy nights! Yes, you can use different pasta shapes! Try fusilli, farfalle, or even spaghetti. Just adjust the cooking time as needed. Make sure to check if your pasta needs more or less time to cook. Cajun seasoning has a bold and spicy flavor. It often includes paprika, cayenne, garlic powder, and onion powder. This mix gives it warmth and depth. The unique blend makes it perfect for hearty dishes like this pasta. Cajun seasoning adds a kick that makes your meal exciting! In this blog post, we explored how to create delicious One-Pot Cajun Chicken Pasta. We covered essential ingredients, preparation steps, and tips for enhancing flavor. Cooking methods and storage tips help you make the most of your dish. Remember, you can easily swap ingredients for tasty variations. Whether you add shrimp or spice it up, experiment to find your favorite. With these key points, you can cook, serve, and store your Cajun masterpiece with confidence. Enjoy your cooking journey!](https://cheftaling.com/wp-content/uploads/2025/07/d63c01b6-0aec-4875-b4a1-13cf845073df.webp)
Are you ready for a tasty meal that’s quick and easy? One-Pot Cajun Chicken Pasta is a complete dish that