Chef Taling

  • Recipes
    • Dinner
    • Desserts
    • Appetizer
    • Drinks
  • Privacy Policy
  • Contact
  • About
menu icon
go to homepage
  • Recipes
    • Dinner
    • Desserts
    • Appetizer
    • Drinks
  • Privacy Policy
  • Contact
  • About
Discover the comforting flavors of Butter Swim Biscuit Chicken Pot Pie, a classic dish that elevates your family meals with ease! This recipe combines tender rotisserie chicken and vibrant vegetables in a creamy filling topped with fluffy, buttery biscuits that soak up all the deliciousness. Perfect for cozy dinners or gatherings, this dish will warm your heart and fill your belly. Click through for step-by-step instructions and enjoy a taste of nostalgia today!

search icon
Homepage link
  • Recipes
    • Dinner
    • Desserts
    • Appetizer
    • Drinks
  • Privacy Policy
  • Contact
  • About
Discover the comforting flavors of Butter Swim Biscuit Chicken Pot Pie, a classic dish that elevates your family meals with ease! This recipe combines tender rotisserie chicken and vibrant vegetables in a creamy filling topped with fluffy, buttery biscuits that soak up all the deliciousness. Perfect for cozy dinners or gatherings, this dish will warm your heart and fill your belly. Click through for step-by-step instructions and enjoy a taste of nostalgia today!

×

Butter Swim Biscuit Chicken Pot Pie Recipe: A Comfort Food Classic

Published: Feb 8, 2025 · by Taling · Leave a Comment

WANT TO SAVE THIS RECIPE?

Discover the comforting flavors of Butter Swim Biscuit Chicken Pot Pie, a classic dish that elevates your family meals with ease! This recipe combines tender rotisserie chicken and vibrant vegetables in a creamy filling topped with fluffy, buttery biscuits that soak up all the deliciousness. Perfect for cozy dinners or gatherings, this dish will warm your heart and fill your belly. Click through for step-by-step instructions and enjoy a taste of nostalgia today!

Introduction

Comfort food holds a special place in our hearts and culinary culture, offering solace and warmth through familiar flavors and hearty textures. It’s the kind of food that brings us back to cherished memories of family gatherings, cozy nights in, and shared meals around the table. Among the myriad of comfort food options, the Butter Swim Biscuit Chicken Pot Pie stands out as a perfect blend of rich, savory filling topped with fluffy, buttery biscuits. This dish not only embodies the essence of comfort food but also elevates it to new heights with its unique twist.

Comfort food holds a special place in our hearts and culinary culture, offering solace and warmth through familiar flavors and hearty textures. It's the kind of food that brings us back to cherished memories of family gatherings, cozy nights in, and shared meals around the table. Among the myriad of comfort food options, the Butter Swim Biscuit Chicken Pot Pie stands out as a perfect blend of rich, savory filling topped with fluffy, buttery biscuits. This dish not only embodies the essence of comfort food but also elevates it to new heights with its unique twist.

Butter Swim Biscuit Chicken Pot Pie is an easy-to-make dish that is ideal for family meals or gatherings. It combines the classic flavors of chicken pot pie with the delightful texture of homemade biscuits that literally swim in a pool of buttery goodness. Whether you’re looking to impress guests or simply want to whip up a cozy dinner, this recipe is a foolproof way to satisfy your cravings for something hearty and comforting.

The Appeal of Chicken Pot Pie

Chicken pot pie has deep roots in American cuisine, tracing its history back to the early settlers who brought their pie-making traditions from Europe. Over the years, this dish has evolved, becoming a staple in homes across the country. The beloved chicken pot pie is more than just a meal; it is a symbol of comfort, nostalgia, and the joy of home-cooked food.

One of the reasons chicken pot pie remains a favorite is its versatility. It can be adapted to suit individual tastes and dietary restrictions, whether by swapping out chicken for turkey or adding in seasonal vegetables. The combination of tender chicken, savory vegetables, and a creamy sauce encased in a flaky crust creates a symphony of flavors that resonates with many. Each bite evokes a sense of warmth and familiarity, making it the go-to comfort dish for countless families.

What sets the Butter Swim Biscuit Chicken Pot Pie apart is the innovative use of butter swim biscuits. Unlike traditional biscuit recipes that require rolling out dough, this method allows the biscuits to bake right on top of the filling, soaking up the rich flavors while remaining soft and fluffy. This unique twist not only simplifies the preparation process but also enhances the overall experience of enjoying a classic chicken pot pie.

Understanding the Ingredients

To create the ultimate Butter Swim Biscuit Chicken Pot Pie, it’s essential to understand the key ingredients that contribute to its deliciousness.

Shredded Rotisserie Chicken

Using shredded rotisserie chicken is a game-changer in this recipe. It saves time and effort while infusing the dish with incredible flavor. Rotisserie chickens are pre-cooked and seasoned, offering a convenient option for busy cooks. The tenderness of the chicken combined with the savory spices creates a well-rounded filling that is hard to resist.

Frozen Mixed Vegetables

Frozen mixed vegetables are another practical choice for this recipe. They provide a colorful and nutritious addition to the pot pie while eliminating the need for chopping and prepping fresh vegetables. Typically, these blends include peas, carrots, corn, and green beans, which not only add texture but also contribute essential vitamins and minerals to the dish.

Chicken Broth and Whole Milk

The combination of chicken broth and whole milk is vital for creating a rich and creamy filling. Chicken broth adds depth and enhances the chicken flavor, while whole milk contributes creaminess and richness that complements the other ingredients. Together, they form the perfect base for the filling, ensuring that each spoonful is satisfying.

Spices and Seasonings

To elevate the flavor profile, spices and seasonings play a crucial role. Garlic powder, onion powder, dried thyme, salt, and pepper are essential in bringing out the deliciousness of the chicken and vegetables. These ingredients work harmoniously to create a savory filling that is bursting with flavor, ensuring that every bite is memorable.

Biscuit Dough Components

The biscuit dough is the crowning glory of this dish. The primary components include flour, baking powder, baking soda, and butter. The combination of these ingredients ensures that the biscuits rise beautifully while remaining tender and flaky. The butter, in particular, adds richness, contributing to the irresistible flavor of the biscuits as they bake atop the creamy filling.

Step-by-Step Preparation of Butter Swim Biscuit Chicken Pot Pie

Now that we’ve explored the ingredients that make up this delicious Butter Swim Biscuit Chicken Pot Pie, let’s delve into the preparation. This step-by-step guide will ensure that you create a dish that not only looks appealing but tastes absolutely divine.

Step 1: Preheat the Oven

Start by preheating your oven to 425°F (220°C). This ensures that the biscuits bake perfectly while the filling bubbles and melds together.

Step 2: Prepare the Filling

In a large mixing bowl, combine the shredded rotisserie chicken with the frozen mixed vegetables. Pour in the chicken broth and whole milk, followed by the garlic powder, onion powder, dried thyme, salt, and pepper. Gently stir until everything is well combined. This mixture will form the flavorful filling of your pot pie.

Step 3: Transfer the Filling to a Baking Dish

Next, pour the filling into a greased 9×13-inch baking dish or a deep pie dish. Make sure to spread it out evenly, allowing for the perfect distribution of flavors.

Step 4: Make the Biscuit Dough

In a separate bowl, whisk together the flour, baking powder, and baking soda. Once combined, add in the cold butter. Using a pastry cutter or your fingers, work the butter into the flour until the mixture resembles coarse crumbs. Gradually stir in milk until a soft dough forms. Be careful not to overmix, as this can result in tough biscuits.

Step 5: Drop the Biscuit Dough

Using a spoon or cookie scoop, drop generous spoonfuls of the biscuit dough directly on top of the filling. Leave a bit of space between each biscuit to allow for rising during baking. The beauty of this method is that the biscuits will cook right in the pot pie, soaking up all the delicious flavors from the filling.

With these initial steps complete, you are well on your way to creating a comforting and mouthwatering Butter Swim Biscuit Chicken Pot Pie. Stay tuned for the final baking instructions and tips to ensure your dish turns out perfectly!

Comfort food holds a special place in our hearts and culinary culture, offering solace and warmth through familiar flavors and hearty textures. It's the kind of food that brings us back to cherished memories of family gatherings, cozy nights in, and shared meals around the table. Among the myriad of comfort food options, the Butter Swim Biscuit Chicken Pot Pie stands out as a perfect blend of rich, savory filling topped with fluffy, buttery biscuits. This dish not only embodies the essence of comfort food but also elevates it to new heights with its unique twist.

Preheating the Oven

Before embarking on this delicious journey of creating Butter Swim Biscuit Chicken Pot Pie, it is essential to preheat your oven. This step is crucial because it ensures even cooking and helps achieve that beautifully golden crust that defines a perfect pot pie. Set your oven to 425°F (220°C) and allow it to fully heat while you prepare the filling and biscuit dough. This preheating stage not only promotes proper baking but also enhances the flavors of the dish, making every bite a delightful experience.

Preparing the Chicken and Vegetable Filling

The heart of any pot pie lies in its filling, and this recipe is no exception. You will need to create a rich, creamy mixture with tender chicken and vibrant vegetables. Start by cooking your chicken—whether you prefer rotisserie chicken for convenience or fresh chicken breasts. If using raw chicken, boil or sauté it until fully cooked, then shred or chop into bite-sized pieces.

Ingredients for the Filling:

  1. 2 cups cooked chicken, shredded or diced
  2. 1 cup carrots, diced
  3. 1 cup peas (fresh or frozen)
  4. 1 cup potatoes, diced
  5. 1 cup celery, diced
  6. 1 medium onion, chopped
  7. 4 tablespoons butter
  8. ⅓ cup all-purpose flour
  9. 2 cups chicken broth
  10. 1 cup milk
  11. Salt and pepper to taste
  12. 1 teaspoon dried thyme
  13. 1 teaspoon garlic powder

In a large skillet over medium heat, melt the butter and add the chopped onion, cooking until translucent. Next, add the carrots, celery, and potatoes, sautéing them until they begin to soften—about 5-7 minutes. Stir in the flour, mixing well to coat the vegetables. Gradually add the chicken broth and milk, stirring constantly until the mixture thickens and becomes creamy. Add the shredded chicken, peas, thyme, garlic powder, salt, and pepper. Mix well and allow the filling to simmer for an additional 5 minutes. This step ensures that all the flavors meld beautifully, resulting in a savory filling that will complement the biscuit topping.

Making the Biscuit Dough

Now that your filling is ready, it’s time to focus on the biscuit dough—a defining element of this dish. The key to achieving the perfect biscuit texture is to handle the dough gently and avoid overmixing.

Ingredients for the Biscuit Dough:

  1. 2 cups all-purpose flour
  2. 1 tablespoon baking powder
  3. 1 teaspoon salt
  4. ½ cup cold butter, cubed
  5. 1 cup milk

In a large mixing bowl, whisk together the flour, baking powder, and salt. Next, incorporate the cold butter using a pastry cutter or your fingers until the mixture resembles coarse crumbs. The cold butter is vital; it creates flaky layers in the biscuits. Gradually stir in the milk, mixing just until combined. Avoid overworking the dough; it should be slightly sticky but manageable.

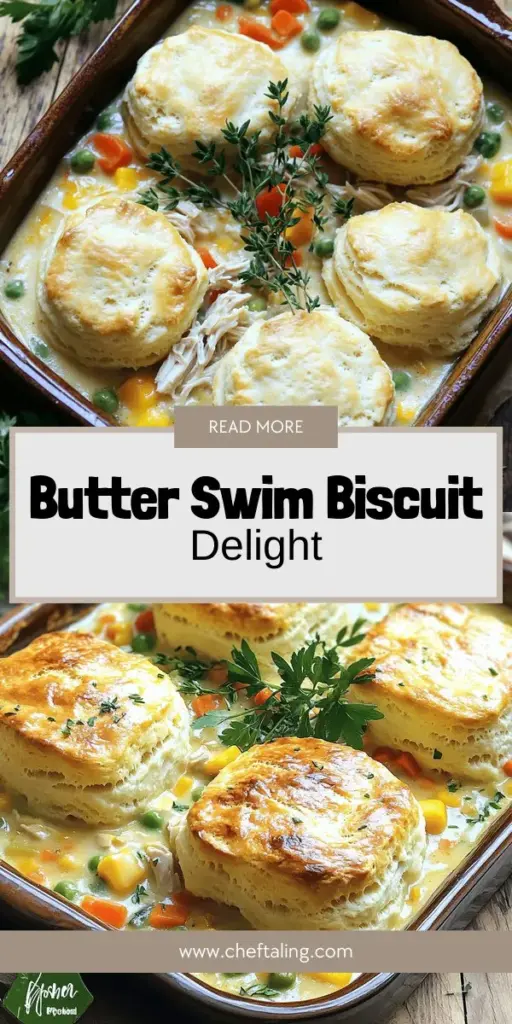
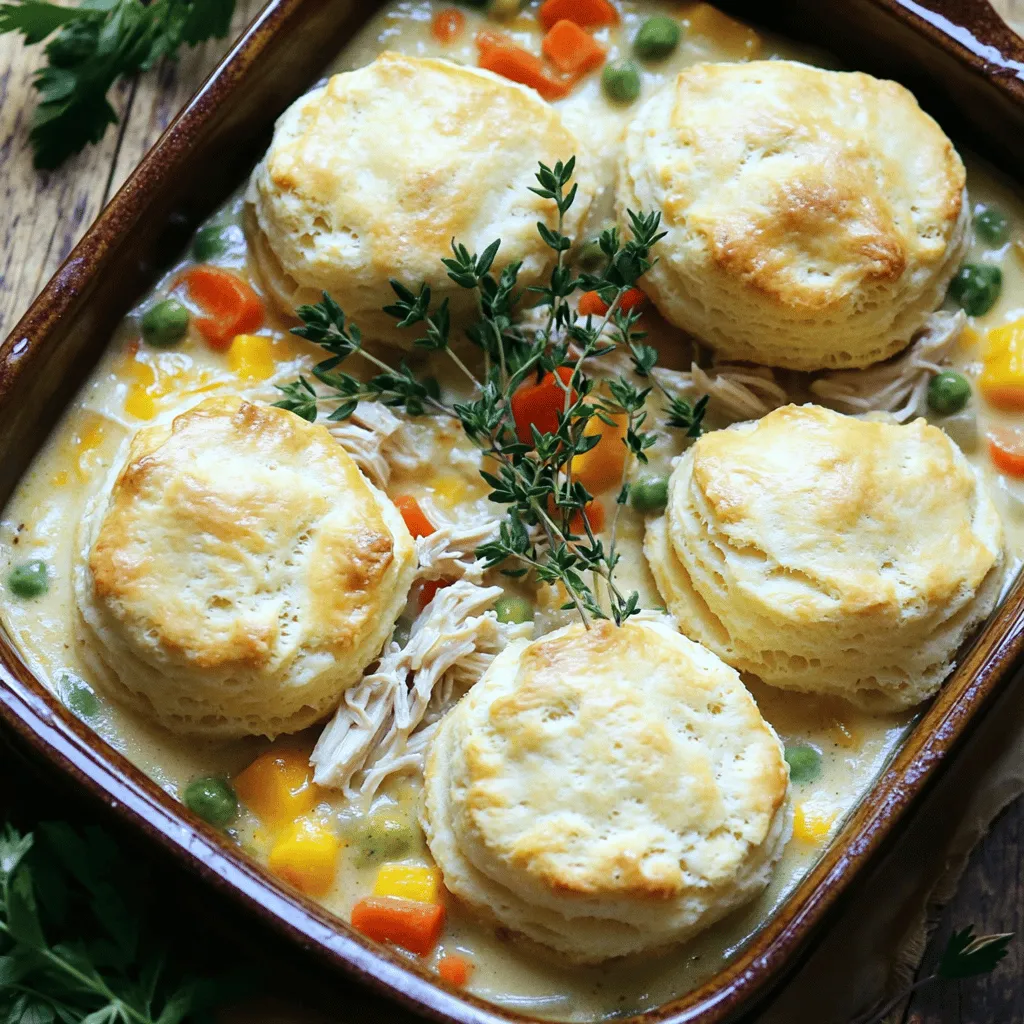
Assembling the Pot Pie

With both the filling and biscuit dough prepared, it’s time to assemble your Butter Swim Biscuit Chicken Pot Pie. Begin by pouring the creamy chicken and vegetable mixture into a greased 9×13-inch baking dish. Spread the filling evenly to ensure every bite is packed with flavor.

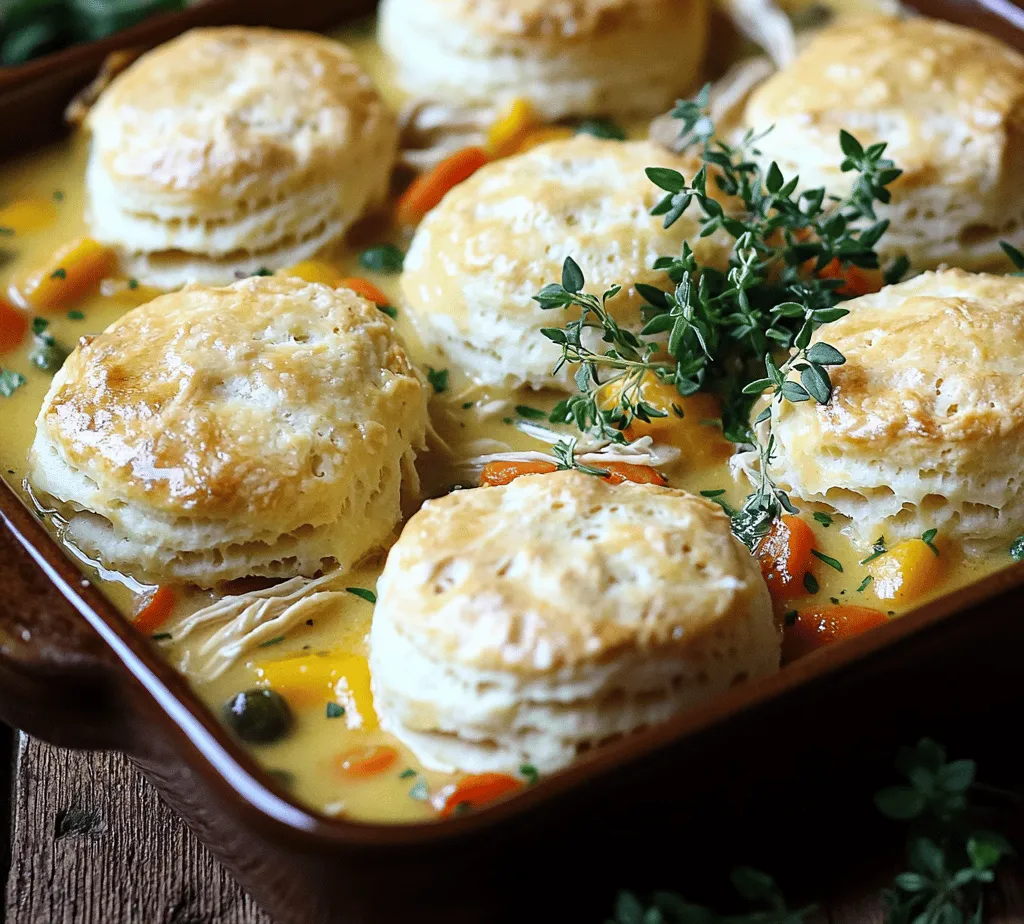
Next, drop spoonfuls of the biscuit dough over the filling. It’s okay if the dough doesn’t cover the entire surface; the biscuits will spread and rise during baking, creating a beautiful, rustic appearance. For an extra touch of flavor, drizzle melted butter over the biscuit dough before baking. This will not only add richness but also contribute to that golden-brown finish that makes this dish so appealing.

Baking Process

Place the assembled pot pie in your preheated oven and bake for 25-30 minutes, or until the biscuit topping is golden brown and cooked through. Keep an eye on it towards the end of the baking time to prevent over-browning. The aroma wafting through your kitchen will be irresistible, signaling that your hard work is about to pay off.

Cooling and Serving

Once baked to perfection, remove the pot pie from the oven and allow it to cool for about 10-15 minutes. This resting period is crucial as it allows the filling to set slightly, making it easier to serve and enhancing the overall flavor. Cutting into a hot pie can lead to a runny filling, but patience will reward you with a slice that holds its shape beautifully.

Presentation Tips for Butter Swim Biscuit Chicken Pot Pie

When it comes to serving your Butter Swim Biscuit Chicken Pot Pie, presentation can elevate the dining experience. Consider serving individual portions in small bowls or ramekins for a cozy touch. This not only makes it easier for guests to enjoy but also adds a charming element to the meal.

Garnishing Ideas

To enhance the visual appeal of your dish, consider garnishing each serving with fresh herbs. Thyme or parsley adds a pop of color and freshness, complementing the rich flavors of the pot pie. A sprinkle of freshly cracked black pepper also adds a touch of elegance.

Suggested Accompaniments

For a well-rounded meal, pair your pot pie with simple side dishes. A crisp green salad with a light vinaigrette balances the richness of the pie. Alternatively, roasted vegetables or a classic coleslaw can offer a delightful contrast in texture and flavor.

Nutritional Information

Understanding the nutritional value of your meal can help in planning a balanced diet. Here’s a breakdown of the nutritional values per serving of Butter Swim Biscuit Chicken Pot Pie (assuming 8 servings):

  1. Calories: 450
  2. Protein: 20g
  3. Fats: 25g
  4. Carbohydrates: 40g
  5. Fiber: 3g

This dish provides a good balance of protein from the chicken, healthy fats from the butter, and carbohydrates from the biscuit dough. While it’s a comforting meal, it can still fit into a healthy diet when enjoyed in moderation. Pairing it with vegetables or a salad further enhances its nutritional profile.

Conclusion

Butter Swim Biscuit Chicken Pot Pie is not just a meal; it’s a comforting experience that warms the soul. With its creamy, savory filling and flaky biscuit topping, it brings together flavors and textures that create a satisfying dish perfect for family gatherings, weeknight dinners, or special occasions.

As you prepare this delightful recipe, take a moment to appreciate the joy of cooking and the memories that can be made around the dinner table. The act of sharing a hearty meal with loved ones strengthens bonds and fosters moments that will be cherished for years to come. So roll up your sleeves, gather your ingredients, and enjoy the process of creating this delicious Butter Swim Biscuit Chicken Pot Pie—your family will thank you for it!

Comfort food holds a special place in our hearts and culinary culture, offering solace and warmth through familiar flavors and hearty textures. It's the kind of food that brings us back to cherished memories of family gatherings, cozy nights in, and shared meals around the table. Among the myriad of comfort food options, the Butter Swim Biscuit Chicken Pot Pie stands out as a perfect blend of rich, savory filling topped with fluffy, buttery biscuits. This dish not only embodies the essence of comfort food but also elevates it to new heights with its unique twist.

Butter Swim Biscuit Chicken Pot Pie

Discover the comforting flavors of Butter Swim Biscuit Chicken Pot Pie, a classic dish that elevates your family meals with ease! This recipe combines tender rotisserie chicken and vibrant vegetables in a creamy filling topped with fluffy, buttery biscuits that soak up all the deliciousness. Perfect for cozy dinners or gatherings, this dish will warm your heart and fill your belly. Click through for step-by-step instructions and enjoy a taste of nostalgia today!
Print Recipe Pin Recipe

Ingredients
  

2 cups shredded rotisserie chicken

1 cup frozen mixed vegetables (peas, carrots, corn, and green beans)

1 cup chicken broth

1 cup whole milk

¼ cup unsalted butter, melted

1 teaspoon garlic powder

1 teaspoon onion powder

½ teaspoon dried thyme

½ teaspoon salt

¼ teaspoon black pepper

1 ½ cups all-purpose flour

2 teaspoons baking powder

½ teaspoon baking soda

½ teaspoon salt (for the biscuit dough)

Instructions
 

Preheat your oven to 425°F (220°C).

    In a large bowl, combine the shredded rotisserie chicken, frozen mixed vegetables, chicken broth, whole milk, garlic powder, onion powder, thyme, salt, and pepper. Mix well and set aside.

      In another bowl, whisk together the flour, baking powder, baking soda, and salt for the biscuit dough.

        Slowly pour in the melted butter, mixing until just combined. The dough should be thick but spreadable.

          Pour the chicken and vegetable mixture into a greased 9x13 inch baking dish, spreading it evenly.

            Dollop the biscuit dough over the top of the chicken mixture, using a spoon to gently spread it out into an even layer. It’s okay if some of the filling peeks through.

              Bake the pot pie in the preheated oven for 25-30 minutes, or until the biscuit topping is golden brown and cooked through.

                Allow to cool for 5 minutes before slicing into squares or serving directly from the dish.

                  Prep Time: 15 minutes | Total Time: 45 minutes | Servings: 6

                    - Presentation Tips: Serve warm, scooped into individual bowls for a cozy, rustic presentation. Garnish with fresh thyme leaves or chopped parsley for a pop of color.

                      Related Recipes

                      • To make a tasty butter chicken, gather these main items: - 2 lbs boneless chicken thighs, cut into bite-sized pieces - 1 onion, finely chopped - 3 cloves garlic, minced - 1 inch ginger, grated - 1 can (14 oz) coconut milk - 1 cup tomato puree - 3 tablespoons butter These ingredients form the base of our creamy dish. The chicken thighs add a rich flavor that pairs well with the spices. The coconut milk and tomato puree create a smooth and creamy sauce. Next, we need the right spices to make this dish pop. Here’s what you’ll need: - 2 tablespoons garam masala - 1 tablespoon ground cumin - 1 teaspoon turmeric powder - 1 teaspoon chili powder (adjust to taste) - Salt to taste These spices give the butter chicken its signature flavor. Garam masala adds warmth, while cumin and turmeric bring depth. Adjust the chili powder based on your spice preference. Now that you have all the ingredients, think about how to serve this dish. Here are some great ideas: - Fresh cilantro, for garnish - Cooked basmati rice or naan, for serving The cilantro adds a fresh touch. Pairing the butter chicken with basmati rice or naan makes it a complete meal. Enjoying it with naan allows you to scoop up the sauce. First, set your Instant Pot to sauté mode. Add three tablespoons of butter. Let it melt fully. Once the butter melts, add one finely chopped onion. Stir it for about five minutes. The onion should turn soft and see-through. Now, add three minced cloves of garlic and one inch of grated ginger. Cook this mix for one to two minutes. The aroma will fill your kitchen. Next, add two pounds of boneless chicken thighs, cut into bite-sized pieces. Sprinkle in two tablespoons of garam masala, one tablespoon of ground cumin, one teaspoon of turmeric powder, and one teaspoon of chili powder. Add salt to taste. Stir the chicken for about four to five minutes. It should brown slightly on all sides. Now, pour in one cup of tomato puree and one can of coconut milk. Stir well to coat the chicken evenly. Cancel the sauté mode. Seal the lid on the Instant Pot and set it to cook on high pressure for ten minutes. After cooking, let the pressure release naturally for five minutes. Then, carefully release any remaining pressure. Open the lid, and give the butter chicken a gentle stir. If you want a thicker sauce, use the sauté mode again. Simmer for a few minutes until it reaches your desired thickness. Finally, taste the dish and adjust the salt if needed. Serve hot, garnished with fresh cilantro, alongside cooked basmati rice or naan. Enjoy your meal! To get the best flavor in your Instant Pot butter chicken, start with fresh ingredients. Use ripe tomatoes and fresh garlic. The spices are key, too. Garam masala gives warmth and depth. Cumin adds earthiness. Don’t skip the butter; it enriches the sauce. Always taste as you cook. Adjust salt and spices to fit your taste. Adding a squeeze of lime can brighten the dish. If you want a thicker sauce, there are easy ways to achieve it. After cooking, switch to sauté mode. Let the sauce simmer for a few minutes. This will help it reduce and thicken. You can also add a bit of cornstarch mixed with water. Stir it in and let it cook for a few more minutes. This will give you a creamy texture. Cooking time can vary based on your chicken’s size. If you cut the chicken smaller, 10 minutes is perfect. For larger pieces, increase the time to 12-15 minutes. Always check the chicken for doneness. It should be tender and easy to shred. If it’s not fully cooked, seal the lid and cook for a few more minutes. Adjusting time helps you get the best results. {{image_2}} You can swap chicken with other meats. Try using turkey or shrimp. Both bring unique flavors. Turkey stays juicy and tender, while shrimp cooks fast. For a vegetarian option, use chickpeas or tofu. Both soak up flavors well, making them great substitutes. This recipe uses coconut milk for creaminess. If you want a dairy-free option, this is perfect. You can also use unsweetened almond milk or cashew cream. Both options keep the dish rich without dairy. Just ensure you add extra spices for depth. Spice level is key for flavor. The recipe calls for chili powder. You can adjust it to suit your taste. For a milder dish, reduce the chili powder. If you want more heat, add fresh green chilies or cayenne pepper. Always taste as you go to find your perfect balance. After enjoying your butter chicken, cool it down first. Place the leftovers in an airtight container. This helps keep it fresh. Store it in the fridge for up to three days. When ready to eat, check for any off smells. Trust your nose! If you want to save some for later, freezing works great. Portion the butter chicken into freezer-safe bags. Remove as much air as you can before sealing. You can freeze it for up to three months. Label each bag with the date. This way, you know when you made it. When you're ready to enjoy your frozen butter chicken, thaw it in the fridge overnight. Heat it gently on the stove or in the microwave. Stir it often to ensure even heating. If the sauce seems thick, add a splash of water or coconut milk. Enjoy it again with fresh rice or naan! Yes, you can use chicken breast. It cooks faster and is leaner. Make sure to cut it into bite-sized pieces. This will help it cook evenly. The flavor will be similar, but the texture may differ. Chicken thighs stay juicy, while breasts can dry out if overcooked. To make butter chicken without coconut milk, you can use heavy cream instead. This will still give you a rich and creamy sauce. You can also use plain yogurt for a tangy taste. Just be careful not to boil yogurt, as it can curdle. Butter chicken pairs well with basmati rice or naan. Rice soaks up the sauce nicely. Naan is great for dipping and adds a nice texture. You can also serve it with a side salad or roasted vegetables for a fresh touch. This article covered the key ingredients and steps for making butter chicken. I shared tips for great flavor and how to adjust for your tastes. You learned about storage options and found answers to common questions. Experiment with the variations to make it your own. Enjoy your cooking journey and savor this amazing dish!
                        Instant Pot Butter Chicken Flavorful and Easy Recipe
                      • For the Creamy Tuscan White Bean Skillet, gather these ingredients: - 2 cans (15 oz each) white beans (like cannellini), drained and rinsed - 1 tablespoon olive oil - 1 small onion, finely chopped - 4 cloves garlic, minced - 1 cup cherry tomatoes, halved - 1 cup spinach, roughly chopped - 1 cup vegetable broth - 1 cup coconut milk (or heavy cream for a non-vegan option) - 1 teaspoon dried Italian herbs (oregano, basil, thyme) - Salt and pepper to taste - Fresh basil, for garnish These simple ingredients create a rich and tasty dish. The white beans give you protein and fiber. The coconut milk adds creaminess, while the herbs bring in great flavor. You can make a few swaps if needed. - White beans: Use other beans like navy or great northern beans. - Coconut milk: Swap it for heavy cream for a non-vegan option. - Spinach: Kale or Swiss chard work well too. - Vegetable broth: Chicken broth is a good alternative. - Cherry tomatoes: Use diced regular tomatoes if you prefer. These changes can still keep the dish tasty and enjoyable. Using high-quality ingredients makes a big difference in taste. - Olive oil: Choose extra virgin for a fruity flavor. - Fresh herbs: If you can, use fresh basil instead of dried. It adds a bright taste. - Organic vegetables: They often have better flavor and nutrients. These choices help create a creamy, aromatic meal that everyone will love. Enjoy your cooking! To start your Creamy Tuscan White Bean Skillet, gather your ingredients. You'll need two cans of white beans, one small onion, and four cloves of garlic. Measure out one cup of cherry tomatoes, one cup of spinach, and one cup of vegetable broth. Lastly, get one cup of coconut milk and some Italian herbs. Don't forget salt, pepper, and fresh basil for garnish. Steps: - Drain and rinse the white beans. - Finely chop the onion. - Mince the garlic. - Halve the cherry tomatoes. - Roughly chop the spinach. Make sure to prep everything before you cook. This way, you can move quickly and keep the heat steady. Now, let's get cooking! First, heat the olive oil in a large skillet over medium heat. Add the chopped onion and sauté for about five minutes. The onion should turn translucent. Next, add the minced garlic and cook for one more minute. You want to smell that garlic! Then, stir in the halved cherry tomatoes. Let them cook for three to four minutes until they soften. After that, add the drained white beans and vegetable broth. Stir well and bring it to a gentle simmer. Let this cook for about five minutes. Now, pour in the coconut milk. If you prefer, you can use heavy cream instead. Add the dried Italian herbs and mix everything thoroughly. Let it simmer for about five to seven minutes. The mixture should become creamy and heated through. Finally, fold in the chopped spinach. Allow it to wilt for one to two minutes. Season with salt and pepper to your liking. Remove the skillet from heat and garnish with fresh basil before serving. To make this dish perfect, keep a few tips in mind: - Use medium heat. This helps the onions cook evenly without burning. - Stir often to avoid sticking. This avoids any burnt bits at the bottom. - Taste as you go. Adjust the salt and pepper to fit your palate. - For a thicker sauce, let it simmer longer to reduce the liquid. - Serve hot for the best flavor. These techniques will help you create a delicious meal that impresses everyone at the table. Enjoy! To make your creamy Tuscan white bean skillet even richer, try these simple tips: - Use coconut milk: It adds a sweet, creamy taste. You can also use heavy cream for a non-vegan option. - Add nutritional yeast: This gives a cheesy flavor without dairy. - Stir in mashed beans: Mash some beans with a fork before adding them to the pan. This thickens the sauce nicely. Enhancing the flavor of your dish is easy with these ideas: - Fresh herbs: Add fresh basil, parsley, or thyme just before serving. This brightens the dish. - Lemon juice: A squeeze of lemon adds a fresh zing that lifts all the flavors. - Red pepper flakes: If you enjoy heat, sprinkle in some red pepper flakes for a spicy kick. Here are some common pitfalls when making this dish: - Overcooking spinach: Add the spinach at the end, just until it wilts. This keeps it bright and fresh. - Not draining the beans: Always rinse and drain the beans. This removes extra sodium and helps the sauce stick. - Skipping the seasoning: Don’t forget to taste as you go. Adjust salt and pepper to get the best flavor. These tips will help you create a creamy, flavorful Tuscan white bean skillet that everyone will love! {{image_2}} You can easily make this dish vegan or enjoy it with cream. If you want a vegan meal, use coconut milk. It adds creaminess and a hint of sweetness. For non-vegan, heavy cream works great too. Both options taste good and are rich. Feel free to switch up the greens or beans. If you like kale, use it instead of spinach. Swiss chard also adds nice flavor. You can swap the white beans for black beans or chickpeas. Each choice brings a new twist to this creamy dish. This dish is great for weeknight dinners or special events. Serve it in bowls for a cozy night in. For a fancy meal, present it with crusty bread and a drizzle of olive oil. You can also pair it with a fresh salad for a light lunch or brunch. To keep your creamy Tuscan white bean skillet fresh, use an airtight container. Let the dish cool down for about 30 minutes before storing. Place it in the fridge. It will stay good for up to three days. Be sure to label the container with the date. When you are ready to enjoy leftovers, take them out of the fridge. You can reheat it on the stove over low heat. Stir it often to avoid burning. If it seems too thick, add a splash of vegetable broth or water. You can also use the microwave. Heat in short bursts, checking every minute. Stir to ensure even heating. If you want to freeze the creamy Tuscan white bean skillet, it will keep for up to three months. Use a freezer-safe container for best results. Allow it to cool completely before sealing. When you’re ready to eat, thaw it in the fridge overnight. Reheat it on the stove or in the microwave as mentioned above. Yes, you can make this dish gluten-free. All the ingredients in this recipe are naturally gluten-free. Just be sure to check the labels on the vegetable broth and coconut milk. Some may contain gluten, so choose brands that are marked gluten-free. This creamy Tuscan white bean skillet pairs well with several sides. Here are some great options: - Crusty bread: Perfect for soaking up the creamy sauce. - A fresh green salad: Adds crunch and lightness. - Grilled vegetables: Enhance the meal with smoky flavors. - Quinoa or rice: Adds a hearty touch to the dish. You can easily adjust the spice level in this dish. Here are some ideas: - For mild flavors, stick to the recipe as is. - Add red pepper flakes for heat. Start with a pinch and add more if needed. - Use a spicy vegetable broth for an extra kick. - Incorporate fresh chili peppers if you like bold spice. This blog post covers the key ingredients and steps to create a delicious dish. We explored the best quality ingredients, useful substitutions, and detailed cooking methods. I shared tips for adding creaminess and enhancing flavors while avoiding common mistakes. You can adapt recipes for vegan options and modify for different occasions. Lastly, we reviewed storage options to keep your meal fresh. Keep these ideas in mind to enjoy your cooking journey!
                        Creamy Tuscan White Bean Skillet Flavorful Dinner Treat
                      • To make this dish, you need: - 1 large head of cauliflower, cut into florets - 1 cup sharp cheddar cheese, shredded - 1 cup Gruyère cheese, shredded - 2 tablespoons butter - 2 cups milk Cauliflower is the star! It adds texture and nutrition. The cheeses bring rich flavor and creaminess. Sharp cheddar gives a nice bite, while Gruyère adds depth. Butter helps create a smooth sauce, and milk makes it creamy. You will also need: - 2 tablespoons all-purpose flour - 1 teaspoon garlic powder - 1 teaspoon onion powder - ½ teaspoon paprika - Salt and pepper to taste - ¼ cup breadcrumbs (for topping) - Fresh parsley, chopped (for garnish) Seasonings elevate the dish. Garlic and onion powders add warmth. Paprika gives a hint of smokiness. Salt and pepper balance the flavors. Breadcrumbs create a crunchy topping, and parsley adds color and freshness. For this recipe, you will use: - A large pot - A large skillet - A whisk - A baking dish (if not using an oven-safe skillet) The pot cooks the cauliflower, while the skillet makes the cheese sauce. A whisk helps combine ingredients smoothly. A baking dish is needed if your skillet isn't oven-safe. Start with one large head of cauliflower. Cut it into small florets. This helps them cook evenly. Bring a big pot of salted water to a boil. Once boiling, add the cauliflower florets. Cook them for about five minutes. They should be slightly tender but still firm. Drain the cauliflower and set it aside. This step helps keep the dish bright and fresh. In a large skillet, melt two tablespoons of butter over medium heat. Whisk in two tablespoons of all-purpose flour. Cook this mixture for one to two minutes until it turns a light golden color. Slowly add two cups of milk, whisking as you go. Keep stirring until the sauce simmers and thickens, which takes about five minutes. Add one teaspoon of garlic powder, one teaspoon of onion powder, and half a teaspoon of paprika. Season with salt and pepper to taste. Now, stir in half of the sharp cheddar and Gruyère cheeses until they melt into a creamy sauce. Gently add the blanched cauliflower to your cheese sauce. Make sure all the florets are well coated. If your skillet isn't oven-safe, transfer the mix to a greased baking dish. Sprinkle the rest of the cheese on top. Add a quarter cup of breadcrumbs for a crunchy topping. Now, place the dish in the preheated oven at 375°F (190°C) and bake for about 25 minutes. Look for a golden, bubbly top. Once done, take it out and let it cool a bit. Garnish with some fresh chopped parsley before serving. Enjoy your Cheesy Cauliflower Au Gratin Skillet! To make the best cheese sauce, start with cold milk. This helps it blend better. Whisk in the flour with the melted butter. Cook it for one to two minutes. This step removes the raw flour taste. Slowly add in the milk while whisking. Keep stirring until it thickens. This should take about five minutes. The sauce should be creamy and smooth. Add garlic powder, onion powder, paprika, salt, and pepper for flavor. Mix in half of both cheeses until they melt. This makes a rich and tasty sauce. Serve the Cheesy Cauliflower Au Gratin directly from the skillet. This gives it a cozy, rustic look. You can sprinkle fresh parsley on top for color. Drizzle a bit of olive oil over it for extra flavor. This dish pairs well with a simple green salad. You can also serve it as a side with grilled meats. It’s a comforting dish that everyone loves. Use a large pot for blanching the cauliflower. A whisk is key for making that smooth cheese sauce. You’ll need a large skillet for cooking and baking. If your skillet isn’t oven-safe, use a greased baking dish. Have a spatula ready for mixing everything well. Lastly, keep a baking dish or tray handy for catching drips. With the right tools, your cooking will go smoothly. {{image_2}} You can easily add protein to Cheesy Cauliflower Au Gratin. Chicken, turkey, or ham work well. Simply cook the meat ahead of time and mix it into the cheese sauce. This adds flavor and makes it a hearty dish. For a lighter option, try cooked shrimp or even tofu. Both pair nicely with the cheese sauce. If you want a dairy-free version, you can swap the cheese and milk. Use unsweetened almond milk or coconut milk for a creamy base. For cheese, try cashew cheese or nutritional yeast. Nutritional yeast gives a cheesy flavor without dairy. These swaps keep the dish creamy and tasty, so you don’t miss the dairy. To add more flavor, think about spices and herbs. A pinch of cayenne pepper gives a nice heat. You could also try adding fresh herbs like thyme or rosemary for a fragrant touch. For a smoky flavor, smoked paprika works great. These additions can change the dish and make it even more exciting. Store your Cheesy Cauliflower Au Gratin in an airtight container. It stays fresh for about 3 to 4 days in the fridge. Make sure it cools down first. This way, the steam won’t make it soggy. When you are ready to enjoy it again, just take it out and warm it up. You can freeze leftovers too! Place the dish in a freezer-safe container. It will keep well for up to 2 months. If you freeze it, cover it tightly with plastic wrap and then foil. This helps prevent freezer burn. To reheat, let it thaw in the fridge overnight before warming. Reheat your Cheesy Cauliflower Au Gratin in the oven for the best results. Preheat your oven to 350°F (175°C). Place the dish in a baking pan. You can add a splash of milk to keep it creamy. Bake for about 20 minutes or until it is heated through. If you want a crispy top, broil it for a few minutes at the end. Just watch it closely so it doesn’t burn! Yes, you can prepare Cheesy Cauliflower Au Gratin in advance. Cook the cauliflower and make the cheese sauce. Mix them together, but do not bake yet. Store the mixture in the fridge for up to two days. When you are ready to eat, transfer it to a skillet or baking dish. Top with cheese and breadcrumbs, then bake as directed. This saves time and makes meals easier. If you don’t have Gruyère cheese, don’t worry. You can use Swiss cheese as a great alternative. It melts well and has a similar taste. Another option is to mix sharp cheddar with mozzarella. This blend adds creaminess and flavor. Feel free to experiment with other cheeses, but aim for good melting types. No, this recipe is not gluten-free because it uses all-purpose flour. However, you can easily make it gluten-free. Use a gluten-free flour blend instead of regular flour when making the cheese sauce. Check the breadcrumbs too; choose gluten-free ones to keep the dish safe for gluten-free diets. Enjoy this creamy treat without worry! This blog covered how to make Cheesy Cauliflower Au Gratin. We explored ingredients like cauliflower and dairy, as well as essential equipment. I shared step-by-step instructions to prep, make the sauce, and bake the dish. You found tips for a better cheese sauce and ideas for serving. Variations let you add protein and spice. Finally, I gave storage tips to keep leftovers tasty. You can make this dish your own while enjoying its rich flavors. It's easy to prepare and makes a great meal any time.
                        Cheesy Cauliflower Au Gratin Skillet Comfort Dish
                      • - 1 pound shrimp, peeled and deveined - 2 tablespoons olive oil - 1 tablespoon chili powder - 1 teaspoon cumin - 1 teaspoon smoked paprika - 1/2 teaspoon cayenne pepper (adjust to taste) - Salt and pepper to taste - 8 small corn tortillas - 1 ripe avocado - 1/2 cup sour cream or Greek yogurt - 1 tablespoon lime juice - Salt to taste - Shredded cabbage - Fresh cilantro, chopped - Lime wedges The main ingredients for these spicy shrimp tacos bring bold flavor and freshness. The shrimp must be peeled and deveined to ensure a clean bite. I use olive oil to help the spices stick and enhance the shrimp's taste. A mix of chili powder, cumin, smoked paprika, and cayenne pepper gives the shrimp a kick. Adjust the cayenne for your heat preference. Salt and pepper balance the flavors. For the avocado crema, choose a ripe avocado for smoothness. Sour cream or Greek yogurt adds creaminess, while lime juice brightens the flavor. You can add salt to enhance the taste. Finally, toppings like shredded cabbage and chopped cilantro add crunch and freshness. Lime wedges are perfect for a zesty finish. This mix of ingredients makes these tacos a treat for any meal. - Ingredients needed for the crema: You need one ripe avocado, half a cup of sour cream or Greek yogurt, one tablespoon of lime juice, and salt to taste. - Blending and achieving the perfect texture: Cut the avocado and add it to a blender. Add the sour cream, lime juice, and salt. Blend until smooth and creamy. You want it to be thick but spreadable. If it seems too thick, add a little water to loosen it. Set this mix aside while you prep the shrimp. - Mixing the spices and oil for seasoning: In a bowl, put the peeled and deveined shrimp. Add two tablespoons of olive oil, one tablespoon of chili powder, one teaspoon of cumin, one teaspoon of smoked paprika, half a teaspoon of cayenne pepper, salt, and pepper. - Tips for coating shrimp evenly: Mix everything well. Use your hands or a spoon. Make sure every shrimp gets coated with the spices. This step is key for great flavor. - Best cooking methods for shrimp: Heat a large skillet over medium-high heat. This keeps the shrimp from steaming. - Cooking times and tips for perfect texture: Cook the shrimp for about two to three minutes on each side. They will turn pink and opaque when done. Don’t overcook them or they will become rubbery. Remove them from heat as soon as they are cooked. - Techniques for warming tortillas: Use a separate skillet over medium heat. Put the corn tortillas in for about thirty seconds on each side. - Importance of pliability and avoiding breakage: Warm tortillas become soft and easy to fold. If they are cold, they will break when you fill them. - Layering ingredients for optimal flavor: Take a warm tortilla and add a portion of shrimp. Top with shredded cabbage and a generous dollop of avocado crema. - Tips for presentation: Sprinkle chopped cilantro on top for color. Arrange the tacos neatly on a plate. Serve with lime wedges on the side for a fresh kick. - Ideas for pairing and garnishing: These tacos go well with a side of black beans or corn salad. - Serving temperature recommendations: Serve the tacos warm for the best taste. Enjoy them fresh to keep the flavors vibrant. - Adjust spice levels to taste. If you like heat, add more cayenne. - Try toppings like diced tomatoes, pickled onions, or jalapeños. They add extra zest. - Don’t overcook shrimp. Cook them just until they are pink and opaque. - Avoid making the crema too thick. It should be smooth and easy to spread. - Essential tools: a skillet for cooking shrimp and a blender for the crema. - Optional tools: a taco holder for serving and a food processor for quick blending. {{image_2}} You can switch shrimp for chicken or tofu. For chicken, use 1 pound of boneless thighs or breasts. Cook it for about 6-8 minutes until it's no longer pink. For tofu, press it first to remove water. Cut it into cubes and cook for 4-5 minutes until golden. This keeps your tacos tasty and fun. To make these tacos gluten-free, just use corn tortillas. They are naturally gluten-free and work great. For a vegan avocado crema, swap sour cream for a plant-based yogurt. Blend a ripe avocado with the yogurt and lime juice. It’s creamy and delicious without any dairy. Want to jazz up your tacos? Add fruits like mango or pineapple for sweetness. Diced mango adds a fresh burst. Pineapple gives a nice tang. You can also play with spices. Try adding fresh cilantro or lime zest for extra flavor. Mix it up and discover what you love! To keep your spicy shrimp tacos fresh, store them in a cool place. The best way is to use airtight containers. This helps keep the flavors intact. I recommend using glass or BPA-free plastic containers. Avoid stacking the tacos to keep them from getting soggy. If you want to freeze the tacos, separate the shrimp and tortillas. Wrap the shrimp tightly in plastic wrap or foil. Place them in a freezer bag. For tortillas, stack them and wrap them in foil. When ready to eat, thaw the shrimp in the fridge overnight. Reheat in a skillet over medium heat until hot. Warm the tortillas in a pan for a few seconds before filling. You can keep leftovers in the fridge for up to three days. If you see any signs of spoilage, like a strange smell or color, throw them out. Always trust your senses when it comes to food safety. To make your shrimp tacos spicier, simply add more cayenne pepper. You can also drizzle on hot sauce before serving. This gives you control over the heat level. Start with a little and taste as you go. Adjust until it’s just right for you. Yes, you can use frozen shrimp. Just make sure to thaw them first. Place them in the fridge overnight or run them under cold water. Frozen shrimp may have a slightly different texture but will still be tasty. Always check for any added ingredients in frozen shrimp. Several sides work great with shrimp tacos. Consider serving: - Mexican rice - Black beans - Corn salad - Chips with salsa - Margaritas or iced tea These choices balance the spice and enhance your meal. Enjoy mixing and matching! This blog post covered everything you need for tasty shrimp tacos. We explored key ingredients like fresh shrimp, spices, and creamy avocado sauce. I shared steps to prepare, cook, and assemble your tacos for the best flavor. Plus, I offered tips to enhance taste and avoid common mistakes. In closing, enjoy these tacos with your favorite toppings and sides. Remember, you can always adapt the recipe to your taste. Happy cooking!
                        Spicy Shrimp Tacos with Avocado Crema Recipe Reveal

                      WANT TO SAVE THIS RECIPE?

                      Leave a Reply Cancel reply

                      Your email address will not be published. Required fields are marked *

                      Recipe Rating


                      Discover the comforting flavors of Butter Swim Biscuit Chicken Pot Pie, a classic dish that elevates your family meals with ease! This recipe combines tender rotisserie chicken and vibrant vegetables in a creamy filling topped with fluffy, buttery biscuits that soak up all the deliciousness. Perfect for cozy dinners or gatherings, this dish will warm your heart and fill your belly. Click through for step-by-step instructions and enjoy a taste of nostalgia today!

                      Hi I’m Taling

                      I love sharing perfected dishes from my kitchen. I’m sure they’ll earn a spot in your heart. Let’s savor this journey together!.

                      More about me

                      Recent Desserts

                      • - 2 cups fresh blueberries - 1 cup Greek yogurt (vanilla or plain) - ¼ cup honey or maple syrup - ½ cup coconut milk - Juice of 1 lemon - Zest of 1 lemon - A pinch of salt To make Blueberry Lemon Yogurt Popsicles, gather these fresh ingredients. You need ripe blueberries for the best flavor. Greek yogurt adds creaminess and protein. Honey or maple syrup sweetens the pops. Coconut milk gives a smooth texture and a hint of tropical taste. The juice and zest of one lemon bring a bright, zesty kick. Finally, a pinch of salt enhances all the flavors. Using fresh blueberries is key. They burst with juice and add natural sweetness. If you can’t find fresh berries, frozen ones work too, but they may change the texture slightly. Greek yogurt is a great choice, as it thickens the mix and gives a nice tang. If you prefer a dairy-free option, try a plant-based yogurt. When sweetening, adjust to your taste. Honey has a floral note, while maple syrup offers a richer flavor. The coconut milk adds creaminess and helps with freezing. Lemon juice brightens the pops, while lemon zest adds a fragrant touch. The pinch of salt balances the sweetness and highlights the flavors. Make sure to measure carefully for the best results. Once you have these ingredients, you’re ready to blend and create a delightful summer treat! 1. Combine the fresh blueberries, Greek yogurt, honey (or maple syrup), coconut milk, lemon juice, lemon zest, and a pinch of salt in a blender. 2. Blend the mixture until it is smooth and creamy. You want a nice, consistent texture. 3. Taste the mixture and adjust the sweetness if needed. Add more honey or maple syrup if you like it sweeter. 1. Pour the blueberry yogurt mixture into popsicle molds. Fill them about ¾ full to allow for expansion as they freeze. 2. Insert sticks into the molds. Gently tap the molds on the counter to remove any air bubbles. 3. Freeze the popsicles for at least 4-6 hours, or until they are completely solid. 1. To release the popsicles, run warm water over the outside of the molds for a few seconds. This will help loosen them. 2. Serve the popsicles on a colorful platter. For a fun look, garnish with whole blueberries and a sprinkle of lemon zest. - Best practices for blending ingredients: Start with the blueberries at the bottom. This helps them blend better. Add yogurt and coconut milk next. Blend on a low speed first, then increase to high. This method makes the mixture smooth and creamy. - How to achieve creamier popsicles: Use full-fat Greek yogurt for the best texture. It adds richness and creaminess. Coconut milk also helps. If you want extra creaminess, add more coconut milk or yogurt. - Filling molds too full: Always fill molds about ¾ full. The mixture expands when frozen. If you fill them too full, they overflow and create a mess. - Over-blending or under-blending: Blend just until smooth. Over-blending can make the popsicles icy. Under-blending leaves chunks of fruit. Aim for a nice, even consistency. - Sweetening alternatives: Honey and maple syrup are great options. You can also use agave syrup or stevia. Taste the mix before pouring into molds. Adjust sweetness to your liking. - Balancing flavors with citrus: Lemon juice brightens the flavor. The zest adds a nice touch. If the mixture tastes too sweet, add a bit more lemon juice. This balances the flavors nicely. {{image_2}} You can make these popsicles even more fun! Add other fruits like strawberries or raspberries. These fruits mix well with blueberries. They bring a new taste and color. You can also infuse herbs like mint or basil. Just add a few leaves when blending. This adds a fresh twist to your treats. Need dairy-free options? Use almond milk or oat milk instead of coconut milk. Swap the Greek yogurt for dairy-free yogurt. For a low-sugar version, use less honey or maple syrup. You can also try stevia or monk fruit sweetener. These options keep your popsicles tasty and light. Get creative with your popsicles! Make holiday-themed treats by adding festive colors. For example, use red fruits for Christmas or orange for Halloween. You can also create colorful swirls. Blend purees of different fruits and layer them in your molds. This not only looks great but tastes amazing too! Freezing popsicles requires some care to keep them tasty. First, make sure your popsicle molds are clean and dry before filling. This helps avoid any odd flavors. Fill the molds about three-quarters full. This allows space for the mixture to expand when frozen. Once filled, insert the sticks carefully. If you tap them on the counter, it helps release air bubbles. To maintain flavor and texture, wrap the molds tightly in plastic wrap after freezing. This prevents ice crystals from forming. Ice crystals can ruin the smooth texture you want in your popsicles. Blueberry lemon yogurt popsicles can last up to three months in the freezer if stored well. After that, they may lose flavor or texture. Check for signs of freezer burn, like white patches or dryness. If you see these, it’s best to toss them out. Cleaning your popsicle molds is simple. Rinse them with warm, soapy water and let them dry completely. Avoid using harsh scrubbers that might scratch them. Store molds in a cool, dry place to keep them in good shape. If you don’t have popsicle molds, use small cups or ice cube trays. Just insert wooden sticks or spoons in the center. These alternatives work well and are easy to find at home. I recommend using Greek yogurt for these popsicles. It has a thick texture and gives a creamy taste. Regular yogurt works too, but it may be thinner. Greek yogurt also adds protein, making the popsicles more filling. If you want a twist, try vanilla Greek yogurt for added flavor. Yes, you can use frozen blueberries. They are convenient and still tasty. Frozen berries may make your popsicles a bit looser when blended. Fresh blueberries offer a bright flavor and nice texture. If you use frozen berries, let them thaw for a few minutes before blending. The popsicles need at least 4-6 hours to freeze completely. If you want them to be extra firm, leave them in the freezer overnight. This way, they are ready for hot summer days. Be patient, as the waiting makes the treat even better! You can definitely make these popsicles without added sugar. Use ripe fruit for natural sweetness. You can also try mashed bananas or pureed dates. If you want a little sweetness, use honey or maple syrup. Just remember, different sweeteners can change the taste. You can make tasty and healthy popsicles using fresh ingredients. Blend blueberries, Greek yogurt, honey, and lemon for a creamy treat. Fill molds, freeze, and enjoy! Remember to balance flavors and avoid overfilling molds. Get creative with variations to keep things fun. These popsicles are easy to store and last long in the freezer. You now have the skills to make refreshing popsicles anytime! Enjoy experimenting with flavors and impress your friends and family.
                        Blueberry Lemon Yogurt Popsicles Refreshing Summer Treat
                      • To make Vegan Caramel Apple Overnight Oats, gather these simple items: - 1 cup rolled oats - 1 ½ cups almond milk (or any plant-based milk) - 1 medium apple, diced (preferably a sweeter variety like Fuji or Honeycrisp) - 2 tablespoons maple syrup - 1 tablespoon almond butter - 1 teaspoon cinnamon - ½ teaspoon vanilla extract - 2 tablespoons coconut sugar (for the caramel flavor) - ¼ cup chopped nuts (walnuts or pecans) - A pinch of sea salt You can easily swap out some ingredients if needed. Use oat milk or soy milk instead of almond milk. Peanut butter works well if you don’t have almond butter. For a sweeter taste, try agave syrup in place of maple syrup. You can also replace coconut sugar with brown sugar if that’s what you have on hand. The key is to keep it plant-based while matching your taste. When selecting apples, look for varieties that are sweet and crisp. Fuji and Honeycrisp are my top picks. They add a nice sweetness to the oats. Choose apples that are firm and free from blemishes. If you like a tart flavor, try Granny Smith apples. They balance the sweetness from the other ingredients well. Always wash your apples before using them, as this keeps your dish fresh and clean. Start by grabbing a mixing bowl. Add 1 cup of rolled oats and 1 ½ cups of almond milk. Pour in 2 tablespoons of maple syrup and 1 tablespoon of almond butter. Next, sprinkle in 1 teaspoon of cinnamon and ½ teaspoon of vanilla extract. Mix well until everything blends together. Now, fold in 1 diced apple and ¼ cup of chopped nuts. Save some apple and nuts for later. This mixture is the base for your oats. Take your oat mixture and spoon it into jars or bowls. To make it fun, create layers. Add some of the oat mix, then a layer of chopped apple, and a sprinkle of coconut sugar. Repeat this until the jars are full. This method makes your oats look pretty and tasty. You can see the different layers when you serve them. Cover the jars with lids or plastic wrap and place them in the fridge. Let them chill overnight or for at least 4 hours. This is key for thickening the oats and blending the flavors. In the morning, stir the oats. If they seem too thick, splash in more almond milk. This helps you get the right texture. Enjoy them topped with the reserved apple pieces, nuts, and a drizzle of maple syrup for extra sweetness. To make your oats creamy, use rolled oats instead of instant oats. Rolled oats soak up liquid well and create a smooth texture. Use almond milk, or any plant-based milk you like. A good ratio is 1 cup of oats to 1.5 cups of milk. This helps the oats soften overnight. Stir well to mix everything together. If your oats are too thick in the morning, just add a splash of milk. Sweetness is key in your vegan caramel apple overnight oats. Start with 2 tablespoons of maple syrup. You can add more if you want it sweeter. The coconut sugar adds a nice caramel flavor, so don’t skip it! You can also add more cinnamon for extra warmth. Taste your mixture before refrigerating. Adjust the flavors to match your preferences. Presentation makes a dish more fun. Serve your oats in clear jars to show off the layers. Top with extra diced apples and a sprinkle of cinnamon. Chopped nuts add crunch and a nice look. A drizzle of maple syrup on top makes it even better. You can also add a few chocolate chips for a sweet touch. Enjoy the beautiful colors and textures! {{image_2}} You can change the flavor of your vegan caramel apple overnight oats with the seasons. In autumn, use spiced apples with nutmeg or cloves. In winter, add warm vanilla and a touch of maple. In spring, try fresh berries to add brightness. For summer, mix in diced peaches or plums for a juicy twist. Each season brings new fruits and spices to brighten your oats. To personalize your oats, think about fun toppings. You can add chia seeds for extra fiber. Dried fruits like raisins or cranberries add a nice chew. For crunch, sprinkle some granola on top. You can also try coconut flakes or dark chocolate chips. Each topping adds a new layer of flavor and texture. If you need gluten-free oats, use certified gluten-free rolled oats. Most oats are naturally gluten-free, but cross-contamination can happen. Always check the package. You can also swap almond milk for any other plant-based milk, like oat or rice milk. These swaps keep your oats tasty and safe for all diets. To keep your Vegan Caramel Apple Overnight Oats fresh, store them in the fridge. Place any leftovers in an airtight container. This helps keep them from drying out or absorbing other smells from your fridge. Your oats will stay good for about three to five days. I recommend using glass jars or plastic containers for storing your oats. Mason jars work great because they are easy to seal and look nice. Choose containers that are the right size for your portion. This way, you won’t waste any oats. If you like your oats warm, you can heat them up. Just transfer the oats to a microwave-safe bowl. Heat them in short bursts, about 30 seconds at a time. Stir between heating to make sure they warm evenly. If they feel too thick, add a splash of almond milk to smooth them out. Enjoy your cozy breakfast! Yes, you can use any plant-based milk. Almond, oat, or soy milk work well. Each type gives a unique flavor and texture. Almond milk adds a nutty taste, while oat milk is creamier. Just pick what you like best! Overnight oats stay fresh for up to five days in the fridge. Store them in airtight containers. This way, you can make a batch and grab it throughout the week. Just be sure to stir them before eating. Absolutely! Doubling the recipe is easy and smart for meal prep. Just mix everything in a larger bowl. Divide the mixture into jars or containers. This makes breakfast quick and delicious for the whole week! You learned about key ingredients for overnight oats and smart substitutes. I shared tips on choosing the best apples and preparing your oat mixture. You now know layering tricks and how to store leftovers safely. Experiment with flavors, toppings, and different containers. Overnight oats are easy, tasty, and versatile. Enjoy customizing your creation. Aim for balance in flavors and textures to make it just right for you.
                        Vegan Caramel Apple Overnight Oats Simple Recipe
                      • To make Cookie Dough Greek Yogurt Bark, you will need these key ingredients: - 2 cups plain Greek yogurt - ¼ cup honey or maple syrup - 1 teaspoon vanilla extract - ½ cup mini chocolate chips - ¼ cup almond flour (or finely ground oats) - ¼ cup chopped nuts (e.g., walnuts or pecans) - Pinch of sea salt These ingredients work together to create a creamy and tasty treat. The Greek yogurt gives the bark its smooth texture and protein punch. The honey or maple syrup adds just the right amount of sweetness. If you need alternatives, here are some ideas: - For Greek yogurt, use regular yogurt or a dairy-free option like coconut yogurt. - If you want a low-calorie sweetener, try stevia or agave syrup. These substitutes can help you fit your needs without losing flavor. To make your bark even more fun, consider these add-ins: - Dried fruit like cranberries or raisins for sweetness. - Shredded coconut for a tropical twist. - Different nuts like almonds or pecans for added crunch. These extras can make your bark unique and tasty. Feel free to mix and match based on what you love! To start, gather your ingredients. You need 2 cups of plain Greek yogurt, ¼ cup of honey or maple syrup, and 1 teaspoon of vanilla extract. In a mixing bowl, combine the Greek yogurt, honey, and vanilla. Stir until smooth. Next, add ¼ cup of almond flour and a pinch of sea salt. Mix until combined. This step adds texture and flavor. Finally, fold in ½ cup of mini chocolate chips and ¼ cup of chopped nuts. These add a nice crunch and extra flavor. Now it’s time to spread the mixture. Line a baking sheet with parchment paper. Pour the yogurt mixture onto the sheet. Use a spatula to spread it into an even layer, about ½ inch thick. For extra taste, sprinkle some more chocolate chips and nuts on top. Press them lightly into the mixture. Place the baking sheet in the freezer. Freeze for about 2-3 hours or until the bark is firm. This freezing makes it easy to break into pieces later. Once the bark is frozen, take it out of the freezer. Remove the parchment paper carefully. You can break the bark into pieces or cut it into squares. Use a sharp knife for clean cuts. Store the pieces in an airtight container. Keep them in the freezer until you are ready to enjoy this treat. This helps keep the bark fresh and tasty. To get that creamy texture, start with thick Greek yogurt. It needs to be plain and full-fat. This gives the bark a rich taste. Mixing in almond flour helps create a nice bite. Make sure to blend it well with the yogurt. The mixture should feel smooth and thick. If it is too runny, the bark may not hold together. Use a spatula to spread it evenly on the baking sheet. This helps it freeze uniformly. You can easily change the flavors to fit your taste. Try adding a bit of cinnamon for warmth. You can also mix in other extracts like almond or hazelnut. For a fruity twist, add chopped dried fruits like cranberries or apricots. You can swap out the mini chocolate chips for dark chocolate or even white chocolate. If you want a nutty flavor, try using different nuts like pecans or hazelnuts. Feel free to be creative! A big mistake is not measuring the ingredients. Always use the right amounts for the best taste. Another mistake is not allowing enough freezing time. If the bark is not frozen long enough, it will be too soft. Avoid overmixing the yogurt mixture too. This can make it watery and thin. Lastly, remember to line your baking sheet with parchment paper. This makes it easier to remove the bark once it is frozen. {{image_2}} You can make a tasty, dairy-free version of this treat. Use coconut yogurt instead of Greek yogurt. It has a creamy texture and a subtle flavor. For sweetener, try agave syrup or maple syrup. These swaps keep it delicious without dairy. Don't forget to check labels to ensure your yogurt is dairy-free. Get creative with flavors! You can swap the vanilla extract for almond or hazelnut extract. This change adds a nutty twist. Want a fruity kick? Mix in some mashed banana or pureed strawberries. You can also try adding spices, like cinnamon or nutmeg. Each change gives your bark a unique taste. You can adjust your bark for the seasons. In fall, add pumpkin spice and chopped apples. For winter, mix in peppermint extract and crushed candy canes. In summer, try fresh berries and a hint of lemon zest. Each season brings fresh ideas to your bark, making it fun to enjoy year-round. To keep your Cookie Dough Greek Yogurt Bark fresh, store it in an airtight container. Make sure the container is freezer-safe. This will help prevent freezer burn. If you have leftover pieces, you can layer them with parchment paper. This way, they won’t stick together. When you're ready to enjoy a piece, take it out of the freezer. Let it sit at room temperature for about 5 minutes. This helps to soften it just enough for easy munching. When stored properly, your bark can last up to two months in the freezer. This means you can make a big batch and enjoy it later. Just remember: the fresher the bark, the better it tastes. I recommend eating it within a month for the best flavor and texture. Cookie Dough Greek Yogurt Bark is great on its own. But you can also pair it with fresh fruit like strawberries or bananas. For a fun twist, serve it with a drizzle of chocolate sauce. It makes a great snack for kids and adults alike. You can even break it into smaller pieces and add it to a smoothie for a sweet treat. Remember, the possibilities are endless! You can use other types of yogurt, but Greek yogurt works best. It gives a thick texture and creamy taste. If you use regular yogurt, the bark may not hold its shape as well. You can try dairy-free options too, but check if they are thick enough. To make this bark vegan, use dairy-free yogurt. Coconut yogurt or almond yogurt are great choices. Substitute honey with maple syrup or agave nectar. This way, you keep the sweetness without using animal products. Yes, you can use alternative sweeteners. Stevia, agave syrup, or monk fruit sweetener work well. Just remember to adjust the amount based on sweetness level. This keeps the bark tasty without adding extra sugar. Absolutely! Adding protein powder is a great idea. It boosts nutrition and keeps you full longer. Mix in a scoop of your favorite flavor when combining the yogurt. Make sure to blend well for even flavor throughout the bark. This blog post covered how to make delicious cookie dough Greek yogurt bark. We discussed key ingredients, substitutes, and fun add-ins that boost flavor and crunch. I detailed preparation and freezing steps, plus tips for perfect texture and common mistakes to avoid. We explored dairy-free options, unique flavors, and how to store it well. Remember, you can customize this bark to fit your taste. Enjoy creating this treat and share it with friends and family!
                        Cookie Dough Greek Yogurt Bark Creamy and Simple Treat
                      • - 1 ½ cups all-purpose flour - 1 tablespoon cocoa powder - ½ teaspoon baking powder - ½ teaspoon baking soda - ¼ teaspoon salt - ½ cup unsalted butter, softened - 1 cup granulated sugar - 1 large egg - 1 teaspoon vanilla extract - 1 tablespoon red food coloring - ½ cup powdered sugar (for dusting) For all-purpose flour, you can use cake flour for a softer cookie. If you want a gluten-free option, try almond flour or a gluten-free blend. Instead of unsalted butter, you can use margarine. Just keep in mind that it may change the taste slightly. You might replace granulated sugar with coconut sugar for a different sweetness. Make sure to adjust amounts based on what you like. You can add white chocolate chips or chopped nuts for extra texture. Crushed peppermint candies are great for a holiday twist. If you love cream cheese, consider making a cream cheese frosting drizzle. Just mix cream cheese, butter, and powdered sugar until smooth, then drizzle it over the cookies. To start, preheat your oven to 350°F (175°C). Line two baking sheets with parchment paper. This helps cookies bake evenly. In a medium bowl, sift together the flour, cocoa powder, baking powder, baking soda, and salt. This mix is key for texture. Set this bowl aside. In a large bowl, cream the softened butter and granulated sugar. Use an electric mixer for 2-3 minutes. You want it light and fluffy. Next, beat in one large egg, one teaspoon of vanilla extract, and one tablespoon of red food coloring. Mix until everything is smooth and the color is bright. Gradually add your dry ingredients to the wet mix. Stir until just combined. Be careful not to overmix. Chill the dough in the refrigerator for at least 30 minutes. This makes it easier to handle when forming cookies. After chilling, take the dough out. Use a cookie scoop or tablespoon to scoop out the dough. Form each scoop into a ball. Then, roll each ball in powdered sugar. Make sure they are fully coated. This will create that crinkle look when baked. Place the cookie dough balls on the prepared baking sheets. Leave enough space between each ball for spreading. Now it’s time to bake! Put the baking sheets in the oven. Bake for 10-12 minutes. The edges should be set, but the centers will look slightly underbaked. This gives the cookies a soft texture. Once done, take them out and let the cookies cool on the sheets for 5 minutes. After that, transfer them to a wire rack to cool completely. Enjoy your beautiful, tasty Red Velvet Crinkle Cookies! To get the best texture for your red velvet crinkle cookies, follow these steps: - Use softened butter, not melted. Softened butter helps create a light and fluffy mix. - Chill your dough for at least 30 minutes. Cold dough makes it easier to shape. - Don’t overmix the dough. Mix until just combined for soft, tender cookies. Here are some common mistakes to avoid when baking: - Forgetting to preheat your oven can lead to uneven baking. Always preheat first. - Not measuring flour correctly can make cookies dry. Use a spoon to scoop, then level. - Baking cookies too long makes them hard. Watch the edges; they should be set, but centers can look soft. Having the right tools makes baking fun and easy: - Use a good electric mixer for creaming butter and sugar. - A cookie scoop helps shape uniform cookie balls. - Parchment paper prevents sticking and makes cleanup easy. - A wire rack cools cookies evenly, keeping them soft. {{image_2}} You can easily change the flavor of your Red Velvet Crinkle Cookies. Want a hint of chocolate? Add more cocoa powder. Craving something fruity? Toss in some dried cherries or raspberries. You can also add a teaspoon of almond extract for a nutty twist. These small changes make a big impact on taste. Red velvet is classic, but you can switch up the color for fun. Use blue or green food coloring for a unique look. This works well for themed parties or holidays. For Halloween, try orange or purple! These colors can match your event and make the cookies even more special. If you need a gluten-free option, swap the all-purpose flour with a gluten-free blend. Make sure the blend has xanthan gum for the best texture. For a vegan version, replace the butter with coconut oil and the egg with a flax egg (1 tablespoon of ground flaxseed mixed with 2.5 tablespoons of water). These adjustments keep the cookies tasty while fitting your dietary needs. To keep your Red Velvet Crinkle Cookies fresh, store them in an airtight container. Line the container with parchment paper. This helps to absorb moisture. Place a layer of cookies, then add more parchment paper between layers. This keeps them from sticking together. You can also use a zip-top bag if you don’t have a container. Just remove as much air as possible before sealing. Freezing your cookies is a great way to save them for later. First, let the cookies cool completely. Then, place them in a single layer on a baking sheet. Freeze for about an hour. Once frozen, transfer them to an airtight container or a zip-top bag. This helps to keep the cookies from getting freezer burn. They can last in the freezer for up to three months. When ready to eat, let them thaw at room temperature. Red Velvet Crinkle Cookies stay fresh for about five days at room temperature. If stored correctly in an airtight container, they can last even longer. You can also refrigerate them to extend their shelf life. In the fridge, they can stay good for about a week. Always check for any signs of spoilage before eating. Enjoy these tasty treats while they are fresh! You can use beet juice for a natural option. It gives a nice red hue. Pomegranate juice works too but may change the cookie's taste. If you want, you can skip the coloring. The cookies will still taste great! Look for edges that are set. The centers should look a bit soft. A slight shine means they are ready. They will firm up as they cool. Trust your eyes, but a timer helps too! Yes, you can! Chill the dough and store it in the fridge. It lasts for up to three days. You can also freeze it for up to three months. Just thaw before baking for best results. These cookies pair nicely with milk or coffee. Try them with vanilla ice cream for a treat! You can also serve them at parties with other sweets. They add a fun splash of color to any dessert table. To sum up, we explored the essential ingredients, detailed steps, and handy tips for perfect Red Velvet Crinkle Cookies. Remember to measure your ingredients carefully and consider great mix-ins. Avoid common mistakes for the best texture. You can also try fun variations or make them gluten-free. Store your cookies properly to enjoy longer. These easy steps will help you bake delicious cookies every time. Now, it's time to make your baking dreams a reality!
                        Red Velvet Crinkle Cookies Irresistible and Tasty Treat

                      Recent Drinks

                      • To make a delicious Turmeric Golden Milk Latte, gather these simple ingredients: - 2 cups almond milk (or your preferred milk) - 1 teaspoon ground turmeric - ½ teaspoon ground ginger - ¼ teaspoon cinnamon - 1 tablespoon honey or maple syrup (adjust to taste) - Pinch of black pepper - ½ teaspoon vanilla extract - Optional: a sprinkle of nutmeg for garnish - Almond Milk: This milk is low in calories and rich in vitamins. It helps with heart health. - Turmeric: This spice has curcumin, known for its anti-inflammatory properties. It may help improve brain function. - Ginger: Ginger can help with digestion and nausea. It adds a nice warmth to the drink. - Cinnamon: This spice is rich in antioxidants. It may help lower blood sugar and improve heart health. - Honey or Maple Syrup: Both sweeteners can boost energy. They also provide antioxidants. - Black Pepper: This spice enhances turmeric absorption. It makes the drink more effective. - Vanilla Extract: It adds flavor and can help reduce stress. - Nutmeg: This spice is optional, but it adds warmth and a nice aroma. - Milk Options: You can use oat milk, soy milk, or coconut milk for different flavors. - Sweeteners: If you prefer, try agave syrup or stevia as sugar-free options. - Spices: Experiment with cardamom or cloves for added flavor. - Nutmeg: You can skip it if you don't like nutmeg, or use a touch of cocoa powder instead. 1. Start by taking a small saucepan. 2. Add 2 cups of almond milk to the pan. 3. Measure and add 1 teaspoon of ground turmeric. 4. Next, add ½ teaspoon of ground ginger. 5. Sprinkle in ¼ teaspoon of cinnamon. 6. Sweeten your drink with 1 tablespoon of honey or maple syrup. 7. Don't forget a pinch of black pepper for better absorption of turmeric. 8. Lastly, add ½ teaspoon of vanilla extract. 9. Whisk all the ingredients well in the pan. 10. Place the saucepan on medium heat. 11. Gently warm the mixture while stirring often. 12. Keep an eye on it; do not let it boil. 13. After about 5-7 minutes, it should be hot enough. 14. Remove the pan from heat and let it cool slightly. 15. If you want a frothy drink, use a milk frother or whisk it quickly. 16. Pour the golden milk into your favorite mugs. 17. Optionally, sprinkle a bit of nutmeg on top for a nice touch. 18. Serve warm and enjoy this comforting drink! - Always use a whisk to blend the spices into the milk. - Whisking helps mix the turmeric and other spices evenly. - When heating, keep the heat low to avoid scalding the milk. - Stir often to prevent sticking at the bottom of the pan. - If you see steam but no bubbles, you are at the right temperature. - A milk frother works wonders for a smooth, frothy finish. - If you don’t have a frother, whisk vigorously by hand. - Frothing adds air, giving the latte a creamy feel. - The more you froth, the lighter and fluffier your drink will become. - For an extra touch, froth some almond milk separately and top your latte with it. You can mix spices to make your turmeric latte tastier. Try adding a pinch of nutmeg or a dash of cardamom. These spices add warmth to the drink. You can also use fresh ginger instead of ground ginger. This will give your latte a bright, zesty kick. Just remember, fresh ginger may need more time to steep. Many people rush the heating process. Always warm your milk slowly over medium heat. If you boil it, the spices can lose flavor. Another mistake is not blending the spices well. Make sure to whisk the mixture thoroughly. This helps avoid clumps of turmeric or ginger. Lastly, avoid skipping the black pepper. It helps your body absorb turmeric better. Sweetness is personal. Start with one tablespoon of honey or maple syrup. Taste your latte and add more if you like it sweeter. For creaminess, use full-fat coconut milk for a richer feel. Almond milk is lighter but still delicious. You can also mix almond and coconut milk for the best of both worlds. {{image_2}} You can easily make this latte vegan. Just use almond milk, coconut milk, or oat milk. These milks work great in this recipe. They keep the drink creamy and delicious. If you want a nut-free option, oat milk is the best choice. It blends well with turmeric and spices. To make an iced version, start with brewed turmeric milk. Follow the same steps but let it cool. Pour over ice instead of serving warm. This drink is refreshing on hot days. You can also add some ice cream for a treat! You can mix and match flavors for fun. Try adding matcha for a green twist. This adds a fresh taste and boosts energy. You can also use cocoa for a chocolatey version. The cocoa pairs well with turmeric and spices. For a special touch, add a dash of vanilla extract. This enhances the overall flavor and aroma. To store leftover turmeric golden milk, let it cool first. Then, pour it into an airtight container. Keep it in the fridge for up to three days. This way, you can enjoy the drink again without losing its flavor. When reheating your golden milk, do it gently. Pour it into a small saucepan. Heat it over low to medium heat. Stir it often to avoid burning. Never let it boil, as this can change the taste and texture. You can also use a microwave. Heat in short bursts, stirring in between. Turmeric golden milk lasts about three days in the fridge. Check for signs of spoilage. If it smells sour or has any mold, discard it. Always trust your senses. If it looks or smells off, it’s best to throw it away. Turmeric has many health benefits. It is known for its bright yellow color and active compound called curcumin. Curcumin may help reduce inflammation. It can also support joint health. Some studies suggest it may boost your mood. Turmeric might even help with digestion. Drinking turmeric may also support your immune system. Yes, you can use any milk you like. Almond milk is great, but coconut milk adds creaminess. Oat milk is a good choice for a thicker texture. If you prefer dairy, whole or skim milk works too. Just remember, different types of milk will change the flavor a bit. To make this recipe sugar-free, skip the honey or maple syrup. You can use a sugar substitute like stevia or monk fruit instead. These options will give you sweetness without the calories. Just adjust the amount to your taste. Yes, it is safe for most people to have turmeric daily. Using it in cooking or drinks is a great way to enjoy its benefits. However, if you have health issues or take certain medications, check with a doctor first. Moderation is key, as with any food. In this blog post, we explored the ingredients and health benefits of Turmeric Golden Milk. I shared step-by-step instructions for making it frothy and delicious. We also discovered tips, tricks, and variations to enhance your drink. Proper storage and reheating advice can help you enjoy leftovers. Remember, turmeric offers many health benefits, so enjoy this drink often. Use alternative ingredients if you prefer. With these ideas, you can create the perfect golden milk to suit your taste and health needs. Enjoy your journey to wellness!
                        Turmeric Golden Milk Latte Simple and Creamy Recipe
                      • - 1 ripe mango, peeled and diced - 1 cup fresh pineapple chunks - 1 banana, sliced - 1 cup coconut water (or regular water) - ½ cup plain Greek yogurt (or dairy-free alternative) - 1 tablespoon honey or agave syrup (optional) - A handful of fresh mint leaves (for garnish) - Ice cubes (optional) The key to a delicious mango pineapple smoothie lies in its fresh ingredients. You want ripe fruits for the best flavor. The mango should feel soft when you squeeze it gently. Pineapples should smell sweet and fruity. This smoothie combines sweet mango, tangy pineapple, and creamy banana. Coconut water adds hydration, while Greek yogurt gives it a nice creaminess. You can add honey for extra sweetness if you like. Mint leaves add a refreshing touch when you serve it. Each ingredient plays a role in making this smoothie flavorful and refreshing. Trust me, using fresh ingredients will make a big difference in taste! To make this smoothie, start by gathering your main ingredients. You need a ripe mango, fresh pineapple, and a banana. 1. In a blender, combine the diced mango, pineapple chunks, and banana slices. This mix brings a burst of tropical flavor. 2. Next, add one cup of coconut water to the blender. This not only hydrates but also adds a refreshing twist. 3. For creaminess, pour in half a cup of plain Greek yogurt. If you want it sweeter, drizzle in one tablespoon of honey or agave syrup. 4. Blend on high until the mixture is smooth and creamy. If you like your smoothie chilled, toss in a few ice cubes and blend again until they are fully mixed in. 5. After blending, taste your smoothie. If it needs to be sweeter or thicker, add more honey or coconut water as needed. Once your smoothie is ready, it’s time to serve it. I recommend using tall glasses to show off the vibrant color. For a fun touch, garnish each glass with a few fresh mint leaves on top. This not only looks nice but also adds a fresh aroma. Enjoy your delicious Mango Pineapple Smoothie! For the Full Recipe, please refer back to the ingredient list and instructions. To get your smoothie just right, focus on creaminess. Use ripe fruits like mango and banana. The Greek yogurt adds a nice, smooth texture. If you want a richer taste, try full-fat yogurt. For a lighter feel, use low-fat or dairy-free yogurt. Adjust the thickness by adding more liquid. Coconut water is great for this. If your smoothie is too thick, just pour in a bit more. Blend again until it’s just how you like it. If you want a thicker smoothie, add more banana or ice cubes. Boosting flavor can take your smoothie to the next level. Try adding spices like cinnamon or ginger. These spices not only add warmth but also great health benefits. A dash of cinnamon can make the smoothie taste cozy. A pinch of ginger gives it a nice kick. You can also use flavored yogurts for extra taste. Vanilla or coconut yogurt work well. If you want sweetness, think about honey or agave syrup. These can make your smoothie more enjoyable. For a fun twist, try adding a splash of vanilla extract. It will add a lovely aroma to your drink. For a full taste experience, explore the [Full Recipe]. {{image_2}} You can change the fruit in your smoothie to keep it fresh. Adding strawberries or blueberries gives a sweet twist. These berries add a nice color and taste. You can also try using other tropical fruits like papaya or kiwi. These fruits bring new flavors and nutrients to your drink. Each fruit will change the smoothie’s taste and make it unique. If you want a dairy-free smoothie, swap the Greek yogurt for a plant-based option. Almond, coconut, or soy yogurt works well. These alternatives keep your smoothie creamy without dairy. For sweeteners, you can use maple syrup or agave syrup for a vegan choice. These options add sweetness while keeping your drink plant-based. Enjoy the fruity goodness in many ways! Don't forget to check the Full Recipe for more ideas. You may have some smoothie left after making your Mango Pineapple Smoothie. To keep it fresh, use a glass jar or a BPA-free plastic container. Seal it tightly to prevent air from spoiling the flavor. Store it in the fridge for up to 24 hours. After that, it may lose some taste and texture. If you want to enjoy the smoothie later, freezing is a great option. Pour the smoothie into ice cube trays or freezer-safe bags. Leave some space in the bags for expansion. You can freeze it for up to three months. When you’re ready to drink it, take out what you need. Thaw it in the fridge overnight or blend it straight from the freezer for a slushy treat. Enjoy your refreshing Mango Pineapple Smoothie anytime! Yes, you can make this smoothie ahead of time. If you want to save it, store it in an airtight container. Keep it in the fridge for up to one day. The smoothie may separate, so stir it well before you drink it. If you don’t have coconut water, use regular water or fruit juice instead. Fruit juice can add a nice flavor. You can also try almond milk for a creamier touch. Just remember, the taste will change a bit based on what you use. To make the smoothie thicker, add more Greek yogurt or a banana. You can also use frozen fruit instead of fresh. Frozen fruit gives you a nice, thick texture. Just blend it well, and you’ll get a creamy drink. Yes, this smoothie is great for kids! It is packed with fruits and tastes sweet. You can adjust the sweetness by adding less honey. The bright colors and fresh flavors will appeal to children, making it a fun treat. You can find the Full Recipe for the Tropical Bliss Mango Pineapple Smoothie above in this article. This will guide you through every step to create your own refreshing drink. This blog post covers a simple and tasty smoothie recipe. You learned about the key ingredients and their nutritional benefits. I provided steps to prepare and serve the smoothie perfectly. Tips for texture and flavor help you make it your own. You can explore variations to suit your tastes or dietary needs. Don’t forget storage tips to keep leftovers fresh. Enjoy your smoothie making journey. It’s all about trying new things and having fun!
                        Mango Pineapple Smoothie Refreshing and Flavorful Blend
                      • - 2 packets of frozen açaí puree - 1 ripe banana - 1 cup of fresh pineapple chunks - 1 cup of coconut milk (or any non-dairy milk) - 1 tablespoon of honey or agave syrup (optional) For a vibrant tropical taste, the main ingredients are key. Açaí puree brings rich color and flavor. It is full of antioxidants. Bananas add creaminess and natural sweetness. Fresh pineapple gives a bright, juicy touch. Coconut milk offers a smooth base. You can use any non-dairy milk you prefer. Honey or agave syrup adds sweetness if needed. - Sliced kiwi - Coconut flakes - Granola - Chia seeds - Fresh berries (e.g., strawberries, blueberries) Toppings make your smoothie bowl pop! Sliced kiwi adds a zesty kick. Coconut flakes give it a tropical crunch. Granola provides texture and flavor. Chia seeds offer extra nutrients. Fresh berries, like strawberries and blueberries, add color and taste. You can mix and match these toppings for a fun look. For the full recipe, please refer to the section above. 1. Blend the ingredients Start by adding the frozen açaí puree, ripe banana, fresh pineapple chunks, and coconut milk into a blender. If you want it sweeter, you can add honey or agave syrup. Blend this mixture on high speed until it becomes creamy and smooth. 2. Adjust consistency with coconut milk If your smoothie is too thick, just add a bit more coconut milk. Blend again until you reach the texture you want. This step is key to making your smoothie bowl enjoyable. 3. Pour into a bowl Once blended, carefully pour the smoothie mixture into a bowl. Make sure to use a large enough bowl to hold all the goodness. 4. Add toppings creatively Now comes the fun part! Arrange your toppings, such as sliced kiwi, coconut flakes, granola, chia seeds, and fresh berries, over the smoothie. Try to create a colorful pattern. I love making a circular design to highlight all the vibrant colors. - Tips for presentation Use a shallow bowl to show off your beautiful toppings. You can also sprinkle some extra coconut flakes around the edge for a nice touch. A colorful presentation makes your smoothie bowl more fun to eat. - Recommended serving utensils Serve your smoothie bowl with a regular spoon. If you want to make it more special, use a wooden spoon or a cute, colorful one. Enjoy your tropical treat right away to keep it fresh and tasty. For the full recipe, refer to the earlier sections. To make a great smoothie bowl, start with ripe fruits. Ripe fruits taste better and add natural sweetness. Look for bananas that are yellow with some brown spots. When it comes to pineapples, choose ones that smell sweet. It ensures they are juicy and fresh. Blending is key to your smoothie bowl. You want a smooth and creamy texture. If your mix is too thick, add more coconut milk. Blend again until you reach the right consistency. A good blend makes your bowl enjoyable and easy to eat. A colorful topping arrangement makes your smoothie bowl pop. Use fresh berries, sliced kiwi, and coconut flakes. Lay them out in a pattern. A circular design looks appealing and fun. To elevate your smoothie bowl's look, use bowls with interesting shapes. Tall bowls or wide, shallow ones can change the game. Garnish with a sprinkle of chia seeds for a fancy touch. This not only looks great but adds a bit of crunch too. {{image_2}} You can change the non-dairy milk for this smoothie. Almond, soy, or oat milk work well. Each milk adds a different taste. Try using seasonal fruits too. Mango, papaya, or berries add a fresh twist. You can mix and match to find your favorite blend. Want more nutrients? Add spinach or kale to your smoothie. They blend well and boost health. You won’t even taste them! For extra energy, stir in nut butter or protein powder. Both will make your smoothie more filling. They add great flavor too! You can also experiment with different combinations to find the best taste for you. To store leftovers, place your smoothie bowl in the fridge. Use a tight container to keep it fresh. Glass or BPA-free plastic works well for storage. I prefer glass because it keeps flavors better. You can freeze smoothie bowls for later. Just pour the mixture into an airtight container. Leave some space at the top, as it will expand when frozen. To defrost, place it in the fridge overnight. If you’re in a rush, you can use the microwave. Just heat it in short bursts to avoid cooking. Enjoy your tropical treat later with ease! For the recipe, check out the Full Recipe. What is açaí and what are its benefits? Açaí is a small, dark purple berry from Brazil. It is full of antioxidants, which help fight free radicals in the body. Açaí is also rich in fiber, promoting good digestion. Plus, it has healthy fats that support heart health. You can enjoy its fruity taste in many dishes. Can I make this smoothie bowl ahead of time? Yes! You can prepare the smoothie mix and store it in the fridge for up to 24 hours. Just remember to keep the toppings separate. This way, your bowl stays fresh and tasty. How can I make this recipe vegan or gluten-free? To make it vegan, use agave syrup instead of honey. For gluten-free, ensure your granola and any other toppings are gluten-free. Most fruits and coconut milk are naturally gluten-free, so you’re all set! Can I substitute açaí with other fruits? Yes, you can! If you can’t find açaí, try using frozen berries like blueberries or strawberries. These fruits will add sweetness and a burst of color to your bowl. What to do if the smoothie is too thick? If your smoothie is too thick, just add a little more coconut milk. Blend again until you reach your desired creaminess. This will make it easier to pour and enjoy. How to fix a smoothie bowl that tastes too bland? If your smoothie bowl lacks flavor, try adding a splash of vanilla extract or a pinch of salt. You can also mix in a bit of honey or agave syrup for sweetness. Adjust the toppings to add more taste and texture. This article covers how to make a delicious açaí smoothie bowl. You learned about the key ingredients, easy steps for preparation, and creative topping ideas. I shared tips to improve taste and presentation, plus fun variations to try. Don’t forget storage techniques to keep your bowl fresh. With all this information, you can enjoy a tasty and nutritious treat anytime. Get creative with your favorites and make this recipe truly yours. Enjoy every bite!
                        Tropical Acai Smoothie Bowl Energizing Healthy Treat
                      • - 1 cup plain yogurt - ½ cup coconut milk - 1 cup fresh blueberries (plus extra for garnish) - 2 tablespoons honey or agave syrup (adjust to taste) - ½ teaspoon vanilla extract - A pinch of cardamom powder - Ice cubes (optional) Using fresh ingredients makes a big difference in taste. Fresh blueberries burst with flavor and nutrients. They give the lassi a bright color and a sweet taste. If you can’t find fresh blueberries, frozen ones work too. They are picked at their peak and frozen quickly. This helps keep their taste and nutrients. However, fresh blueberries always add a better texture. Each ingredient in this lassi has great health benefits. - Plain yogurt: Full of protein and good for your gut health. - Coconut milk: Contains healthy fats that can boost energy. - Blueberries: Packed with antioxidants, they help fight disease. - Honey or agave syrup: Adds sweetness and has some vitamins. - Vanilla extract: Adds flavor and may reduce stress. - Cardamom powder: Can aid digestion and add a warm spice note. This Blueberry Coconut Lassi is not just tasty; it’s also good for you! Start by gathering all your ingredients. This makes the process easier and faster. You will need: - 1 cup plain yogurt - ½ cup coconut milk - 1 cup fresh blueberries (plus extra for garnish) - 2 tablespoons honey or agave syrup (adjust to taste) - ½ teaspoon vanilla extract - A pinch of cardamom powder - Ice cubes (optional) Make sure your blueberries are fresh and ripe. They add great flavor and color. If you want a sweeter lassi, adjust the honey or agave syrup to your taste. Now it’s time to blend! In a blender, combine the yogurt, coconut milk, blueberries, honey, vanilla extract, and cardamom powder. Blend on high speed until the mix is smooth and creamy. If you like a thinner drink, add more coconut milk. After blending, taste the lassi. You can add more honey if you want it sweeter. For a chilled treat, add ice cubes and blend again until frothy. Pour your lassi into tall, clear glasses. This shows off the pretty purple color. For a special touch, garnish with a few whole blueberries on top. You can also sprinkle a little cardamom powder for added flair. If you want to impress, add a slice of lime on the glass rim. This not only looks good but adds a nice contrast to the drink. Enjoy your refreshing Blueberry Coconut Lassi! For the full recipe, check the earlier section. For a thick and creamy lassi, use full-fat yogurt. This gives your drink a rich texture. If you want it thinner, add a bit more coconut milk. Blend it well until it's smooth. You can also try adding ice cubes. This makes it frothy and cold. Both honey and agave syrup are great for sweetness. Honey gives a floral taste, while agave is mild. Start with two tablespoons and taste it. If you want it sweeter, add more. Remember, you can always add more, but you can't take it out! You can make your lassi even better! Try adding a pinch of cinnamon or nutmeg for warmth. Fresh mint leaves can add a nice touch too. You might even add a splash of lime juice for a zesty kick. All these extras can make your blueberry coconut lassi unique and delicious. For the full recipe, check out the complete instructions. {{image_2}} You can easily make a vegan version of blueberry coconut lassi. Just swap the yogurt with a plant-based option. Use coconut yogurt or almond yogurt for a creamy base. These alternatives keep that rich flavor. They also add a nice texture. You still get the fresh taste from blueberries and coconut milk. This change makes the drink creamy without any dairy. Spices can enhance the flavor of your lassi. Cardamom adds a warm note. You can also try cinnamon for a sweet twist. If you want more fruit, think about adding bananas or mangoes. These fruits blend well with blueberries. They also boost the health benefits. Each adds its own flavor and richness to the drink. If you prefer different dairy options, there are many choices. Greek yogurt gives a thicker texture. It also adds a tangy taste. You can use regular yogurt instead of plain yogurt. It is a great way to change the flavor. Try using buttermilk for a unique twist. Each choice will change the texture and taste of your lassi. Each option keeps the drink creamy and delicious. For the full recipe, check out the link above. To keep your blueberry coconut lassi fresh, store it in a clean glass jar. Make sure the jar is airtight. This helps keep out air and bacteria. If you have leftovers, don’t let them sit out for long. Refrigerate the lassi within two hours of making it. Always use a spoon to scoop the lassi. Avoid using your fingers, as this can introduce germs. When stored properly, blueberry coconut lassi lasts about 2 to 3 days in the fridge. After that, the taste and texture may change. You will notice it may separate a bit. If this happens, just give it a good shake or blend it again. Always check for any off smells or changes in color before consuming. You can freeze blueberry coconut lassi for later enjoyment. Pour the lassi into ice cube trays or freezer-safe containers. Leave some space at the top, as liquids expand when frozen. To use, thaw the lassi in the fridge overnight or blend the frozen cubes into smoothies. This method keeps the flavor and nutrients intact. For the best taste, use frozen lassi within three months. For the full recipe, check out the earlier section! Yes, you can use Greek yogurt. It makes the lassi thicker and creamier. If you prefer a lighter drink, stick with plain yogurt. Greek yogurt has more protein, which is great for keeping you full. Just remember to adjust the coconut milk to balance the thickness. Absolutely! Blueberry Coconut Lassi is a fun and tasty drink for kids. It has natural sweetness from honey and blueberries. The yogurt provides healthy probiotics, good for digestion. Kids love the vibrant color and fruity flavor. You can make it as sweet as they like! You can find Blueberry Coconut Lassi at many health food stores or cafes. Some grocery stores may also carry it in the yogurt section. If you want a fresh one, try making it at home. You can easily whip up this drink with the Full Recipe I provided. Blueberry coconut lassi is a nutritious and tasty drink. You learned about key ingredients, like fresh blueberries and coconut. The blending process ensures a smooth drink. Adjust sweetness with honey or agave for your taste. You can try different fruits and spices to mix it up. Storing tips help you keep leftovers fresh. Remember, lassi is fun to make and enjoy. Experiment with variations to find your favorite way to drink it. Enjoy your delicious and healthy blueberry coconut lassi!
                        Blueberry Coconut Lassi Creamy and Refreshing Drink

                      Footer

                      Discover the comforting flavors of Butter Swim Biscuit Chicken Pot Pie, a classic dish that elevates your family meals with ease! This recipe combines tender rotisserie chicken and vibrant vegetables in a creamy filling topped with fluffy, buttery biscuits that soak up all the deliciousness. Perfect for cozy dinners or gatherings, this dish will warm your heart and fill your belly. Click through for step-by-step instructions and enjoy a taste of nostalgia today!
                      ↑ back to top

                      More information

                      • Home
                      • Drinks
                      • Appetizer
                      • Dinner
                      • Desserts
                      • About
                      • Contact
                      • Privacy Policy

                      Our Policies

                      • Privacy Policy
                      • GDPR Policy
                      • Terms Of Use
                      • Copyright Policy
                      • Cookie Policy
                      • Disclaimer

                      Copyright © 2025 cheftaling