
Are you ready to indulge in a treat that’s both sweet and comforting? Maple Glazed Apple Bars combine the rich flavor of maple syrup with tender apples, resulting in a dessert you can’t resist. In this post, I’ll guide you through simple steps and essential tips to make these bars perfect every time. Let’s dive into the ingredients and bake something delicious together!
Ingredients
Dry Ingredients
- 2 cups all-purpose flour
- 1 teaspoon baking powder
- ½ teaspoon baking soda
- ¼ teaspoon salt
- 1 teaspoon ground cinnamon
For the base, we start with the dry ingredients. All-purpose flour gives the bars their structure. Baking powder and baking soda help them rise. Salt enhances the flavors and balances sweetness. Cinnamon adds warmth and spice, making each bite comforting and delicious.
Wet Ingredients
- ½ cup unsalted butter, softened
- 1 cup brown sugar, packed
- ½ cup granulated sugar
- 2 large eggs
- 2 teaspoons vanilla extract
Next, we move to the wet ingredients. Softened butter creates a rich base. Brown sugar adds moisture and deep flavor, while granulated sugar sweetens without overpowering. Eggs bind everything together, and vanilla adds a lovely aroma. These ingredients blend to create a smooth batter.
Additional Ingredients
- 1 ½ cups peeled and diced apples (about 2 medium apples)
- ½ cup chopped walnuts (optional)
- 1 cup powdered sugar (for glaze)
- 2 tablespoons maple syrup
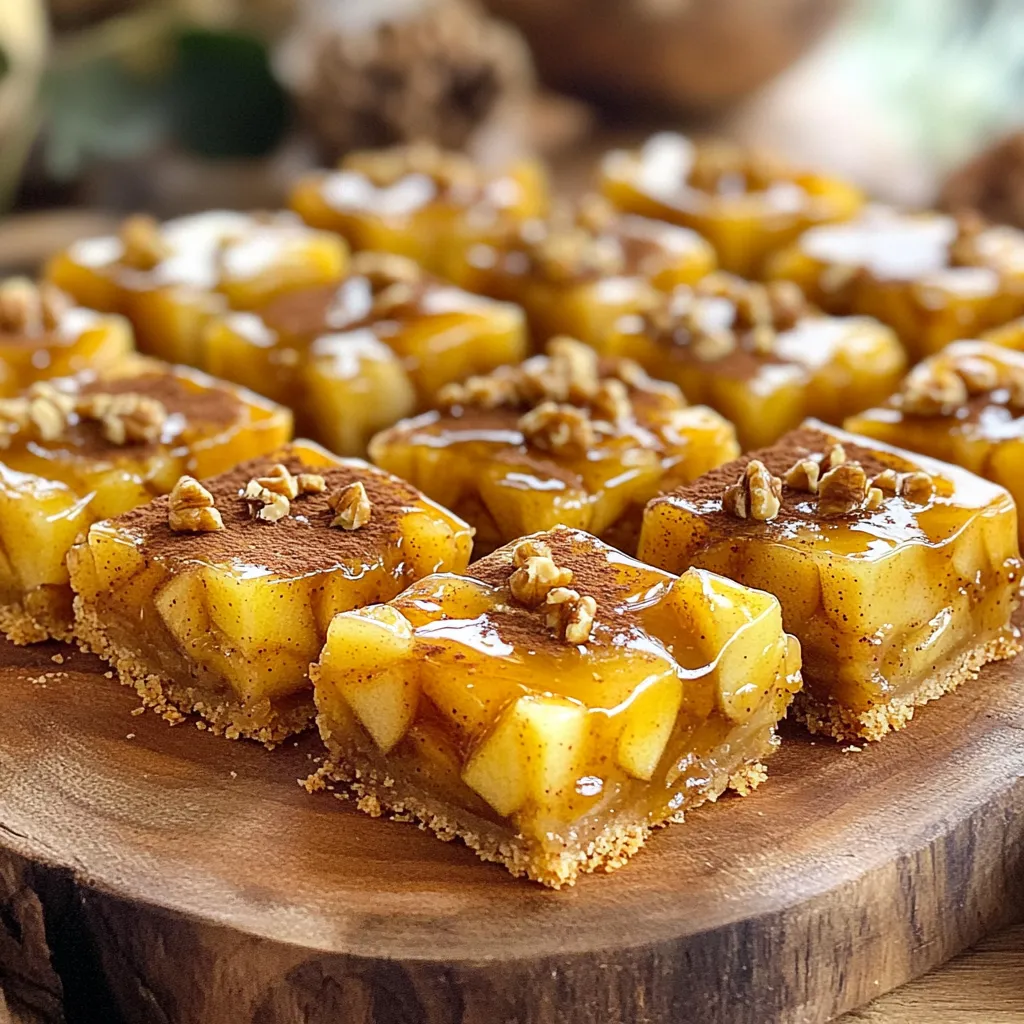
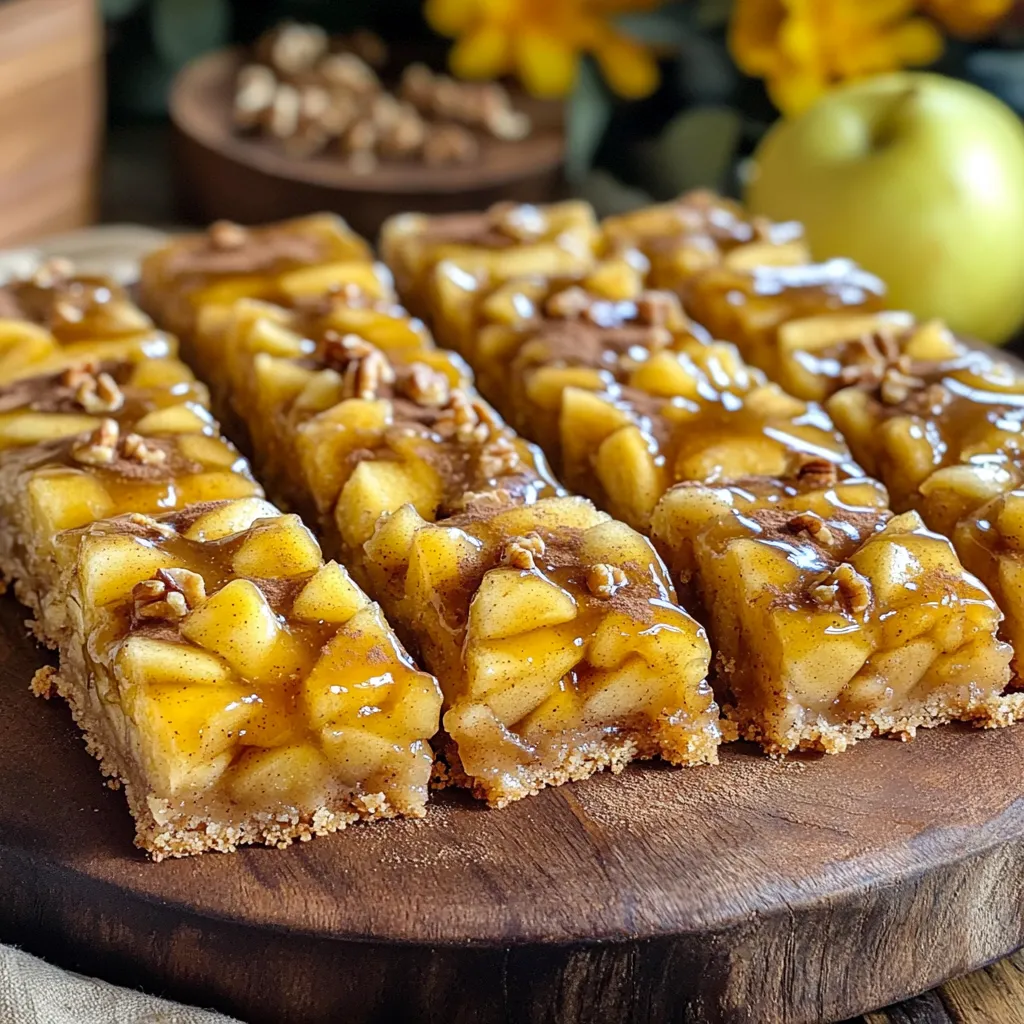
Finally, we have the stars of our recipe. Diced apples bring freshness and texture. Walnuts add a crunchy touch, but they are optional. For the glaze, powdered sugar mixes with maple syrup to create a sweet topping. This glaze ties everything together, making the bars shine.
Step-by-Step Instructions
Preparing the Baking Pan
First, preheat your oven to 350°F (175°C). This gets your oven ready for baking. Next, grease a 9x13-inch baking pan. Use butter or cooking spray. Then, line the pan with parchment paper. Leave some paper hanging over the edges. This makes it easy to lift out the bars later.
Mixing the Dry Ingredients
In a medium bowl, whisk together the dry ingredients. Combine 2 cups of all-purpose flour, 1 teaspoon of baking powder, ½ teaspoon of baking soda, ¼ teaspoon of salt, and 1 teaspoon of ground cinnamon. Make sure the mix is even. This blend gives your bars great flavor and helps them rise.
Creaming the Butter and Sugars
In a large bowl, cream ½ cup of softened unsalted butter with 1 cup of packed brown sugar and ½ cup of granulated sugar. Mix until light and fluffy. This takes about 3 to 4 minutes. The air you whip in gives the bars a nice texture.
Combining Ingredients
Now, add 2 large eggs, one at a time. Mix well after each egg. Then, stir in 2 teaspoons of vanilla extract. After that, gradually add your dry mix to the wet ingredients. Blend until just combined. Do not over-mix; this keeps your bars tender. Finally, fold in 1 ½ cups of peeled and diced apples and ½ cup of chopped walnuts, if you like.
Baking the Bars
Pour the batter into your prepared baking pan. Spread it out evenly. Bake for 25 to 30 minutes. To check if they are done, insert a toothpick into the center. If it comes out clean, the bars are ready.
Preparing the Maple Glaze
While the bars bake, whisk together 1 cup of powdered sugar and 2 tablespoons of maple syrup in a small bowl. Mix until smooth. This glaze adds a sweet touch to your apple bars. When the bars cool, drizzle the glaze over them for that perfect finish.
Tips & Tricks
Texture and Flavor Tips
To get the best texture, avoid over-mixing the batter. When you mix too much, the bars can turn out tough. Mix until just combined. This keeps the bars soft and chewy. The creaming step is key. Cream the butter and sugars together until light and fluffy. This step adds air and helps the bars rise nicely.
Serving Suggestions
For a lovely presentation, arrange the bars on a platter. Sprinkle some cinnamon or chopped walnuts on top. You can also add a small bowl of extra maple syrup for drizzling. Pair these bars with a warm cup of tea or coffee. A scoop of vanilla ice cream makes a great side too.
Enhancing Flavor
You can add fun flavors to the batter. Try mixing in spices like nutmeg or ginger for a warm taste. Walnuts add a nice crunch, but you can also use pecans or almonds. If you want more fruit, toss in some raisins or dried cranberries. These little additions make the bars even more delicious.
Variations
Different Types of Apples
The best apples for baking include Granny Smith, Honeycrisp, and Fuji. Granny Smith apples give a nice tart flavor. Honeycrisp apples are sweet and juicy. Fuji apples provide a great crunch. Using a mix of these apples can enhance the taste. Always choose firm apples. Soft apples can make your bars mushy.
Glaze Alternatives
If you want to switch up the glaze, consider using cream cheese frosting. Mix cream cheese, butter, and powdered sugar for a rich taste. You can also use a simple lemon glaze. Just mix lemon juice and powdered sugar. This gives a bright flavor. Try a caramel sauce if you want something sweet and sticky. Each glaze adds its own twist to the bars.
Nut and Topping Variations
Walnuts add a nice crunch, but you can use other nuts too. Pecans, almonds, or hazelnuts work well. If you love chocolate, mix in chocolate chips. Dried fruits like raisins or cranberries also add great flavor. These options let you create your own unique apple bars. Feel free to experiment and find your favorite mix.
Storage Info
Storing Apple Bars
Store your maple glazed apple bars at room temperature for up to three days. Keep them in an airtight container to keep them moist. If your kitchen is warm, refrigerate them to prevent spoilage. But, note that refrigeration can make them a bit dense.
Freezing Instructions
To freeze the bars, let them cool completely first. Wrap each bar in plastic wrap. Then, place them in a freezer bag or container. They can stay fresh in the freezer for up to three months. When you want to eat one, thaw it overnight in the fridge. Reheat it in the microwave for about 20 seconds for a warm treat.
Shelf Life
These delicious bars stay fresh for about three days at room temperature. In the fridge, they last about a week. If you freeze them, they can hold their flavor and texture for three months. Enjoy them while they are fresh for the best taste!
FAQs
Can I use a different type of sweetener?
Yes, you can use other sweeteners. Brown sugar gives a rich flavor. You might try coconut sugar for a similar taste. Honey or maple syrup can work too, but adjust the liquid in the recipe. Just keep in mind that each sweetener changes the final taste and texture.
What type of apples are best for this recipe?
The best apples are firm and sweet. I recommend Honeycrisp, Granny Smith, or Fuji apples. Honeycrisp adds sweetness and crunch. Granny Smith gives a nice tartness. Fuji is juicy and sweet. Mixing two types can add depth to the flavor.
Can I make these bars gluten-free?
Yes, you can! Use a gluten-free all-purpose flour blend. Look for one with xanthan gum for better texture. Almond flour or oat flour can also work. Just remember that baking time might change slightly.
How do I know when the bars are done baking?
Check the bars after 25 minutes. Insert a toothpick into the center. If it comes out clean, they are done. The edges should look golden brown. If it’s still wet, bake a few more minutes, then check again.
In this post, we covered the key ingredients and steps to make delicious apple bars. We discussed dry and wet ingredients, baking tips, and ways to enhance flavor. You learned about different apple varieties and glaze options.
Enjoy experimenting with the recipe and making it your own. Baking is fun and rewarding. Share your tasty results with friends and family!
Leave a Reply