Chef Taling

  • Recipes
    • Dinner
    • Desserts
    • Appetizer
    • Drinks
  • Privacy Policy
  • Contact
  • About
menu icon
go to homepage
  • Recipes
    • Dinner
    • Desserts
    • Appetizer
    • Drinks
  • Privacy Policy
  • Contact
  • About

search icon
Homepage link
  • Recipes
    • Dinner
    • Desserts
    • Appetizer
    • Drinks
  • Privacy Policy
  • Contact
  • About

×

Vegan Caramel Apple Overnight Oats Simple Recipe

Published: Aug 23, 2025 · by Natalie · Leave a Comment

WANT TO SAVE THIS RECIPE?

Are you ready to enjoy a creamy, sweet breakfast that’s both tasty and vegan? In this simple recipe for Vegan Caramel Apple Overnight Oats, I’ll show you just how easy it is to whip up a delightful dish that’s perfect for busy mornings. With fresh apples and a rich caramel flavor, you’ll want to savor every bite. Let’s dive right into the ingredients you'll need to get started!

To make Vegan Caramel Apple Overnight Oats, gather these simple items: - 1 cup rolled oats - 1 ½ cups almond milk (or any plant-based milk) - 1 medium apple, diced (preferably a sweeter variety like Fuji or Honeycrisp) - 2 tablespoons maple syrup - 1 tablespoon almond butter - 1 teaspoon cinnamon - ½ teaspoon vanilla extract - 2 tablespoons coconut sugar (for the caramel flavor) - ¼ cup chopped nuts (walnuts or pecans) - A pinch of sea salt You can easily swap out some ingredients if needed. Use oat milk or soy milk instead of almond milk. Peanut butter works well if you don’t have almond butter. For a sweeter taste, try agave syrup in place of maple syrup. You can also replace coconut sugar with brown sugar if that’s what you have on hand. The key is to keep it plant-based while matching your taste. When selecting apples, look for varieties that are sweet and crisp. Fuji and Honeycrisp are my top picks. They add a nice sweetness to the oats. Choose apples that are firm and free from blemishes. If you like a tart flavor, try Granny Smith apples. They balance the sweetness from the other ingredients well. Always wash your apples before using them, as this keeps your dish fresh and clean. Start by grabbing a mixing bowl. Add 1 cup of rolled oats and 1 ½ cups of almond milk. Pour in 2 tablespoons of maple syrup and 1 tablespoon of almond butter. Next, sprinkle in 1 teaspoon of cinnamon and ½ teaspoon of vanilla extract. Mix well until everything blends together. Now, fold in 1 diced apple and ¼ cup of chopped nuts. Save some apple and nuts for later. This mixture is the base for your oats. Take your oat mixture and spoon it into jars or bowls. To make it fun, create layers. Add some of the oat mix, then a layer of chopped apple, and a sprinkle of coconut sugar. Repeat this until the jars are full. This method makes your oats look pretty and tasty. You can see the different layers when you serve them. Cover the jars with lids or plastic wrap and place them in the fridge. Let them chill overnight or for at least 4 hours. This is key for thickening the oats and blending the flavors. In the morning, stir the oats. If they seem too thick, splash in more almond milk. This helps you get the right texture. Enjoy them topped with the reserved apple pieces, nuts, and a drizzle of maple syrup for extra sweetness. To make your oats creamy, use rolled oats instead of instant oats. Rolled oats soak up liquid well and create a smooth texture. Use almond milk, or any plant-based milk you like. A good ratio is 1 cup of oats to 1.5 cups of milk. This helps the oats soften overnight. Stir well to mix everything together. If your oats are too thick in the morning, just add a splash of milk. Sweetness is key in your vegan caramel apple overnight oats. Start with 2 tablespoons of maple syrup. You can add more if you want it sweeter. The coconut sugar adds a nice caramel flavor, so don’t skip it! You can also add more cinnamon for extra warmth. Taste your mixture before refrigerating. Adjust the flavors to match your preferences. Presentation makes a dish more fun. Serve your oats in clear jars to show off the layers. Top with extra diced apples and a sprinkle of cinnamon. Chopped nuts add crunch and a nice look. A drizzle of maple syrup on top makes it even better. You can also add a few chocolate chips for a sweet touch. Enjoy the beautiful colors and textures! {{image_2}} You can change the flavor of your vegan caramel apple overnight oats with the seasons. In autumn, use spiced apples with nutmeg or cloves. In winter, add warm vanilla and a touch of maple. In spring, try fresh berries to add brightness. For summer, mix in diced peaches or plums for a juicy twist. Each season brings new fruits and spices to brighten your oats. To personalize your oats, think about fun toppings. You can add chia seeds for extra fiber. Dried fruits like raisins or cranberries add a nice chew. For crunch, sprinkle some granola on top. You can also try coconut flakes or dark chocolate chips. Each topping adds a new layer of flavor and texture. If you need gluten-free oats, use certified gluten-free rolled oats. Most oats are naturally gluten-free, but cross-contamination can happen. Always check the package. You can also swap almond milk for any other plant-based milk, like oat or rice milk. These swaps keep your oats tasty and safe for all diets. To keep your Vegan Caramel Apple Overnight Oats fresh, store them in the fridge. Place any leftovers in an airtight container. This helps keep them from drying out or absorbing other smells from your fridge. Your oats will stay good for about three to five days. I recommend using glass jars or plastic containers for storing your oats. Mason jars work great because they are easy to seal and look nice. Choose containers that are the right size for your portion. This way, you won’t waste any oats. If you like your oats warm, you can heat them up. Just transfer the oats to a microwave-safe bowl. Heat them in short bursts, about 30 seconds at a time. Stir between heating to make sure they warm evenly. If they feel too thick, add a splash of almond milk to smooth them out. Enjoy your cozy breakfast! Yes, you can use any plant-based milk. Almond, oat, or soy milk work well. Each type gives a unique flavor and texture. Almond milk adds a nutty taste, while oat milk is creamier. Just pick what you like best! Overnight oats stay fresh for up to five days in the fridge. Store them in airtight containers. This way, you can make a batch and grab it throughout the week. Just be sure to stir them before eating. Absolutely! Doubling the recipe is easy and smart for meal prep. Just mix everything in a larger bowl. Divide the mixture into jars or containers. This makes breakfast quick and delicious for the whole week! You learned about key ingredients for overnight oats and smart substitutes. I shared tips on choosing the best apples and preparing your oat mixture. You now know layering tricks and how to store leftovers safely. Experiment with flavors, toppings, and different containers. Overnight oats are easy, tasty, and versatile. Enjoy customizing your creation. Aim for balance in flavors and textures to make it just right for you.

Ingredients

Detailed Ingredient List

To make Vegan Caramel Apple Overnight Oats, gather these simple items:

  1. 1 cup rolled oats
  2. 1 ½ cups almond milk (or any plant-based milk)
  3. 1 medium apple, diced (preferably a sweeter variety like Fuji or Honeycrisp)
  4. 2 tablespoons maple syrup
  5. 1 tablespoon almond butter
  6. 1 teaspoon cinnamon
  7. ½ teaspoon vanilla extract
  8. 2 tablespoons coconut sugar (for the caramel flavor)
  9. ¼ cup chopped nuts (walnuts or pecans)
  10. A pinch of sea salt

Substitutions for Plant-Based Ingredients

You can easily swap out some ingredients if needed. Use oat milk or soy milk instead of almond milk. Peanut butter works well if you don’t have almond butter. For a sweeter taste, try agave syrup in place of maple syrup. You can also replace coconut sugar with brown sugar if that’s what you have on hand. The key is to keep it plant-based while matching your taste.

Tips for Choosing the Best Apples

When selecting apples, look for varieties that are sweet and crisp. Fuji and Honeycrisp are my top picks. They add a nice sweetness to the oats. Choose apples that are firm and free from blemishes. If you like a tart flavor, try Granny Smith apples. They balance the sweetness from the other ingredients well. Always wash your apples before using them, as this keeps your dish fresh and clean.

Step-by-Step Instructions

Preparation of the Oat Mixture

Start by grabbing a mixing bowl. Add 1 cup of rolled oats and 1 ½ cups of almond milk. Pour in 2 tablespoons of maple syrup and 1 tablespoon of almond butter. Next, sprinkle in 1 teaspoon of cinnamon and ½ teaspoon of vanilla extract. Mix well until everything blends together. Now, fold in 1 diced apple and ¼ cup of chopped nuts. Save some apple and nuts for later. This mixture is the base for your oats.

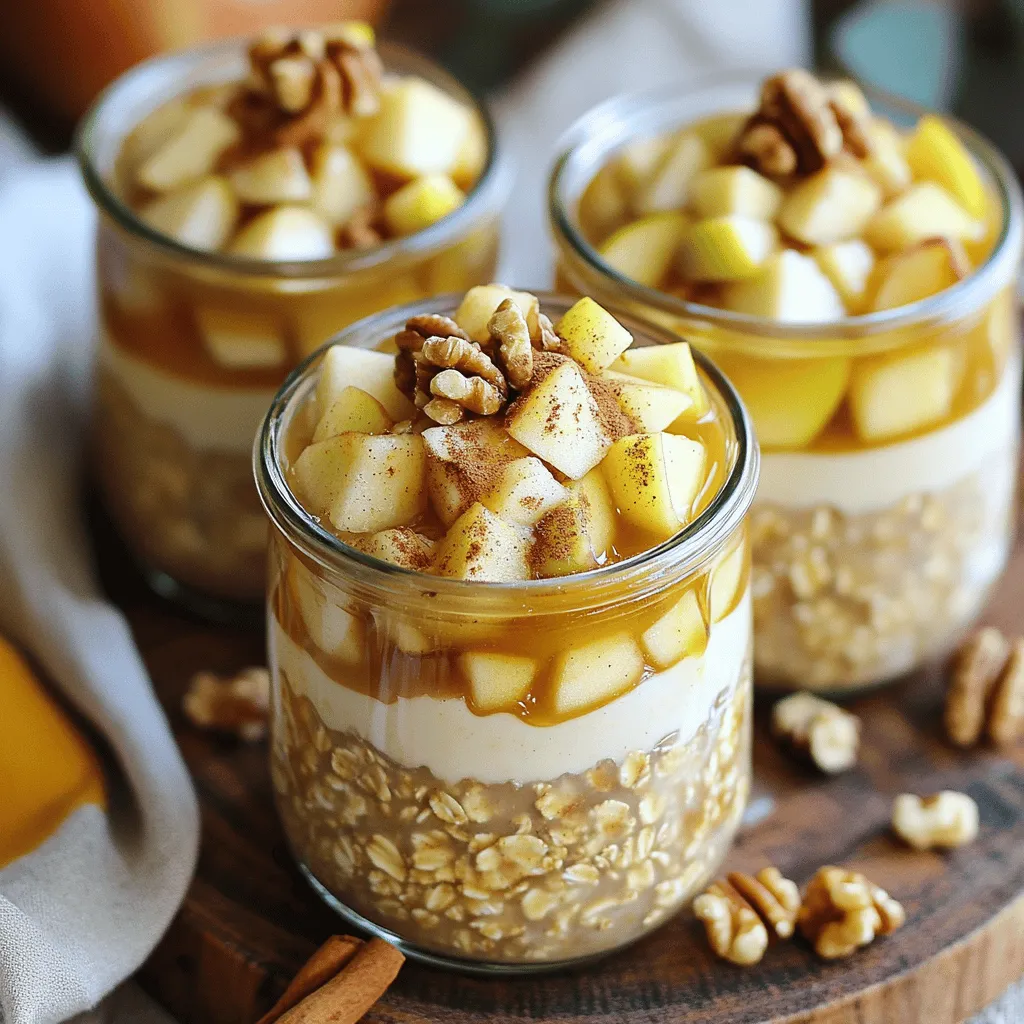
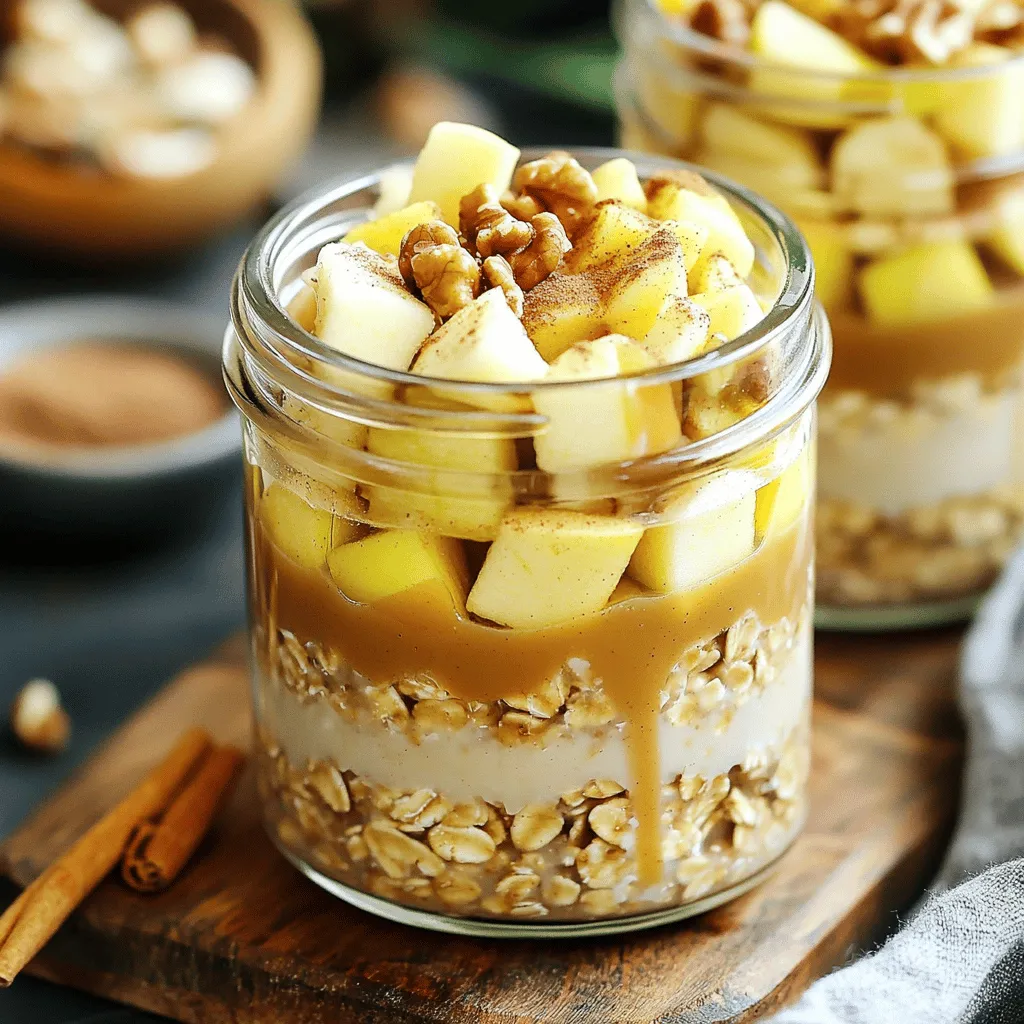
Layering Technique for Jars

Take your oat mixture and spoon it into jars or bowls. To make it fun, create layers. Add some of the oat mix, then a layer of chopped apple, and a sprinkle of coconut sugar. Repeat this until the jars are full. This method makes your oats look pretty and tasty. You can see the different layers when you serve them.

Overnight Refrigeration Tips

Cover the jars with lids or plastic wrap and place them in the fridge. Let them chill overnight or for at least 4 hours. This is key for thickening the oats and blending the flavors. In the morning, stir the oats. If they seem too thick, splash in more almond milk. This helps you get the right texture. Enjoy them topped with the reserved apple pieces, nuts, and a drizzle of maple syrup for extra sweetness.

Tips & Tricks

Best Practices for Creamy Oats

To make your oats creamy, use rolled oats instead of instant oats. Rolled oats soak up liquid well and create a smooth texture. Use almond milk, or any plant-based milk you like. A good ratio is 1 cup of oats to 1.5 cups of milk. This helps the oats soften overnight. Stir well to mix everything together. If your oats are too thick in the morning, just add a splash of milk.

Adjusting Sweetness and Flavor

Sweetness is key in your vegan caramel apple overnight oats. Start with 2 tablespoons of maple syrup. You can add more if you want it sweeter. The coconut sugar adds a nice caramel flavor, so don’t skip it! You can also add more cinnamon for extra warmth. Taste your mixture before refrigerating. Adjust the flavors to match your preferences.

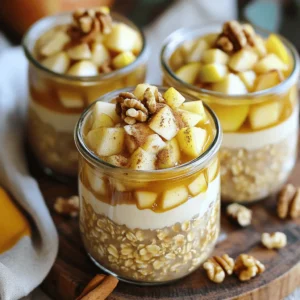
Garnishing Ideas for Presentation

Presentation makes a dish more fun. Serve your oats in clear jars to show off the layers. Top with extra diced apples and a sprinkle of cinnamon. Chopped nuts add crunch and a nice look. A drizzle of maple syrup on top makes it even better. You can also add a few chocolate chips for a sweet touch. Enjoy the beautiful colors and textures!

Variations

Seasonal Flavors to Try

You can change the flavor of your vegan caramel apple overnight oats with the seasons. In autumn, use spiced apples with nutmeg or cloves. In winter, add warm vanilla and a touch of maple. In spring, try fresh berries to add brightness. For summer, mix in diced peaches or plums for a juicy twist. Each season brings new fruits and spices to brighten your oats.

Additional Toppings and Mix-Ins

To personalize your oats, think about fun toppings. You can add chia seeds for extra fiber. Dried fruits like raisins or cranberries add a nice chew. For crunch, sprinkle some granola on top. You can also try coconut flakes or dark chocolate chips. Each topping adds a new layer of flavor and texture.

Gluten-Free Options

If you need gluten-free oats, use certified gluten-free rolled oats. Most oats are naturally gluten-free, but cross-contamination can happen. Always check the package. You can also swap almond milk for any other plant-based milk, like oat or rice milk. These swaps keep your oats tasty and safe for all diets.

Storage Info

How to Store Leftovers

To keep your Vegan Caramel Apple Overnight Oats fresh, store them in the fridge. Place any leftovers in an airtight container. This helps keep them from drying out or absorbing other smells from your fridge. Your oats will stay good for about three to five days.

Best Containers for Overnight Oats

I recommend using glass jars or plastic containers for storing your oats. Mason jars work great because they are easy to seal and look nice. Choose containers that are the right size for your portion. This way, you won’t waste any oats.

Reheating Instructions

If you like your oats warm, you can heat them up. Just transfer the oats to a microwave-safe bowl. Heat them in short bursts, about 30 seconds at a time. Stir between heating to make sure they warm evenly. If they feel too thick, add a splash of almond milk to smooth them out. Enjoy your cozy breakfast!

FAQs

Can I use different types of milk?

Yes, you can use any plant-based milk. Almond, oat, or soy milk work well. Each type gives a unique flavor and texture. Almond milk adds a nutty taste, while oat milk is creamier. Just pick what you like best!

How long do overnight oats last in the fridge?

Overnight oats stay fresh for up to five days in the fridge. Store them in airtight containers. This way, you can make a batch and grab it throughout the week. Just be sure to stir them before eating.

Can I double the recipe for meal prep?

Absolutely! Doubling the recipe is easy and smart for meal prep. Just mix everything in a larger bowl. Divide the mixture into jars or containers. This makes breakfast quick and delicious for the whole week!

You learned about key ingredients for overnight oats and smart substitutes. I shared tips on choosing the best apples and preparing your oat mixture. You now know layering tricks and how to store leftovers safely. Experiment with flavors, toppings, and different containers.

Overnight oats are easy, tasty, and versatile. Enjoy customizing your creation. Aim for balance in flavors and textures to make it just right for you.

To make Vegan Caramel Apple Overnight Oats, gather these simple items: - 1 cup rolled oats - 1 ½ cups almond milk (or any plant-based milk) - 1 medium apple, diced (preferably a sweeter variety like Fuji or Honeycrisp) - 2 tablespoons maple syrup - 1 tablespoon almond butter - 1 teaspoon cinnamon - ½ teaspoon vanilla extract - 2 tablespoons coconut sugar (for the caramel flavor) - ¼ cup chopped nuts (walnuts or pecans) - A pinch of sea salt You can easily swap out some ingredients if needed. Use oat milk or soy milk instead of almond milk. Peanut butter works well if you don’t have almond butter. For a sweeter taste, try agave syrup in place of maple syrup. You can also replace coconut sugar with brown sugar if that’s what you have on hand. The key is to keep it plant-based while matching your taste. When selecting apples, look for varieties that are sweet and crisp. Fuji and Honeycrisp are my top picks. They add a nice sweetness to the oats. Choose apples that are firm and free from blemishes. If you like a tart flavor, try Granny Smith apples. They balance the sweetness from the other ingredients well. Always wash your apples before using them, as this keeps your dish fresh and clean. Start by grabbing a mixing bowl. Add 1 cup of rolled oats and 1 ½ cups of almond milk. Pour in 2 tablespoons of maple syrup and 1 tablespoon of almond butter. Next, sprinkle in 1 teaspoon of cinnamon and ½ teaspoon of vanilla extract. Mix well until everything blends together. Now, fold in 1 diced apple and ¼ cup of chopped nuts. Save some apple and nuts for later. This mixture is the base for your oats. Take your oat mixture and spoon it into jars or bowls. To make it fun, create layers. Add some of the oat mix, then a layer of chopped apple, and a sprinkle of coconut sugar. Repeat this until the jars are full. This method makes your oats look pretty and tasty. You can see the different layers when you serve them. Cover the jars with lids or plastic wrap and place them in the fridge. Let them chill overnight or for at least 4 hours. This is key for thickening the oats and blending the flavors. In the morning, stir the oats. If they seem too thick, splash in more almond milk. This helps you get the right texture. Enjoy them topped with the reserved apple pieces, nuts, and a drizzle of maple syrup for extra sweetness. To make your oats creamy, use rolled oats instead of instant oats. Rolled oats soak up liquid well and create a smooth texture. Use almond milk, or any plant-based milk you like. A good ratio is 1 cup of oats to 1.5 cups of milk. This helps the oats soften overnight. Stir well to mix everything together. If your oats are too thick in the morning, just add a splash of milk. Sweetness is key in your vegan caramel apple overnight oats. Start with 2 tablespoons of maple syrup. You can add more if you want it sweeter. The coconut sugar adds a nice caramel flavor, so don’t skip it! You can also add more cinnamon for extra warmth. Taste your mixture before refrigerating. Adjust the flavors to match your preferences. Presentation makes a dish more fun. Serve your oats in clear jars to show off the layers. Top with extra diced apples and a sprinkle of cinnamon. Chopped nuts add crunch and a nice look. A drizzle of maple syrup on top makes it even better. You can also add a few chocolate chips for a sweet touch. Enjoy the beautiful colors and textures! {{image_2}} You can change the flavor of your vegan caramel apple overnight oats with the seasons. In autumn, use spiced apples with nutmeg or cloves. In winter, add warm vanilla and a touch of maple. In spring, try fresh berries to add brightness. For summer, mix in diced peaches or plums for a juicy twist. Each season brings new fruits and spices to brighten your oats. To personalize your oats, think about fun toppings. You can add chia seeds for extra fiber. Dried fruits like raisins or cranberries add a nice chew. For crunch, sprinkle some granola on top. You can also try coconut flakes or dark chocolate chips. Each topping adds a new layer of flavor and texture. If you need gluten-free oats, use certified gluten-free rolled oats. Most oats are naturally gluten-free, but cross-contamination can happen. Always check the package. You can also swap almond milk for any other plant-based milk, like oat or rice milk. These swaps keep your oats tasty and safe for all diets. To keep your Vegan Caramel Apple Overnight Oats fresh, store them in the fridge. Place any leftovers in an airtight container. This helps keep them from drying out or absorbing other smells from your fridge. Your oats will stay good for about three to five days. I recommend using glass jars or plastic containers for storing your oats. Mason jars work great because they are easy to seal and look nice. Choose containers that are the right size for your portion. This way, you won’t waste any oats. If you like your oats warm, you can heat them up. Just transfer the oats to a microwave-safe bowl. Heat them in short bursts, about 30 seconds at a time. Stir between heating to make sure they warm evenly. If they feel too thick, add a splash of almond milk to smooth them out. Enjoy your cozy breakfast! Yes, you can use any plant-based milk. Almond, oat, or soy milk work well. Each type gives a unique flavor and texture. Almond milk adds a nutty taste, while oat milk is creamier. Just pick what you like best! Overnight oats stay fresh for up to five days in the fridge. Store them in airtight containers. This way, you can make a batch and grab it throughout the week. Just be sure to stir them before eating. Absolutely! Doubling the recipe is easy and smart for meal prep. Just mix everything in a larger bowl. Divide the mixture into jars or containers. This makes breakfast quick and delicious for the whole week! You learned about key ingredients for overnight oats and smart substitutes. I shared tips on choosing the best apples and preparing your oat mixture. You now know layering tricks and how to store leftovers safely. Experiment with flavors, toppings, and different containers. Overnight oats are easy, tasty, and versatile. Enjoy customizing your creation. Aim for balance in flavors and textures to make it just right for you.

Vegan Caramel Apple Overnight Oats

Start your day with a delicious twist on breakfast—Vegan Caramel Apple Overnight Oats! This easy recipe combines rolled oats, almond milk, fresh apples, and a hint of caramel flavor for a nutritious and satisfying meal. Perfectly layered in jars, these oats are not only delicious but also visually appealing. Click through to discover how to create this simple and wholesome breakfast that will keep you full and energized!
Print Recipe Pin Recipe

Ingredients
  

1 cup rolled oats

1 ½ cups almond milk (or any plant-based milk)

1 medium apple, diced (preferably a sweeter variety like Fuji or Honeycrisp)

2 tablespoons maple syrup

1 tablespoon almond butter

1 teaspoon cinnamon

½ teaspoon vanilla extract

2 tablespoons coconut sugar (for the caramel flavor)

¼ cup chopped nuts (walnuts or pecans)

A pinch of sea salt

Instructions
 

In a mixing bowl, combine the rolled oats, almond milk, maple syrup, almond butter, cinnamon, and vanilla extract. Stir well until all ingredients are fully incorporated.

    Fold in the diced apple and chopped nuts, reserving some apple and nuts for garnish if desired.

      In a small bowl, mix together the coconut sugar and a tiny pinch of sea salt. This will give your oats a caramel-like flavor.

        Layer the oat mixture in jars or bowls. For a fun twist, alternate layers of the oat mixture with additional chopped apples and a sprinkle of the coconut sugar mixture to simulate layers of caramel.

          Cover the jars or bowls with lids or plastic wrap and refrigerate overnight, or for at least 4 hours, to allow the mixture to thicken and the flavors to meld.

            In the morning, give the oats a good stir. If the mixture is too thick, add a splash more almond milk to reach your desired consistency.

              Top the oats with the reserved apple pieces, a sprinkle of chopped nuts, and a drizzle of additional maple syrup if you want extra sweetness.

                Prep Time: 10 minutes | Total Time: 4+ hours | Servings: 2

                  - Presentation Tips: Serve in clear jars to showcase the layers and garnish with extra apple slices and a sprinkle of cinnamon on top.

                    Related Recipes

                    • - 2 cups fresh blueberries - 1 cup Greek yogurt (vanilla or plain) - 1/4 cup honey or maple syrup - 1/2 cup coconut milk - Juice of 1 lemon - Zest of 1 lemon - A pinch of salt To make Blueberry Lemon Yogurt Popsicles, gather these fresh ingredients. You need ripe blueberries for the best flavor. Greek yogurt adds creaminess and protein. Honey or maple syrup sweetens the pops. Coconut milk gives a smooth texture and a hint of tropical taste. The juice and zest of one lemon bring a bright, zesty kick. Finally, a pinch of salt enhances all the flavors. Using fresh blueberries is key. They burst with juice and add natural sweetness. If you can’t find fresh berries, frozen ones work too, but they may change the texture slightly. Greek yogurt is a great choice, as it thickens the mix and gives a nice tang. If you prefer a dairy-free option, try a plant-based yogurt. When sweetening, adjust to your taste. Honey has a floral note, while maple syrup offers a richer flavor. The coconut milk adds creaminess and helps with freezing. Lemon juice brightens the pops, while lemon zest adds a fragrant touch. The pinch of salt balances the sweetness and highlights the flavors. Make sure to measure carefully for the best results. Once you have these ingredients, you’re ready to blend and create a delightful summer treat! 1. Combine the fresh blueberries, Greek yogurt, honey (or maple syrup), coconut milk, lemon juice, lemon zest, and a pinch of salt in a blender. 2. Blend the mixture until it is smooth and creamy. You want a nice, consistent texture. 3. Taste the mixture and adjust the sweetness if needed. Add more honey or maple syrup if you like it sweeter. 1. Pour the blueberry yogurt mixture into popsicle molds. Fill them about 3/4 full to allow for expansion as they freeze. 2. Insert sticks into the molds. Gently tap the molds on the counter to remove any air bubbles. 3. Freeze the popsicles for at least 4-6 hours, or until they are completely solid. 1. To release the popsicles, run warm water over the outside of the molds for a few seconds. This will help loosen them. 2. Serve the popsicles on a colorful platter. For a fun look, garnish with whole blueberries and a sprinkle of lemon zest. - Best practices for blending ingredients: Start with the blueberries at the bottom. This helps them blend better. Add yogurt and coconut milk next. Blend on a low speed first, then increase to high. This method makes the mixture smooth and creamy. - How to achieve creamier popsicles: Use full-fat Greek yogurt for the best texture. It adds richness and creaminess. Coconut milk also helps. If you want extra creaminess, add more coconut milk or yogurt. - Filling molds too full: Always fill molds about 3/4 full. The mixture expands when frozen. If you fill them too full, they overflow and create a mess. - Over-blending or under-blending: Blend just until smooth. Over-blending can make the popsicles icy. Under-blending leaves chunks of fruit. Aim for a nice, even consistency. - Sweetening alternatives: Honey and maple syrup are great options. You can also use agave syrup or stevia. Taste the mix before pouring into molds. Adjust sweetness to your liking. - Balancing flavors with citrus: Lemon juice brightens the flavor. The zest adds a nice touch. If the mixture tastes too sweet, add a bit more lemon juice. This balances the flavors nicely. {{image_2}} You can make these popsicles even more fun! Add other fruits like strawberries or raspberries. These fruits mix well with blueberries. They bring a new taste and color. You can also infuse herbs like mint or basil. Just add a few leaves when blending. This adds a fresh twist to your treats. Need dairy-free options? Use almond milk or oat milk instead of coconut milk. Swap the Greek yogurt for dairy-free yogurt. For a low-sugar version, use less honey or maple syrup. You can also try stevia or monk fruit sweetener. These options keep your popsicles tasty and light. Get creative with your popsicles! Make holiday-themed treats by adding festive colors. For example, use red fruits for Christmas or orange for Halloween. You can also create colorful swirls. Blend purees of different fruits and layer them in your molds. This not only looks great but tastes amazing too! Freezing popsicles requires some care to keep them tasty. First, make sure your popsicle molds are clean and dry before filling. This helps avoid any odd flavors. Fill the molds about three-quarters full. This allows space for the mixture to expand when frozen. Once filled, insert the sticks carefully. If you tap them on the counter, it helps release air bubbles. To maintain flavor and texture, wrap the molds tightly in plastic wrap after freezing. This prevents ice crystals from forming. Ice crystals can ruin the smooth texture you want in your popsicles. Blueberry lemon yogurt popsicles can last up to three months in the freezer if stored well. After that, they may lose flavor or texture. Check for signs of freezer burn, like white patches or dryness. If you see these, it’s best to toss them out. Cleaning your popsicle molds is simple. Rinse them with warm, soapy water and let them dry completely. Avoid using harsh scrubbers that might scratch them. Store molds in a cool, dry place to keep them in good shape. If you don’t have popsicle molds, use small cups or ice cube trays. Just insert wooden sticks or spoons in the center. These alternatives work well and are easy to find at home. I recommend using Greek yogurt for these popsicles. It has a thick texture and gives a creamy taste. Regular yogurt works too, but it may be thinner. Greek yogurt also adds protein, making the popsicles more filling. If you want a twist, try vanilla Greek yogurt for added flavor. Yes, you can use frozen blueberries. They are convenient and still tasty. Frozen berries may make your popsicles a bit looser when blended. Fresh blueberries offer a bright flavor and nice texture. If you use frozen berries, let them thaw for a few minutes before blending. The popsicles need at least 4-6 hours to freeze completely. If you want them to be extra firm, leave them in the freezer overnight. This way, they are ready for hot summer days. Be patient, as the waiting makes the treat even better! You can definitely make these popsicles without added sugar. Use ripe fruit for natural sweetness. You can also try mashed bananas or pureed dates. If you want a little sweetness, use honey or maple syrup. Just remember, different sweeteners can change the taste. You can make tasty and healthy popsicles using fresh ingredients. Blend blueberries, Greek yogurt, honey, and lemon for a creamy treat. Fill molds, freeze, and enjoy! Remember to balance flavors and avoid overfilling molds. Get creative with variations to keep things fun. These popsicles are easy to store and last long in the freezer. You now have the skills to make refreshing popsicles anytime! Enjoy experimenting with flavors and impress your friends and family.
                      Blueberry Lemon Yogurt Popsicles Refreshing Summer Treat
                    • To make Cookie Dough Greek Yogurt Bark, you will need these key ingredients: - 2 cups plain Greek yogurt - 1/4 cup honey or maple syrup - 1 teaspoon vanilla extract - 1/2 cup mini chocolate chips - 1/4 cup almond flour (or finely ground oats) - 1/4 cup chopped nuts (e.g., walnuts or pecans) - Pinch of sea salt These ingredients work together to create a creamy and tasty treat. The Greek yogurt gives the bark its smooth texture and protein punch. The honey or maple syrup adds just the right amount of sweetness. If you need alternatives, here are some ideas: - For Greek yogurt, use regular yogurt or a dairy-free option like coconut yogurt. - If you want a low-calorie sweetener, try stevia or agave syrup. These substitutes can help you fit your needs without losing flavor. To make your bark even more fun, consider these add-ins: - Dried fruit like cranberries or raisins for sweetness. - Shredded coconut for a tropical twist. - Different nuts like almonds or pecans for added crunch. These extras can make your bark unique and tasty. Feel free to mix and match based on what you love! To start, gather your ingredients. You need 2 cups of plain Greek yogurt, 1/4 cup of honey or maple syrup, and 1 teaspoon of vanilla extract. In a mixing bowl, combine the Greek yogurt, honey, and vanilla. Stir until smooth. Next, add 1/4 cup of almond flour and a pinch of sea salt. Mix until combined. This step adds texture and flavor. Finally, fold in 1/2 cup of mini chocolate chips and 1/4 cup of chopped nuts. These add a nice crunch and extra flavor. Now it’s time to spread the mixture. Line a baking sheet with parchment paper. Pour the yogurt mixture onto the sheet. Use a spatula to spread it into an even layer, about 1/2 inch thick. For extra taste, sprinkle some more chocolate chips and nuts on top. Press them lightly into the mixture. Place the baking sheet in the freezer. Freeze for about 2-3 hours or until the bark is firm. This freezing makes it easy to break into pieces later. Once the bark is frozen, take it out of the freezer. Remove the parchment paper carefully. You can break the bark into pieces or cut it into squares. Use a sharp knife for clean cuts. Store the pieces in an airtight container. Keep them in the freezer until you are ready to enjoy this treat. This helps keep the bark fresh and tasty. To get that creamy texture, start with thick Greek yogurt. It needs to be plain and full-fat. This gives the bark a rich taste. Mixing in almond flour helps create a nice bite. Make sure to blend it well with the yogurt. The mixture should feel smooth and thick. If it is too runny, the bark may not hold together. Use a spatula to spread it evenly on the baking sheet. This helps it freeze uniformly. You can easily change the flavors to fit your taste. Try adding a bit of cinnamon for warmth. You can also mix in other extracts like almond or hazelnut. For a fruity twist, add chopped dried fruits like cranberries or apricots. You can swap out the mini chocolate chips for dark chocolate or even white chocolate. If you want a nutty flavor, try using different nuts like pecans or hazelnuts. Feel free to be creative! A big mistake is not measuring the ingredients. Always use the right amounts for the best taste. Another mistake is not allowing enough freezing time. If the bark is not frozen long enough, it will be too soft. Avoid overmixing the yogurt mixture too. This can make it watery and thin. Lastly, remember to line your baking sheet with parchment paper. This makes it easier to remove the bark once it is frozen. {{image_2}} You can make a tasty, dairy-free version of this treat. Use coconut yogurt instead of Greek yogurt. It has a creamy texture and a subtle flavor. For sweetener, try agave syrup or maple syrup. These swaps keep it delicious without dairy. Don't forget to check labels to ensure your yogurt is dairy-free. Get creative with flavors! You can swap the vanilla extract for almond or hazelnut extract. This change adds a nutty twist. Want a fruity kick? Mix in some mashed banana or pureed strawberries. You can also try adding spices, like cinnamon or nutmeg. Each change gives your bark a unique taste. You can adjust your bark for the seasons. In fall, add pumpkin spice and chopped apples. For winter, mix in peppermint extract and crushed candy canes. In summer, try fresh berries and a hint of lemon zest. Each season brings fresh ideas to your bark, making it fun to enjoy year-round. To keep your Cookie Dough Greek Yogurt Bark fresh, store it in an airtight container. Make sure the container is freezer-safe. This will help prevent freezer burn. If you have leftover pieces, you can layer them with parchment paper. This way, they won’t stick together. When you're ready to enjoy a piece, take it out of the freezer. Let it sit at room temperature for about 5 minutes. This helps to soften it just enough for easy munching. When stored properly, your bark can last up to two months in the freezer. This means you can make a big batch and enjoy it later. Just remember: the fresher the bark, the better it tastes. I recommend eating it within a month for the best flavor and texture. Cookie Dough Greek Yogurt Bark is great on its own. But you can also pair it with fresh fruit like strawberries or bananas. For a fun twist, serve it with a drizzle of chocolate sauce. It makes a great snack for kids and adults alike. You can even break it into smaller pieces and add it to a smoothie for a sweet treat. Remember, the possibilities are endless! You can use other types of yogurt, but Greek yogurt works best. It gives a thick texture and creamy taste. If you use regular yogurt, the bark may not hold its shape as well. You can try dairy-free options too, but check if they are thick enough. To make this bark vegan, use dairy-free yogurt. Coconut yogurt or almond yogurt are great choices. Substitute honey with maple syrup or agave nectar. This way, you keep the sweetness without using animal products. Yes, you can use alternative sweeteners. Stevia, agave syrup, or monk fruit sweetener work well. Just remember to adjust the amount based on sweetness level. This keeps the bark tasty without adding extra sugar. Absolutely! Adding protein powder is a great idea. It boosts nutrition and keeps you full longer. Mix in a scoop of your favorite flavor when combining the yogurt. Make sure to blend well for even flavor throughout the bark. This blog post covered how to make delicious cookie dough Greek yogurt bark. We discussed key ingredients, substitutes, and fun add-ins that boost flavor and crunch. I detailed preparation and freezing steps, plus tips for perfect texture and common mistakes to avoid. We explored dairy-free options, unique flavors, and how to store it well. Remember, you can customize this bark to fit your taste. Enjoy creating this treat and share it with friends and family!
                      Cookie Dough Greek Yogurt Bark Creamy and Simple Treat
                    • - 1 ½ cups all-purpose flour - 1 tablespoon cocoa powder - ½ teaspoon baking powder - ½ teaspoon baking soda - ¼ teaspoon salt - ½ cup unsalted butter, softened - 1 cup granulated sugar - 1 large egg - 1 teaspoon vanilla extract - 1 tablespoon red food coloring - ½ cup powdered sugar (for dusting) For all-purpose flour, you can use cake flour for a softer cookie. If you want a gluten-free option, try almond flour or a gluten-free blend. Instead of unsalted butter, you can use margarine. Just keep in mind that it may change the taste slightly. You might replace granulated sugar with coconut sugar for a different sweetness. Make sure to adjust amounts based on what you like. You can add white chocolate chips or chopped nuts for extra texture. Crushed peppermint candies are great for a holiday twist. If you love cream cheese, consider making a cream cheese frosting drizzle. Just mix cream cheese, butter, and powdered sugar until smooth, then drizzle it over the cookies. To start, preheat your oven to 350°F (175°C). Line two baking sheets with parchment paper. This helps cookies bake evenly. In a medium bowl, sift together the flour, cocoa powder, baking powder, baking soda, and salt. This mix is key for texture. Set this bowl aside. In a large bowl, cream the softened butter and granulated sugar. Use an electric mixer for 2-3 minutes. You want it light and fluffy. Next, beat in one large egg, one teaspoon of vanilla extract, and one tablespoon of red food coloring. Mix until everything is smooth and the color is bright. Gradually add your dry ingredients to the wet mix. Stir until just combined. Be careful not to overmix. Chill the dough in the refrigerator for at least 30 minutes. This makes it easier to handle when forming cookies. After chilling, take the dough out. Use a cookie scoop or tablespoon to scoop out the dough. Form each scoop into a ball. Then, roll each ball in powdered sugar. Make sure they are fully coated. This will create that crinkle look when baked. Place the cookie dough balls on the prepared baking sheets. Leave enough space between each ball for spreading. Now it’s time to bake! Put the baking sheets in the oven. Bake for 10-12 minutes. The edges should be set, but the centers will look slightly underbaked. This gives the cookies a soft texture. Once done, take them out and let the cookies cool on the sheets for 5 minutes. After that, transfer them to a wire rack to cool completely. Enjoy your beautiful, tasty Red Velvet Crinkle Cookies! To get the best texture for your red velvet crinkle cookies, follow these steps: - Use softened butter, not melted. Softened butter helps create a light and fluffy mix. - Chill your dough for at least 30 minutes. Cold dough makes it easier to shape. - Don’t overmix the dough. Mix until just combined for soft, tender cookies. Here are some common mistakes to avoid when baking: - Forgetting to preheat your oven can lead to uneven baking. Always preheat first. - Not measuring flour correctly can make cookies dry. Use a spoon to scoop, then level. - Baking cookies too long makes them hard. Watch the edges; they should be set, but centers can look soft. Having the right tools makes baking fun and easy: - Use a good electric mixer for creaming butter and sugar. - A cookie scoop helps shape uniform cookie balls. - Parchment paper prevents sticking and makes cleanup easy. - A wire rack cools cookies evenly, keeping them soft. {{image_2}} You can easily change the flavor of your Red Velvet Crinkle Cookies. Want a hint of chocolate? Add more cocoa powder. Craving something fruity? Toss in some dried cherries or raspberries. You can also add a teaspoon of almond extract for a nutty twist. These small changes make a big impact on taste. Red velvet is classic, but you can switch up the color for fun. Use blue or green food coloring for a unique look. This works well for themed parties or holidays. For Halloween, try orange or purple! These colors can match your event and make the cookies even more special. If you need a gluten-free option, swap the all-purpose flour with a gluten-free blend. Make sure the blend has xanthan gum for the best texture. For a vegan version, replace the butter with coconut oil and the egg with a flax egg (1 tablespoon of ground flaxseed mixed with 2.5 tablespoons of water). These adjustments keep the cookies tasty while fitting your dietary needs. To keep your Red Velvet Crinkle Cookies fresh, store them in an airtight container. Line the container with parchment paper. This helps to absorb moisture. Place a layer of cookies, then add more parchment paper between layers. This keeps them from sticking together. You can also use a zip-top bag if you don’t have a container. Just remove as much air as possible before sealing. Freezing your cookies is a great way to save them for later. First, let the cookies cool completely. Then, place them in a single layer on a baking sheet. Freeze for about an hour. Once frozen, transfer them to an airtight container or a zip-top bag. This helps to keep the cookies from getting freezer burn. They can last in the freezer for up to three months. When ready to eat, let them thaw at room temperature. Red Velvet Crinkle Cookies stay fresh for about five days at room temperature. If stored correctly in an airtight container, they can last even longer. You can also refrigerate them to extend their shelf life. In the fridge, they can stay good for about a week. Always check for any signs of spoilage before eating. Enjoy these tasty treats while they are fresh! You can use beet juice for a natural option. It gives a nice red hue. Pomegranate juice works too but may change the cookie's taste. If you want, you can skip the coloring. The cookies will still taste great! Look for edges that are set. The centers should look a bit soft. A slight shine means they are ready. They will firm up as they cool. Trust your eyes, but a timer helps too! Yes, you can! Chill the dough and store it in the fridge. It lasts for up to three days. You can also freeze it for up to three months. Just thaw before baking for best results. These cookies pair nicely with milk or coffee. Try them with vanilla ice cream for a treat! You can also serve them at parties with other sweets. They add a fun splash of color to any dessert table. To sum up, we explored the essential ingredients, detailed steps, and handy tips for perfect Red Velvet Crinkle Cookies. Remember to measure your ingredients carefully and consider great mix-ins. Avoid common mistakes for the best texture. You can also try fun variations or make them gluten-free. Store your cookies properly to enjoy longer. These easy steps will help you bake delicious cookies every time. Now, it's time to make your baking dreams a reality!
                      Red Velvet Crinkle Cookies Irresistible and Tasty Treat
                    • - 3 ripe bananas, mashed - 1/3 cup melted butter - 1/2 cup granulated sugar - 1 large egg, beaten - 1 teaspoon vanilla extract - 1 teaspoon baking soda - A pinch of salt - 1 cup all-purpose flour - 1/2 cup Nutella (or chocolate hazelnut spread) - 1/2 cup chopped walnuts (optional) - Alternatives for bananas: You can use unsweetened applesauce. This adds moisture and sweetness. - Gluten-free options for flour: Try using almond flour or a gluten-free blend. Both work well. - Nutella substitutes: Use any chocolate hazelnut spread or even peanut butter for a twist. - Ripe bananas for sweetness: The riper the bananas, the sweeter the bread. Look for brown spots. - Choosing the right chocolate spread: A high-quality chocolate spread adds rich flavor. It makes your bread extra special. First, set your oven to 350°F (175°C). This helps the bread bake evenly. While the oven heats up, grab a 9x5 inch loaf pan. Grease it well with butter or baking spray. This prevents the bread from sticking and makes for easy removal later. In a big bowl, take your three ripe bananas and mash them. You want them smooth and creamy. Next, pour in 1/3 cup of melted butter. Mix them together until combined. Now, add 1/2 cup of granulated sugar, one beaten egg, and 1 teaspoon of vanilla extract. Stir this mixture well. You want all the ingredients to blend nicely. Now, sprinkle 1 teaspoon of baking soda and a pinch of salt over the wet mix. Stir just until combined. Do not overmix! Next, gently fold in 1 cup of all-purpose flour. Keep folding until you see no dry flour. If you like nuts, mix in 1/2 cup of chopped walnuts at this point. Pour half of the banana batter into your greased loaf pan. Next, take 1/2 cup of Nutella and spoon dollops over the batter. Use a knife or skewer to swirl the Nutella gently into the batter. Be careful not to mix it too much! Pour the rest of the banana batter on top. Again, add dollops of Nutella and swirl gently. This creates that beautiful marbled look. Now, it's time to bake! Place the loaf pan in the preheated oven. Bake for about 50-60 minutes. To check if it’s done, insert a toothpick into the center. If it comes out clean, your bread is ready. Let it cool in the pan for 10 minutes before moving it to a wire rack to cool completely. Enjoy your delicious creation! To get the best texture, mash your bananas well. They should be smooth, with no lumps. The right consistency helps the bread rise nicely. When mixing the batter, stop as soon as you no longer see dry flour. Overmixing can make the bread tough. One big mistake is using unripe bananas. Ripe bananas are sweeter and add moisture. They should have brown spots for the best flavor. Also, pay close attention to baking time. Overbaking dries out the bread, while underbaking leaves it gooey. Always check with a toothpick. This bread is delicious plain, but you can make it even better. Serve it warm with a pat of butter. For a treat, add a scoop of ice cream on top. Pair it with coffee or a glass of milk for a perfect snack. Enjoy it at breakfast or as a dessert! {{image_2}} You can enhance your Banana Nutella Swirl Bread with spices. Adding cinnamon or nutmeg gives a warm touch. These spices blend well with the banana and chocolate flavors. You can start with a half teaspoon of each. This small change can make a big difference. You can also experiment with different nuts. While walnuts are classic, try pecans or hazelnuts. Each nut adds a unique taste and texture to the bread. Toasting the nuts first can boost their flavor. Just remember to chop them coarsely for great bites. If you're looking for vegan options, I have some ideas. Swap the egg for a flaxseed or chia seed mixture. Combine one tablespoon of seeds with three tablespoons of water and let it sit for five minutes. Use this as a perfect egg substitute. For a low-sugar version, try using mashed dates or applesauce. These natural sweeteners work well in banana bread. You can also reduce the granulated sugar by half. This way, you keep the bread sweet but healthier. Many cultures have their own takes on banana bread. For instance, in Brazil, they often add coconut flakes. This gives a tropical twist that pairs well with chocolate. You can also try adding spices from your region. Incorporating local ingredients can make your bread unique. If you have access to local nuts or fruits, use them. This not only supports local farmers but adds personal flair to your baking. Each bite can tell a story of where you're from. To keep your Banana Nutella Swirl Bread fresh, store it at room temperature. Use a sealed container or a plastic bag. This helps to keep the bread soft. Avoid direct sunlight and heat sources. For best results, wrap the bread in plastic wrap before placing it in the container. This extra layer keeps moisture in. If you want to freeze your bread, slice it first. Place each slice in a freezer bag, removing as much air as possible. This prevents freezer burn and keeps the bread tasty. You can freeze the slices for up to three months. When you're ready to eat, thaw the slices at room temperature or warm them in the toaster. This method revives the flavor and texture. At room temperature, the bread lasts about three days. After that, it may start to dry out. Look for a few signs that the bread has gone bad. If you see mold or notice an off smell, it’s best to toss it. Freshness is key to enjoying this treat. Yes, you can use frozen bananas! Just thaw them first. Frozen bananas work great in baking. They become mushy, which helps mix easily. You can mash them right after thawing. This adds natural sweetness to your bread. Remember to drain any excess liquid before mixing. To check if the bread is done, use a toothpick. Insert it into the center of the bread. If it comes out clean, the bread is ready. Look for a golden-brown color on top. The edges may pull away from the pan slightly. This means your bread is baked perfectly! There are many fun ways to use leftover Nutella! You can spread it on toast or pancakes. Add it to smoothies for a chocolaty twist. Use it as a dip for fruits like strawberries or apples. You can also swirl it into yogurt or oatmeal for extra flavor. You now have a complete guide to making Banana Nutella Swirl Bread. We covered key ingredients, simple instructions, and tips to avoid mistakes. You learned about ingredient substitutions and the importance of quality. Plus, we discussed variations to make this recipe your own. Remember, the best results come from ripe bananas and careful baking. Enjoy every slice, and feel free to experiment with flavors! Happy baking!
                      Delicious Banana Nutella Swirl Bread Easy Recipe

                    WANT TO SAVE THIS RECIPE?

                    Leave a Reply Cancel reply

                    Your email address will not be published. Required fields are marked *

                    Recipe Rating


                    Hi I’m Taling

                    I love sharing perfected dishes from my kitchen. I’m sure they’ll earn a spot in your heart. Let’s savor this journey together!.

                    More about me

                    Recent Desserts

                    • To make Vegan Caramel Apple Overnight Oats, gather these simple items: - 1 cup rolled oats - 1 ½ cups almond milk (or any plant-based milk) - 1 medium apple, diced (preferably a sweeter variety like Fuji or Honeycrisp) - 2 tablespoons maple syrup - 1 tablespoon almond butter - 1 teaspoon cinnamon - ½ teaspoon vanilla extract - 2 tablespoons coconut sugar (for the caramel flavor) - ¼ cup chopped nuts (walnuts or pecans) - A pinch of sea salt You can easily swap out some ingredients if needed. Use oat milk or soy milk instead of almond milk. Peanut butter works well if you don’t have almond butter. For a sweeter taste, try agave syrup in place of maple syrup. You can also replace coconut sugar with brown sugar if that’s what you have on hand. The key is to keep it plant-based while matching your taste. When selecting apples, look for varieties that are sweet and crisp. Fuji and Honeycrisp are my top picks. They add a nice sweetness to the oats. Choose apples that are firm and free from blemishes. If you like a tart flavor, try Granny Smith apples. They balance the sweetness from the other ingredients well. Always wash your apples before using them, as this keeps your dish fresh and clean. Start by grabbing a mixing bowl. Add 1 cup of rolled oats and 1 ½ cups of almond milk. Pour in 2 tablespoons of maple syrup and 1 tablespoon of almond butter. Next, sprinkle in 1 teaspoon of cinnamon and ½ teaspoon of vanilla extract. Mix well until everything blends together. Now, fold in 1 diced apple and ¼ cup of chopped nuts. Save some apple and nuts for later. This mixture is the base for your oats. Take your oat mixture and spoon it into jars or bowls. To make it fun, create layers. Add some of the oat mix, then a layer of chopped apple, and a sprinkle of coconut sugar. Repeat this until the jars are full. This method makes your oats look pretty and tasty. You can see the different layers when you serve them. Cover the jars with lids or plastic wrap and place them in the fridge. Let them chill overnight or for at least 4 hours. This is key for thickening the oats and blending the flavors. In the morning, stir the oats. If they seem too thick, splash in more almond milk. This helps you get the right texture. Enjoy them topped with the reserved apple pieces, nuts, and a drizzle of maple syrup for extra sweetness. To make your oats creamy, use rolled oats instead of instant oats. Rolled oats soak up liquid well and create a smooth texture. Use almond milk, or any plant-based milk you like. A good ratio is 1 cup of oats to 1.5 cups of milk. This helps the oats soften overnight. Stir well to mix everything together. If your oats are too thick in the morning, just add a splash of milk. Sweetness is key in your vegan caramel apple overnight oats. Start with 2 tablespoons of maple syrup. You can add more if you want it sweeter. The coconut sugar adds a nice caramel flavor, so don’t skip it! You can also add more cinnamon for extra warmth. Taste your mixture before refrigerating. Adjust the flavors to match your preferences. Presentation makes a dish more fun. Serve your oats in clear jars to show off the layers. Top with extra diced apples and a sprinkle of cinnamon. Chopped nuts add crunch and a nice look. A drizzle of maple syrup on top makes it even better. You can also add a few chocolate chips for a sweet touch. Enjoy the beautiful colors and textures! {{image_2}} You can change the flavor of your vegan caramel apple overnight oats with the seasons. In autumn, use spiced apples with nutmeg or cloves. In winter, add warm vanilla and a touch of maple. In spring, try fresh berries to add brightness. For summer, mix in diced peaches or plums for a juicy twist. Each season brings new fruits and spices to brighten your oats. To personalize your oats, think about fun toppings. You can add chia seeds for extra fiber. Dried fruits like raisins or cranberries add a nice chew. For crunch, sprinkle some granola on top. You can also try coconut flakes or dark chocolate chips. Each topping adds a new layer of flavor and texture. If you need gluten-free oats, use certified gluten-free rolled oats. Most oats are naturally gluten-free, but cross-contamination can happen. Always check the package. You can also swap almond milk for any other plant-based milk, like oat or rice milk. These swaps keep your oats tasty and safe for all diets. To keep your Vegan Caramel Apple Overnight Oats fresh, store them in the fridge. Place any leftovers in an airtight container. This helps keep them from drying out or absorbing other smells from your fridge. Your oats will stay good for about three to five days. I recommend using glass jars or plastic containers for storing your oats. Mason jars work great because they are easy to seal and look nice. Choose containers that are the right size for your portion. This way, you won’t waste any oats. If you like your oats warm, you can heat them up. Just transfer the oats to a microwave-safe bowl. Heat them in short bursts, about 30 seconds at a time. Stir between heating to make sure they warm evenly. If they feel too thick, add a splash of almond milk to smooth them out. Enjoy your cozy breakfast! Yes, you can use any plant-based milk. Almond, oat, or soy milk work well. Each type gives a unique flavor and texture. Almond milk adds a nutty taste, while oat milk is creamier. Just pick what you like best! Overnight oats stay fresh for up to five days in the fridge. Store them in airtight containers. This way, you can make a batch and grab it throughout the week. Just be sure to stir them before eating. Absolutely! Doubling the recipe is easy and smart for meal prep. Just mix everything in a larger bowl. Divide the mixture into jars or containers. This makes breakfast quick and delicious for the whole week! You learned about key ingredients for overnight oats and smart substitutes. I shared tips on choosing the best apples and preparing your oat mixture. You now know layering tricks and how to store leftovers safely. Experiment with flavors, toppings, and different containers. Overnight oats are easy, tasty, and versatile. Enjoy customizing your creation. Aim for balance in flavors and textures to make it just right for you.
                      Vegan Caramel Apple Overnight Oats Simple Recipe
                    • - 2 cups old-fashioned rolled oats - 1 cup sliced almonds - ½ cup honey or maple syrup - ¼ cup coconut oil, melted - 1 teaspoon pure vanilla extract - ½ teaspoon cinnamon - ¼ teaspoon sea salt The main ingredients create a great base for your granola clusters. Old-fashioned rolled oats give you texture and fiber. Sliced almonds add crunch and protein. Honey or maple syrup provides natural sweetness. Coconut oil helps bind the granola and gives it a nice flavor. Vanilla extract adds a warm aroma. Cinnamon and sea salt enhance the taste, making it irresistible. - ½ cup dried fruit (e.g., cranberries or cherries) Adding dried fruit is optional but can enhance your granola. Dried cranberries or cherries bring a chewy texture. They also add a burst of flavor that contrasts nicely with the crunchy clusters. Feel free to mix in your favorite dried fruit to make it your own! - Benefits of oats and almonds - Natural sweeteners vs. processed sugars Oats are a fantastic source of fiber. They help keep you full and support heart health. Almonds provide healthy fats and protein. They are great for your skin and heart. Using honey or maple syrup makes the granola healthier than using processed sugars. Natural sweeteners offer flavor without the crash. This granola is a smart choice for breakfast or snacks! First, preheat your oven to 325°F (165°C). This helps your granola cook evenly. Next, line your baking sheet with parchment paper. This will make cleanup easy and prevent sticking. In a large mixing bowl, combine the rolled oats, sliced almonds, cinnamon, and sea salt. I like to stir these ingredients well to mix the flavors. This step is key for a tasty granola. In a separate bowl, whisk together the melted coconut oil, honey or maple syrup, and vanilla extract. This mixture brings sweetness and flavor. Make sure it is fully combined to coat the oats well. Now, pour the wet mixture over the dry ingredients. Stir gently but thoroughly to ensure even coating. Every oat should feel the love of the sweet mixture! Transfer the mixture to your prepared baking sheet. Press it down firmly with a spatula. This step is crucial for making clusters. Bake in the preheated oven for 20-25 minutes. Stir halfway through to ensure even baking. Look for a golden brown color. Once baked, allow the granola to cool completely on the baking sheet. This cooling time helps the granola harden and form clusters. After it cools, break the granola into clusters. If you like, mix in any dried fruit at this stage for extra flavor. Enjoy your crunchy and delicious snack! To get those perfect granola clusters, you must press the mixture down firmly. This step helps the granola stick together as it bakes. Use a spatula to compact the mix into an even layer on the baking sheet. This creates a solid base for your clusters. Also, bake at the right temperature, which is 325°F (165°C). This temperature ensures that the granola cooks evenly and gets that lovely golden color. You can easily change the flavor of your granola. Try adding spices like nutmeg or cardamom for a warm touch. You can also use different nuts or seeds. Swap sliced almonds for walnuts or pecans. This switch adds a unique crunch and flavor. You could even add seeds like pumpkin or sunflower for more texture. Presentation can make your granola even more appealing. Serve the clusters in mason jars or cute bowls. This adds a fun touch to your breakfast or snack. Drizzle with honey or almond butter for extra sweetness. A sprinkle of sliced almonds on top makes it look even better. Enjoy your beautiful and tasty creation! {{image_2}} If you need a nut-free option, try using seeds. Sunflower seeds or pumpkin seeds work great. They keep the crunch and add good flavor. Use them in the same amount as the sliced almonds. This way, you still get tasty granola clusters without nuts. You can mix things up! For a sweet twist, add chocolate chips to your granola. Chocolate chip vanilla almond granola clusters taste amazing. You can also try a maple pecan version. Just swap the almonds for pecans and add a splash of maple syrup. Both variations are sure to please. Get creative with seasonal flavors! In the fall, add dried cranberries or a sprinkle of pumpkin spice. This gives a warm, cozy taste. For summer, toss in some tropical fruits like dried mango or pineapple. It adds a fun, fruity vibe. Enjoy these variations to keep your granola exciting! Store your Vanilla Almond Granola Clusters in airtight containers. This keeps them fresh. Place the containers in a cool, dry spot. Avoid warm places to prevent moisture. When stored at room temperature, your granola lasts about two weeks. For longer storage, consider freezing it. Granola freezes well, and you can keep it for up to three months. Check the texture and smell of your granola. If it feels soft or chewy, it may be stale. A lack of aroma also means it’s time to toss it. Fresh granola should smell sweet and nutty. Homemade Vanilla Almond Granola Clusters last about two weeks when stored properly. Use an airtight container to keep them fresh. After two weeks, the granola may still be safe to eat but could lose its crunch. Yes, you can! Use certified gluten-free oats to make this recipe gluten-free. Many brands offer gluten-free oats, which are safe for those with gluten sensitivities. Granola clusters are great with yogurt or smoothie bowls. You can also sprinkle them on oatmeal or mix them into your favorite cereal. They add a nice crunch and flavor. To lower sugar, use less honey or maple syrup. You can also try unsweetened applesauce or mashed bananas. These options keep the flavor and texture while cutting back on sugar. Making Vanilla Almond Granola Clusters is easy and fun. You learned the main ingredients needed, like oats and almonds, and how to combine them. I shared tips for perfect clusters and fun variations to try. Storage methods keep your granola fresh longer. Homemade granola is tasty and healthier than store-bought. It’s a great snack or breakfast option. Enjoy making this recipe and customizing it to your taste!
                      Vanilla Almond Granola Clusters Crunchy and Delicious
                    • - 3 ripe peaches, peeled and pitted - 1 cup fresh raspberries Fresh fruits are the stars of this sorbet. Ripe peaches give it a sweet, juicy base. They should feel soft when you gently press them. Fresh raspberries add a tangy burst of flavor. Their bright color makes the sorbet look beautiful. - ½ cup granulated sugar - 1 cup water - 2 tablespoons lemon juice We use granulated sugar to sweeten the sorbet. It mixes well with the fruit and makes a simple syrup. Water helps the sugar dissolve easily. Lemon juice adds a bit of zing. It balances the sweetness and brings out the fruit's natural flavors. - A pinch of salt Salt is a secret ingredient here. It enhances the flavors and makes the sorbet taste better. Just a small pinch will do. It helps all the sweet and tart notes shine through. First, we make a simple syrup. In a medium saucepan, combine 1 cup of water with ½ cup of granulated sugar. Heat this over medium heat. Stir until the sugar dissolves completely. This usually takes just a few minutes. Once the sugar dissolves, remove the saucepan from the heat. Let the syrup cool to room temperature. This syrup will add sweetness to our sorbet. Now, we will prepare the fruit. Take 3 ripe peaches, peel them, and remove the pits. Then, rinse 1 cup of fresh raspberries. Place the peaches and raspberries in a blender or food processor. Blend them until the mixture is smooth. You want a creamy texture without any chunks. This will create the rich base for our sorbet. Next, we combine everything. Pour the cooled simple syrup into the blender with the fruit. Add 2 tablespoons of lemon juice and a pinch of salt. Blend again until all the ingredients mix well. Taste the mixture. If it needs more sweetness, add a little sugar or extra raspberries and blend again. Now, transfer this mixture into a shallow container. Place it in the freezer. Every 30 minutes, stir the mixture to break up any ice crystals. This will take about 4 hours. When it is fully frozen and smooth, it’s ready to serve. Use a scoop to dish it up into bowls. Enjoy your peach raspberry sorbet! To make your sorbet shine, you can adjust the sweetness. Taste the mix before freezing. If it's not sweet enough, add a bit more sugar. You can also use extra raspberries for a bolder flavor. Try mixing in other fruits for fun. You can use strawberries, blackberries, or even mango. Each fruit brings its own taste to the sorbet. This way, you can create many yummy flavors! To avoid ice crystals, stir the sorbet every 30 minutes while it freezes. This helps keep it smooth and creamy. If you skip this step, the sorbet may turn icy. Use a shallow container for freezing. A wider surface area helps the sorbet freeze faster and stay smooth. Glass or metal containers work best. They help cool the mixture evenly. For a lovely presentation, serve the sorbet in chilled bowls. This keeps it cold for longer. You might want to garnish it with fresh raspberries or mint leaves. This adds color and extra flavor to your dish. Another idea is to create a layered dessert. You can serve sorbet with yogurt or fresh fruit. This not only makes it pretty but also adds more taste and texture to enjoy! {{image_2}} You can switch out fruits for fun flavors. Try using seasonal fruits like strawberries or mangoes. They add a new twist to your sorbet. You can mix peaches with blackberries, too. Each fruit brings its own sweetness and taste. Adding herbs or spices can also change the flavor. A little mint can make your sorbet refreshing. You might like a hint of ginger for a spicy kick. Experimenting with different combinations keeps things exciting. If you want to cut down on sugar, try sugar substitutes. Agave syrup or honey can work well in this recipe. Just remember to adjust the amount since they are sweeter. This way, you can enjoy a tasty treat without all the sugar. For a dairy-free option, you can leave out any cream. This sorbet is already dairy-free, making it perfect for those with allergies. You can enjoy this cool treat without any worries. To keep your peach raspberry sorbet fresh, choose the right container. I recommend using a shallow, airtight container. This helps the sorbet freeze evenly. You can also use a glass or plastic container with a tight lid. Avoid metal containers, as they can cause freezer burns. When storing your sorbet, freeze it quickly. After you finish freezing it, press a piece of plastic wrap directly onto the surface. This helps keep out air and moisture. Always ensure the lid is on tight before placing it back in the freezer. Your peach raspberry sorbet can last up to two weeks in the freezer. After that, it may lose its flavor and texture. To enjoy it at its best, try to eat it within this time frame. Watch for signs of spoilage. If you see ice crystals forming on the surface, that means it is starting to lose quality. If the sorbet has an off smell or odd color, it's best to toss it. Always trust your senses when enjoying this tasty treat! You can make sorbet by freezing the mixture manually. First, blend your fruits, sugar, and water. Once mixed, pour it into a shallow dish. Place it in the freezer. Every 30 minutes, stir it with a fork. This breaks up ice and keeps it smooth. Repeat until it’s fully frozen, usually about 4 hours. Yes, you can use frozen fruit. Just make sure to thaw it a bit before blending. This helps with blending. You might need less sugar since frozen fruit can be sweeter. Taste the mixture and adjust as needed. To soften sorbet, take it out of the freezer a few minutes before serving. Let it sit at room temperature for 5 to 10 minutes. You can also scoop it and place it in the fridge for a short time. This helps it reach the right texture. Sorbet is often seen as a healthier option than ice cream. It usually has less fat since it doesn’t contain cream. Sorbet is made mainly from fruit and sugar. However, it can still have a lot of sugar. Always check labels if you buy it. Fresh fruit sorbet is a great way to enjoy sweet flavors with fewer calories. In summary, we covered how to make delightful sorbet using fresh fruits like peaches and raspberries. You learned about necessary ingredients like sugar and lemon juice, and how to blend them into a smooth mix. We also explored tips for enhancing flavor and achieving the perfect texture. Don’t forget to try different fruits or adjustments for your diet. With proper storage, your sorbet will last. Enjoy refreshing treats with this simple method! Create your unique flavors and share them with others.
                      Peach Raspberry Sorbet Refreshing Summer Treat
                    • To make these delightful bars, you need the following key ingredients: - 1 cup all-purpose flour - ¼ cup powdered sugar - ½ cup unsalted butter, softened - ¼ teaspoon salt - 2 large eggs - 1 cup granulated sugar - ¼ cup freshly squeezed lemon juice - Zest of 1 lemon - 1 cup fresh raspberries These ingredients create a tasty treat that is both sweet and tangy. The flour and butter make a nice crust, while the eggs and sugar give the filling a smooth texture. Fresh lemon juice and zest add a bright flavor, and raspberries give a burst of color and taste. You can add some optional ingredients to make your bars even better: - Extra powdered sugar for dusting This optional dusting gives a lovely finish to the bars. It adds a touch of sweetness and makes the bars look even more appealing. Having the right tools makes cooking easier. For this recipe, you will need: - 8x8 inch baking dish - Parchment paper - Mixing bowls - Whisk - Spatula Using parchment paper helps lift the bars out easily. A whisk is great for mixing the filling smoothly. These tools will help you create perfect Raspberry Lemonade Bars every time. First, you need to preheat your oven to 350°F (175°C). This step is key to getting the bars baked just right. Next, grab an 8x8 inch baking dish. Line it with parchment paper. Leave some paper hanging over the sides. This will help you lift the bars out later. In a medium bowl, mix together these four ingredients: - 1 cup all-purpose flour - ¼ cup powdered sugar - ½ cup unsalted butter, softened - ¼ teaspoon salt Stir them well until the mix forms a crumbly dough. Then, press this dough into the bottom of your lined baking dish. Make sure to spread it evenly. Bake this crust for about 15 minutes, or until it turns a light golden color. While the crust bakes, you can prepare the filling. In another bowl, whisk together: - 2 large eggs - 1 cup granulated sugar - ¼ cup freshly squeezed lemon juice - Zest of 1 lemon Mix these until they are smooth and combined. Next, gently fold in 1 cup of fresh raspberries. Be careful not to crush them too much. You want to keep some whole for a nice texture. Once the crust is ready, pour the raspberry-lemon filling over it. Return the dish to the oven and bake for an extra 20-25 minutes. The filling should be set and slightly golden on top when done. After baking, let the bars cool completely in the dish on a wire rack. When cool, use the parchment paper to lift the bars out and cut them into squares. If you like, you can dust the tops with extra powdered sugar before serving. To make a great crust, use cold butter. It keeps the crust flaky. Mix the flour, powdered sugar, and salt well. This helps the flavors blend. Press the dough firmly into the baking dish. Make sure it’s even. Bake until it’s lightly golden. This gives a perfect base for your filling. For a smooth filling, whisk the eggs well. Mix in the granulated sugar until it’s blended. Add the lemon juice and zest next. This gives a bright flavor. Gently fold in the raspberries. Be careful not to mash them. You want some berries whole for texture. This makes every bite exciting. When serving, cut the bars into neat squares. Dust them with powdered sugar for a sweet touch. Use a sharp knife for clean edges. Arrange them on a colorful plate. This makes for a pretty display. You can also add fresh raspberries on top. This adds a nice pop of color. Enjoy with a glass of lemonade for a refreshing treat! {{image_2}} You can switch up the fruit in these bars. Try using blueberries or strawberries. Each fruit gives a unique taste. I love the sweet and tart mix of peach and lemon. You can blend fruits too. For instance, mix raspberries with blackberries for a berry blast! To make these bars gluten-free, swap all-purpose flour with almond or coconut flour. These flours add flavor and texture. You may need to adjust the amounts. Almond flour is heavier, so use less. Coconut flour absorbs more moisture, so add extra liquid. Want to spice things up? Add fresh mint or basil for a herbal twist. You can also mix in a pinch of cinnamon for warmth. If you like spicy, try a dash of cayenne pepper. These small changes can make a big impact on taste! To keep your Raspberry Lemonade Bars fresh, store them in an airtight container. They will stay good at room temperature for up to two days. If you want to keep them longer, place them in the fridge. They can last about a week when chilled. Always make sure to cover them well to prevent them from drying out. You can freeze these bars for longer storage. First, cut them into squares. Wrap each piece tightly in plastic wrap. Then, place them in a freezer-safe bag or container. They will stay fresh in the freezer for up to three months. When you’re ready to enjoy them, just thaw them in the fridge overnight. If you want to warm your Raspberry Lemonade Bars, use the oven. Preheat your oven to 300°F (150°C). Place the bars on a baking sheet and heat for about 10 minutes. This will make them warm and soft without losing their flavor. Avoid using the microwave, as it can make the bars soggy. Enjoy your delicious treat! Yes, you can use frozen raspberries. They work well in this recipe. Just remember to thaw them first. Drain any extra water to keep the filling from being too runny. This way, your bars stay firm and tasty. To add more tartness, increase the lemon juice. Try adding an extra tablespoon. You can also add a bit more lemon zest. This will boost the lemon flavor and balance the sweetness of the raspberries. The best way to cut the bars is using a sharp knife. First, let the bars cool completely. Use the parchment paper to lift them out. Then, run the knife under hot water for clean cuts. Wipe the knife dry between cuts for neat squares. Raspberry Lemonade Bars last up to five days in the fridge. Store them in an airtight container. If you want to keep them longer, you can freeze them for up to three months. Just make sure to wrap them tightly before freezing. Raspberry Lemonade Bars are easy to make and delicious. We covered key ingredients, step-by-step baking, and helpful tips. You can also try different fruit or gluten-free options. Remember to store them right for the best taste. These bars are great for sharing or enjoying at home. I hope you feel inspired to create your own tasty treats. Enjoy the sweet and tangy flavors!
                      Raspberry Lemonade Bars Refreshing Summer Treat

                    Recent Drinks

                    • To make a delicious Turmeric Golden Milk Latte, gather these simple ingredients: - 2 cups almond milk (or your preferred milk) - 1 teaspoon ground turmeric - ½ teaspoon ground ginger - ¼ teaspoon cinnamon - 1 tablespoon honey or maple syrup (adjust to taste) - Pinch of black pepper - ½ teaspoon vanilla extract - Optional: a sprinkle of nutmeg for garnish - Almond Milk: This milk is low in calories and rich in vitamins. It helps with heart health. - Turmeric: This spice has curcumin, known for its anti-inflammatory properties. It may help improve brain function. - Ginger: Ginger can help with digestion and nausea. It adds a nice warmth to the drink. - Cinnamon: This spice is rich in antioxidants. It may help lower blood sugar and improve heart health. - Honey or Maple Syrup: Both sweeteners can boost energy. They also provide antioxidants. - Black Pepper: This spice enhances turmeric absorption. It makes the drink more effective. - Vanilla Extract: It adds flavor and can help reduce stress. - Nutmeg: This spice is optional, but it adds warmth and a nice aroma. - Milk Options: You can use oat milk, soy milk, or coconut milk for different flavors. - Sweeteners: If you prefer, try agave syrup or stevia as sugar-free options. - Spices: Experiment with cardamom or cloves for added flavor. - Nutmeg: You can skip it if you don't like nutmeg, or use a touch of cocoa powder instead. 1. Start by taking a small saucepan. 2. Add 2 cups of almond milk to the pan. 3. Measure and add 1 teaspoon of ground turmeric. 4. Next, add ½ teaspoon of ground ginger. 5. Sprinkle in ¼ teaspoon of cinnamon. 6. Sweeten your drink with 1 tablespoon of honey or maple syrup. 7. Don't forget a pinch of black pepper for better absorption of turmeric. 8. Lastly, add ½ teaspoon of vanilla extract. 9. Whisk all the ingredients well in the pan. 10. Place the saucepan on medium heat. 11. Gently warm the mixture while stirring often. 12. Keep an eye on it; do not let it boil. 13. After about 5-7 minutes, it should be hot enough. 14. Remove the pan from heat and let it cool slightly. 15. If you want a frothy drink, use a milk frother or whisk it quickly. 16. Pour the golden milk into your favorite mugs. 17. Optionally, sprinkle a bit of nutmeg on top for a nice touch. 18. Serve warm and enjoy this comforting drink! - Always use a whisk to blend the spices into the milk. - Whisking helps mix the turmeric and other spices evenly. - When heating, keep the heat low to avoid scalding the milk. - Stir often to prevent sticking at the bottom of the pan. - If you see steam but no bubbles, you are at the right temperature. - A milk frother works wonders for a smooth, frothy finish. - If you don’t have a frother, whisk vigorously by hand. - Frothing adds air, giving the latte a creamy feel. - The more you froth, the lighter and fluffier your drink will become. - For an extra touch, froth some almond milk separately and top your latte with it. You can mix spices to make your turmeric latte tastier. Try adding a pinch of nutmeg or a dash of cardamom. These spices add warmth to the drink. You can also use fresh ginger instead of ground ginger. This will give your latte a bright, zesty kick. Just remember, fresh ginger may need more time to steep. Many people rush the heating process. Always warm your milk slowly over medium heat. If you boil it, the spices can lose flavor. Another mistake is not blending the spices well. Make sure to whisk the mixture thoroughly. This helps avoid clumps of turmeric or ginger. Lastly, avoid skipping the black pepper. It helps your body absorb turmeric better. Sweetness is personal. Start with one tablespoon of honey or maple syrup. Taste your latte and add more if you like it sweeter. For creaminess, use full-fat coconut milk for a richer feel. Almond milk is lighter but still delicious. You can also mix almond and coconut milk for the best of both worlds. {{image_2}} You can easily make this latte vegan. Just use almond milk, coconut milk, or oat milk. These milks work great in this recipe. They keep the drink creamy and delicious. If you want a nut-free option, oat milk is the best choice. It blends well with turmeric and spices. To make an iced version, start with brewed turmeric milk. Follow the same steps but let it cool. Pour over ice instead of serving warm. This drink is refreshing on hot days. You can also add some ice cream for a treat! You can mix and match flavors for fun. Try adding matcha for a green twist. This adds a fresh taste and boosts energy. You can also use cocoa for a chocolatey version. The cocoa pairs well with turmeric and spices. For a special touch, add a dash of vanilla extract. This enhances the overall flavor and aroma. To store leftover turmeric golden milk, let it cool first. Then, pour it into an airtight container. Keep it in the fridge for up to three days. This way, you can enjoy the drink again without losing its flavor. When reheating your golden milk, do it gently. Pour it into a small saucepan. Heat it over low to medium heat. Stir it often to avoid burning. Never let it boil, as this can change the taste and texture. You can also use a microwave. Heat in short bursts, stirring in between. Turmeric golden milk lasts about three days in the fridge. Check for signs of spoilage. If it smells sour or has any mold, discard it. Always trust your senses. If it looks or smells off, it’s best to throw it away. Turmeric has many health benefits. It is known for its bright yellow color and active compound called curcumin. Curcumin may help reduce inflammation. It can also support joint health. Some studies suggest it may boost your mood. Turmeric might even help with digestion. Drinking turmeric may also support your immune system. Yes, you can use any milk you like. Almond milk is great, but coconut milk adds creaminess. Oat milk is a good choice for a thicker texture. If you prefer dairy, whole or skim milk works too. Just remember, different types of milk will change the flavor a bit. To make this recipe sugar-free, skip the honey or maple syrup. You can use a sugar substitute like stevia or monk fruit instead. These options will give you sweetness without the calories. Just adjust the amount to your taste. Yes, it is safe for most people to have turmeric daily. Using it in cooking or drinks is a great way to enjoy its benefits. However, if you have health issues or take certain medications, check with a doctor first. Moderation is key, as with any food. In this blog post, we explored the ingredients and health benefits of Turmeric Golden Milk. I shared step-by-step instructions for making it frothy and delicious. We also discovered tips, tricks, and variations to enhance your drink. Proper storage and reheating advice can help you enjoy leftovers. Remember, turmeric offers many health benefits, so enjoy this drink often. Use alternative ingredients if you prefer. With these ideas, you can create the perfect golden milk to suit your taste and health needs. Enjoy your journey to wellness!
                      Turmeric Golden Milk Latte Simple and Creamy Recipe
                    • - 1 ripe mango, peeled and diced - 1 cup fresh pineapple chunks - 1 banana, sliced - 1 cup coconut water (or regular water) - ½ cup plain Greek yogurt (or dairy-free alternative) - 1 tablespoon honey or agave syrup (optional) - A handful of fresh mint leaves (for garnish) - Ice cubes (optional) The key to a delicious mango pineapple smoothie lies in its fresh ingredients. You want ripe fruits for the best flavor. The mango should feel soft when you squeeze it gently. Pineapples should smell sweet and fruity. This smoothie combines sweet mango, tangy pineapple, and creamy banana. Coconut water adds hydration, while Greek yogurt gives it a nice creaminess. You can add honey for extra sweetness if you like. Mint leaves add a refreshing touch when you serve it. Each ingredient plays a role in making this smoothie flavorful and refreshing. Trust me, using fresh ingredients will make a big difference in taste! To make this smoothie, start by gathering your main ingredients. You need a ripe mango, fresh pineapple, and a banana. 1. In a blender, combine the diced mango, pineapple chunks, and banana slices. This mix brings a burst of tropical flavor. 2. Next, add one cup of coconut water to the blender. This not only hydrates but also adds a refreshing twist. 3. For creaminess, pour in half a cup of plain Greek yogurt. If you want it sweeter, drizzle in one tablespoon of honey or agave syrup. 4. Blend on high until the mixture is smooth and creamy. If you like your smoothie chilled, toss in a few ice cubes and blend again until they are fully mixed in. 5. After blending, taste your smoothie. If it needs to be sweeter or thicker, add more honey or coconut water as needed. Once your smoothie is ready, it’s time to serve it. I recommend using tall glasses to show off the vibrant color. For a fun touch, garnish each glass with a few fresh mint leaves on top. This not only looks nice but also adds a fresh aroma. Enjoy your delicious Mango Pineapple Smoothie! For the Full Recipe, please refer back to the ingredient list and instructions. To get your smoothie just right, focus on creaminess. Use ripe fruits like mango and banana. The Greek yogurt adds a nice, smooth texture. If you want a richer taste, try full-fat yogurt. For a lighter feel, use low-fat or dairy-free yogurt. Adjust the thickness by adding more liquid. Coconut water is great for this. If your smoothie is too thick, just pour in a bit more. Blend again until it’s just how you like it. If you want a thicker smoothie, add more banana or ice cubes. Boosting flavor can take your smoothie to the next level. Try adding spices like cinnamon or ginger. These spices not only add warmth but also great health benefits. A dash of cinnamon can make the smoothie taste cozy. A pinch of ginger gives it a nice kick. You can also use flavored yogurts for extra taste. Vanilla or coconut yogurt work well. If you want sweetness, think about honey or agave syrup. These can make your smoothie more enjoyable. For a fun twist, try adding a splash of vanilla extract. It will add a lovely aroma to your drink. For a full taste experience, explore the [Full Recipe]. {{image_2}} You can change the fruit in your smoothie to keep it fresh. Adding strawberries or blueberries gives a sweet twist. These berries add a nice color and taste. You can also try using other tropical fruits like papaya or kiwi. These fruits bring new flavors and nutrients to your drink. Each fruit will change the smoothie’s taste and make it unique. If you want a dairy-free smoothie, swap the Greek yogurt for a plant-based option. Almond, coconut, or soy yogurt works well. These alternatives keep your smoothie creamy without dairy. For sweeteners, you can use maple syrup or agave syrup for a vegan choice. These options add sweetness while keeping your drink plant-based. Enjoy the fruity goodness in many ways! Don't forget to check the Full Recipe for more ideas. You may have some smoothie left after making your Mango Pineapple Smoothie. To keep it fresh, use a glass jar or a BPA-free plastic container. Seal it tightly to prevent air from spoiling the flavor. Store it in the fridge for up to 24 hours. After that, it may lose some taste and texture. If you want to enjoy the smoothie later, freezing is a great option. Pour the smoothie into ice cube trays or freezer-safe bags. Leave some space in the bags for expansion. You can freeze it for up to three months. When you’re ready to drink it, take out what you need. Thaw it in the fridge overnight or blend it straight from the freezer for a slushy treat. Enjoy your refreshing Mango Pineapple Smoothie anytime! Yes, you can make this smoothie ahead of time. If you want to save it, store it in an airtight container. Keep it in the fridge for up to one day. The smoothie may separate, so stir it well before you drink it. If you don’t have coconut water, use regular water or fruit juice instead. Fruit juice can add a nice flavor. You can also try almond milk for a creamier touch. Just remember, the taste will change a bit based on what you use. To make the smoothie thicker, add more Greek yogurt or a banana. You can also use frozen fruit instead of fresh. Frozen fruit gives you a nice, thick texture. Just blend it well, and you’ll get a creamy drink. Yes, this smoothie is great for kids! It is packed with fruits and tastes sweet. You can adjust the sweetness by adding less honey. The bright colors and fresh flavors will appeal to children, making it a fun treat. You can find the Full Recipe for the Tropical Bliss Mango Pineapple Smoothie above in this article. This will guide you through every step to create your own refreshing drink. This blog post covers a simple and tasty smoothie recipe. You learned about the key ingredients and their nutritional benefits. I provided steps to prepare and serve the smoothie perfectly. Tips for texture and flavor help you make it your own. You can explore variations to suit your tastes or dietary needs. Don’t forget storage tips to keep leftovers fresh. Enjoy your smoothie making journey. It’s all about trying new things and having fun!
                      Mango Pineapple Smoothie Refreshing and Flavorful Blend
                    • - 2 packets of frozen açaí puree - 1 ripe banana - 1 cup of fresh pineapple chunks - 1 cup of coconut milk (or any non-dairy milk) - 1 tablespoon of honey or agave syrup (optional) For a vibrant tropical taste, the main ingredients are key. Açaí puree brings rich color and flavor. It is full of antioxidants. Bananas add creaminess and natural sweetness. Fresh pineapple gives a bright, juicy touch. Coconut milk offers a smooth base. You can use any non-dairy milk you prefer. Honey or agave syrup adds sweetness if needed. - Sliced kiwi - Coconut flakes - Granola - Chia seeds - Fresh berries (e.g., strawberries, blueberries) Toppings make your smoothie bowl pop! Sliced kiwi adds a zesty kick. Coconut flakes give it a tropical crunch. Granola provides texture and flavor. Chia seeds offer extra nutrients. Fresh berries, like strawberries and blueberries, add color and taste. You can mix and match these toppings for a fun look. For the full recipe, please refer to the section above. 1. Blend the ingredients Start by adding the frozen açaí puree, ripe banana, fresh pineapple chunks, and coconut milk into a blender. If you want it sweeter, you can add honey or agave syrup. Blend this mixture on high speed until it becomes creamy and smooth. 2. Adjust consistency with coconut milk If your smoothie is too thick, just add a bit more coconut milk. Blend again until you reach the texture you want. This step is key to making your smoothie bowl enjoyable. 3. Pour into a bowl Once blended, carefully pour the smoothie mixture into a bowl. Make sure to use a large enough bowl to hold all the goodness. 4. Add toppings creatively Now comes the fun part! Arrange your toppings, such as sliced kiwi, coconut flakes, granola, chia seeds, and fresh berries, over the smoothie. Try to create a colorful pattern. I love making a circular design to highlight all the vibrant colors. - Tips for presentation Use a shallow bowl to show off your beautiful toppings. You can also sprinkle some extra coconut flakes around the edge for a nice touch. A colorful presentation makes your smoothie bowl more fun to eat. - Recommended serving utensils Serve your smoothie bowl with a regular spoon. If you want to make it more special, use a wooden spoon or a cute, colorful one. Enjoy your tropical treat right away to keep it fresh and tasty. For the full recipe, refer to the earlier sections. To make a great smoothie bowl, start with ripe fruits. Ripe fruits taste better and add natural sweetness. Look for bananas that are yellow with some brown spots. When it comes to pineapples, choose ones that smell sweet. It ensures they are juicy and fresh. Blending is key to your smoothie bowl. You want a smooth and creamy texture. If your mix is too thick, add more coconut milk. Blend again until you reach the right consistency. A good blend makes your bowl enjoyable and easy to eat. A colorful topping arrangement makes your smoothie bowl pop. Use fresh berries, sliced kiwi, and coconut flakes. Lay them out in a pattern. A circular design looks appealing and fun. To elevate your smoothie bowl's look, use bowls with interesting shapes. Tall bowls or wide, shallow ones can change the game. Garnish with a sprinkle of chia seeds for a fancy touch. This not only looks great but adds a bit of crunch too. {{image_2}} You can change the non-dairy milk for this smoothie. Almond, soy, or oat milk work well. Each milk adds a different taste. Try using seasonal fruits too. Mango, papaya, or berries add a fresh twist. You can mix and match to find your favorite blend. Want more nutrients? Add spinach or kale to your smoothie. They blend well and boost health. You won’t even taste them! For extra energy, stir in nut butter or protein powder. Both will make your smoothie more filling. They add great flavor too! You can also experiment with different combinations to find the best taste for you. To store leftovers, place your smoothie bowl in the fridge. Use a tight container to keep it fresh. Glass or BPA-free plastic works well for storage. I prefer glass because it keeps flavors better. You can freeze smoothie bowls for later. Just pour the mixture into an airtight container. Leave some space at the top, as it will expand when frozen. To defrost, place it in the fridge overnight. If you’re in a rush, you can use the microwave. Just heat it in short bursts to avoid cooking. Enjoy your tropical treat later with ease! For the recipe, check out the Full Recipe. What is açaí and what are its benefits? Açaí is a small, dark purple berry from Brazil. It is full of antioxidants, which help fight free radicals in the body. Açaí is also rich in fiber, promoting good digestion. Plus, it has healthy fats that support heart health. You can enjoy its fruity taste in many dishes. Can I make this smoothie bowl ahead of time? Yes! You can prepare the smoothie mix and store it in the fridge for up to 24 hours. Just remember to keep the toppings separate. This way, your bowl stays fresh and tasty. How can I make this recipe vegan or gluten-free? To make it vegan, use agave syrup instead of honey. For gluten-free, ensure your granola and any other toppings are gluten-free. Most fruits and coconut milk are naturally gluten-free, so you’re all set! Can I substitute açaí with other fruits? Yes, you can! If you can’t find açaí, try using frozen berries like blueberries or strawberries. These fruits will add sweetness and a burst of color to your bowl. What to do if the smoothie is too thick? If your smoothie is too thick, just add a little more coconut milk. Blend again until you reach your desired creaminess. This will make it easier to pour and enjoy. How to fix a smoothie bowl that tastes too bland? If your smoothie bowl lacks flavor, try adding a splash of vanilla extract or a pinch of salt. You can also mix in a bit of honey or agave syrup for sweetness. Adjust the toppings to add more taste and texture. This article covers how to make a delicious açaí smoothie bowl. You learned about the key ingredients, easy steps for preparation, and creative topping ideas. I shared tips to improve taste and presentation, plus fun variations to try. Don’t forget storage techniques to keep your bowl fresh. With all this information, you can enjoy a tasty and nutritious treat anytime. Get creative with your favorites and make this recipe truly yours. Enjoy every bite!
                      Tropical Acai Smoothie Bowl Energizing Healthy Treat
                    • - 1 cup plain yogurt - ½ cup coconut milk - 1 cup fresh blueberries (plus extra for garnish) - 2 tablespoons honey or agave syrup (adjust to taste) - ½ teaspoon vanilla extract - A pinch of cardamom powder - Ice cubes (optional) Using fresh ingredients makes a big difference in taste. Fresh blueberries burst with flavor and nutrients. They give the lassi a bright color and a sweet taste. If you can’t find fresh blueberries, frozen ones work too. They are picked at their peak and frozen quickly. This helps keep their taste and nutrients. However, fresh blueberries always add a better texture. Each ingredient in this lassi has great health benefits. - Plain yogurt: Full of protein and good for your gut health. - Coconut milk: Contains healthy fats that can boost energy. - Blueberries: Packed with antioxidants, they help fight disease. - Honey or agave syrup: Adds sweetness and has some vitamins. - Vanilla extract: Adds flavor and may reduce stress. - Cardamom powder: Can aid digestion and add a warm spice note. This Blueberry Coconut Lassi is not just tasty; it’s also good for you! Start by gathering all your ingredients. This makes the process easier and faster. You will need: - 1 cup plain yogurt - ½ cup coconut milk - 1 cup fresh blueberries (plus extra for garnish) - 2 tablespoons honey or agave syrup (adjust to taste) - ½ teaspoon vanilla extract - A pinch of cardamom powder - Ice cubes (optional) Make sure your blueberries are fresh and ripe. They add great flavor and color. If you want a sweeter lassi, adjust the honey or agave syrup to your taste. Now it’s time to blend! In a blender, combine the yogurt, coconut milk, blueberries, honey, vanilla extract, and cardamom powder. Blend on high speed until the mix is smooth and creamy. If you like a thinner drink, add more coconut milk. After blending, taste the lassi. You can add more honey if you want it sweeter. For a chilled treat, add ice cubes and blend again until frothy. Pour your lassi into tall, clear glasses. This shows off the pretty purple color. For a special touch, garnish with a few whole blueberries on top. You can also sprinkle a little cardamom powder for added flair. If you want to impress, add a slice of lime on the glass rim. This not only looks good but adds a nice contrast to the drink. Enjoy your refreshing Blueberry Coconut Lassi! For the full recipe, check the earlier section. For a thick and creamy lassi, use full-fat yogurt. This gives your drink a rich texture. If you want it thinner, add a bit more coconut milk. Blend it well until it's smooth. You can also try adding ice cubes. This makes it frothy and cold. Both honey and agave syrup are great for sweetness. Honey gives a floral taste, while agave is mild. Start with two tablespoons and taste it. If you want it sweeter, add more. Remember, you can always add more, but you can't take it out! You can make your lassi even better! Try adding a pinch of cinnamon or nutmeg for warmth. Fresh mint leaves can add a nice touch too. You might even add a splash of lime juice for a zesty kick. All these extras can make your blueberry coconut lassi unique and delicious. For the full recipe, check out the complete instructions. {{image_2}} You can easily make a vegan version of blueberry coconut lassi. Just swap the yogurt with a plant-based option. Use coconut yogurt or almond yogurt for a creamy base. These alternatives keep that rich flavor. They also add a nice texture. You still get the fresh taste from blueberries and coconut milk. This change makes the drink creamy without any dairy. Spices can enhance the flavor of your lassi. Cardamom adds a warm note. You can also try cinnamon for a sweet twist. If you want more fruit, think about adding bananas or mangoes. These fruits blend well with blueberries. They also boost the health benefits. Each adds its own flavor and richness to the drink. If you prefer different dairy options, there are many choices. Greek yogurt gives a thicker texture. It also adds a tangy taste. You can use regular yogurt instead of plain yogurt. It is a great way to change the flavor. Try using buttermilk for a unique twist. Each choice will change the texture and taste of your lassi. Each option keeps the drink creamy and delicious. For the full recipe, check out the link above. To keep your blueberry coconut lassi fresh, store it in a clean glass jar. Make sure the jar is airtight. This helps keep out air and bacteria. If you have leftovers, don’t let them sit out for long. Refrigerate the lassi within two hours of making it. Always use a spoon to scoop the lassi. Avoid using your fingers, as this can introduce germs. When stored properly, blueberry coconut lassi lasts about 2 to 3 days in the fridge. After that, the taste and texture may change. You will notice it may separate a bit. If this happens, just give it a good shake or blend it again. Always check for any off smells or changes in color before consuming. You can freeze blueberry coconut lassi for later enjoyment. Pour the lassi into ice cube trays or freezer-safe containers. Leave some space at the top, as liquids expand when frozen. To use, thaw the lassi in the fridge overnight or blend the frozen cubes into smoothies. This method keeps the flavor and nutrients intact. For the best taste, use frozen lassi within three months. For the full recipe, check out the earlier section! Yes, you can use Greek yogurt. It makes the lassi thicker and creamier. If you prefer a lighter drink, stick with plain yogurt. Greek yogurt has more protein, which is great for keeping you full. Just remember to adjust the coconut milk to balance the thickness. Absolutely! Blueberry Coconut Lassi is a fun and tasty drink for kids. It has natural sweetness from honey and blueberries. The yogurt provides healthy probiotics, good for digestion. Kids love the vibrant color and fruity flavor. You can make it as sweet as they like! You can find Blueberry Coconut Lassi at many health food stores or cafes. Some grocery stores may also carry it in the yogurt section. If you want a fresh one, try making it at home. You can easily whip up this drink with the Full Recipe I provided. Blueberry coconut lassi is a nutritious and tasty drink. You learned about key ingredients, like fresh blueberries and coconut. The blending process ensures a smooth drink. Adjust sweetness with honey or agave for your taste. You can try different fruits and spices to mix it up. Storing tips help you keep leftovers fresh. Remember, lassi is fun to make and enjoy. Experiment with variations to find your favorite way to drink it. Enjoy your delicious and healthy blueberry coconut lassi!
                      Blueberry Coconut Lassi Creamy and Refreshing Drink

                    Footer

                    ↑ back to top

                    More information

                    • Home
                    • Drinks
                    • Appetizer
                    • Dinner
                    • Desserts
                    • About
                    • Contact
                    • Privacy Policy

                    Our Policies

                    • Privacy Policy
                    • GDPR Policy
                    • Terms Of Use
                    • Copyright Policy
                    • Cookie Policy
                    • Disclaimer

                    Copyright © 2025 cheftaling