
Are you craving a meal that's creamy, comforting, and quick to make? This One-Pot Garlic Parmesan Orzo fits the bill perfectly! With just a few simple ingredients and easy steps, you can create a dish that dazzles your taste buds. Whether you want a quick weeknight dinner or a cozy family meal, this recipe has you covered. Let's dive into the delicious details and make cooking a breeze!

Ingredients
Essential Ingredients for One-Pot Garlic Parmesan Orzo
To make this creamy dish, you need just a few key items:
- 1 cup orzo pasta
- 3 cups vegetable broth
- 3 tablespoons butter
- 4 garlic cloves, minced
- 1 cup heavy cream
- 1 cup freshly grated Parmesan cheese
- 1 teaspoon dried Italian herbs
- Salt and pepper to taste
- Fresh parsley, chopped (for garnish)
These ingredients work together to create a rich and tasty meal. The orzo acts as the base, soaking up all the flavors. Garlic gives it a nice kick, while butter adds a lovely richness. Heavy cream and Parmesan make it wonderfully creamy.
Optional Ingredients for Enhanced Flavor
While the core ingredients shine, you can boost the flavor even more with:
- A squeeze of lemon juice for brightness
- Red pepper flakes for a bit of heat
- Cooked vegetables like spinach or peas for added nutrition
These extras can really elevate your dish. A touch of lemon can freshen up the creaminess. Red pepper flakes add a fun twist, and veggies make the meal more colorful.
Substitutions for Common Ingredients
If you're out of something or want to switch it up, here are some easy swaps:
- Substitute orzo with another small pasta, like ditalini or farro.
- Use chicken broth instead of vegetable broth for a meaty flavor.
- Swap heavy cream for half-and-half or a non-dairy option like coconut milk.
These substitutions help you tailor the dish to your pantry. Don't hesitate to get creative! Each change adds a unique twist to the classic recipe.
Step-by-Step Instructions
Preparation of Garlic and Orzo
Start by melting three tablespoons of butter in a large pot. Keep the heat at medium. Once the butter melts, add four minced garlic cloves. Cook the garlic for one to two minutes. Watch it closely to avoid burning. The goal is to get it fragrant. Now, add one cup of orzo pasta. Stir it in and let it toast for one to two minutes. This adds a nice flavor to the orzo.
Cooking the Orzo in Broth
Next, pour in three cups of vegetable broth. Bring this mixture to a boil. After it boils, lower the heat and let it simmer. Cover the pot and let the orzo cook for ten to twelve minutes. Stir it occasionally. The orzo should be al dente and most of the liquid should be absorbed.
Final Steps to Achieve Creaminess
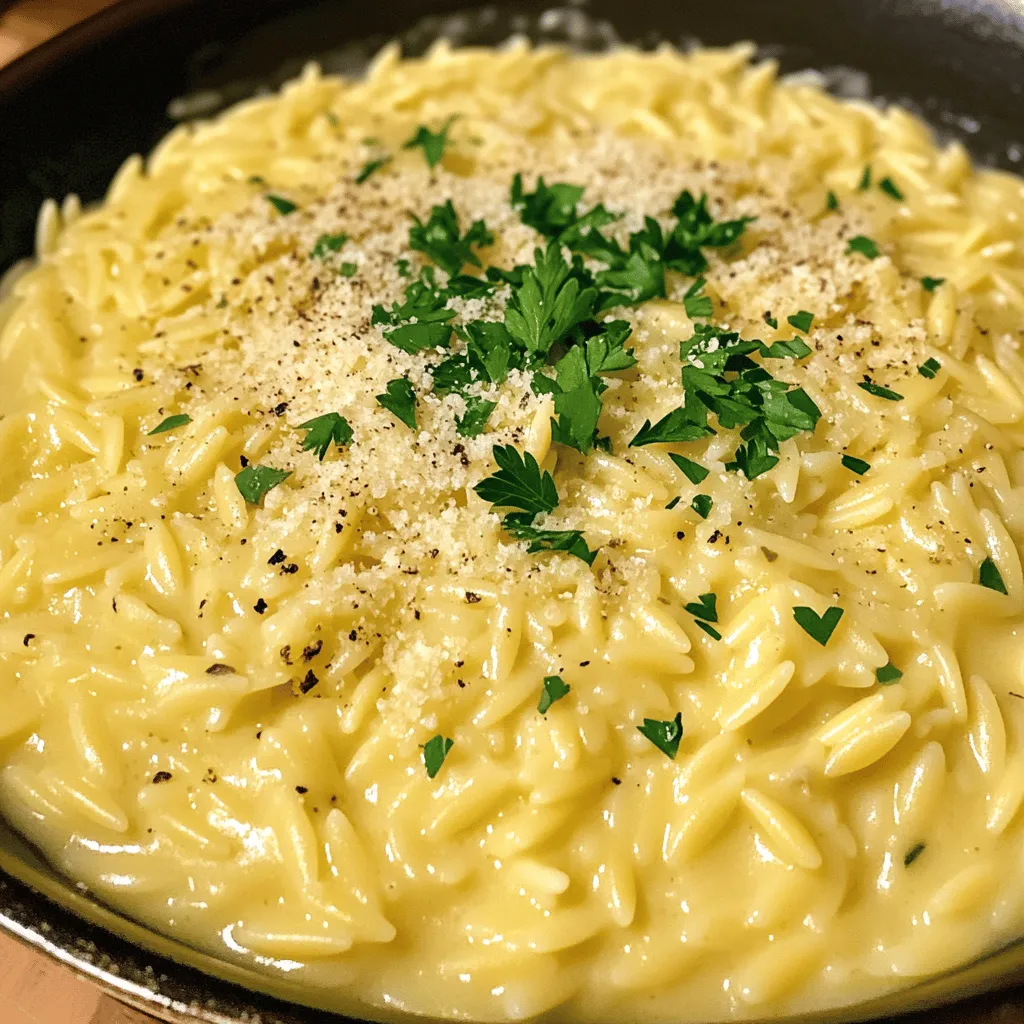
Once the orzo is cooked, lower the heat again. Add one cup of heavy cream and one cup of freshly grated Parmesan cheese. Stir this mixture well until the cheese melts. It should look creamy and delicious. Sprinkle one teaspoon of dried Italian herbs, along with salt and pepper to taste. Mix everything thoroughly. Remove the pot from heat and let it sit for a couple of minutes. This allows the orzo to thicken up. Finally, serve hot and garnish with freshly chopped parsley. Enjoy your creamy comfort meal!
Tips & Tricks
How to Achieve the Perfect Creamy Consistency
To get that dreamy creamy texture, use heavy cream. It blends well with the Parmesan cheese. Make sure to stir the mixture well after adding the cream and cheese. This helps mix everything evenly. Let it sit for a few minutes after cooking. This resting time helps it thicken just right. If the orzo seems too thick, add a splash more vegetable broth or cream.
Flavor Enhancements to Consider
Adding a splash of lemon juice lifts the flavors. It gives a nice bright taste. Fresh herbs like basil or thyme can also add depth. You might try red pepper flakes for a kick. Don't forget to taste as you go. Adjust salt and pepper to your liking. This way, you make the dish truly yours.
Common Mistakes to Avoid
One common mistake is not stirring enough. Stirring helps the orzo cook evenly and prevents sticking. Avoid cooking the garlic too long. Burnt garlic can ruin the dish. Lastly, don’t skip letting it rest before serving. This step helps the orzo absorb the sauce. Remember, patience pays off in creamy comfort meals!
Variations
Vegetable Add-ins for Extra Nutrition
You can boost the nutrition of your orzo dish easily. Try adding vegetables like spinach, peas, or cherry tomatoes. Just stir them in when the orzo is almost done cooking. This adds color and taste. You can also use bell peppers or zucchini for more crunch. These veggies will cook quickly and blend well with the creamy sauce.
Protein Options to Include in the Dish
Adding protein makes this meal even heartier. You can mix in cooked chicken, shrimp, or sausage. For a quick option, use rotisserie chicken. If you want to keep it light, try adding canned chickpeas or white beans. Mix in the protein just before serving to heat it through. This makes your dish filling and satisfying.
Creating a Vegan Version of One-Pot Garlic Parmesan Orzo
To make a vegan version, swap out the butter and cream. Use olive oil instead of butter and coconut cream or a cashew cream for richness. Replace Parmesan cheese with a vegan cheese alternative or nutritional yeast. This will give you that cheesy flavor without dairy. Follow the same steps, and you’ll have a creamy, plant-based meal that everyone will enjoy.
Storage Info
Best Practices for Refrigerating Leftovers
You can store your One-Pot Garlic Parmesan Orzo in the fridge for up to five days. Place the orzo in an airtight container. Make sure it cools down before sealing the lid. This keeps it fresh and tasty for your next meal.
Freezing Tips for One-Pot Garlic Parmesan Orzo
If you want to keep it longer, freeze the orzo. Use a freezer-safe container and fill it, leaving space for expansion. It’s best to freeze it within two days of cooking. To thaw, move it to the fridge overnight before reheating.
Reheating Instructions for Optimal Taste
When you’re ready to enjoy your orzo again, reheat it on the stove. Add a splash of vegetable broth or cream to help it regain its creamy texture. Heat over medium-low heat, stirring often. You can also use the microwave; just cover it and heat in short bursts, stirring in between.
FAQs
Can I use different types of pasta?
Yes, you can use other small pasta shapes like ditalini or small shells. The cooking time may change, so check the package for specifics. Make sure to adjust the liquid as needed. For best results, stick to pasta that cooks in about 10-12 minutes.
How do I make it gluten-free?
To make this dish gluten-free, simply swap the orzo with a gluten-free pasta. Many brands offer gluten-free orzo or similar shapes. Always check the labels to ensure they meet your dietary needs. The cooking time might vary, so keep an eye on it.
What can I serve with One-Pot Garlic Parmesan Orzo?
This orzo pairs well with grilled chicken or roasted vegetables. A fresh salad with a light vinaigrette also complements the dish nicely. You might enjoy it with crusty bread for a comforting meal. For a fun twist, try serving it with shrimp or scallops.
This blog post explored how to make One-Pot Garlic Parmesan Orzo. We discussed essential and optional ingredients, including substitutions. I provided step-by-step instructions to cook orzo with garlic and broth, ensuring creamy results. Helpful tips showed how to enhance flavors and avoid mistakes. We also covered variations with veggies, proteins, and a vegan option. Lastly, we shared best storage practices for leftovers. Enjoy this dish's simplicity and taste, and feel free to experiment with your favorite flavors. You’ll love how easy and satisfying it is!


Leave a Reply