
Are you ready to elevate your dinner game? Herb Roasted Sweet Potato Wedges are not just easy to make; they burst with flavor! You’ll love how simple ingredients like sweet potatoes, olive oil, and herbs can transform your meal. In this guide, I’ll share my tips and tricks for mastering this tasty dish, complete with variations and storage tips. Let’s get cooking deliciousness on your plate!
Ingredients
List of Required Ingredients
- 3 medium sweet potatoes
- 3 tablespoons olive oil
- 2 teaspoons dried oregano
- 2 teaspoons garlic powder
- 1 teaspoon paprika
- 1 teaspoon ground cumin
- Salt and pepper
- Fresh parsley (for garnish)
- Optional: Fresh lemon juice
Gather all your ingredients before you start cooking. The sweet potatoes are the stars here. They add sweetness and nutrition. Olive oil helps the spices stick and adds flavor. Dried oregano brings an earthy taste. Garlic powder adds depth, while paprika adds a hint of smokiness. Ground cumin gives warmth that rounds out the flavors. Don’t forget salt and pepper to enhance everything. Fresh parsley will brighten the dish when you serve it. If you like a tangy kick, fresh lemon juice is a great optional addition.
Step-by-Step Instructions
Preparation
- Preheat your oven to 425°F (220°C). This step is key for crispiness.
- In a large mixing bowl, combine:
- 3 tablespoons olive oil
- 2 teaspoons dried oregano
- 2 teaspoons garlic powder
- 1 teaspoon paprika
- 1 teaspoon ground cumin
- Salt and pepper to taste
Mix well to create a tasty herb-infused oil.
Coating Sweet Potatoes
- Cut 3 medium sweet potatoes into wedges.
- Add the wedges to the oil mixture.
- Toss them gently until each wedge is coated. This helps the flavors stick.
Roasting
- Line a baking sheet with parchment paper. This makes cleanup easier.
- Spread the coated sweet potato wedges in a single layer. Avoid overcrowding them.
- Roast in the oven for 25-30 minutes. Flip the wedges halfway through cooking.
- They are done when they turn golden brown and feel tender.
- For extra brightness, squeeze fresh lemon juice over the wedges.
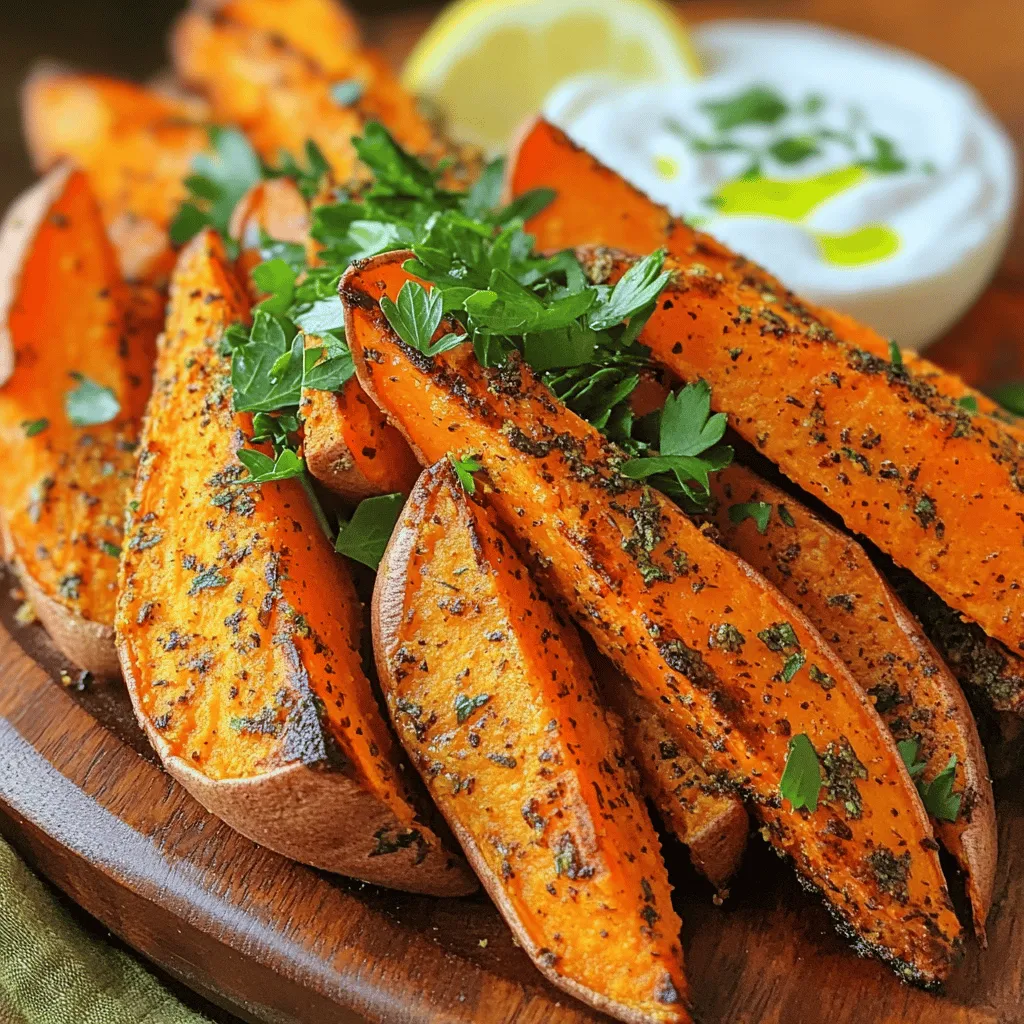
- Finally, garnish with freshly chopped parsley. Enjoy your delicious creation!
Tips & Tricks
Perfect Cooking Techniques
To make the best herb roasted sweet potato wedges, coat them evenly. Start by mixing the olive oil and spices in a bowl. This herb-infused oil will help the flavors stick. Once mixed, add the sweet potato wedges. Toss them until every wedge shines with oil and herbs. This step is key for great taste.
Spacing on the baking sheet matters too. If wedges touch, they will steam instead of roast. Spread them out in a single layer. This allows hot air to flow around each piece. You want crispy edges and soft centers.
Serving Suggestions
For a lovely presentation, serve the wedges on a rustic platter. You can also use the baking sheet for a casual look. Garnish with freshly chopped parsley for a pop of color.
Pair your sweet potato wedges with tasty dips. A yogurt sauce adds creaminess. A spicy aioli brings some heat. Both options make for a great flavor boost.
Flavor Enhancements
Want to change things up? Try adding spices or fresh herbs. A pinch of cayenne can give the wedges a kick. You can also switch dried oregano for fresh herbs.
Don't forget to adjust the seasoning. Taste the oil mix before adding the wedges. Add more salt or pepper if needed. This way, you can customize the flavors to your liking.

Variations
Alternative Seasonings
You can spice up your sweet potato wedges easily. If you love heat, try adding cayenne pepper. It gives a nice kick that warms the palate. Start with just a pinch. You can always add more if you like it spicy.
Using fresh herbs is another great option. Instead of dried oregano, try fresh rosemary or thyme. They add a burst of flavor. Chop them finely and mix them into your herb oil. Fresh herbs make the dish vibrant and tasty.
Different Cooking Methods
Air frying is a popular method for cooking sweet potato wedges. It makes them crispy without much oil. Set your air fryer to 400°F (200°C). Cook the wedges for about 15-20 minutes. Shake the basket halfway through for even cooking.
Grilling is another fun way to prepare these wedges. The grill adds a smoky flavor that’s hard to beat. After tossing in the herb oil, place them on a hot grill. Cook for about 10-15 minutes, turning often for nice grill marks.
Serving Styles
Herb roasted sweet potato wedges are perfect as a side dish. They pair well with grilled meats or fish. You can also enjoy them as a snack. Serve with a yogurt dip or spicy aioli for extra flavor.
For a healthy meal, add the wedges to salads or grain bowls. They add color and sweetness. Toss them with greens, nuts, and a light dressing. It makes for a filling and tasty meal.
Storage Info
Storing Leftovers
To keep your sweet potato wedges fresh, let them cool first. Place them in an airtight container. Store the container in the fridge. They will stay good for about 3 to 5 days. If you want to enjoy them later, make sure they are completely cooled before sealing.
Reheating Instructions
You can reheat your wedges in two ways: the oven or the microwave. The oven keeps them crispy. Preheat it to 375°F (190°C) and bake for about 10 minutes. If you use the microwave, heat them for 30 seconds at a time until warm. The microwave may make them softer.
Freezing Options
Freezing cooked sweet potato wedges is easy. Place cooled wedges in a freezer-safe bag. Seal it tightly, removing as much air as possible. They can last up to 3 months in the freezer. When you want to eat them, take them out and thaw overnight in the fridge. Reheat in the oven for the best texture.
FAQs
How to make herb roasted sweet potato wedges?
To make herb roasted sweet potato wedges, follow these easy steps:
1. First, preheat your oven to 425°F (220°C).
2. In a bowl, mix olive oil, oregano, garlic powder, paprika, cumin, salt, and pepper.
3. Cut three medium sweet potatoes into wedges and toss them in the oil mix.
4. Spread the wedges on a parchment-lined baking sheet.
5. Roast for 25-30 minutes, flipping halfway, until golden and tender.
6. Optional: Squeeze fresh lemon juice over the hot wedges and garnish with parsley.
Can I use other types of potatoes?
Yes, you can use other types of potatoes. Regular potatoes, such as russets or Yukon golds, work well. You can also use colorful potatoes for a fun twist. Each type changes the flavor and texture slightly. Sweet potatoes add a natural sweetness, while regular potatoes offer a more savory base.
How do I know when sweet potato wedges are done?
Sweet potato wedges are done when they are golden brown and soft inside. You can test them by poking with a fork; if it goes in easily, they are ready. Look for a crispy outside and a tender inside. This balance makes each bite delicious.
Can I make this recipe vegan?
Yes, this recipe is easily vegan. All the ingredients are plant-based. The olive oil, sweet potatoes, and spices are perfect for a vegan diet. If you want a creamy dip, try a vegan yogurt or tahini sauce on the side.
This blog post covered how to make tasty herb-roasted sweet potato wedges. We discussed the key ingredients, step-by-step instructions, and cooking tips. You learned about various flavors, cooking methods, and how to store leftovers.
Experimenting with spices or swapping potatoes can make this dish unique. Enjoy these wedges as a side or snack. Now, it’s your turn to put this knowledge to use and impress your friends and family in the kitchen!


Leave a Reply