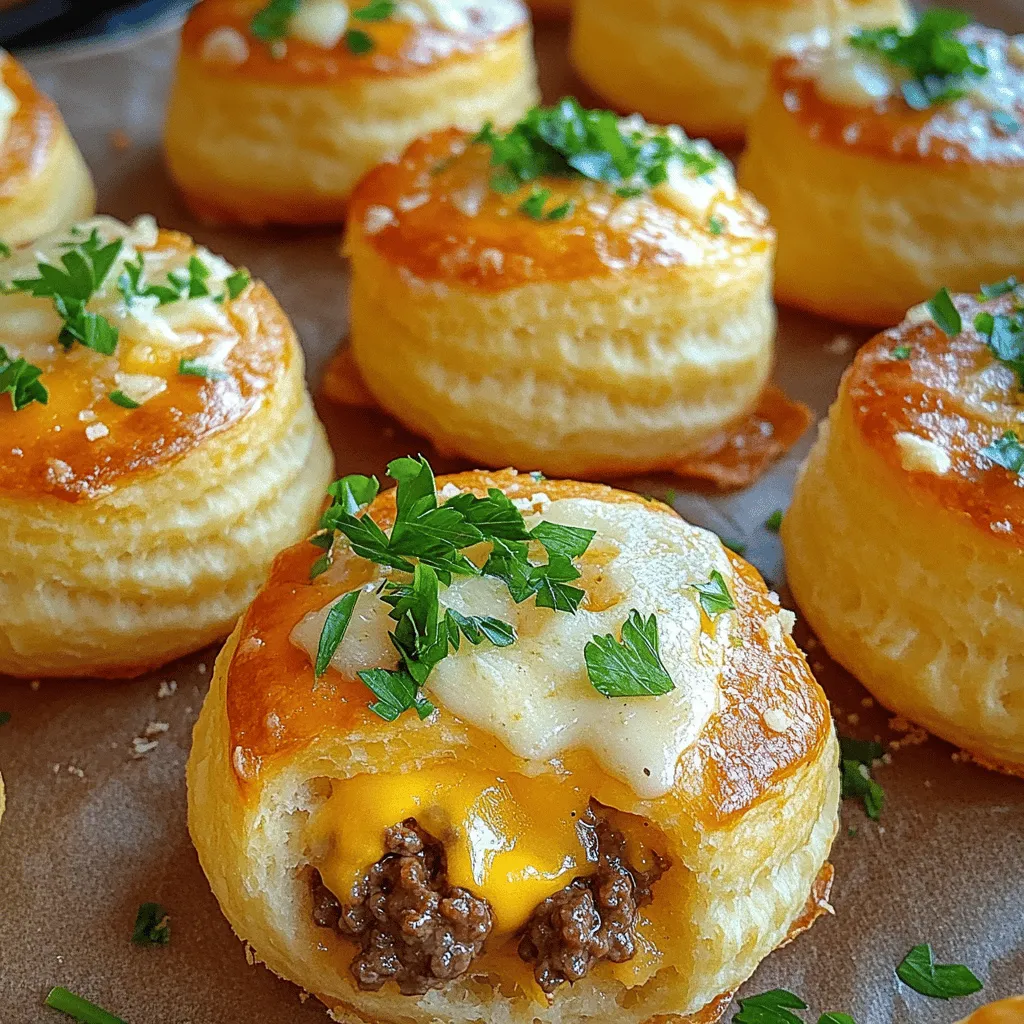
Are you ready to elevate your snack game? Garlic Parmesan Cheeseburger Bombs combine juicy beef, melty cheese, and flavorful spices, all wrapped in soft biscuit dough. In this article, I’ll share my easy step-by-step guide to making these tasty treats. Whether for game day or family dinner, these bombs are sure to impress. Grab your ingredients and let’s get started on this delightful cooking adventure!
Ingredients
Main Ingredients for Garlic Parmesan Cheeseburger Bombs
– 1 lb ground beef
– 1 cup shredded cheddar cheese
– 1 cup shredded mozzarella cheese
– 1 teaspoon garlic powder
– 1 teaspoon onion powder
– 1 teaspoon smoked paprika
– Salt and pepper to taste
For the main flavors, ground beef is key. You can use any beef you like, but I suggest 80/20 for the best taste. The cheese options are fun. I use both cheddar and mozzarella for a creamy bite. The seasonings and spices bring the flavors together. Garlic powder, onion powder, and smoked paprika add depth. Salt and pepper pull everything into harmony.
Additional Ingredients
– 1 package of refrigerated biscuit dough (10 count)
– 1/2 cup grated Parmesan cheese
– 1/4 cup melted butter
– 2 tablespoons fresh parsley, chopped (optional)
The biscuit dough is like a cozy blanket for the beef. It wraps everything up nicely. Grated Parmesan cheese adds a salty punch. The melted butter helps the bombs get golden brown. Fresh parsley is optional but adds a pop of color and taste.
Kitchen Tools Needed
– Mixing bowl
– Baking sheet
– Parchment paper
Tools make cooking easier. You need a mixing bowl to combine the ingredients. A baking sheet is necessary for cooking the bombs. Parchment paper helps with easy cleanup and prevents sticking.
For the full recipe, check out the details above. Happy cooking!
Step-by-Step Instructions
Preparing the Beef Mixture
To start, you need to mix the beef and spices. In a large bowl, combine 1 pound of ground beef, 1 teaspoon of garlic powder, 1 teaspoon of onion powder, 1 teaspoon of smoked paprika, and salt and pepper to taste. Use your hands or a spoon to mix it well.
Next, form the beef mixture into balls. Take about 1.5 tablespoons of the beef mix and flatten it in your hand. Place about 1 tablespoon of cheddar and mozzarella cheese in the center. Fold the edges over the cheese and roll it into a tight ball. Repeat this until you use all the beef.
Assembling the Bombs
Now, it’s time to work with the biscuit dough. Take a biscuit from the package and flatten it with your hands or a rolling pin. Aim for a circle, about 4 inches wide.
Place a beef ball in the center of the biscuit circle. Carefully pinch the edges of the dough together to seal the beef ball inside. Make sure it is completely sealed so the cheese doesn’t leak out during baking.
Baking Process
Before you bake, preheat your oven to 375°F (190°C). This step is important for even cooking.
Next, place the sealed bombs on a baking sheet lined with parchment paper. In a small bowl, mix 1/4 cup of melted butter with 1/2 cup of grated Parmesan cheese. Brush this mixture generously over each cheeseburger bomb.
Bake in the oven for 15-20 minutes. You will know they are done when the biscuits turn golden brown. Once out of the oven, let them cool for a few minutes. If you want, sprinkle fresh parsley on top for a nice touch.
For the complete recipe, check out the Full Recipe section.
Tips & Tricks
How to Perfect Your Garlic Parmesan Cheeseburger Bombs
To get the best bake on your biscuits, preheat your oven to 375°F. This ensures they cook evenly. Bake them for 15-20 minutes. Watch for a golden brown color on top. This shows they are done and will be soft inside.
For even cheese distribution, use a mix of cheddar and mozzarella. These melt well together. Be sure to place the cheese in the center of the beef ball before sealing it. This helps the cheese melt inside the bomb.
Common Mistakes to Avoid
One common mistake is overfilling the beef balls. If you add too much filling, they can burst open while baking. Stick to about 1 tablespoon of cheese per ball. This keeps them nice and round.
Another mistake is not sealing the biscuit dough properly. If the dough is not sealed tightly, the filling can leak out. Pinch the edges well to create a good seal. This will keep all the flavors inside.
Enhancing Flavor
To elevate the taste of your bombs, consider adding extra seasonings. A pinch of cayenne pepper gives a nice kick. You can also mix in some Italian seasoning for a twist.
If you want to try different cheese combinations, consider pepper jack for spice or gouda for a smoky flavor. These choices add a fun twist to your classic cheeseburger bomb.
For the full recipe, check out the complete instructions that guide you step by step!
Variations
Different Fillings
You can change the meat in Garlic Parmesan Cheeseburger Bombs. Use ground turkey or ground chicken instead of beef. Both options keep the dish light while still being tasty.
If you prefer a vegetarian option, try black beans or lentils. They offer great protein and flavor. Just mash them up and mix in your favorite spices.
Unique Flavor Profiles
Want to add some heat? Toss in jalapeños or your favorite spicy pepper. A little kick can make these bombs even more fun.
You can also play around with herbs and spices. Fresh basil, thyme, or oregano can add a new twist. Try mixing different seasonings to find your perfect flavor.
Serving Suggestions
Dipping sauces are a must! Ranch, ketchup, or barbecue sauce pair well with these bombs. They add extra flavor and fun to each bite.
For sides, think about crispy fries or a fresh salad. Both will complement the cheeseburger bombs nicely. You can also serve them with a light dip, like tzatziki.
Check out the Full Recipe to get started on these delightful treats!
Storage Info
Best Practices for Storing Leftovers
To store your Garlic Parmesan Cheeseburger Bombs, place them in an airtight container. Keep them in the fridge. They stay fresh for about 3 to 4 days. Make sure they are cool before sealing to prevent moisture build-up.
Freezing Instructions
If you want to freeze these tasty bombs, wrap each one tightly in plastic wrap. Then, place them in a freezer-safe bag. They can last up to three months in the freezer. When you’re ready to eat, take them out and thaw in the fridge overnight. Reheat in the oven for the best taste.
Serving Recommendations
For the best flavor, reheat the bombs in the oven. Preheat your oven to 350°F (175°C) and bake for about 10 to 15 minutes. This keeps them warm and crispy. You can also serve them hot right from the oven for a delightful treat. If you want to add a little extra flavor, pair them with your favorite dipping sauce.
FAQs
How do I know when the cheeseburger bombs are done?
To check if your cheeseburger bombs are done, look for a nice golden brown color. Bake them at 375°F (190°C) for about 15 to 20 minutes. The biscuit dough should puff up and feel firm. You can also use a meat thermometer. The center should reach 160°F (70°C) to ensure the beef is fully cooked. Let them cool slightly before serving.
Can I make Garlic Parmesan Cheeseburger Bombs ahead of time?
Yes, you can prepare these cheeseburger bombs in advance. You can make the beef mixture and form the balls. Place them in the fridge until you are ready to bake. You can also assemble the bombs and keep them wrapped in plastic. Just make sure to bake them within a day or two for the best taste.
What can I serve with Garlic Parmesan Cheeseburger Bombs?
These bombs pair well with many sides. Here are some ideas:
– Crispy French fries
– Fresh salad with a simple dressing
– Sliced veggies with ranch dip
– Garlic bread for extra flavor
– A side of marinara sauce for dipping
For the full recipe, check out the detailed steps to make these tasty treats!
You now have all the details to make Garlic Parmesan Cheeseburger Bombs. We covered main ingredients, tips for perfection, and fun variations. Remember, the key is in how you mix and bake. Be creative with flavors and fillings, and don’t forget those side dishes. Each bomb is a tasty treat that can impress friends and family. Enjoy the making and the eating! You’ll want to share this recipe with others. Happy cooking!


