Raspberry Lemon Bars Bright and Zesty Delight

WANT TO SAVE THIS RECIPE?

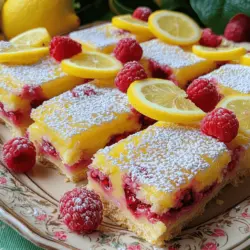
Raspberry Lemon Bars are a bright and zesty treat that you’ll love! With a buttery crust and a tangy lemon filling, these bars burst with fresh raspberry flavor. They’re easy to make and perfect for any occasion. I’ll guide you through each step so you can whip up this delightful dessert in no time. Get ready to impress your friends and family with these sweet and tart treats!

Ingredients

For the perfect raspberry lemon bars, you need these simple and fresh ingredients:

– 1 cup all-purpose flour

– 1/2 cup powdered sugar

– 1/4 teaspoon salt

– 1/2 cup unsalted butter, melted

– 2 large eggs

– 1 cup granulated sugar

– 1/4 cup fresh lemon juice (about 2 lemons)

– Zest of 1 lemon

– 1 cup fresh raspberries (you can use frozen if thawed)

– 1 teaspoon baking powder

– 1/2 teaspoon vanilla extract

– Additional powdered sugar for dusting

Each ingredient plays a role. The flour gives structure, while the sugar sweetens the tartness of the lemons. Fresh lemon juice and zest bring bright, zesty flavor. Raspberries add a sweet-tart burst.

You can easily find these ingredients at any grocery store. I always choose fresh lemons and raspberries for the best taste. If you want to make these bars gluten-free, just swap the all-purpose flour for a gluten-free blend. You can find the full recipe above to guide you through the steps.

Step-by-Step Instructions

Preparing the Oven and Pan

– Preheat the oven to 350°F (175°C).

– Grease or line an 8×8 inch baking pan.

Making the Crust

First, I whisk together 1 cup of all-purpose flour, 1/2 cup of powdered sugar, and 1/4 teaspoon of salt in a bowl. Then, I mix in 1/2 cup of melted unsalted butter until the mixture looks crumbly. Next, I press this mixture firmly into the bottom of the prepared pan. This forms a nice crust for the bars.

Preparing the Lemon Filling

In a large bowl, I combine 2 large eggs and 1 cup of granulated sugar. I whisk them until well mixed. Then, I stir in 1/4 cup of fresh lemon juice, the zest of 1 lemon, and 1/2 teaspoon of vanilla extract. This filling will give our bars a zesty kick.

Adding Raspberries

Now, I gently fold in 1 cup of fresh raspberries along with 1 teaspoon of baking powder. I take care not to break the raspberries as I mix them in. This adds a burst of flavor and color to our bars.

Combining and Baking

Next, I pour the lemon and raspberry mixture over the crust. I then bake the whole thing for 20-25 minutes. The edges should set while the center has a slight jiggle. To check for doneness, I insert a toothpick into the filling. It should come out clean or with just a few moist crumbs.

Cooling and Serving

Once baked, I remove the pan from the oven and let it cool at room temperature. After it cools, I place it in the fridge for at least 1 hour. This helps the bars firm up. When ready to serve, I dust the top with extra powdered sugar and cut it into squares. Enjoy the sweet and tangy flavor of these raspberry lemon bars! For the full recipe, check the earlier section.

Tips & Tricks

Perfecting Your Bars

– Always use eggs at room temperature. This helps them mix in better. Cold eggs can make the filling less smooth.

– Fresh raspberries give the best taste. Look for bright red, plump berries for great flavor. Frozen raspberries work too, but thaw them first.

Serving Suggestions

– Dust the top with powdered sugar for a sweet touch.

– Add fresh berries or lemon slices on top for a nice look. This makes your bars pop on the plate.

– Serve these bars chilled for the best taste.

Adjusting Sweetness and Tartness

– You can change the lemon juice to fit your taste. More lemon juice makes it tart, while less gives a sweeter taste.

– If you like sweeter bars, add more sugar to the filling. Just be careful not to overdo it.

– Balance the flavors for a perfect bite. Enjoy the bright and zesty delight of these bars!

Check out the Full Recipe for complete steps and ingredients.

Variations

Flavor Combinations

You can switch up the flavor with some easy swaps. Try using blueberries or blackberries instead of raspberries. These berries add a new taste and color. You can also add coconut or almond extract to the lemon mix. This will give your bars a unique twist.

Gluten-Free Option

If you need a gluten-free version, it’s simple! Just use gluten-free all-purpose flour instead of regular flour. This swap keeps the texture nice and light. You won’t lose any flavor, and everyone can enjoy them.

Vegan Version

Want a vegan option? I have you covered! Replace the eggs with flaxseed meal or applesauce. These ingredients work well to bind everything together. Also, switch butter for coconut oil. This keeps the bars moist while adding a hint of coconut flavor.

For the full recipe, check out the details above!

Storage Info

How to Store Raspberry Lemon Bars

To keep your raspberry lemon bars fresh, store them in an airtight container. Place them in the refrigerator. This helps to maintain their bright and zesty flavor. Make sure to cover them well to avoid drying out.

Freezing Tips

If you want to keep your bars longer, freeze them. Wrap each bar individually in plastic wrap. Then, store them in a freezer-safe container. This method keeps them fresh for months. When you’re ready to eat, thaw them in the fridge overnight.

Shelf Life

Raspberry lemon bars last up to a week in the fridge. In the freezer, they can last up to three months. This makes them great for meal prep or special treats. Enjoy the sweet and tangy taste anytime! For the full recipe, check the earlier section.

FAQs

Can I use frozen raspberries instead of fresh ones?

Yes, ensure they are thawed completely before adding. Frozen raspberries work well in this recipe. They save time and can still offer great flavor. Just remember to drain any excess water after thawing.

How do I know when my lemon bars are done baking?

Check for set edges and a slight jiggle in the center; a toothpick should come out clean. The edges will firm up first, while the middle stays a bit soft. This balance gives the bars their perfect texture.

Can I make these raspberry lemon bars ahead of time?

Absolutely! They are best when made a day in advance and chilled. This allows the flavors to mix well and the bars to firm up nicely. It’s a great way to save time for events or gatherings. You can enjoy them cold, making them a refreshing treat!

These raspberry lemon bars bring bright flavors and a delightful mix of tartness and sweetness. We discussed the simple ingredients, step-by-step methods, and helpful tips to perfect your bars. Remember, using fresh raspberries can elevate the taste. You can also experiment with flavors or make them gluten-free or vegan. Store them well to enjoy for days. Now you can create this treat with ease and share it with friends and family!

For the perfect raspberry lemon bars, you need these simple and fresh ingredients: - 1 cup all-purpose flour - 1/2 cup powdered sugar - 1/4 teaspoon salt - 1/2 cup unsalted butter, melted - 2 large eggs - 1 cup granulated sugar - 1/4 cup fresh lemon juice (about 2 lemons) - Zest of 1 lemon - 1 cup fresh raspberries (you can use frozen if thawed) - 1 teaspoon baking powder - 1/2 teaspoon vanilla extract - Additional powdered sugar for dusting Each ingredient plays a role. The flour gives structure, while the sugar sweetens the tartness of the lemons. Fresh lemon juice and zest bring bright, zesty flavor. Raspberries add a sweet-tart burst. You can easily find these ingredients at any grocery store. I always choose fresh lemons and raspberries for the best taste. If you want to make these bars gluten-free, just swap the all-purpose flour for a gluten-free blend. You can find the full recipe above to guide you through the steps. - Preheat the oven to 350°F (175°C). - Grease or line an 8x8 inch baking pan. First, I whisk together 1 cup of all-purpose flour, 1/2 cup of powdered sugar, and 1/4 teaspoon of salt in a bowl. Then, I mix in 1/2 cup of melted unsalted butter until the mixture looks crumbly. Next, I press this mixture firmly into the bottom of the prepared pan. This forms a nice crust for the bars. In a large bowl, I combine 2 large eggs and 1 cup of granulated sugar. I whisk them until well mixed. Then, I stir in 1/4 cup of fresh lemon juice, the zest of 1 lemon, and 1/2 teaspoon of vanilla extract. This filling will give our bars a zesty kick. Now, I gently fold in 1 cup of fresh raspberries along with 1 teaspoon of baking powder. I take care not to break the raspberries as I mix them in. This adds a burst of flavor and color to our bars. Next, I pour the lemon and raspberry mixture over the crust. I then bake the whole thing for 20-25 minutes. The edges should set while the center has a slight jiggle. To check for doneness, I insert a toothpick into the filling. It should come out clean or with just a few moist crumbs. Once baked, I remove the pan from the oven and let it cool at room temperature. After it cools, I place it in the fridge for at least 1 hour. This helps the bars firm up. When ready to serve, I dust the top with extra powdered sugar and cut it into squares. Enjoy the sweet and tangy flavor of these raspberry lemon bars! For the full recipe, check the earlier section. - Always use eggs at room temperature. This helps them mix in better. Cold eggs can make the filling less smooth. - Fresh raspberries give the best taste. Look for bright red, plump berries for great flavor. Frozen raspberries work too, but thaw them first. - Dust the top with powdered sugar for a sweet touch. - Add fresh berries or lemon slices on top for a nice look. This makes your bars pop on the plate. - Serve these bars chilled for the best taste. - You can change the lemon juice to fit your taste. More lemon juice makes it tart, while less gives a sweeter taste. - If you like sweeter bars, add more sugar to the filling. Just be careful not to overdo it. - Balance the flavors for a perfect bite. Enjoy the bright and zesty delight of these bars! Check out the Full Recipe for complete steps and ingredients. {{image_2}} You can switch up the flavor with some easy swaps. Try using blueberries or blackberries instead of raspberries. These berries add a new taste and color. You can also add coconut or almond extract to the lemon mix. This will give your bars a unique twist. If you need a gluten-free version, it's simple! Just use gluten-free all-purpose flour instead of regular flour. This swap keeps the texture nice and light. You won’t lose any flavor, and everyone can enjoy them. Want a vegan option? I have you covered! Replace the eggs with flaxseed meal or applesauce. These ingredients work well to bind everything together. Also, switch butter for coconut oil. This keeps the bars moist while adding a hint of coconut flavor. For the full recipe, check out the details above! To keep your raspberry lemon bars fresh, store them in an airtight container. Place them in the refrigerator. This helps to maintain their bright and zesty flavor. Make sure to cover them well to avoid drying out. If you want to keep your bars longer, freeze them. Wrap each bar individually in plastic wrap. Then, store them in a freezer-safe container. This method keeps them fresh for months. When you’re ready to eat, thaw them in the fridge overnight. Raspberry lemon bars last up to a week in the fridge. In the freezer, they can last up to three months. This makes them great for meal prep or special treats. Enjoy the sweet and tangy taste anytime! For the full recipe, check the earlier section. Yes, ensure they are thawed completely before adding. Frozen raspberries work well in this recipe. They save time and can still offer great flavor. Just remember to drain any excess water after thawing. Check for set edges and a slight jiggle in the center; a toothpick should come out clean. The edges will firm up first, while the middle stays a bit soft. This balance gives the bars their perfect texture. Absolutely! They are best when made a day in advance and chilled. This allows the flavors to mix well and the bars to firm up nicely. It’s a great way to save time for events or gatherings. You can enjoy them cold, making them a refreshing treat! These raspberry lemon bars bring bright flavors and a delightful mix of tartness and sweetness. We discussed the simple ingredients, step-by-step methods, and helpful tips to perfect your bars. Remember, using fresh raspberries can elevate the taste. You can also experiment with flavors or make them gluten-free or vegan. Store them well to enjoy for days. Now you can create this treat with ease and share it with friends and family!

Raspberry Lemon Bars

Satisfy your sweet tooth with these delicious Raspberry Lemon Bars, a bright and zesty treat that everyone will love! With a buttery crust and tangy lemon filling bursting with fresh raspberry flavor, these easy-to-make bars are perfect for any occasion. Discover the simple ingredients and step-by-step instructions to impress your friends and family. Click through to explore the full recipe and enjoy this delightful dessert!

Ingredients
  

1 cup all-purpose flour

1/2 cup powdered sugar

1/4 teaspoon salt

1/2 cup unsalted butter, melted

2 large eggs

1 cup granulated sugar

1/4 cup fresh lemon juice (about 2 lemons)

Zest of 1 lemon

1 cup fresh raspberries (you can use frozen if thawed)

1 teaspoon baking powder

1/2 teaspoon vanilla extract

Additional powdered sugar for dusting

Instructions
 

Preheat the Oven: Preheat your oven to 350°F (175°C). Grease an 8x8 inch baking pan or line it with parchment paper for easy removal.

    Make the Crust: In a medium bowl, whisk together the flour, powdered sugar, and salt. Pour in the melted butter and mix until crumbly. Press this mixture firmly into the bottom of the prepared pan to form an even layer. Bake for 15 minutes or until lightly golden.

      Prepare the Lemon Filling: In a large mixing bowl, whisk together the eggs and granulated sugar until well combined. Stir in the lemon juice, lemon zest, and vanilla extract.

        Add Raspberries: Gently fold in the raspberries and baking powder into the lemon mixture, being careful not to break them apart.

          Combine and Bake: Pour the raspberry lemon mixture over the pre-baked crust in the pan. Bake for an additional 20-25 minutes, or until the edges are set, and the center has a slight jiggle. A toothpick inserted into the lemon filling should come out clean or with only a few moist crumbs.

            Cooling: Remove the pan from the oven and allow it to cool completely at room temperature. Once cooled, place it in the refrigerator for at least 1 hour to firm up.

              Serve: Once chilled, dust the top with additional powdered sugar, then cut into squares or bars.

                Prep Time: 20 minutes | Total Time: 1 hour 40 minutes | Servings: 16 bars

                  - Presentation Tips: Arrange the lemon bars on a decorative plate, and garnish with fresh raspberries and lemon slices for a pop of color. Enjoy the delightful combination of tangy lemon and sweet raspberries!

                    WANT TO SAVE THIS RECIPE?

                    Leave a Comment

                    Recipe Rating